

You can invoke PowerShell scripts in many different ways, but they all have one downfall, you can’t simply run them like a standard Windows program (EXE). Perhaps you’d like to prevent editing the code in a script or perhaps make it easier for your users to run scripts. It’s time to learn how to convert a PS1 to an EXE.
In this tutorial, you will learn how to use PS1 to EXE generators, and you will also get to compare them so you can decide which one best suits your preference.
Requirements
Different tools are demonstrated throughout this tutorial with step-by-step instructions on how to convert PS1 to EXE. Make sure you have all the requirements below to follow along.
- A Windows computer with an administrator privileges
- From Windows 7, 8.1, and 10, PowerShell is already included upon installing the operating system. Though some scripts can be run with PowerShell 3.0, it’s much better to get PowerShell 5.1 or PowerShell 7
- Your PowerShell execution policy set to allow script execution
PS2EXE
The PS2EXE utility is the first tool on our list. PS2EXE is a free, open-source PowerShell module that, according to the author Ingo Karstein, “does not convert the PowerShell script to another language. It encapsulates the script with a lightweight PowerShell host written in C# and compiles the dynamically generated C# source code in memory to an EXE file.”
Visit Ingo Karstein’s blog to know more about how PS2EXE started. The module’s development halted around 2017, but Markus Scholtes took over PS2EXE’s evolution creating a GUI version as well.
Installing PS2EXE Module
PS2EXE started as a PowerShell script, and when Markus Scholtes took over the development, a module has been made available. Since PS2EXE uses the module to convert your script to an executable, you’ll need to install it from the PowerShell Gallery.
Follow the instructions below to install the PS2EXE module.
- Open up a PowerShell console as administrator.
2. Run the Install-Module command to download and install the module from the PowerShell Gallery
Install-Module ps2exe3. Type Y and press Enter once you see the prompt about an untrusted repository. Don’t worry. This message is harmless.
Untrusted repository
 You are installing the modules from an untrusted repository. If you trust this repository, change
 its InstallationPolicy value by running the Set-PSRepository cmdlet. Are you sure you want to
 install the modules from 'PSGallery'?
 [Y] Yes  [A] Yes to All  [N] No  [L] No to All  [S] Suspend  [?] Help (default is "N"): Y
Converting PS1 to EXE via the Command Line
PS2EXE provides two ways to convert PowerShell scripts to EXEs; a command-line and a GUI. Let’s first cover using the command-line.
To convert a single PowerShell script to EXE via the command-line requires a single line providing the main PS2EXE command (Invoke-PS2EXE) followed by the script’s path to convert and the path to the EXE you’d like to create.
## Use the full command name
Invoke-ps2exe .\source.ps1 .\target.exe

## Use the alias
ps2exe .\source.ps1 .\target.exe
You can now run target.exe, and it will invoke the code defined in the source.ps1 script. If you didn’t use the NoConsole parameter while converting your script, a PowerShell console would appear when running the target.exe file.
Hiding the Console
In the previous example, when running target.exe, a typical PowerShell console will appear. Most of the time, you don’t want to see this. To prevent that, you can use the NoConsole parameter when creating the EXE, as shown below.
Invoke-ps2exe "D:\Test\Get-LatestAppLog.ps1" "D:\Test\Get-LatestAppLog.exe" -noConsole
You can also choose to compile the EXE for x86 or x64 runtime only and others. You can find a list of available parameters on the GitHub release page.
Converting PS1 to EXE via the PS2EXE-GUI Tool
If you’re not a fan of the command-line, you can also use a GUI with the PS2EXE module. Built a little later, the GUI version provides nearly all of the same functionality as the command-line version.
It only takes a few clicks to convert PS1 to EXE with the GUI version of PS2EXE. And unlike the command line, you can browse and select the source file (PS1) from a nice File Explorer browse dialog box.
To run the GUI version, you’ll need to have .NET 4.x on your computer. If you only have .NET 3.5x, you can download the PS2EXE-GUI for .NET 3.5x version separately.
Assuming you have already installed the PS2EXE PowerShell module from above, open up File Explorer and navigate to either of the PS2EXE module folders below and open the folder representing the module version.
Windows 32bit: C:\Program Files (x86)\WindowsPowerShell\Modules\ps2exe\<version>
Windows 64bit: C:\Program Files\WindowsPowerShell\Modules\ps2exe\<version>
Inside of these folders, you’ll find a file called Win-PS2EXE.exe.
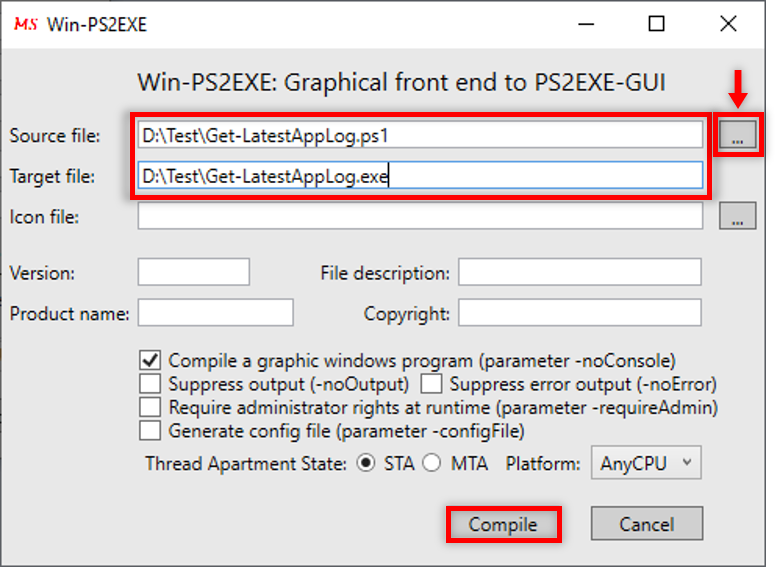
- Open the C:\Program Files\WindowsPowerShell\Modules\ps2exe\<version>\Win-PS2EXE.exe utility.
2. Click on the ellipsis directly to the right of the Source file box to locate the PS1 script you’d like to convert.
3. Define the value for the Target file and make sure to include the .exe file extension.
4. Choose any customizations to the conversion you’d like below. This is simply a GUI representation of the parameters you can use for your script, just like the command-line version.
5. Click Compile to begin the conversion process.
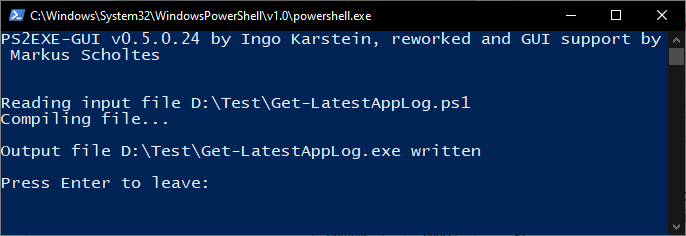
6. When you click Compile button, PS2EXE will open a PowerShell session and perform the conversion. Once done, press Enter or close the console window.
FYI: Some executable files compiled with PS2EXE may get detected as a virus with your antivirus software. If this happens, be sure to report these false positives to your antivirus vendor.
PS1 to EXE
PS1 to EXE is another free desktop application developed by F2KO Software that enables you to convert a PS1 to an EXE file. The Ps1 to Exe, unlike PS2EXE, is a GUI tool complete with a simple script editor.
Just like PS2EXE, Ps1 to Exe also has both the GUI and Command-Line version. However, instead of the PowerShell console, Ps1 to Exe requires you to run the commands inside the Command Prompt.
Unfortunately, although F2KO’s website is still up, there seems to be no way to download PS1 to EXE from there. Luckily, a downloadable installer of this tool has been circulating on the internet.
Let’s go through how to run and use PS1 to EXE to create an EXE from a PowerShell script.
Converting PS1 to EXE Using GUI
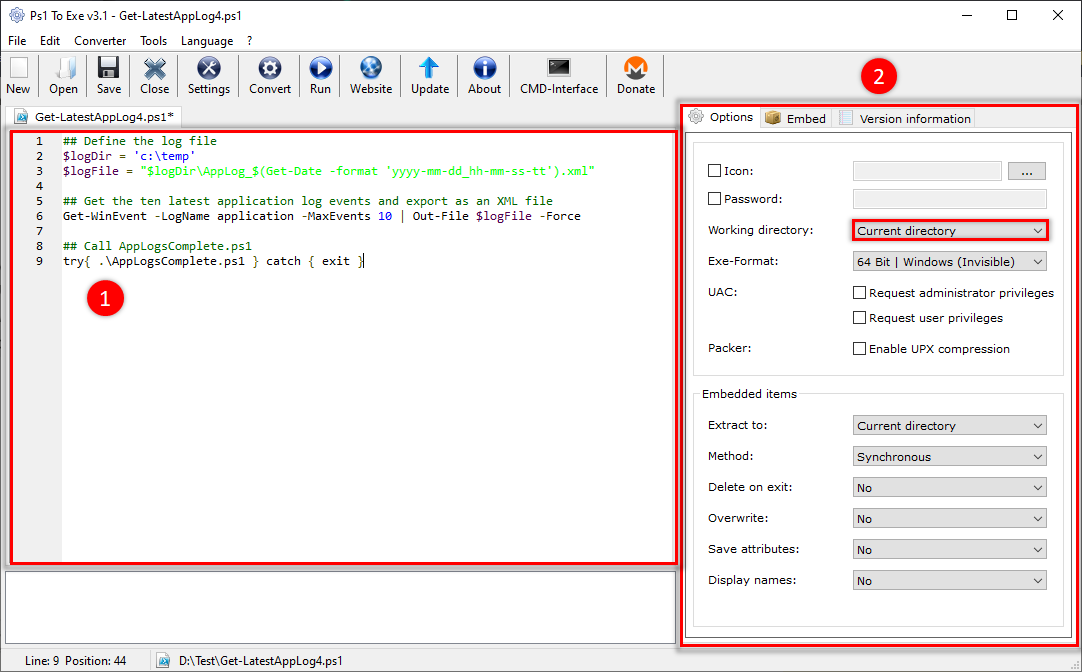
After you install and launch Ps1 to Exe, you’ll notice that PS1 to EXE has a simple script editor. Inside this script editor, you can build and save scripts and click a button to convert them.
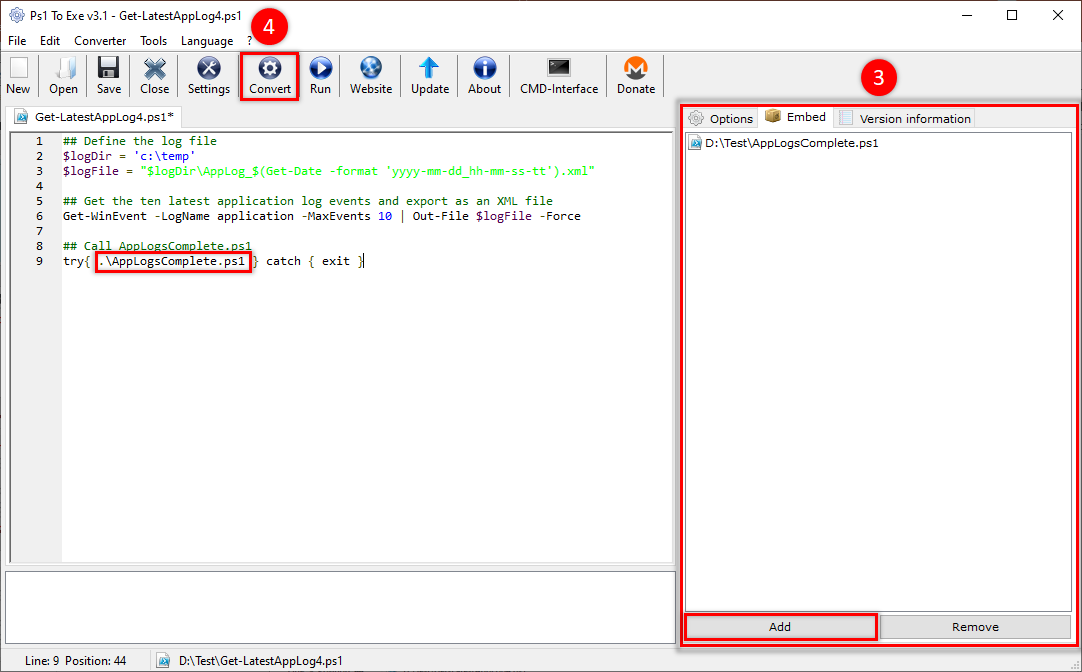
Ps1 to Exe supports dot-sourcing; notice how another PS1 file was called with the command-line below.
## Call AppLogsComplete.ps1
try { .\AppLogsComplete.ps1 } catch { exit }
To convert a script to an EXE with PS1 to EXE:
- Open the PS1 to EXE tool from your desktop.
2. Click on File —> Open, find the script you’d like to convert and open it.
Once you have the script open, configure how you’d like the compiled EXE to run. On the right side of the screen, you’ll see a panel with three tabs to explore. Each one of the tabs has a different configuration option you choose.
3. To add dependent scripts, click on the Embed tab then click Add.
4. When satisfied with the conversion options, click on the Convert button on the top toolbar to convert the script to an EXE.
Converting PS1 to EXE Using the Command Line
If you’d rather stick the command-line, PS1 to EXE CLI called ps1_to_exe.exe but to use it is a bit tricky.
With PS1 to EXE open:
- Open up a Command Prompt as administrator
2. Change the working directory to PS1 to EXE’s installation folder.
x86
 cd 'C:\Program Files (x86)\Ps1 to Exe'
 x64
 cd 'C:\Program Files\Ps1 to Exe'
3. Now run ps1_to_exe to convert the PS1 to an executable.
The command below also includes a dependent script in the compiled EXE file and sets the executable files target platform to a 64-bit Windows OS.
ps1_to_exe /ps1 "D:\Test\Get-LatestAppLog4.ps1" /exe "D:\Test\Get-LatestAppLogs.exe" /include "D:\Test\AppLogsComplete.ps1" /invisible /x64Below is a demonstration of the actual conversion process and the output details.
IExpress 2.0
If you’d rather not download yet another tool, you’re in luck because you have the old school IExpress utility at your disposal. IExpress is a built-in Windows application that’s typically used for packaging files or creating software installers.
It just so has it that IExpress can also convert PS1 to EXEs while compiling dependency files altogether in a single executable file!
To convert a simple PowerShell script to EXE:
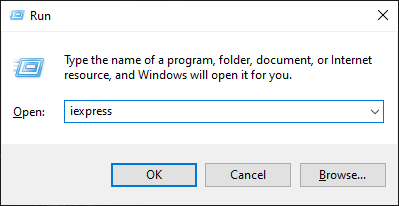
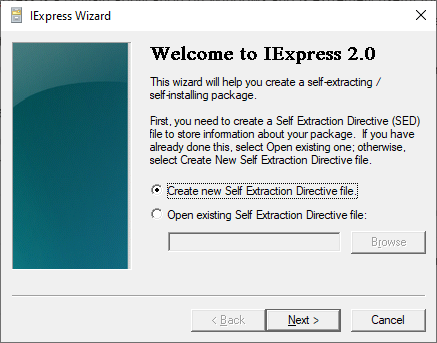
- You must open IExpress as an administrator. Press the Windows*+R* key to open the Run dialog box, type in iexpress then press the Ctrl+Shift+Enter key.
2. On IExpress’ welcome page, select Create new Self-Extraction Directive File and click Next to configure your package. The Self Extraction Directive (SED) file controls the options used when building an installation package; think of it as a configuration file.
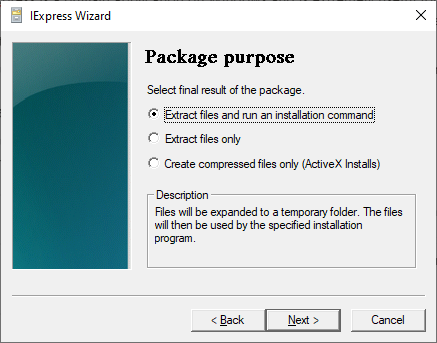
3. Select the Extract files and run an installation command option and click Next. If you’re creating a software installer, this option extracts files you will include in the package. This option also lets you write a custom command to execute the script when you run the executable file.
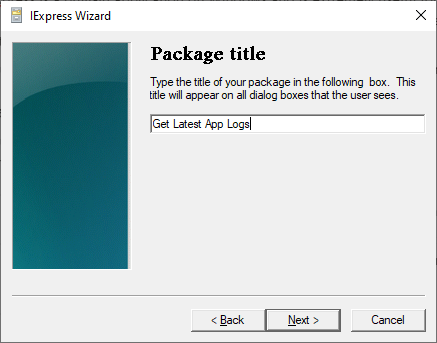
4. Now provide a Package Title and click Next. The package title will appear on all the prompts the user will see during the installation.
The package title only applies if you’re creating a software installer. In this case, the title doesn’t matter.
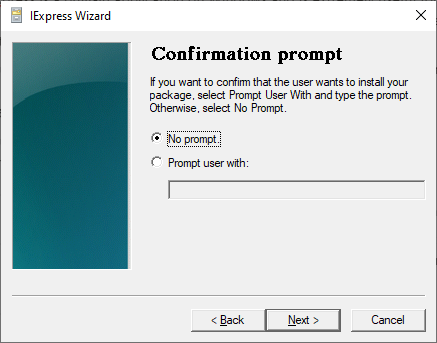
6. Next, choose No prompt. Choosing No prompt does not prompt the user with an unnecessary dialog box when they run the EXE.
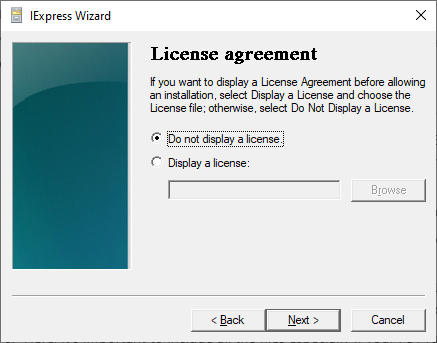
6. If you’re creating the package for a project that requires an End User License Agreement (EULA), you can opt into adding a license to show when you run the EXE. For this demonstration, though, choose the Do not display license option and click Next.
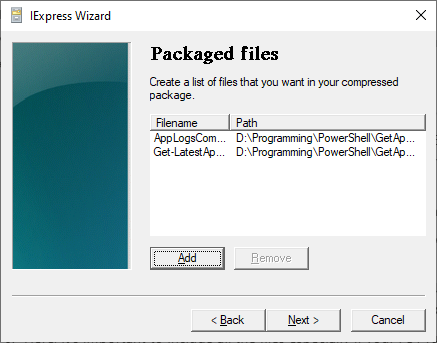
7. Now click on Add and browse for all of the scripts you’d like included in this EXE. Be sure to include the main script you intend to call and any dependent scripts and other files that the scripts reference.
8. On the Install Program to Launch window, provide the path to the powershell.exe engine using the File parameter. Also, ensure you set the ExecutionPolicy parameter to Bypass to ensure any pre-configured execution policies do not prevent script execution.
powershell.exe -ExecutionPolicy Bypass -File Get-LatestAppLog.ps1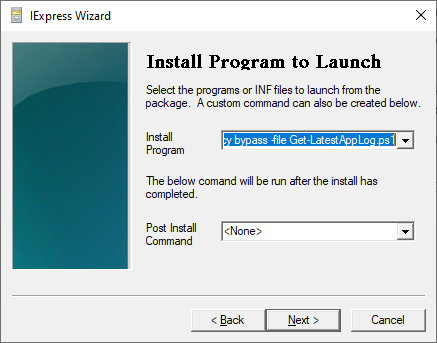
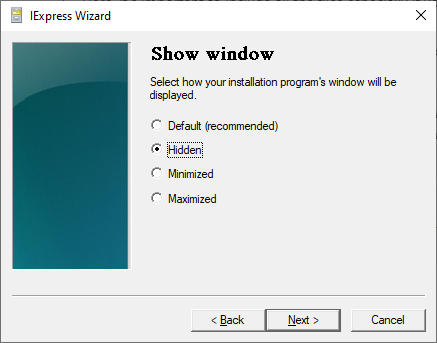
9. Next, you can define how you want the EXE windows to behave when executed. If the EXE is supposed to run in the background, choose Hidden and click Next. Hidden is the most common window behavior.
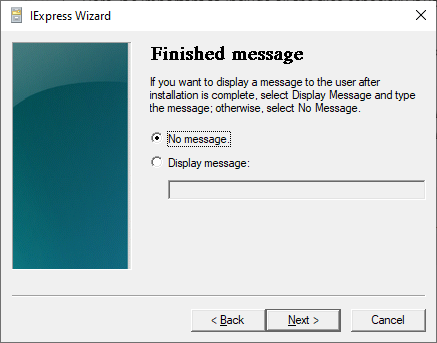
10. Since you’re just running an EXE in the background, there’s no need to include a Finished message. Select No Message and Next.
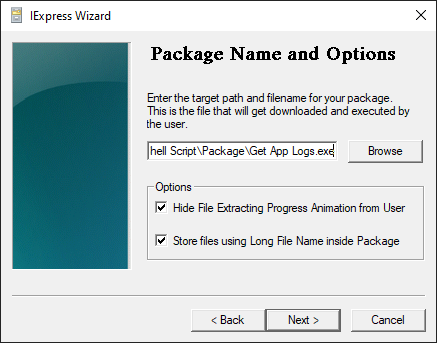
11. Now select the path to the EXE you’d like to create. Here you can also enable a couple of different options. Once complete, click Next.
- Hide File Extracting Progress Animation from User – If your EXE runs in the background, keep this option disabled.
- Store Files using Long File Name inside Package – To support Long File Names during the extraction process when running the EXE. The option should be left disabled if you will run the package on Win 95 and you will be using an INF file during installation.
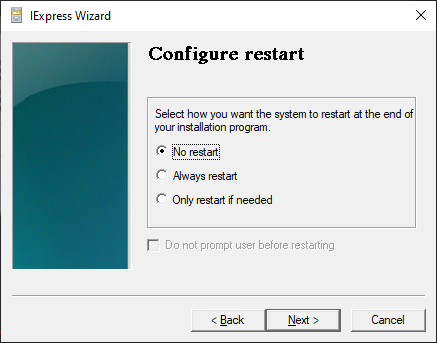
12. If you’d like the EXE to invoke a restart after the script is complete, here you can select Always restart. After selecting an option, click Next.
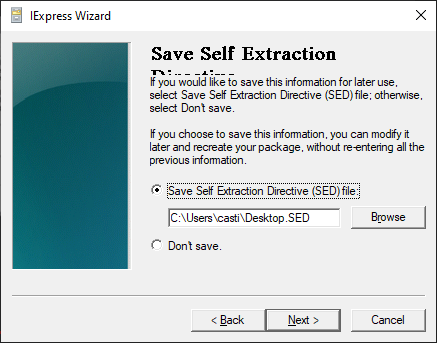
13. Now select Save Self Extraction Directive (SED) file and click Next. Saving a SED file allows you to modify any options you’ve provided throughout this wizard at a later time. The SED file contains answers to all values provided so far.
14. Now all that’s left is to compile the package. Click Next, and you’ll see a process log. To complete creating the package, click Finish, and you’re all set.
Requiring Run as Administrator Privileges
If you have a script that requires to be run as an administrator, IExpress does not give you an option to do so, but it’s still possible.
Before running IExpress, copy the code below and paste it at the top of your script. This code snippet checks to see if the script is running as an administrator. If not, it will close and rerun the script with administrator privileges automatically.
Remember that you need to change the WindowStyle **parameter on the Show Window screen depending on how you want to show or hide the EXE’s window when you run it.
param([switch]$Elevated)

function Test-Admin {
    $currentUser = New-Object Security.Principal.WindowsPrincipal $([Security.Principal.WindowsIdentity]::GetCurrent())
    $currentUser.IsInRole([Security.Principal.WindowsBuiltinRole]::Administrator)
}
## Test if the script is running as admin, if not, run it again as admin
if ((Test-Admin) -eq $false){
    if ($elevated) {
    } else {
        try{
            Start-Process powershell.exe -WindowStyle Hidden -Verb RunAs -ArgumentList ('-noprofile -file "{0}" -elevated' -f ($MyInvocation.MyCommand.Definition))
            ## Window Styles : Normal, Minimized, Maximized and Hidden

						## ------> THE REST OF YOUR SCRIPT GOES HERE <------ ##

        }
        catch{
            exit
        }
    }
    exit
}
ISE Steroids
If you love writing scripts in the PowerShell ISE, this tool suits your style. ISE Steroids is an extension to the PowerShell ISE editor packed as a PowerShell module that adds many ISE features.
ISE Steroids has many features, but the one you’re here for is its ability to convert a script to an EXE, so let’s dig in.
- Assuming you’ve already got ISE Steroids installed, open the PowerShell ISE.
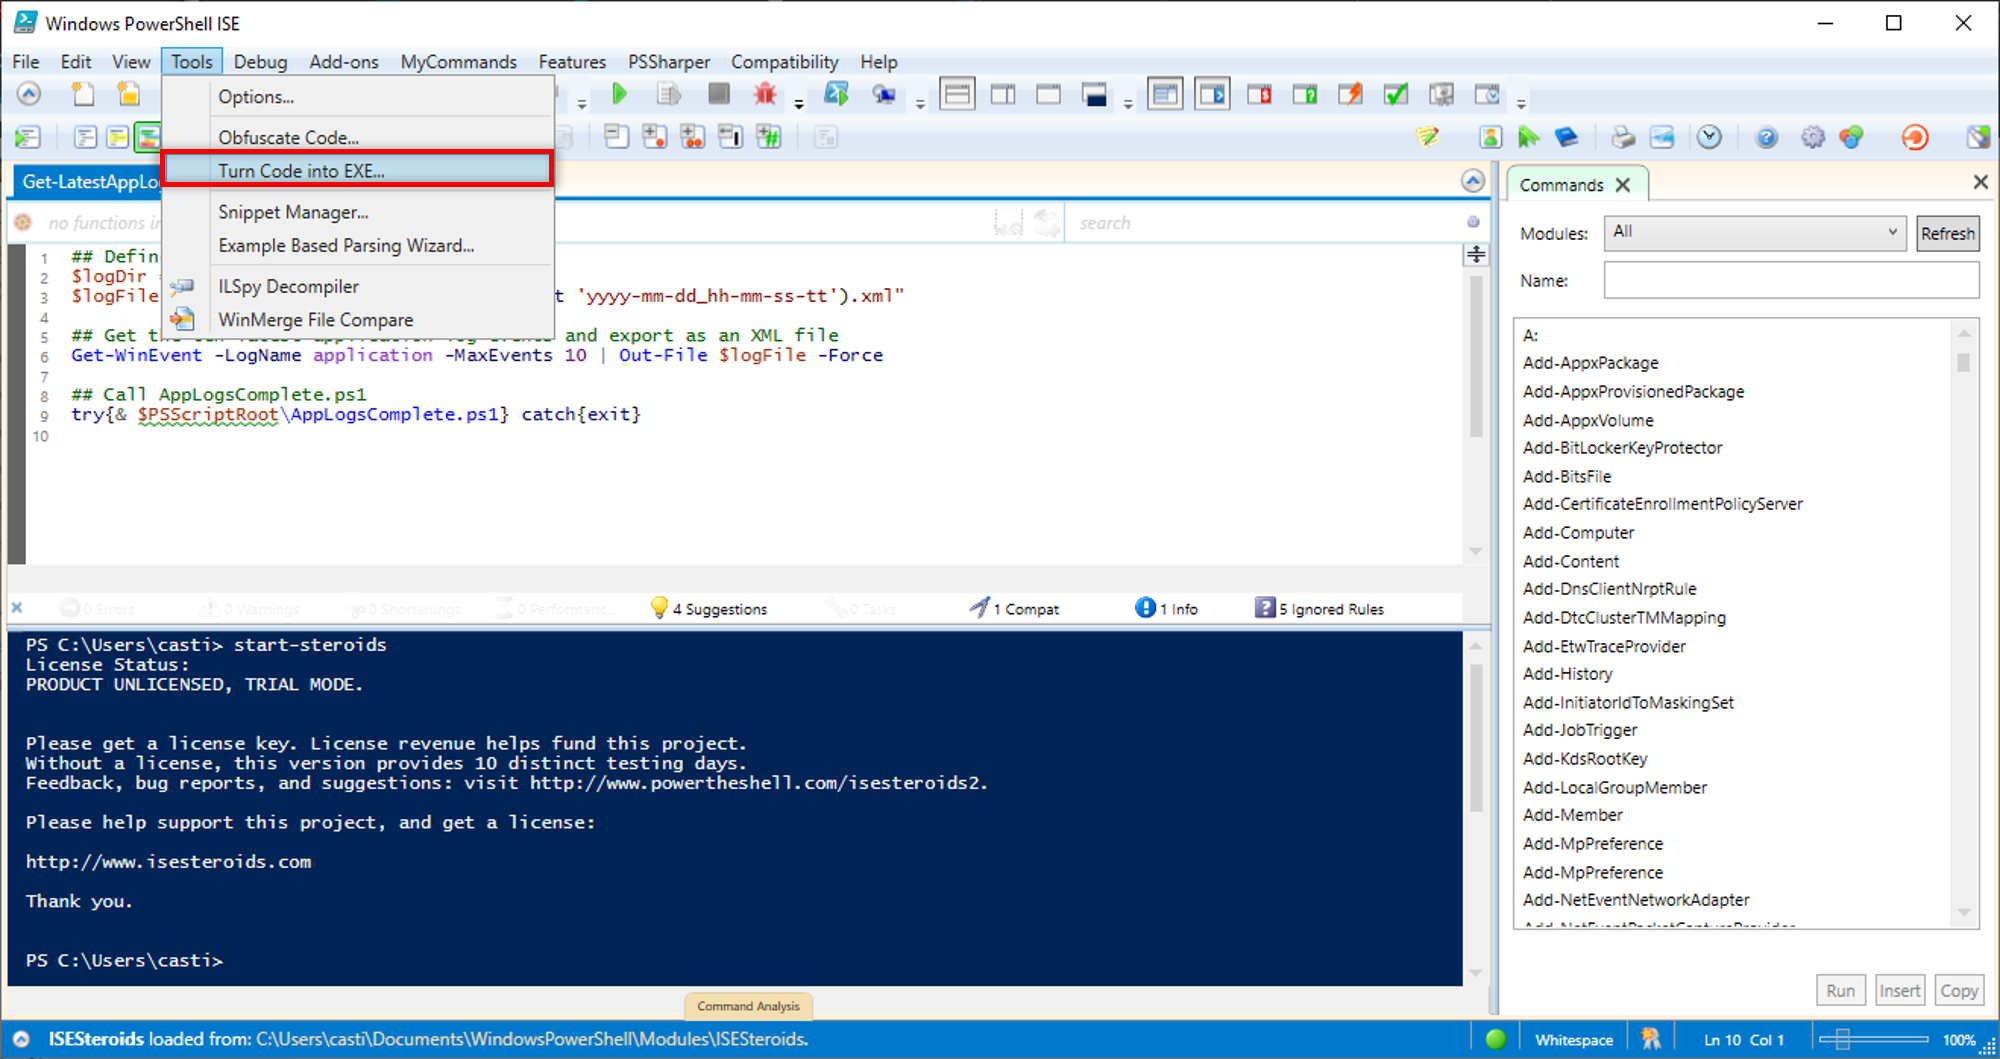
2. In the integrated console, run Start-Steroids to run the extension and load Steroids.
3. Open up or write a new script in the editor window. This tutorial will be using these files.
4. Click on the Tools —> Turn Code into EXE option just like in the screenshot below.
5. Now define all of the options you’d like to apply to the resulting EXE in the small window, like the one below. These options are parameters, the same as PS2EXE’s, to configure your EXE file’s properties and behaviour.
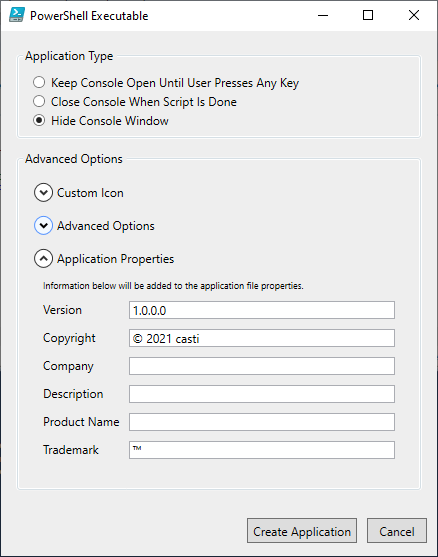
6. Once you’ve set all of the options, click on the Create Application button. ISE Steroids will then ask you to select a target path. After that, you’re done converting your PS1 to EXE.
Visual Studio Code and PowerShell Pro Tools
For our next editor, we bring you Visual Studio (VS) Code. VS Code is Microsoft’s recommended replacement for the PowerShell ISE and has been embraced by many PowerShell developers.
Although VS Code doesn’t have a native way to convert PowerShell scripts to EXEs, you can still make it happen with the PowerShell Pro Tools extension. Along with converting scripts to EXE, the PowerShell Pro Tools extension helps you package scripts, includes a GUI designer, and more.
PowerShell Pro Tools require both .NET 4.6.2 (or later) Developer Pack and .NET Core 1.0 or later for packaging scripts.
You’re using the Get-LatestAppLog3.ps1 and AppLogsComplete.ps1 for this demonstration.
Assuming you have the VS Code and the PowerShell Pro Tools extension installed:
- Open up VS Code and a PowerShell script to convert to an EXE.
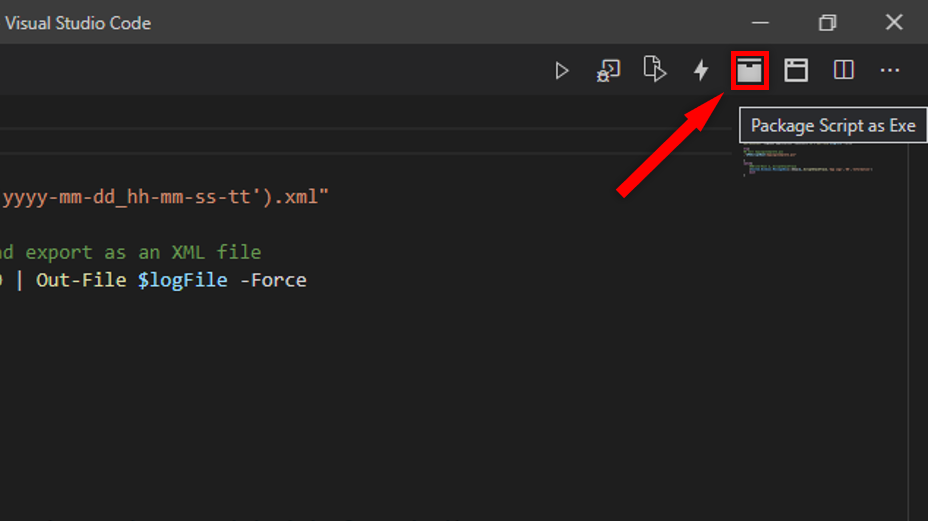
2. In the top-right corner of VS Code, click on the Package Script as Exe button as shown below.
3. When you create an EXE from a script for the first time, PowerShell Pro Tools will create a package.psd1 file in the current workspace’s root.
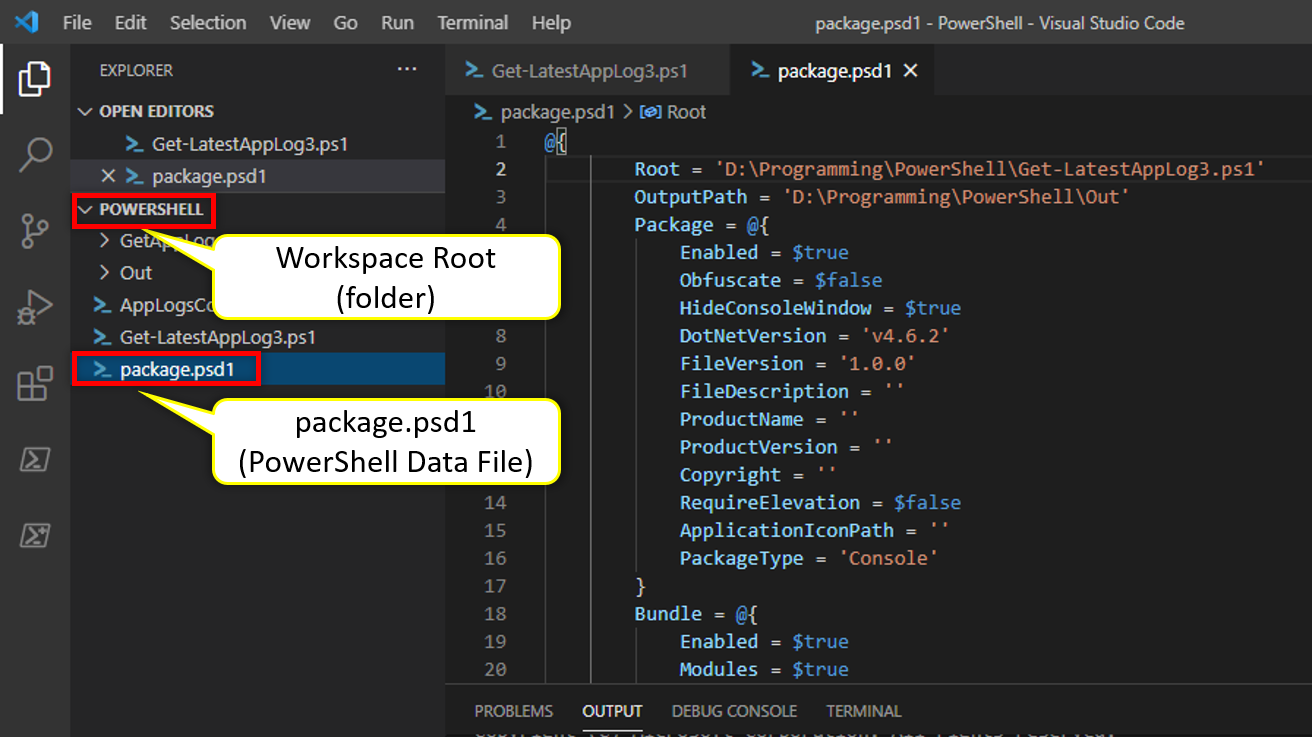
4. Inside the package.psd1 file, the script’s exact path to convert is automatically populated for the Root key. Define the Output Path key to specify the path to save the EXE, as shown below.

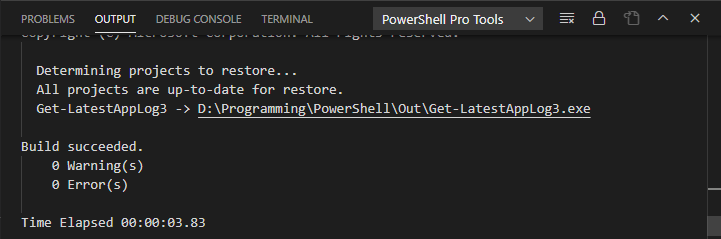
5. When you create an EXE from a script, you’ll notice various log messages in the Output pane at the bottom of the screen. If any errors come up while compiling the script, you’ll see them displayed here.
Compiling Other Scripts in the Same EXE
If you have dependent scripts called in your main script, the PowerShell Pro Tools extension can take care of those too. To do that, PowerShell Pro Tools requires you to dot-source any scripts you’d like included with the EXE.
The Get-LatestAppLog3.ps1 script below is the main script to compile. Inside of it, it runs the AppLogsComplete.ps1 script. To ensure PowerShell Pro Tools includes the dependent AppLogsComplete.ps1 file, you must dot source the script or bring it into the current script’s scope.
. "$PSScriptRoot\AppLogsComplete.ps1"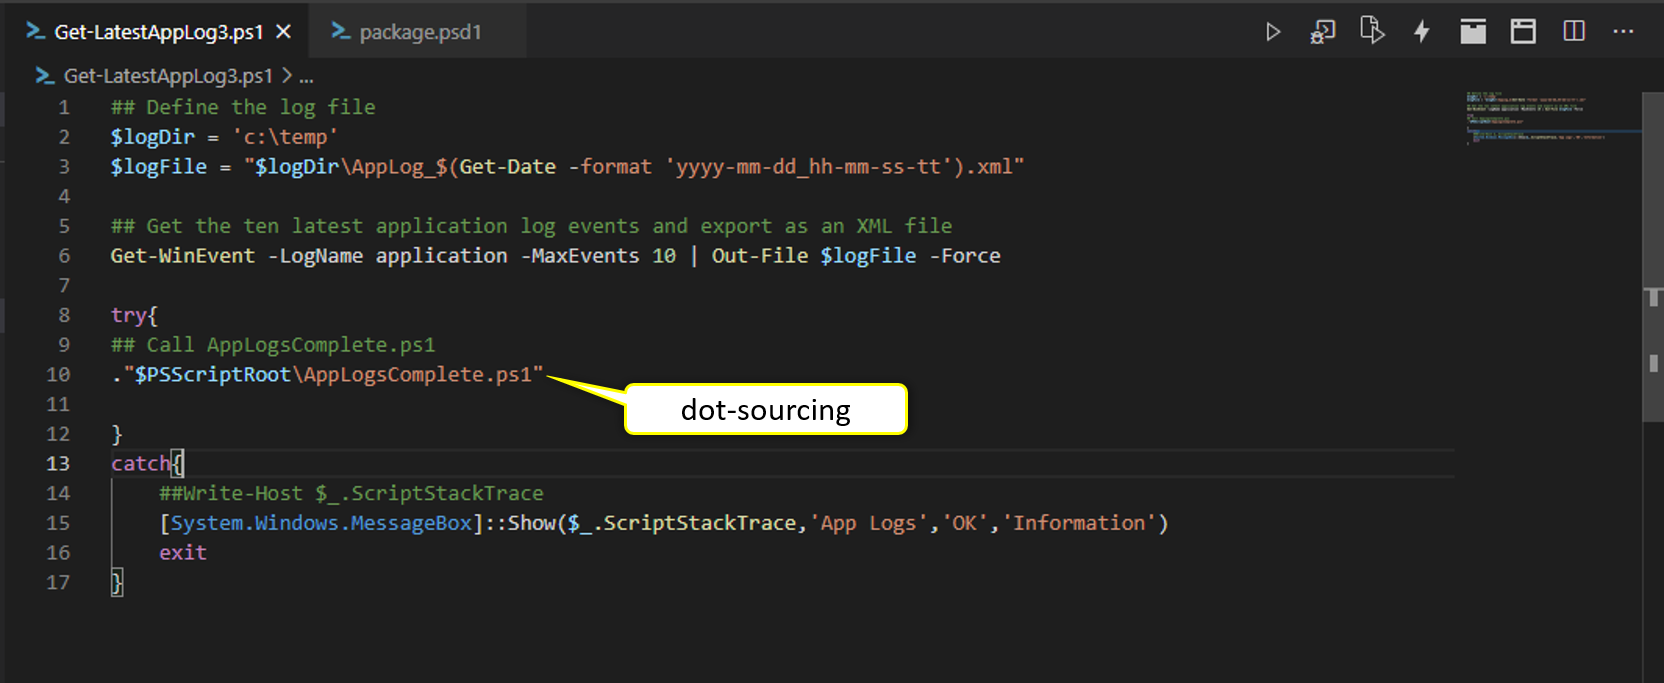
Once you’ve dot-sourced any dependent scripts, click on the Package Script as Exe again to start converting your scripts to an executable file.
PowerGUI
PowerGUI was one of the original PowerShell script editors. Although it seems to have been long forgotten about, you can still find the copies lingering on the web. Why speak of a long-forgotten PowerShell script editor? Because it has a built-in PS1 to EXE converter!
Although PowerGUI’s website doesn’t exist anymore, you can still find a copy on sites like Softpedia.
Compiling PS1 Script to an EXE
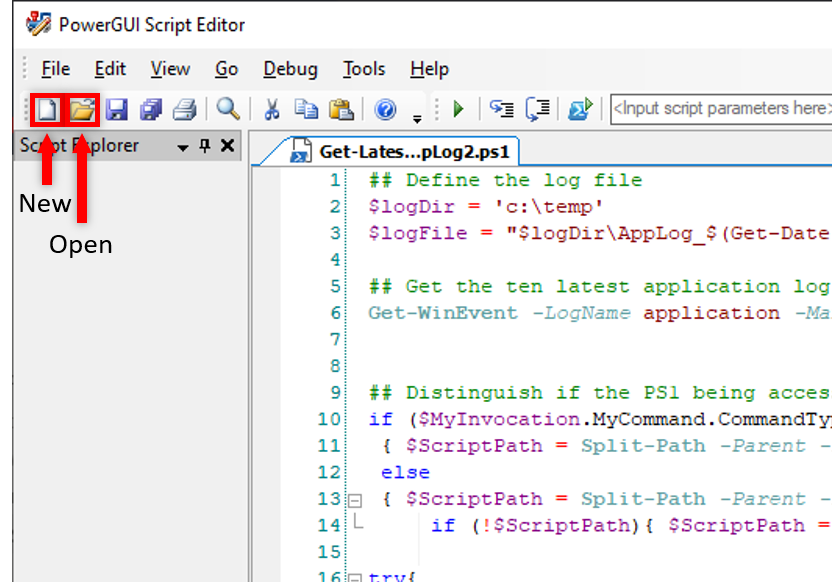
After installing PowerGUI, launch it, and you’ll get to see a Start Page. To start compiling your scripts, you can either create a new script or open up an existing one from the toolbar, like shown in the screenshot below.
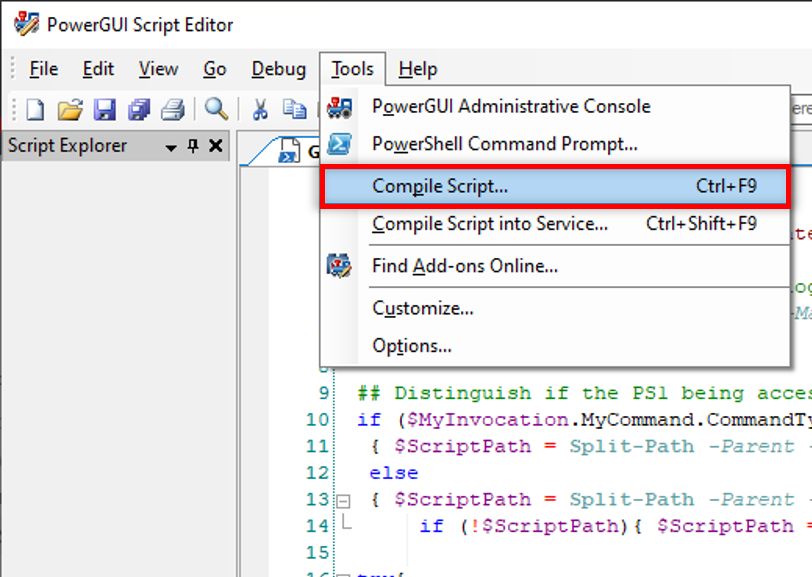
Once you’re satisfied with your script, click on the Tools menu. Then choose Compile Script or press Ctrl+F9 on your keyboard.
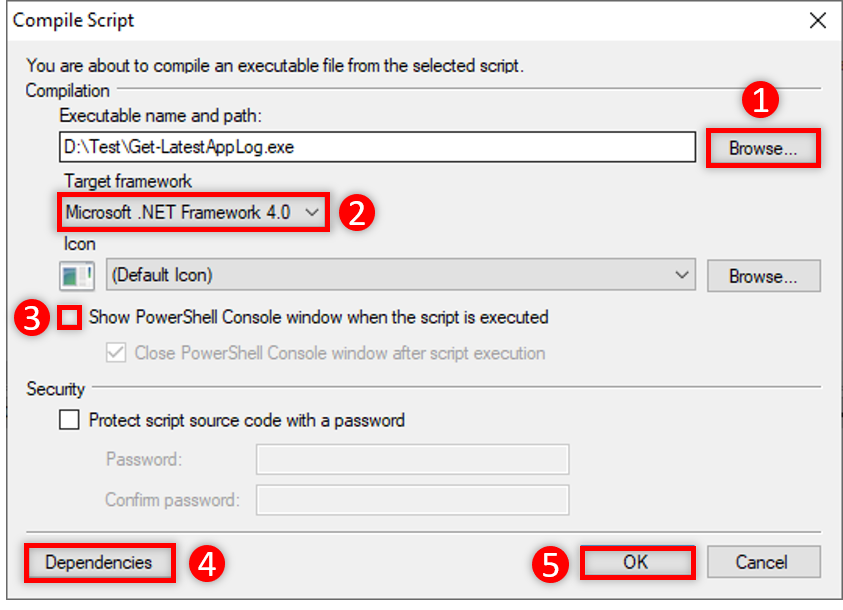
Now, configure how you’d like the EXE to run after the conversion. The Compile Script window, as it shows below, houses different options you can choose from for the EXE’s behavior.
- Click on the Browse button and locate your PS1 that you want to convert.
2. PowerGUI supports Target Framework from Microsoft .NET Framework 3.5 to .NET Framework 4.0.
3. If you only want to run the EXE to run in the background, disable the Show PowerShell Console window when the script is executed option.
4. You can also click on the Dependencies button (bottom-left) if you have other files to include. Usually, other PowerShell scripts that your script relies on.
5. Once you’re happy with the configuration, click OK to start converting your PS1 to EXE.
On a side note, you’ll notice a downside with PowerGUI in terms of controlling how you want the EXE to run. PowerGUI doesn’t give many options, such as adding parameters.
PowerGUI also doesn’t give you an option to embed information such as copyright, version, and description, unlike other PS1 to EXE generators. But if it doesn’t bother you that much, then PowerGUI is a good find you can keep.
PowerShell Studio
To round off our list of PS1 to EXE converters, let’s end with one of the most feature-rich PowerShell IDEs, Sapien Technologies’ PowerShell Studio. Built from the ground up as an exclusively PowerShell IDE, it would be a disservice to PowerShell Studio to only demonstrate its ability to convert PS1s to EXEs. Still, we only have a limited amount of space!
Just like PowerShell Pro Tools in Visual Studio Code, PowerShell Studio also has strict requirements for packaging scripts; such as .NET Framework 4.8, .NET 5 for PowerShell 7 and Visual Studio 2015-2019 Runtime
Assuming you have PowerShell Studio installed, open PowerShell Studio and create or open an existing PowerShell script. This tutorial will use the Get-LatestAppLog3.ps1 script.
Navigating Settings
Before you convert a script in PowerShell Studio, you should first learn the plethora of ways you can change the behavior of the resulting EXE.
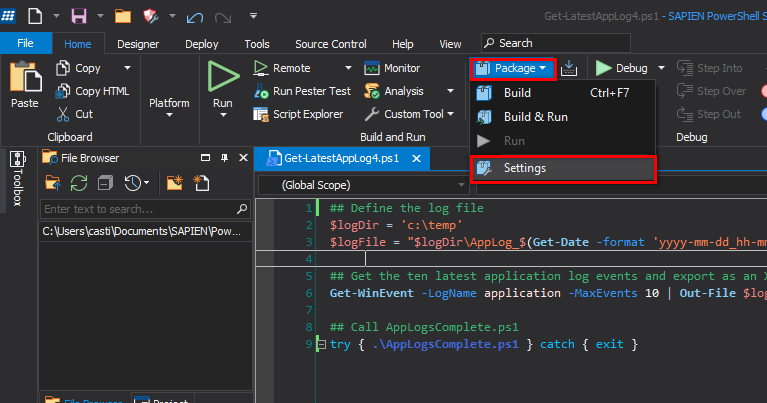
Click on the Package button in the top-right corner of the window, and choose Settings. This opens up the Script Packager window, where you can define all of the options available to you.
Each option in the Script Packager plays an important role in how you want your EXE file’s output to turn out. These options are demonstrated in the following sections with screenshots.
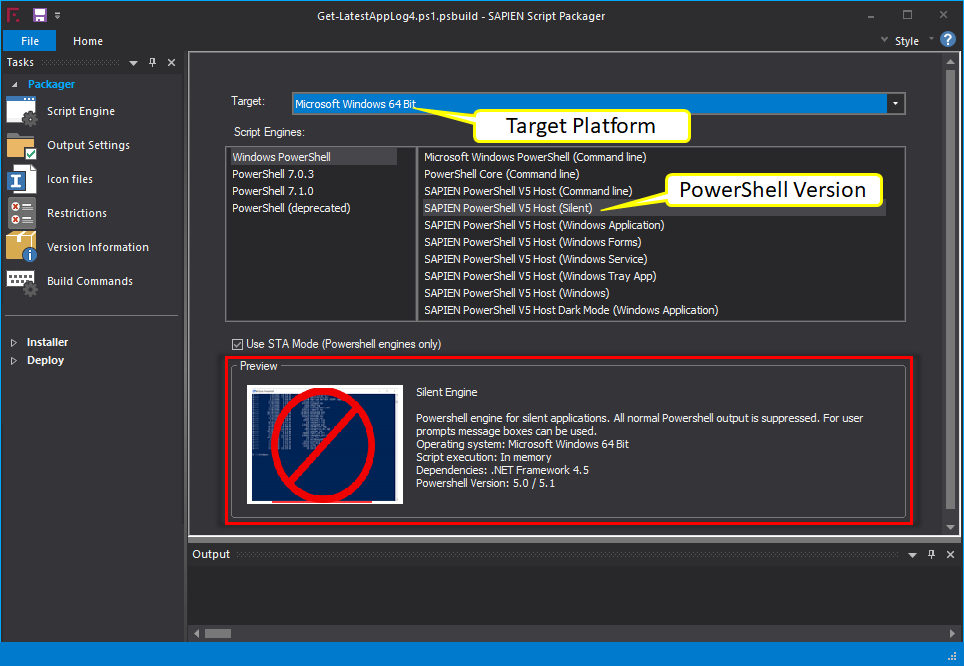
Script Engine
The Script Engine section focuses on the target platform and the script engine to compile your executable file.
Start with selecting your Target. You get to choose either a 32-bit or 64-bit version of windows, or you can choose both for flexibility. PowerShell Studio will create an EXE for each platform you choose here.
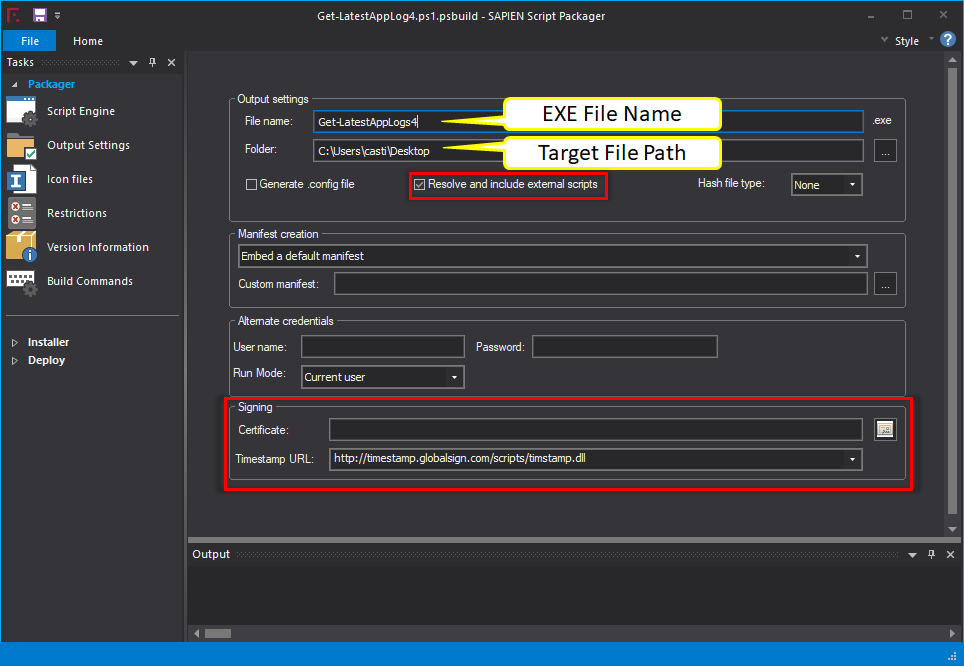
Output Settings
This section has options to configure how the EXE file will turn out after compiling.
- Output file – The name of the resulting EXE.
Do not include a file extension (.exe) as it will automatically be set for you for the field.
- Output folder – Where PowerShell Studio will save the executable file.
- Resolve and include external scripts – Be sure this option is checked if you have dependent scripts in your main script. If you don’t enable this, external scripts will be ignored while compiling your executable file.
Always ensure any dependent scripts are in the same folder as the main script.
- Signing – A place where you can search for a certificate to sign the EXE along with the password to the certificate (if it has one).
Icon Files
An icon helps you distinguish applications from one another, and the Icon Files section gives you that option to add an icon for your executable file.
To add an icon file, click on the Add File button or simply drag and drop the icon file in the Icon Files section.
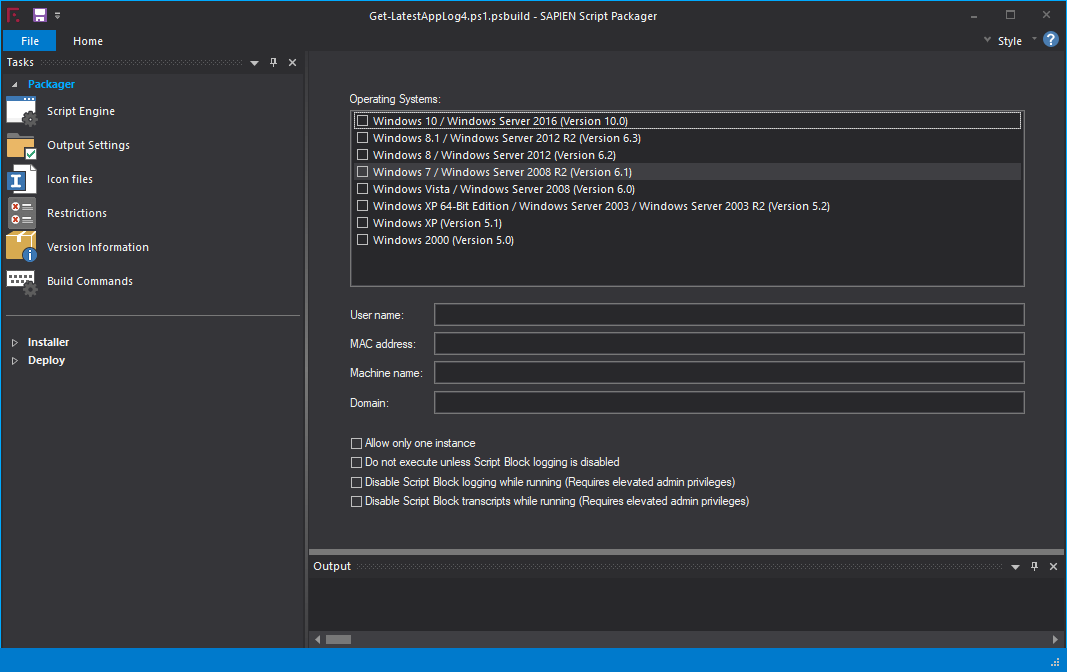
Restrictions
In the Restrictions section, you can include or exclude criteria to allow EXE execution.
Checking an Operating System in this field will ensure the resulting EXE will only execute on that operating system. Likewise, you can define criteria such as a specific user must be logged in, the computer must have a certain MAC address and more.
As you can see below, you have full control over when the resulting EXE executes.
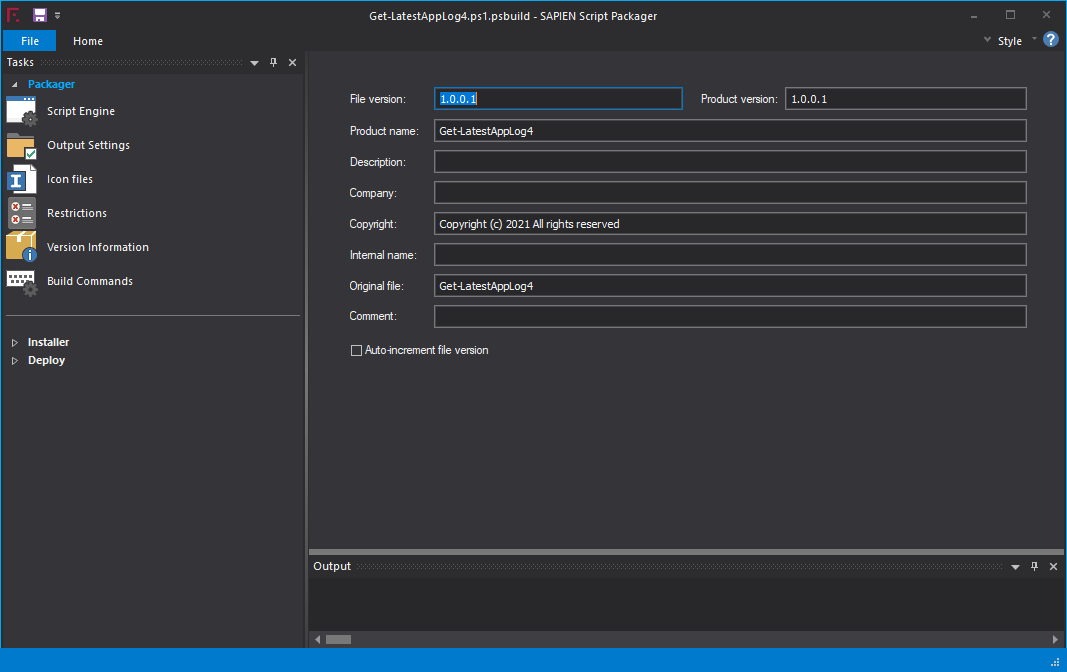
Version Information
When PowerShell Studio creates an EXE, that EXE has various file attributes. In the Version Information section, you can define what those attributes look like.
Here you can set attributes like File Version, Product Version, Copyright, and so on. You can see all the available attributes below.
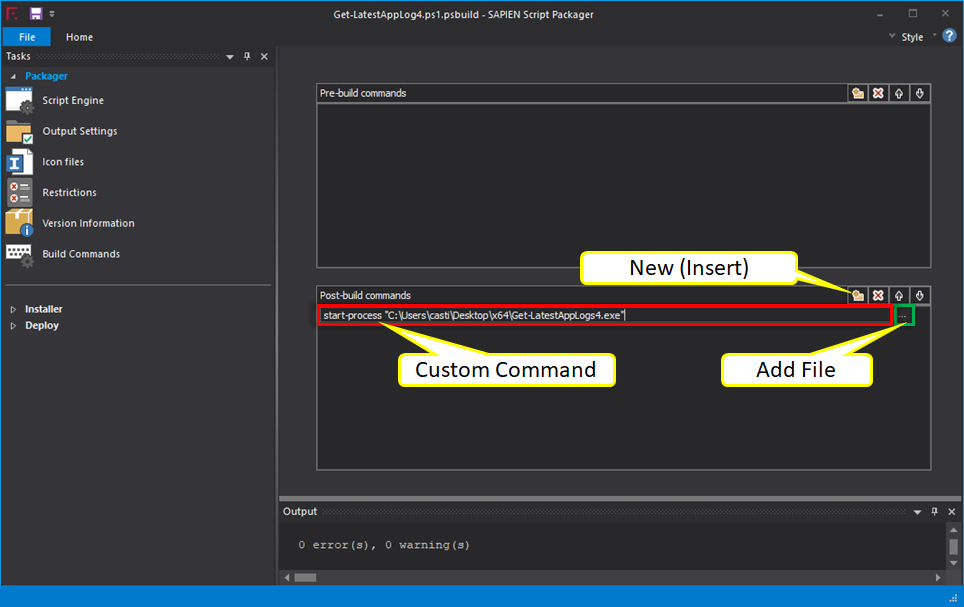
Build Options
Lastly, you will find a Build Options section. In this section, you can add custom pre-build or post-build commands to execute. This option will execute PowerShell commands before or after compiling the script to an executable file.
Let’s say you want to run some code right after PowerShell Studio finishes creating the EXE. To do so, click on the New (Insert) button in the Post-build commands box. Both the pre-build and post-build commands accept PowerShell commands directly.
Alternatively, you can click on the Add File (ellipsis) button and select another application or PowerShell script to run.
After setting up everything, click OK to package the script to an executable. The file’s location will automatically open up for you to check the executable file.
Accounting for External PowerShell Script Dependencies
A PowerShell script sometimes isn’t a self-contained unit. A script can also call other scripts. When converting to an EXE, some of the tools discussed here do not automatically find these dependent scripts and compile them.
When a script contains a reference to another script, and that script is converted to an EXE, the path can change. When that happens, the PowerShell code inside of the EXE cannot find the dependent script, and it fails.
Perhaps you have a script you’d like to convert that calls other scripts in the same folder. When you run the script via the PowerShell console, it can find these scripts since they’re all in the same working directory. When you convert a script to an EXE, this can break.
If you intend to convert a PS1 to an EXE and that script calls other scripts in the same directory, add the following code snippet to the top of your script.
This code snippet below resolves the path of an external script you’re running from the main script as long as they are both in the same directory.
if ($MyInvocation.MyCommand.CommandType -eq "ExternalScript")
 { $ScriptPath = Split-Path -Parent -Path $MyInvocation.MyCommand.Definition }
 else
 { $ScriptPath = Split-Path -Parent -Path ([Environment]::GetCommandLineArgs()[0])
     if (!$ScriptPath){ $ScriptPath = "." } }
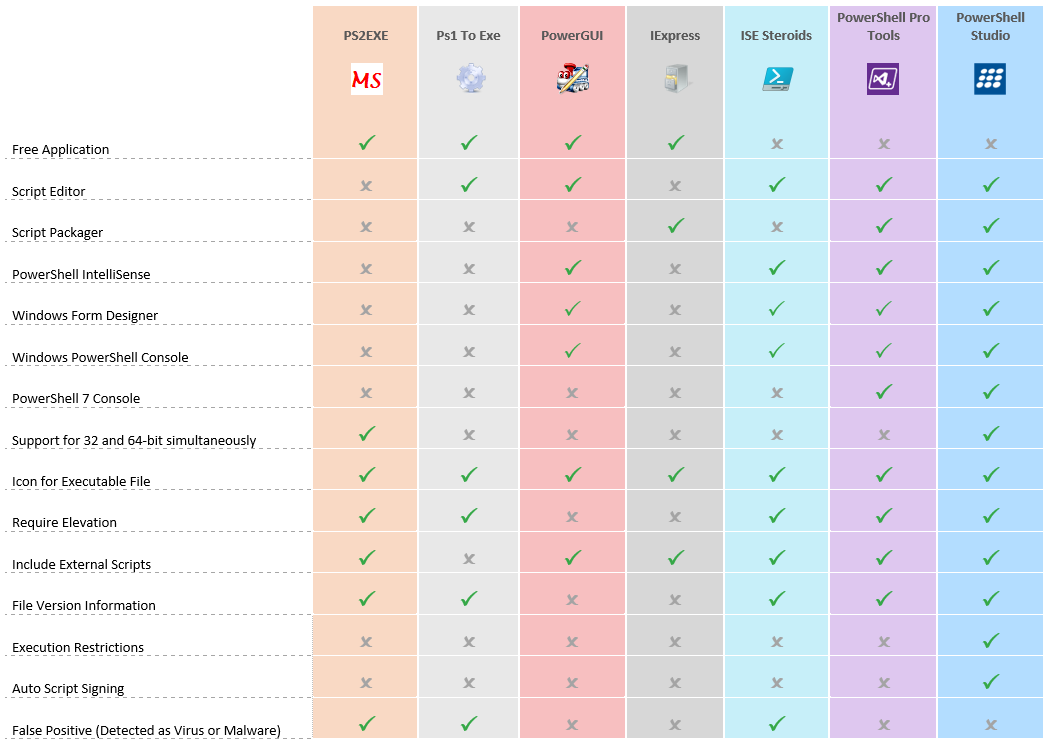
Features Comparison
If you still haven’t made up your mind yet on how you’d like to create an EXE from a PowerShell script, take a look at the below table. This table provides a bird’s eye view of the features of each tool to help you decide which tool to be your choice of PS1 to EXE converter.