


PowerShell rename is just one of the many cmdlets you can use to manage your files. If you’re wondering how to use PowerShell to write a file, use PowerShell to output to a file, or use PowerShell to check if a file exists, along with other file examples, stay tuned.
Not a reader? Watch this related video tutorial!In this tutorial, you’re going to learn how to get started working with files through an example-based approach to help inspire you to learn the skills you need to wrangle files.
Prerequisites
This tutorial will be a hands-on demonstration. If you’d like to follow along, be sure you have the following:
- Any version of Windows 10, but this tutorial uses Windows 10 Enterprise, build 19043.
- PowerShell 5.1 or higher would work, but this tutorial uses PowerShell 7.1.
- An editor such as PowerShell ISE or Visual Studio Code with the PowerShell extension.
Checking if a File Exists
When you’re writing some kind of automation script, you’ll sometimes need to wait for files to show up before taking action. To do so, PowerShell’s Test-Path cmdlet is your friend. The Test-Path cmdlet is a built-in cmdlet that returns True or False depending on a file/directory path exists or not.
Checking for a Single File
Let’s say you need to discover if a single file exists. If so, then the basic Test-Path PowerShell command will work just fine.
To demonstrate, create a file (one.file) in your working directory or pick any other random file. Once you’ve selected your test file, run the command below, replacing the path (C:\Folder\) and file name (one.file).
The Test-Path cmdlet below returns a True value if the file (one.file) exists. Otherwise, you’ll see a False value displayed on the console.
Test-Path C:\Folder\one.file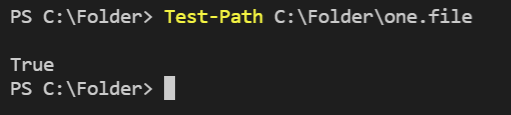
Checking for Multiple Files
Even though the Test-Path cmdlet only checks for the existence of a single file, you can build a script to send this cmdlet various files of your choosing to check. Below is a great example of this behavior.
The script below tests if three files in the $files array exist or not. If so, it will return All files were found, hooray!, if not, it will return Files are missing.
To see the script in action, copy and paste the script below to a code editor, then save it as file_existence.ps1. Ensure you have the files defined in the $files array created ahead of time.
## Store the file paths in an array
$files = "C:\Folder\one.file", "C:\Folder\two.file", "C:\Folder\three.file"

## Run the Test-Path cmdlet against each file path to return an array of True/False
## values. Then, using the -notcontains operator, return True if all boolean values
## returned via Test-Path are true.
$filecheck = ($files | Test-Path) -notcontains $false

## If $fileCheck is a boolean true (all files exist)
if($filecheck -eq $True) {
	Write-Host "All files were found, hooray!"
} else { ## If $fileCheck is a boolean false (at least one file does not exist)
	Write-Host "Files are missing."
}
After saving the script, run it on PowerShell with the following command.
./file_existence.ps1Since all files exist, you’ll see below a message saying All files were found, hooray!.

Removing Files by Last Write Time
Instead of just checking file existence, perhaps you may also want to get rid of files that have stayed in your system for too long. If so, the script below is what you need to clean your storage.
The script below searches for all files in the C:\folder file for files with a file extension. When found, it then filters all of those files using the Where-Object cmdlet to only return those files with a LastWriteTime property less than 30 days old. It then removes all of those files with the Remove-Item cmdlet.
## Find the current date/time
$Now=Get-Date

## Find all files in the C:\\folder with a .file extension that have been
## written to in the last 30 days. When found, remove them.
Get-Childitem C:\Folder\*.file | Where-Object `
	{ $_.LastWriteTime -gt $Now.AddDays(-30) } | Remove-Item -Verbose
Comparing Files by File Hash Attributes
Now you’ve tried removing files, let’s try comparing files instead by file hash. A file hash is a uniquely generated cryptographic value based on a file’s content. If file contents are changed, the hash value will change also. This change is a great way to compare the contents of two different files.
As an example, perhaps you have two files that you’d like to compare to ensure they are both exactly the same. To do that, you’ll first need to find the hash of each file then compare those hash values. Below is an example script you could use to make this requirement a reality.
The script below runs the Get-FileHash cmdlet to compute the file hashes on demand for one.file **and two.file files, compares the Hash object property that the Get-FileHash cmdlet returns, compares them, and returns different information based on the result.
To compute the hash value with a different algorithm, add the -Algorithm parameter to the Get-FileHash command cmdlet. Like this: Get-FileHash “C:\Folder\one.file” -Algorithm SHA512
## Get the file hash for each file using the default algorithm of SHA256.
$file1 = Get-FileHash "C:\Folder\one.file"
$file2 = Get-FileHash "C:\Folder\two.file"

## Compare the Hash object property returned from Get-Filehash for equality
If ($file1.Hash -eq $file2.Hash){
	## If the file hashes match, tell us so.
	Write-Host "File Sizes Match"
	Write-Host $file1.Hash
	Write-Host $file2.Hash
} else {
	## If the file hashes do not match, show the differing hashes
	Write-Host "File Sizes Do Not Match"
}
Recording Script Results to an Output File
Printing a script’s output to the console is handy, such as during development or even file comparison. But when implementing scripts in an automated environment, you should sometimes record the script results in an output file too.
Using the Out-File cmdlet is a great way to send output you’d only normally see in the PowerShell console to a file.
To demonstrate writing script results to an output file, create a file named numbers.txt in your working directory with a set of random eight-digit numbers. Perhaps you’d like to sort these numbers, pad a few zeroes on front of each of them, and then create a new file with the results.
Set-Content -Path 'numbers.txt' -Value '912450033'
Set-Content -Path 'numbers.txt' -Value '235646123'
Set-Content -Path 'numbers.txt' -Value '523366623'
Set-Content -Path 'numbers.txt' -Value '824582456'
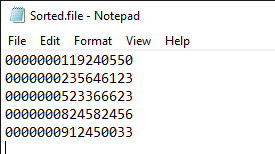
Set-Content -Path 'numbers.txt' -Value '119240550'Take a look at the example below. This example reads the numbers.txt file, sorts the list of numbers in ascending order, pads 16 zeroes to the front of each number, and then saves the sorted and padded numbers into the C:\temp\sorted.file text file.
## Read the C:\folders\numbers.txt file returning each number and start a
## foreach loop.
Get-Content -Path C:\Folder\numbers.txt | ForEach-Object -Process {
	## Convert the string representation of the number to an integer for sorting
	[int]$_
# Sort the numbers in ascending order and start processing each number
} | Sort-Object | ForEach-Object {
	# Pad 16 zeroes in front of every sorted number
	$_.ToString(“0000000000000000”)
} | Out-File -FilePath C:\temp\Sorted.file -Verbose ## Write the results to another file
Below, you can see the sorted numbered list outputted to a text file named Sorted.file.
Adding a Date String to a Filename
You previously manipulated a file’s content. But this time, let’s see how to manipulate a filename by adding a date string. Descriptive file names improve folder scanning and sorting, and a date string is an accessible way to improve your file organization.
Take a look at the example below. This example finds all files in the C:\folder with a file extension and renames each file by prepending the current datetime string to each.
## Find the current datetime and convert to a string that
## looks like 12252020120000 for December 25th
$Now = (Get-Date).ToString("MMddyyhhmmss")
## Find all files with a .file extension in the C:\folder directory
## iterate over each one to only return the name. Store each file name
## in the $fileList variable
$filelist = (Get-ChildItem "C:\Folder\*.file" | ForEach-Object {$_.name})
## Process each file in a foreach loop
foreach ($file in $filelist) {
## Prepend the datetime string to the file name
$newname = $Now + $file
## Rename the old file to the new name with the datetime string
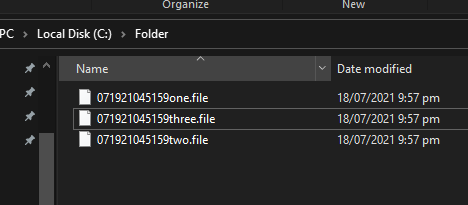
Rename-Item "C:\Folder\$file" $newname -Verbose
}You can see below that each file name now starts with the date string.
Creating Files & Directories With PowerShell New-Item
The files created above were output via different processed, but what if you simply want to create a file or directory. The PowerShell New-Item command creates both files and directories. That’s not all, you can create Symbolic Links, Junctions, and Hard Links as well though these are not commonly used.
Below, are two examples of using PowerShell New-Item to create a file and a folder.
# Using PowerShell New-Item to create a Directory
New-Item -ItemType 'Directory' -Name 'Folder'
# Using PowerShell New-Item to create a file named, Testfile.txt in the previously created directory.
New-Item -ItemType 'File' -Name 'TestFile.txt' -Path .\Folder\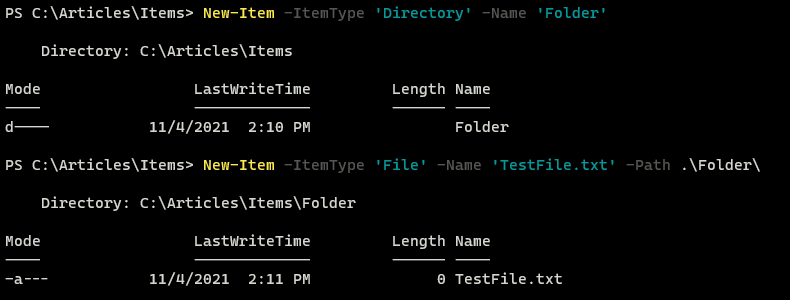
Using the PowerShell Move File Command: Move-Item
Since you have created a file under a directory named Folder how would you go about moving this file to the parent directory? The PowerShell move file command, Move-Item command not only works to move single files or directories, but offers filtering capabilities to help quickly move content from one location to the next.
In the below example, you are moving the previously created file, TestFile.txt, to the parent directory. Using the syntax of .. to signify the parent directory from the current location, use the PowerShell move item command, Move-Item to move the file.
# Use the PowerShell move item command, Move-Item to move the target file.
Move-Item -Path '.\TestFile.txt' -Destination '..'
# Verify that the file no longer exists in the directory
Get-ChildItem
# Set the path to the parent directory
Set-Location ..
# Verify that the file exists in the directory
Get-ChildItem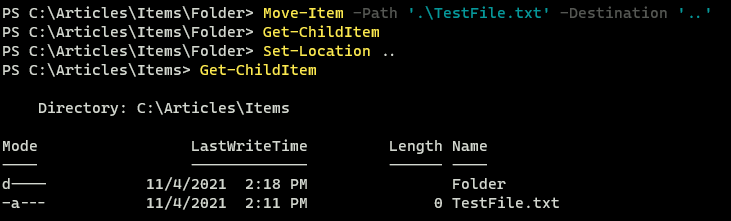
Changing Names With PowerShell Rename Command Rename-Item
With the file moved, perhaps TestFile.txt is not the ideal name. Naturally, the PowerShell rename command, Rename-Item works to retitle items such as files and directories. In the example shown below, you will change the TestFile.txt name to RenamedFile.txt and the directory Folder to RenamedFolder.
# Using the PowerShell rename command, Rename-Item, to retitle a file
Rename-Item -Path '.\TestFile.txt' -NewName 'RenamedFile.txt'
# Using the PowerShell rename command, Rename-Item, to retitle a folder
Rename-Item -Path '.\TestFile.txt' -NewName 'RenamedFile.txt'
# Verifying that the PowerShell rename command functioned correctly
Get-ChildItem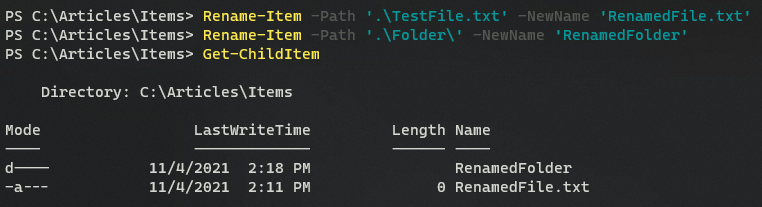
Rename-ItemConclusion
As you’ve seen, PowerShell has many different cmdlets and methods to manage files. And this tutorial only touched on the topic!
Take this knowledge and build upon it. See what scripts you can come up with to help you in your daily tasks. What are you going to build now?


