


Being able to track what PowerShell scripts are doing is important, especially in a production environment. Recording activity is key to troubleshooting, auditing, and investigating potential security issues. Using PowerShell and a community module known as PSFramework allows you to take your logging to a whole new level which you’ll learn about in this article!
If you find yourself using the Write-Host cmdlet to display error information or manually registering Windows event sources, this article is for you.
Stay with us if you want a simple, scalable PowerShell logging solution that can write to a text file or integrate into a log management solution.
Creating Better Log Messages
Before deciding on how best to generate logs with PowerShell, you need to first understand how to come up with better log messages, to begin with.
There are many reasons to generate logs. One of the most common is the infamous error message. Error messages can be helpful or harmful depending on how you look at things.
You’ve undoubtedly been victim to some bad error messages in your day. If you’ve ever seen the movie Office Space, PC LOAD LETTER is a prime example.
If your error messages cause someone to think, “WTF does that mean?”, you should consider rewriting your message! Logs should be clear and concise.
Make Events Actionable
A log message indicating a cryptic PC LOAD LETTER error message by itself doesn’t make a lot of sense. No one is going to know what that message means including you a few years from now! You should always generate log messages for error conditions that are actionable.
Using the PC LOAD LETTER message for example, what would you think if it instead said, “PC LOAD LETTER: Check the specs on the rotary girder. If within spec, contact vendor support for further guidance“? You’d probably keep your cool a bit more and actually have a jumpstart on fixing the problem.
Keep Logs Simple and Human-Readable
Log information must be human-readable. Include enough information to make the event actionable and not left to guesswork. You can be precise, but make sure you can have someone else understand, even if on a basic level, what the event means.
Logging is only as complicated as you want to make it. Keeping logs simple makes troubleshooting easier for all involved.
Logging Options in Windows
When you hear the word ‘log’ in IT, what comes to mind? Chances are you immediately begin to think about log files. Although log files are, indeed, an option and one you’ll learn about in this article, they aren’t the only option.
Another alternative is the Windows Event Log. The Windows Event Log and it’s seemingly endless number of log sources is ubiquitous in Windows. The event log allows you to write logs the varying degrees of severity, sources, categories, messages, and more.
The Windows Event Log differs from a log file because it has structure. A log file, on its own, is a simple text file. It’s up to the developer to come up with a schema for the log messages. The Windows Event log already has the schema taken care of.
Throughout this article, we’ll cover using PowerShell to work with the event log. We’ll also cover logging with log files using the PSFramework PowerShell module.
Prerequisites
The remainder of this article is going to be a walkthrough. If you’ll be following along, you’ll need to ensure we’re both on the same page. To work through each topic in this article, you’ll need:
- Windows PowerShell 5.1
- intermediate knowledge of PowerShell
- to understand basic Windows event logging terminology
Writing Events to the Windows Event Log
One way to capture logging information with PowerShell is to use the Windows Event Log. As mentioned earlier, the Windows Event Log already provides a schema to work with. It also includes GUI tools like the Windows Event Viewer and PowerShell cmdlets to create and parse event log messages.
The main PowerShell cmdlet you’ll use to write log events to the Windows Event Log is the Write-EventLog cmdlet. The Write-EventLog cmdlet is how you can generate new log events in existing event logs. If you’re planning on using existing event sources like the Application, Security, System event logs, the Write-EventLog cmdlet is all you need.
The Windows Event Log has a concept known as sources. In a nutshell, a source is simply a way to put event log messages into buckets. Built-in sources are used to separate operating system-specific events from software events, for example.
Using existing sources to write events works just fine if you’d like your log message to show up in a default source. But you can also create your own sources which will help differentiate your custom-generated event log messages from all the others.
Creating an Event Log Source
You can create a custom event log source by using the New-EventLog cmdlet. This cmdlet will modify the registry to make your event log a first-class citizen in Windows.
From an administrative PowerShell console, register a new event log source providing a name and source as shown below.
PS51> New-EventLog -LogName 'Application' -Source 'ATA_Script’'If you don’t have appropriate permissions or are running the command under a non-elevated PowerShell console session, you will see an error like below.

Creating Event Log Entries
Once you’ve created a source for your script/application, you can then get down to business and begin generating event log messages using the Write-EventLog cmdlet.
Below you can see an example of writing an event log message to the Application event log using the event source just created (ATA_Script). This message is an Informational event with an ID of 1.
PS51> Write-EventLog -LogName 'Application' -Source 'ATA_Script' -EntryType 'Information' -EventID 1 -Message 'Everything is broken. Everything is cool when you’re part of a team!'Once the event is created, you can then find this event in the Windows Event Viewer or using PowerShell using the Get-WinEvent or the Get-EventLog cmdlet. The below example is using the Get-EventLog cmdlet to find all Informational events using the event source just created. If more than one event is returned, it returns the newest one.
PS51> Get-EventLog -LogName 'Application' -EntryType 'Information' -Source 'ATA_Script’' -Newest 1
Event Source Best Practice
Before you leave this section, it’s important you know about a gotcha here. In the above example, PowerShell is using the arbitrary registered source (ATA_Script) created earlier. This source is required to write an entry to the Windows Application log.
Using a custom sources like this works well for simple scenarios like:
- Event logging for a custom Windows service.
- Recording results from a simple PowerShell function.
- Providing a trigger event for another process.
As a best practice, register a new event source for each script you want to generate event log entries as shown in the first step. When you do it this way, it’s easier to keep track of what is generating the event log entries. Imagine you have five scripts, each doing a very specific task. If all of them were using the same event source, how could you determine which script had failure? Registering a new event source helps you organize your logging sources.
Leveraging PowerShell Transcripts
Although the method you’re about to learn works, it’s not the best way. You’ll see why in a bit.
Although the Write-Host cmdlet is useful when you need some visual feedback when a script runs, it’s not great at logging. Why?
- The output is specific to a single PowerShell session. When you close the session, the output is gone.
- The cmdlet doesn’t have much customization beyond foreground and background colors of text.
Below you can see an example of what Write-Host cmdlet looks like in use.

Although by default, this output is only displayed to the PowerShell console and not recorded anywhere else, it can be using PowerShell transcripts.
Using the Start-Transcript cmdlet, you can create transcripts (text files) that capture all output sent to a PowerShell console. The Start-Transcript cmdlet is a great way to record PowerShell session activity.
While the Start-Transcript cmdlet starts recording console activity to a new transcript, the Stop-Transcript cmdlets stops it. You can see an example below.

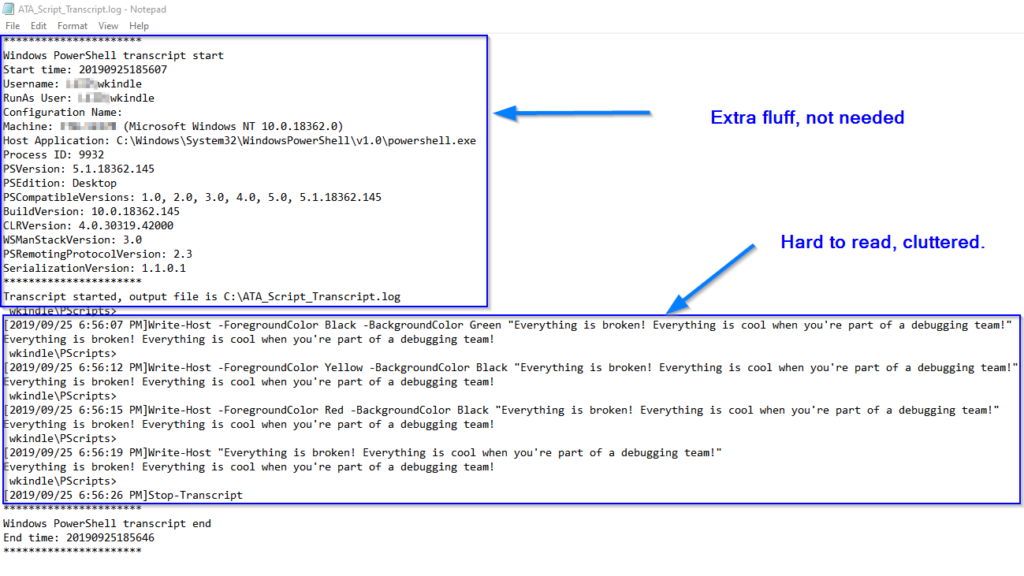
Although using the Write-Host cmdlet and PowerShell transcripts technically works, it’s not the greatest solution. Notice what the transcript contains in the example below. The log is difficult to read and is near impossible to parse!
Logging with the PSFramework PowerShell Module
As promised, it’s time to get into logging to text files! Although, you could roll your own log file solution using a combination of the Add-Content, Set-Content and other PowerShell cmdlets, there’s no need. You can use a free PowerShell module called PSFramework!
PSFramework is a PowerShell module that allows you to log activity in a variety of different scenarios.
Important PSFramework Concepts
Providers
A key concept of the PSFramework module is providers. Providers are pointers to various destinations you’d like logs to be stored in. A provider could be something like Kiwi Log Server, Elasticsearch, loggly, Graylog or something as basic as a file (usually text).
Although extensible, when you first download the PSFramework module, you immediately get three providers to use:
- Filesystem – This provider writes all message streams you create to the currently-logged-in user’s %APPDATA% folder with automatic seven-day retention and rotation. Filesystem is the default provider.
- Gelf – This provider allows PSFramework to send log message streams to an open source log manager called Graylog. There is a little more setup involved when using this option.
- Logfile – This provider allows you to specify a file to write all messages to. Because a log file could be of various types, the default output is CSV-formatted. This means you can use common log file extensions like .txt, .log, or .csv. The choice is yours.
Message Streams
Message streams contain output from commands. These are used to classify information being recorded in the logs. Common streams are Verbose, Debug, Information, Error and Warning. You can read more about available streams using Help about_psf_message .
Let’s get down to actually use the PSFramework module now and see what it can do!
Install PSFramework
The first task is to download and install this module. To do so, download it from the PowerShell Gallery by running Install-Module -Name PSFramework -Scope CurrentUser. This will place the module in my user profile rather than the system path. If you’d like to make the module available to all users on your system, don’t use the Scope parameter.
Once installed, you will now have access to all the cmdlets that are required for the code examples demonstrated in the rest of this article.
Setting up a Provider
There are three registered and installed providers available to choose from with the default PSFramework configuration – filesystem, logfile, and greylog. If you want to use another provider, you will first register and then install that provider within PSFramework. Before you can start writing to logs, you must enable one of these providers.
The command to enable a provider is Set-PSFLoggingProvider. This cmdlet has two required parameters – Name andEnable. You’ll use each parameter to enable the provider or providers you wish to work with.
If you plan on using your own provider, you will need to run the Register-PSFLoggingProvider and the Install-PSFLoggingProvider cmdlets. These cmdlets and scenario are outside the intended scope of this article. If you wish to explore this option further, consult the built-in help provided with the module. There are some examples that could lead you to expanding on existing capabilities and provide you with a deeper understanding of how logging works.
For this demonstration, you’ll be using the logfile provider. Since this provider is off by default, you must first enable the provider so that message streams can be sent to it. Using the Set-PSFLoggingProvider command, you can do that no sweat:
Set-PSFLoggingProvider -Name 'logfile' -Enable $trueIf you want to stick with the filesystem provider, no action would be required on your part as it’s already enabled by default.
To see all of the currently-registered providers, run the Get-PSFLoggingProvider command. This command should return output similar to the screenshot below.

Now that you’ve enabled a provider, you can begin sending message streams to that provider you wish to use for your logging solution.
Logging with the filesystem Provider
The filesystem provider provides a quick way to start logging without having to configure storage locations for log files. It’s perfect for short-term logging needs, but not one where you need long-term diagnostic logging.
In this demonstration of the filesystem provider, you’re going to learn how to use the Write-PSFMessage cmdlet. Imagine you’ve got an existing PowerShell script that starts a service on a remote host. Sometimes the service doesn’t start for some reason and the errors generated are not being captured. You can see the example below.
Invoke-Command -ComputerName 'Lab01.domain.local' -ScriptBlock { Start-Service -Name 'BITS' }You’d like to know the Start-Service command is able to successfully start the service and when it fails. To do so, you force Start-Service to return a terminating error and then add try/catch blocks to catch any errors that happen.
try {
    Invoke-Command -ComputerName 'Lab01.domain.local' -ScriptBlock { Start-Service -Name 'BITS' } -ErrorAction Stop
} catch {

}
You now need to log both when Start-Service is successful and when it fails. You know that if Invoke-Command fails, PowerShell will run code inside of the catch block and not any code after Invoke-Command runs.
Contrast that behavior with a success where code after Invoke-Command will run. You decide to run theWrite-PSFMessage command in the appropriate spots.
As you can see below, if the code successfully executes, Write-PSFMessage will record a helpful message with a level of Important and tagged as Success.
try {
    Invoke-Command -ComputerName 'Lab01.domain.local' -ScriptBlock { Start-Service -Name 'BITS' } -ErrorAction Stop

    Write-PSFMessage -Level Important -Message 'Successfully started BITS.' -Tag 'Success'
} catch {
    Write-PSFMessage -Level Warning -Message 'Error starting BITS.' -Tag 'Failure' -ErrorRecord $_
}
Above you saw a use of the
Tagsfeature. Tags are optional, but it does make it easier when needing to sort and search a log. Tags are free text allowing you to define your own. Some common tags are SUCCESS, FAILURE, ERROR and INFO.
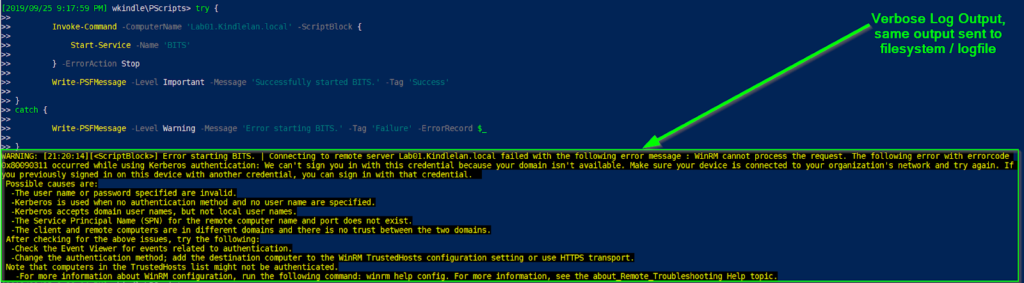
Now if the command fails, you will see a warning written to the PowerShell console as shown below.
Viewing the filesystem Log
Once you’ve written a few message streams with the filesystem provider, you can use the Get-PSFMessage cmdlet to query the log.
If the code in the example above generated log messages at the Warning level, you could read all of those messages by using a value of Warning for the Level parameter. You can see an example of how to do this along with the output type you will receive.
PS51> Get-PSFMessage -Level Warning
Logging with the logfile Provider
Now that you’ve seen how the filesystem provider works, let’s check out the logfile provider. The logfile providers allows you to write message streams to plain-text files, by default, in a CSV format.
To use the logfile provider, you’ll first have to tell PSFramework to not use the default provider (filesystem) and to set a file to record messages to. To do so, use the Set-PSFLoggingProvider cmdlet. You can see in the below example how to do this.
- name of the provider (logfile) via the
Nameparameter - setting the
Enabledproperty to True - setting the destination file as the value for
FilePath
PS51> Set-PSFLoggingProvider -Name logfile -Enabled $true -FilePath 'C:\My_Events.log'Note: Be sure to set the provider at the beginning of your script!
When a message is received via running the Write-PSFMessage command as before, PSFramework will record the message. The message will include a date format of mm:dd:yyyy, script name (source), message level, a verbose message, tag (optional), and an error record.
Below is an example of what a single log message will look like in Windows notepad in an unstructured format.

To take advantage of the CSV format, open the log file up in Microsoft Excel and the output will look much better as shown below.
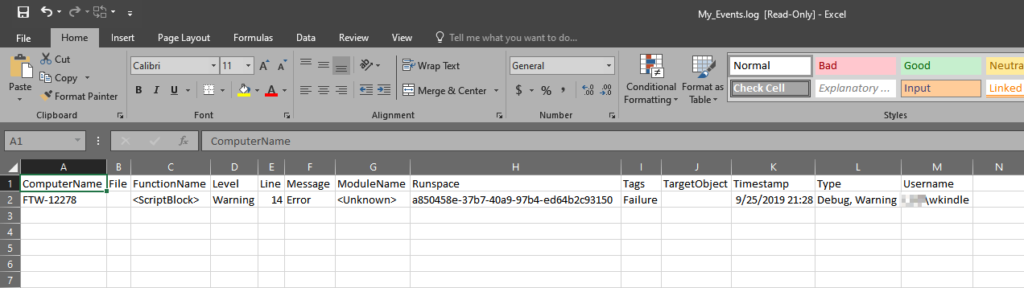
My choice to use the logfile provider instead of the filesystem provider was due to a need to keep a long running history and import information into Excel. The format of the output makes it a breeze to generate charts and filter data for reporting.
Bonus: Querying Logs by Runspace
An advanced feature of the PSFramework module is working with runspaces. A PowerShell runspace is a commonway you can run processes in parallel by spinning up threads.
Since you may have multiple streams of logging running at once in different runspaces, PSFramework allows you to look at multiple logs in real time. These logs can come from many sources through the use of runspaces. This feature is extremely useful as you can leave a single PowerShell session open while running multiple commands or scripts in the background.
If you know the runspace ID, you can specify it using the Runspace parameter on the Get-PSFMessage command as shown below.
Get-PSFMessage -Runspace a2346978-d324-4886-89b8-bd14769be78fRunspace can be a complicated topic to grasp. If you would like to learn more, check out this Microsoft DevBlog Series about using runspaces.
Using PSFramework in the Real-World: A Note from the Author
I’ve been using the PSFramework module for months now and it has supercharged my maintenance scripts and forced me to write better code.
It’s forced me to write better error handling code and to make a habit of setting the common ErrorAction parameter to True on cmdlets to create terminating errors.
I started seeing the benefits instantly. There’s even been an ongoing problem I was able to finally solve using the log file that was generated.
I was running into an error that only occurred when executing a script using scheduled jobs. The script would run fine when executed manually. The issue turned out to be a credential and timing issue. Since the error record ID was in the log file, error messages were clear and using tags, I was able to narrow it down in no time.
Having tried other methods to generate log files and this module is by far the easiest to use.
The PSFramework is module works great, is reliable, and gives you the most control over verbose messages.
Summary
As you’ve learned throughout this article, logging should be a key component of your automation processes. Establishing clear logging guidelines with informative and actionable logs coupled with understanding logging options will go a long way.
If you haven’t used the PSFramework module and haven’t walked through the demos provided here, please do so. This helpful module allows you to many different options in recording logs which will ultimately help troubleshooting, auditing and security analysis.


