

Microsoft PowerShell has been traditionally thought of as a Windows-only product but not anymore. As of PowerShell v6, the full capabilities of PowerShell are now available cross-platform with Linux as the most popular.
In this tutorial, you’re going to learn how to get started from scratch by installing PowerShell on Ubuntu (other Linux distributions are similar), how to run commands, and even install some modules.
Let’s get started!
Prerequisites
This tutorial will contain various demos. If you’d like to follow along, be sure you have the following:
- Any supported Linux distribution – This tutorial uses Peppermint 10 which is based on Ubuntu 18.04 (LTS).
- An account with root access.
Updating Package Repository
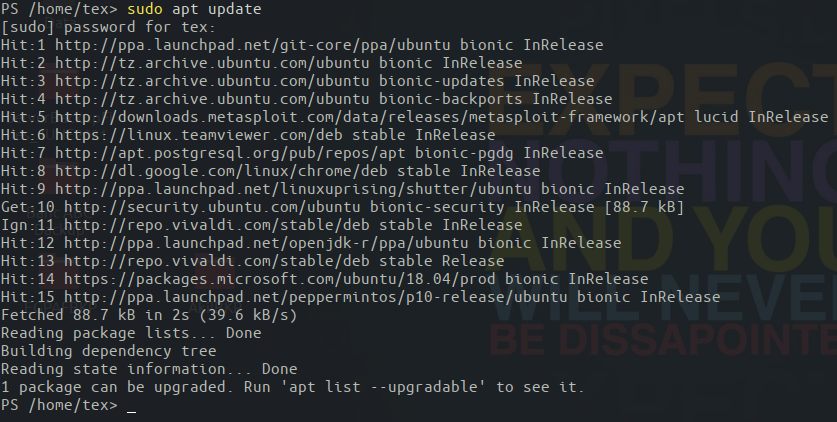
Before jumping to installing PowerShell on Linux, you must first update the apt package manager’s repository list. Some distributions of Linux use the apt package manager to install apt packages; PowerShell is one of them.
To ensure that apt can find the PowerShell package and any dependency when downloading, you must first update apt’s package repository list. To do that, run [apt update](<https://www.cyberciti.biz/faq/what-does-sudo-apt-get-update-command-do-on-ubuntu-debian/>).
sudo apt updateInstalling PowerShell on Linux
Now that you’ve updated the package repositories, it’s time to install PowerShell on Linux. Since this tutorial is using an Ubuntu-based distribution, you have two different ways to install PowerShell; using snap packages or via the .NET SDK.
Installing PowerShell via Snap Packages
The easiest way to install PowerShell on Ubuntu is via snaps. Snaps are packages that work across several Linux versions and distributions.
To install PowerShell on Linux via a snap package, open a terminal and run the snap install Linux command with sudo rights to using the snap package name of powershell.
By default, snap packages are limited in scope for security reasons. Specifying the
--classicparameter allows you to make changes to your system outside the security sandbox.
sudo snap install powershell --classic
Installing PowerShell via the .NET SDK
1. Sometimes you’ll find that the PowerShell snap package does not contain the latest version of PowerShell. When that happens, you can always opt for the .NET SDK route which is always going to be updated.
PowerShell is packaged with .NET Core so when you install the .NET SDK, you get PowerShell too!
Download and install the latest available .NET SDK by running the below command using the apt package manager. As of this writing, the latest available .NET SDK package is v5.0.8. You can check the latest available version here.
sudo apt install dotnet-sdk-5.0
2. Now, install PowerShell via the dotnet application using dotnet tool install. The dotnet tool command specifies a NuGet package which PowerShell is packaged as.
By specifying the --global option, dotnet installs the PowerShell package to ~\.dotnet\tools and ensures the directory is in the system PATH so you can execute it from anywhere.
dotnet tool install --global PowerShell 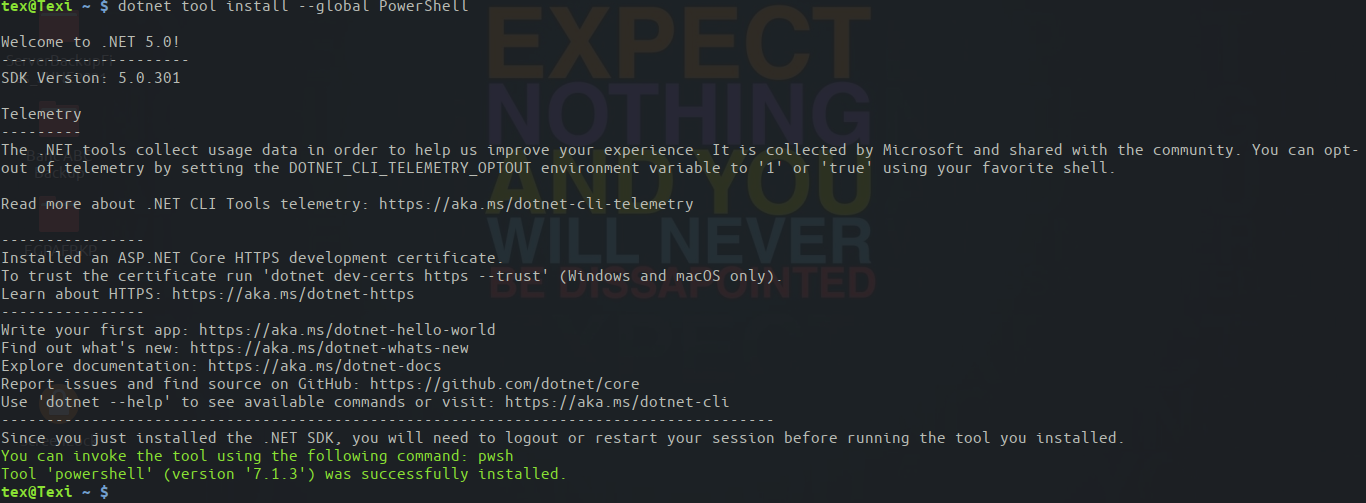
Running Basic PowerShell Commands on Linux
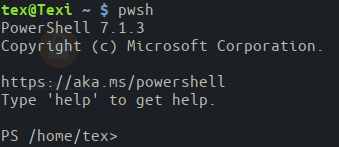
Now that you have PowerShell installed on Linux, what next? Let’s start by running a few basic commands. To start PowerShell, simply run pwsh and you’ll be dropped into the PowerShell interactive console.
Being a cross-platform scripting language, PowerShell on Linux supports all of the commonly known commands from CMD and Linux’s command line shell such as sudo apt update. No need to open a Bash terminal!
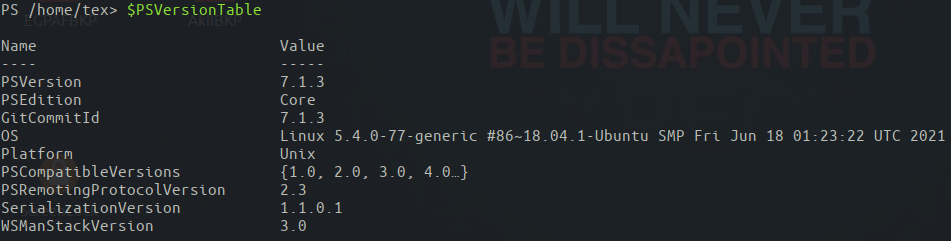
From here on out you can run thousands of built-in PowerShell commands. While you’re at it, check what version of PowerShell is installed using $PSVersionTable. You should see that the PSEdition shows as Core and Platform is Unix.
Once you’re done in the PowerShell console, exit by running the exit command. This command will drop you back into your Bash terminal.
PowerShell on Linux Limitations
Just because you can install PowerShell and run commands on it doesn’t necessarily mean you can do everything possible on Windows. After all, Linux being Open Source, is a completely different operating system and some commands will not be available for features not available in Linux.
Windows -ne Linux
For example, since Linux doesn’t have a registry, you won’t see any PowerShell drives. The Get-PSDrive cmdlet will still be available but it will only return the mounted Linux storage volumes and other standard PS Drives. You can see an example below.
Get-PSDrive | Format-Table -Auto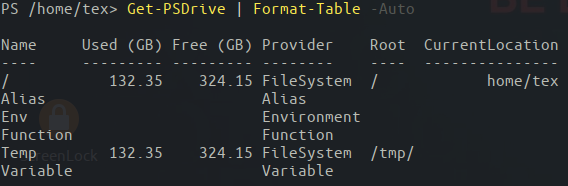
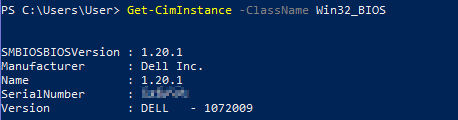
Unlike Microsoft Windows, Linux neither has Common Information Model (CIM) nor Windows Management Instrumentation (WMI). Both of these assist in providing information about the management of devices and applications to the Windows operating system.
You can see below that the Windows PowerShell cmdlet Get-CimInstance isn’t available in PowerShell on Linux.
Get-CimInstance -ClassName Win32_BIOS
But if you try to use Get-CimInstance in Windows PowerShell, you’ll see below that it works as expected.
No Scheduled Jobs
Another drawback of PowerShell on Linux is the lack of scheduled jobs. Scheduled jobs are a handy feature in Window PowerShell that allows you to run tasks in the background via the Windows Task Scheduler.
To create a scheduled job in Windows PowerShell requires you to register the job via the Register-ScheduledJob cmdlet. You’ll see an example of copying some Excel workbooks that works in Windows PowerShell below. You’ll notice that the Register-ScheduledJob cmdlet isn’t found.

Although you can’t schedule a job, you can still invoke background jobs using the Start-Job command. The Start-Job cmdlet allows you to run background jobs in PowerShell to execute a task with no interaction with the current session.
Perhaps you’d like to list all files in /var/backups but do so in the background. You could create the command to execute in a ScriptBlock and create a job called GetAllBackupFiles invoke with Start-Job, as shown below.
Start-Job -Name GetAllBackupFiles -ScriptBlock {Get-ChildItem /var/backups -Recurse}
Once the background job starts, you can then receive the output from that job using the Retrieve-Job cmdlet by specifying the -Name that you provided when starting it.
Retrieve-Job -Name GetAllBackupFiles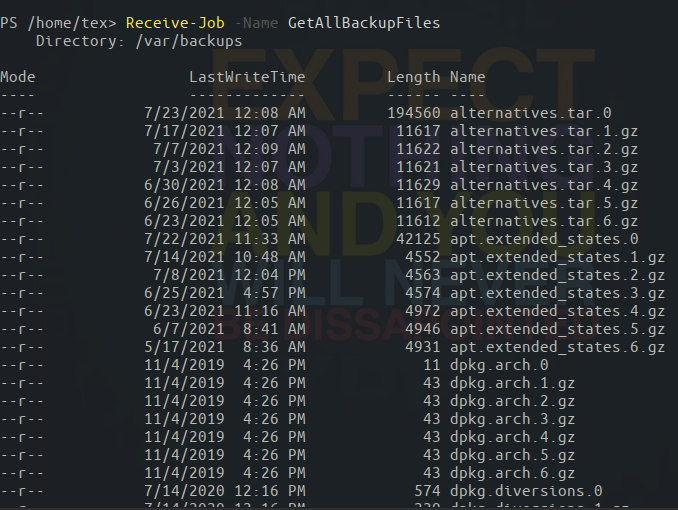
Working with PowerShell Modules on Linux
An important concept in Windows PowerShell is the PowerShell module. PowerShell modules are groups of commands built as “packages” built both from Microsoft and via the PowerShell community.
Finding Installed Modules
By default, PowerShell on Linux, like Windows, installs various modules. Find all of those modules by running the Get-Module command, as shown below. The ListAvailable parameter tells Get-Module to return all modules on the filesystem; not just loaded modules.
Get-Module -ListAvailableYou can see below that the Pester module is installed in /root/.local/share/powershell/Modules which is the user location for PowerShell modules. You’ll learn how to install modules in an upcoming section.
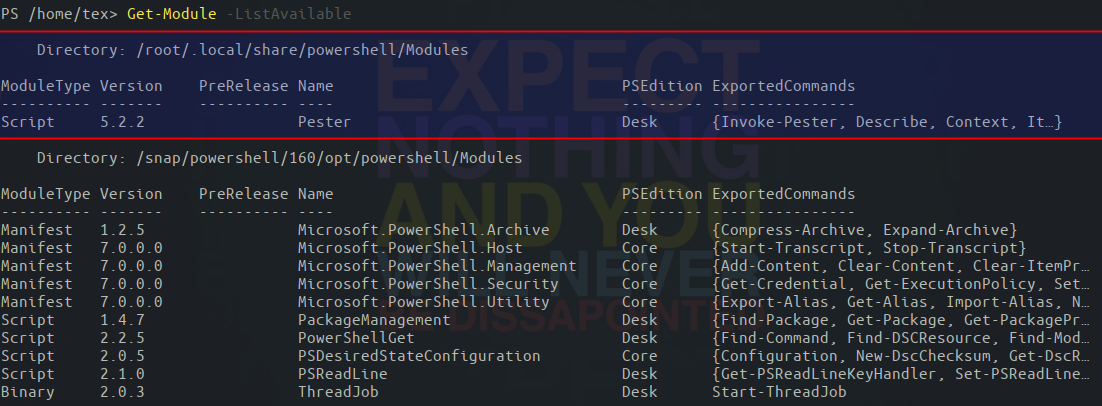
You can see each location to install modules by looking at the PSModulePath environment variable, as shown below. Since the value of $env:PSModulePath is one string, the tutorial is using the split operator to split the string on colons (not semicolons like Windows) to display each path on a different line.
$env:PSModulePath -split ':'
Installing PowerShell Modules on Linux
Even though PowerShell on Linux comes with various modules already installed, chances are you’re going to need more functionality. When that happens, you can leverage the PowerShell Gallery. The PowerShell Gallery is a repository of thousands of modules that work both in Windows and Linux.
Using the Install-Module cmdlet, you can install modules on Linux just like you can on Windows. But first, you should find the module you’re looking for using Find-Module.
Let’s say you’d like to run some Pesters tests using the popular Pester testing framework. Pester comes packaged in a module. Check to see if the Pester module is available in the PowerShell Gallery using the Find-Module cmdlet.
Find-Module PesterYou can see below that Find-Module found the available Pester module.

Once you’ve verified the Pester module is available, now install the module using the Install-Module cmdlet specifying the Name of the module.
Install-Module -Name PesterWhen you run Install-Module, PowerShell will prompt you about an untrusted repository because the repository is marked as untrusted. For testing, this warning is nothing to worry about so type A to confirm.

Once the module has been installed, now run the Get-InstalledModule cmdlet and you’ll see that Pester has been installed and its commands are now available.

You’ll also see that by using the Get-Command cmdlet, you can also find all commands inside of the Pester module, as shown below.
Get-Command -Module Pester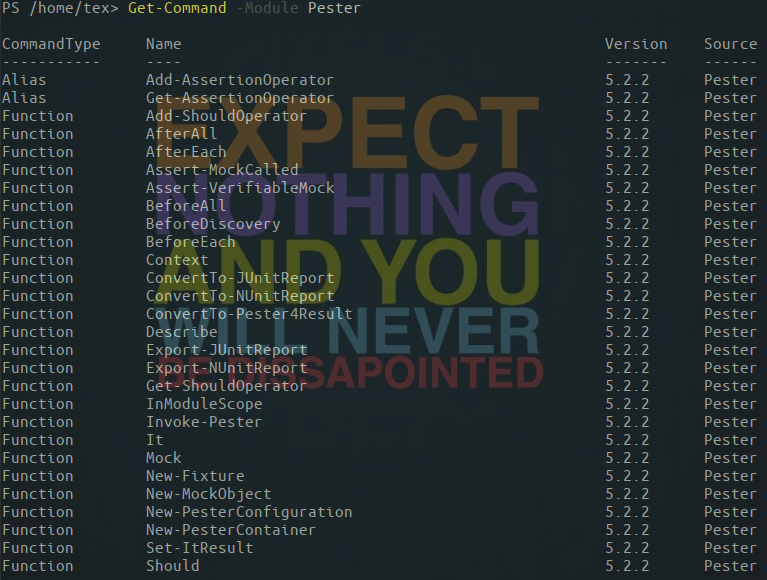
Running PowerShell Scripts From Bash
To wrap up this tutorial, let’s end with running PowerShell scripts from Bash. Throughout this tutorial, you’ve been interactively running PowerShell commands inside of a PowerShell console. If you have a PowerShell script you need to execute, there’s no need to drop into the PowerShell console. Instead, you can execute the script directly from Bash.
To demonstrate running a PowerShell script from Bash, open your favorite Linux text editor and paste the following command and save the file as DrivesInformation.ps1. This script will simply enumerate all of the PS drives.
Get-PSDriveIn your Bash terminal, instead of running pwsh, hitting Enter and then running the script inside of the PowerShell console, invoke the script directly from Bash. To do this, run pwsh again but this time specify the PowerShell script you just created, as shown below.
You’ll see that you receive the same output you would inside of the interactive PowerShell session directly in your Bash terminal.
pwsh /home/tex/DrivesInformation.ps1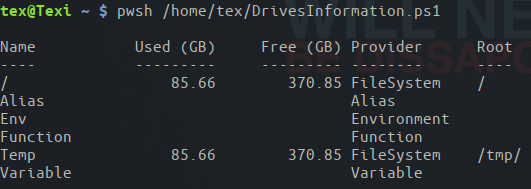
Conclusion
You should now have a good start at running PowerShell in Linux! It’s now up to you to start learning more about PowerShell and automating all you can!


