


If you and your team have way too many PowerShell scripts lying around running who knows where, this article is for you. In this article, you’re going to learn how to set up the popular Jenkins automation server to manage and execute PowerShell scripts!
Not a reader? Watch this related video tutorial!
Not seeing the video? Make sure your ad blocker is disabled.
You’ll learn how to integrate Git version control with Jenkins to then set up and schedule PowerShell scripts to run at predefined schedules.
PowerShell Script Sprawl: This Isn’t Working
As an automation engineer, one of the main challenges my team and I had to overcome was scheduled PowerShell script sprawl. I found dozens of PowerShell scripts being scheduled and run from many different places.
Each engineer, or team of engineers, had their own server that they scheduled things on. Each type of script was executed on the server that ran that service.
- A domain controller ran all of the Active Directory scripts.
- An Exchange server ran all of the Exchange scripts.
- A member server ran all networking team scripts.
- A member server ran all of the database scripts for the DBAs.
- A member server ran all of the security team’s scripts.
- …and on and on
All code that was running on any of these servers was either saved as a script file in a temp directory on that server or as a script folder on a shared drive. It was a nightmare!
Believe it or not, for the most part, this system worked fine. Scripts ran as desired and we had backups on all servers anyway. No code was ever lost.
It was understandably easy for everyone to be happy with this status quo. Improving on this system wasn’t high on the priority list.
But this system wasn’t without its flaws. While it met the needs of some engineers, it wasn’t able to scale or be easily maintainable forever. This system also didn’t allow for any flexibility in the scheduled tasks either. This rigidness led to ten versions of the same script (with slight edits) being scheduled.
Enter Jenkins.
Why Jenkins?
Of all the options you have to schedule and run PowerShell scripts, why choose Jenkins? Using a Jenkins server to run PowerShell scripts provides many benefits. Here are a few highlights:
Better Control
Once you have all of your PowerShell scripts in one place, there’s no wondering which server a script is run on. You are now able to forget about that script you wrote two years ago that is now outdated and locking out some service account.
You can organize scripts into an easily navigable folder structure, control exactly where all of your scripts actually execute and even use pipelines to break up large monolithic scripts into smaller modular chunks that can be reused in multiple jobs.
Easy Scheduling
With Jenkins, you have a single, central place with full support for scheduling PowerShell script execution. You can schedule different scripts to run at different times with different parameters, have a nice web GUI for managing schedules and more.
Version Control
Having PowerShell scripts under some kind of version control solves many different problems. One of those is being able to integrate with tools like Jenkins. Jenkins can integrate with Git and other version control products to automatically pull the latest version.
Consolidated Logging
When PowerShell scripts are spread out all over the place and creating logs, logs can be scattered everywhere. With Jenkins, you get excellent logging in a readable output window on a website instead of having to dig through some log file your scheduled task made.
Prerequisites/Requirements
This article will be a walkthrough on how to set up Jenkins to run PowerShell scripts. As such, you’re going to need a few things to follow along.
- A running Jenkins server
- Git installed on your Jenkins server or build agent
- A Git repo set up containing your PowerShell scripts (Be sure you know the repo URL)
- Jenkins Git plugin
Installing the PowerShell Plugin
To run PowerShell scripts with Jenkins, you’ll have to install the PowerShell plugin. To do so, at the main page:
- Click on Manage Jenkins and then on Manage Plugins.
- Click on the Available tab.
- On the right-hand side of the screen, type powershell in the Filter box. You should then see the PowerShell plugin appear as shown below.

4. Select the Install checkbox and click Install without restart.
5. Installing the PowerShell plugin will create a Windows PowerShell build step option when you provide the PowerShell script to run a little later.
Creating a Job
Jenkins has a concept of jobs. A job is a set of instructions that you can provide Jenkins to know what scripts to execute, schedules to adhere to, etc. You’ll create a job in this section that will execute a PowerShell script. To do so, you’ll set up a job that will clone a Git repository into Jenkins.
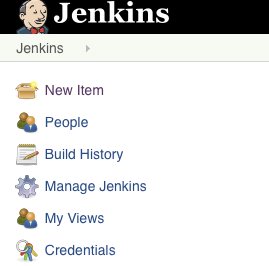
- Once logged in Jenkins, click New Item in the upper right-hand corner.
2. You’ll then be provided with the screen shown below. Select Freestyle project. This type of job will allow the most flexibility.
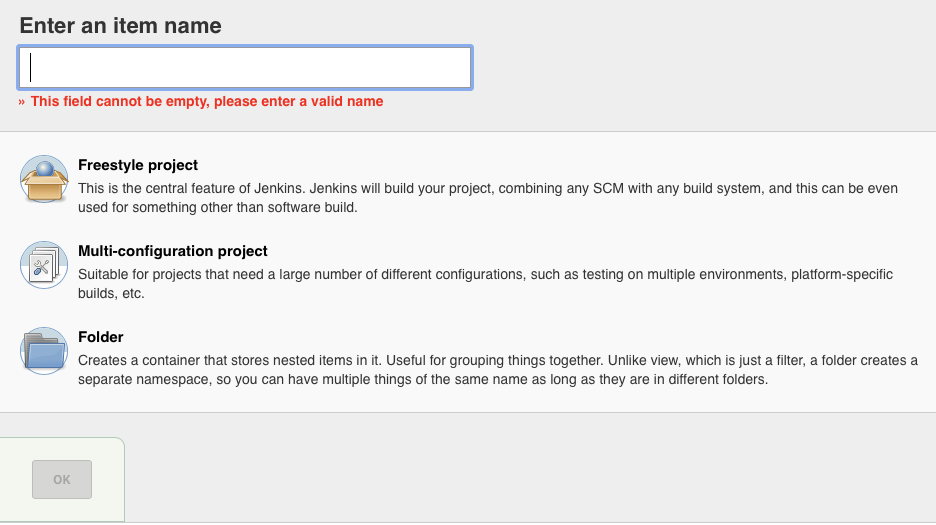
3. Give the job the name Hello World and click OK.

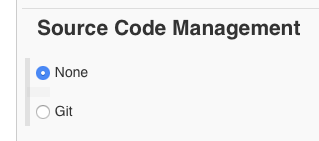
4. You should now be at the Job Configuration screen. You should now see a section called Source Code Management as shown below. This allows you to specify which Git repo Jenkins will clone to make available to the job. For this demo, choose Git.
5. When you click on Git, you should now see an option asking you for your Git repository information. This is the Git repo that contains your PowerShell scripts.
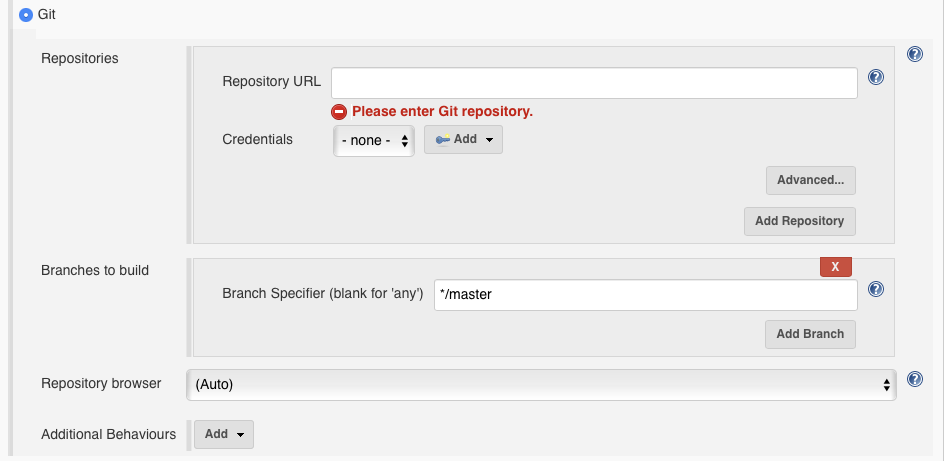
Below is a breakdown of each field:
- Repository URL – The URL pointing to the Git repo. In TFS, for example, the URL may look like this: *http://SERVERNAME:8080/tfs//Messaging/_git/Dynamic Distro List*
- Credentials – A username/password that that has access to the repository. If you don’t have a credential already set up, you can create one by clicking on Add.
- Name – This can be left blank.
- Refspec -This can be left blank.
- Branch Specifier – This allows you to choose what branch you want this job to use. By default, it is going to pull the master branch, but if you have another testing branch you want to use, you can specify it here.
You can also clone more than one repository for a job by using the Add Repository button above. This is useful if you have modules or other dependencies that you need in a separate repository.
Adding the Windows PowerShell Build Step
Perhaps you have a script in the root of the Git repo’s master branch called Hello World.ps1. Inside of this script, you have a single line:
Write-Host "Hello World, I'm a Jenkins build!"You’d like to execute this script when the job runs. To do so, you’ll have to create a build step.
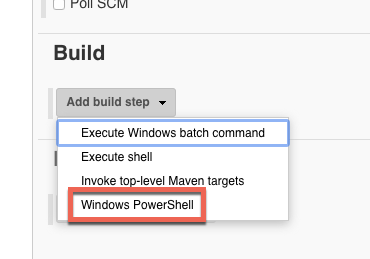
Jenkins allows you to specify numerous build steps per job. For your purposes, you need to add a Windows PowerShell build step. To do so, at the job configuration screen:
- Click on the Add build step button and choose Windows PowerShell.
2. Inside of the Command box, dot source the PowerShell script located in your Git repo as shown below. You can see we’re using a PowerShell environment variable called WORKSPACE. This variable represents the current working directory (the root folder of the Git repo).
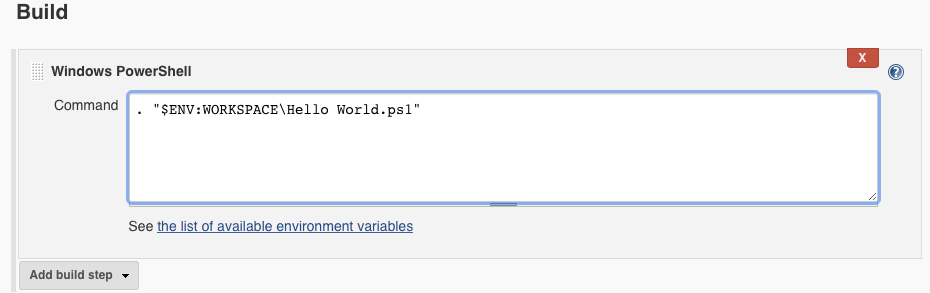
3. Now click on Save to save the job.
You should now have a job set up to invoke a PowerShell script from a Git repo!
Executing the PowerShell Script
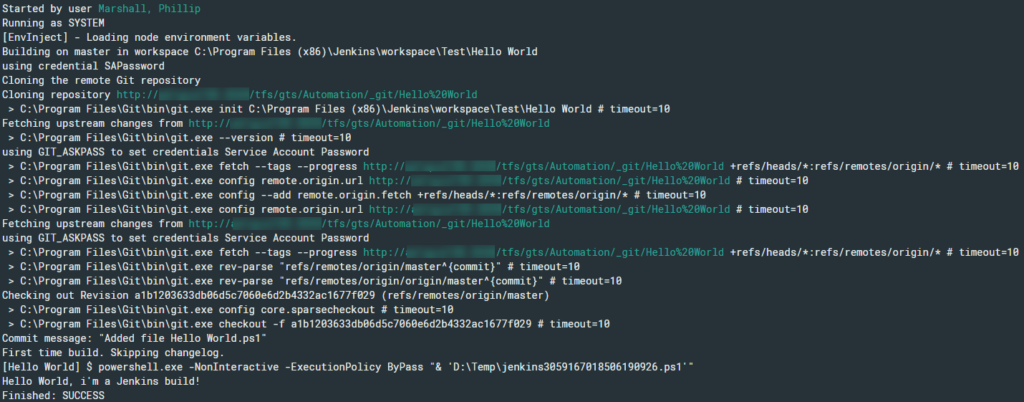
Now that you have created a job, run it and take a look at the output.
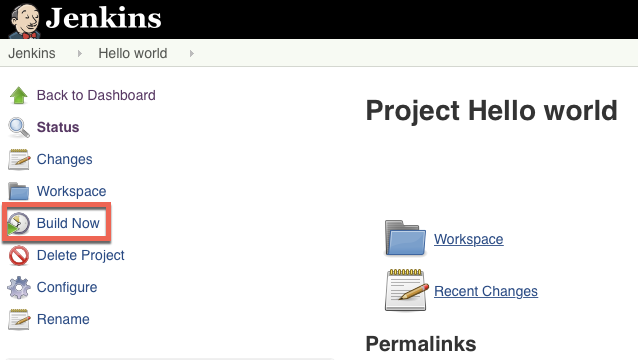
- Ensure you’re at the main job screen. If you used the Hello World name for this job, the default URL will be http://localhost:8080/job/Hello world/.
- On the main job screen, click Build Now on the left-hand side as shown below.
Clicking on Build Now immediately launches a build of the current job. For jobs that are complex and take a while to run, you will have the ability to click the build and see the output in real-time as it runs. In this case, however, the job will run practically instantly.
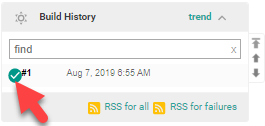
4. To see the results, click the green check next to the build.
If all went according to plan, you will see something like the following in your output:
Schedules and Triggers
You now have a job that can run whenever needed and that outputs the Hello World message. But one of the major selling points of Jenkins is to replace scheduled tasks. We don’t want to have to go in and manually run it. If you reopen that job, you will see a section called Build Triggers.
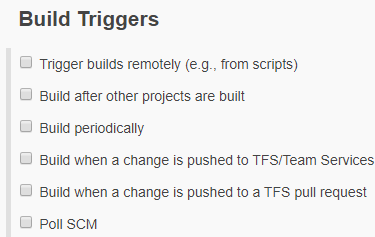
These are your options for having a job run without requiring that you click on Build Now in Jenkins.
Creating a Schedule
There are a few different options to create triggers from. In this example, let’s keep it simple.
- Select Build periodically. This trigger allows you to schedule jobs using a cron-like scheduling syntax.
2. Set the job to run at at 7: 30 a.m. Monday, Wednesday, and Friday as shown below.

3. Save the changes and wait.
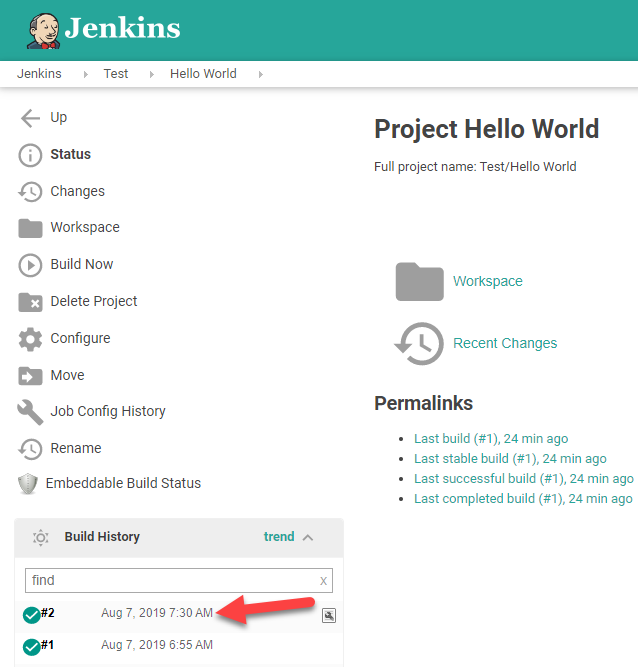
When the assigned date and time occurs, you will then see the script ran as desired under Build History.
You now have a PowerShell script scheduled in Jenkins that will execute at a recurring interval.


