

A common SysAdmin task involves managing a PowerShell IP configuration. Typically, one performs this task using the GUI, which is OK. But PowerShell can do the same job and more, which you can put into scripting.
In this tutorial, you will learn how to use a few network management cmdlets in PowerShell to help manage a Windows host’s IP address, gateway, and DNS settings.
Read on, and level up your network troubleshooting skills with PowerShell IP configuration commands!
Prerequisites
This tutorial comprises hands-on demonstrations. You will need administrative access to PowerShell on a modern Windows OS to follow along. This tutorial uses Windows Server 2022, but the commands work on Windows 10 versions and newer.
Getting Network Adapter Properties (Get-NetAdapter)
In troubleshooting or gathering a host’s IP address, you could use traditional tools like ping, ipconfig, or sconfig. But with PowerShell cmdlets, you can script this process for automation.
Open PowerShell and run the below Get-NetAdapter cmdlet to get the list of network adapters and their properties, such as your host’s InterfaceAlias and InterfaceIndex.
Get-NetAdapter
Note that your adapter does not have an IP Address object yet. You need to know which one you are going to use. For this tutorial, you are working with the adapter alias of Ethernet.
Retrieving an Address PowerShell IP Configuration (Get-NetIPAddress)
You previously listed all the network interfaces with a single command. But you can also list property values and your host’s current IP address via the Get-NetIPAddress cmdlet.
Run the below cmdlet (without parameters) to display each adapter’s address and PowerShell IP configuration.
Get-NetIPAddress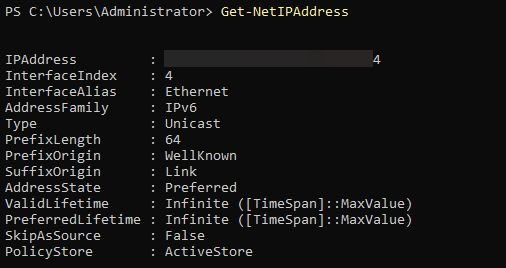
Now, run the following command to narrow the output (Select-Object) to the Ethernet’s InterfaceAlias and IPAddress.
Get-NetIPAddress -InterfaceAlias Ethernet | Select-Object -Property InterfaceAlias,IPAddress
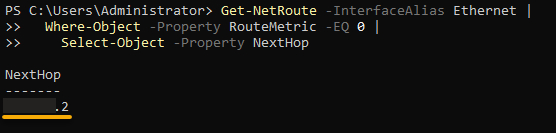
Getting the IP Route Information (Get-NetRoute)
An IP address enables a host to communicate with others on the same network. But what happens when the host needs to communicate outside that network?
A gateway address is necessary, and the Get-NetRoute cmdlet is what you need. This cmdlet provides information that previous cmdlets you have learned about do not.
Run the below Get-NetRoute command to check the current gateway (NextHop) for the Ethernet interface.
Get-NetRoute -InterfaceAlias Ethernet | Where-Object -Property RouteMetric -EQ 0 | Select-Object -Property NextHopTypically, a DHCP server supplies the gateway address. You’ll want to capture this address later for this article.
Getting DNS Server IP Addresses (Get-DnsClientServerAddress)
DNS is necessary for name resolution for both internal and external networks. Without DNS, you would have to remember the internet address for each host on your network.
But chances are that your host has DNS already configured through DHCP. You can use the Get-DnsClientServerAddress cmdlet to verify the current configuration.
Get-DnsClientServerAddressRecord the IP addresses by redirecting the output to a text file or writing them down. You will need to reassign these DNS server addresses later in this tutorial.

Getting IP Network Configurations (Get-NetIPConfiguration)
When you need the information the previous three cmdlets you have learned about in one go, the Get-NetIPConfiguration cmdlet will do the trick. This cmdlet’s one prominent feature is it provides more focused information.
Run the Get-NetIPConfiguration cmdlet below to display the IP network configurations gathered by the previous cmdlets you ran.
Get-NetIPConfiguration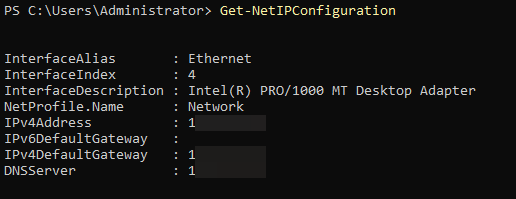
The Get-NetIPConfiguration cmdlet is quicker if you only have one network interface. But if you have more than one network interface, you may have to filter out properties to prevent the console from scrolling.
Configuring IP, Gateway, and DNS Address Manually
With the cmdlets you have learned so far, it is time to put your new knowledge to work. For this tutorial, you will assign a static IP address, gateway, and DNS servers to a Windows Server 2022 host.
The commands from this point forward only change the IP address, gateway, and DNS settings for the specified network adapter. You must repeat these steps for each adapter you want to change.
1. Open PowerShell as administrator, and run the following command to list the network adapters on your server.
Get-NetAdapterFind installed network adapters command
Identify the network adapter that you want to change. You can use the adapter’s name or the index number displayed in the list (i.e., Ethernet).

2. Next, run the below Net-NetIPAddress command to change the IPv4 address of your network adapter. The -PrefixLength of 24 shows that it used the first 24 bits of the IP address for the network portion of the address. Be sure to replace the following accordingly:
AdapterName– The name or index number of your target network adapter.ServerAddress– The IPv4 address to add to the network adapter.GatewayAddress– The gateway address should be in the same subnet as the IPv4 address.
New-NetIPAddress -InterfaceAlias "[AdapterName]" -IPAddress [ServerAddress] -PrefixLength 24 -DefaultGateway [GatewayAddress]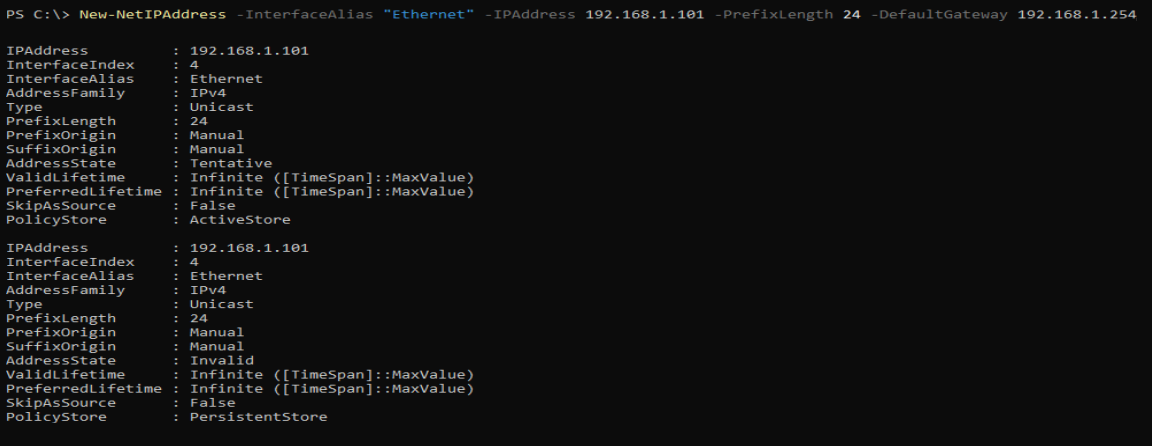
Related to the New-NetIPAddress cmdlet is Set-NetIPAddress, which changes existing IP configuration, while Remove-NetIPAddress expunges a configuration.
3. Now, run the following Set-DnsClientServerAddress command, which does not produce output, but changes the DNS servers. Ensure you replace AdapterName with your network adapter’s name (-InterfaceAlias) or index number (-InterfaceIndex). This command sets the DNS servers for your network adapter to Google’s public DNS servers at 8.8.8.8 and 8.8.4.4. But you can specify any valid DNS server IP addresses you want.
Set-DnsClientServerAddress -InterfaceAlias "[AdapterName]" -ServerAddresses 8.8.8.8, 8.8.4.4Note that with the Set-DnsClientServerAddress cmdlet, you can assign one or more internal or public-facing DNS IP addresses.
4. Lastly, run the below Restart-NetAdapter command, which does not print output to the console but restarts your network adapter and applies the changes. Congratulations! You have just manually configured your network interface with a custom configuration.
Restart-NetAdapter -Name EthernetIf your host only has one adapter, like in this tutorial, you may lose connectivity briefly, depending on how you are connected. This last step is essential to complete to start using the new IP address.
Conclusion
Knowing your network configuration is crucial to keeping a healthy network. The good news is that you learned about four basic network configuration commands available from PowerShell IP configuration cmdlets.
With this newfound knowledge, you can easily create a script using PowerShell IP configuration abilities as part of a broader server configuration process.
What comes next? Why not try adjusting more advanced options like MTU, adding more routes, or resetting an adapter to use DHCP instead of a static address?


