

DNS records are typically managed dynamically by your DNS server. However, at times, you may find that you need to manually create, edit, or remove various types of DNS records. Or to even add various DNS tasks to automation scripts. It is at times like this that using PowerShell DNS cmdlets is the way to go.
Not a reader? Watch this related video tutorial!This blog post has a companion video created by TechSnips contributor, David Lamb. Feel free to have a watch or, if you prefer text, read on!
Viewing DNS Records with PowerShell DNS Cmdlets
You can view all of the resource records for a given DNS zone by simply using the PowerShell DNS cmdlet Get-DnsServerResourceRecord. Using this cmdlet, you can specify the ZoneName parameter which will list all DNS records in that zone.
As you can see below, this generates quite a lengthy list of records.
PS51> Get-DnsServerResourceRecord -ZoneName corp.ad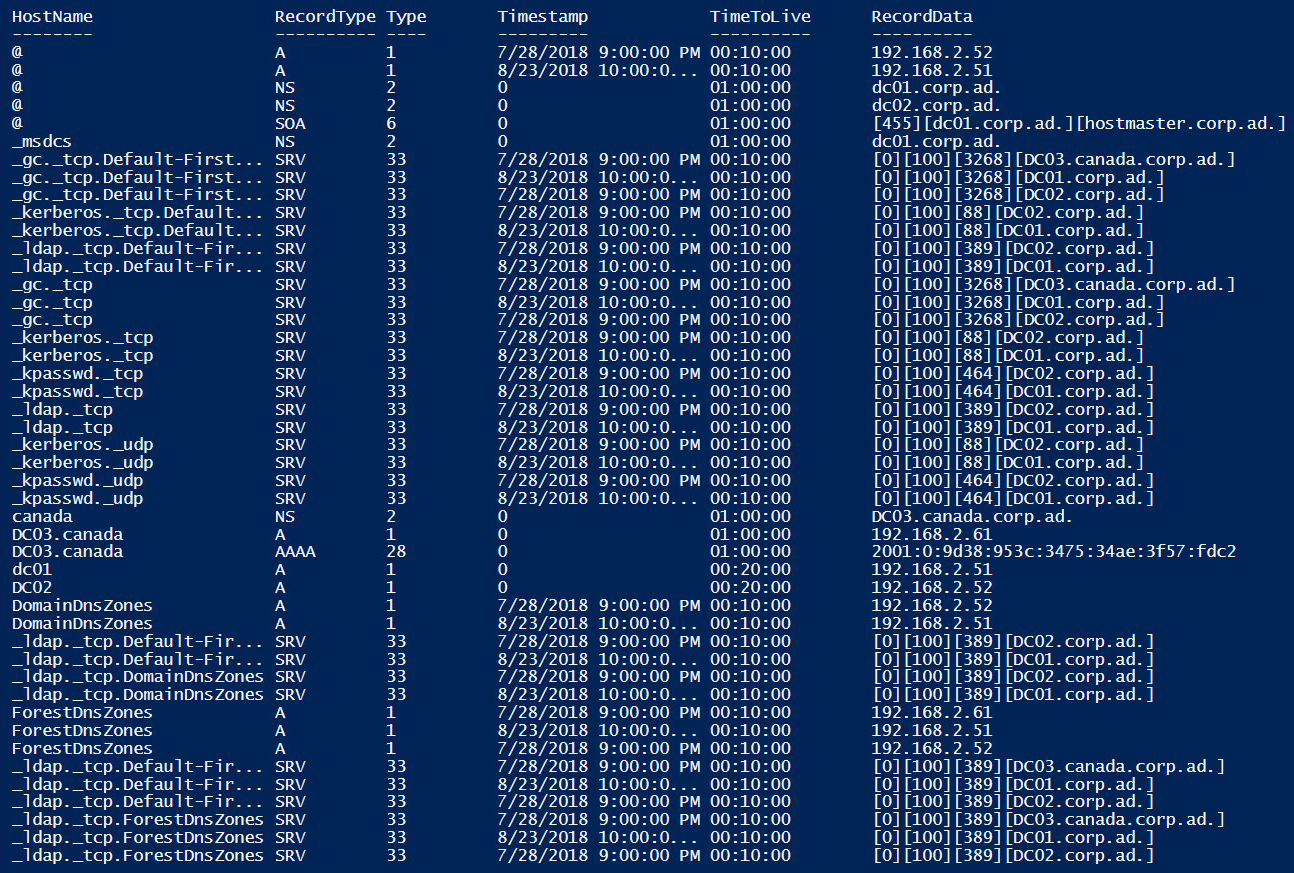
This behavior highlights one of the advantages of this particular cmdlet over the graphical DNS console. The view gives you all of the records for this zone, regardless of which folder they are in. In the graphical console, it would take quite some time to piece this information together.
Now thin out this list a bit. Using the same cmdlet, but adding the RRType parameter to search for A records (IPv4 hosts) and filtering for records where the Time To Live (TTL) is greater than 15 minutes gives us a bit more of a manageable list. You can use the Where-Object cmdlet to filter on many different DNS record properties.
PS51> Get-DnsServerResourceRecord -ZoneName corp.ad -RRType A | Where-Object TimeToLive -GE "00:15:00"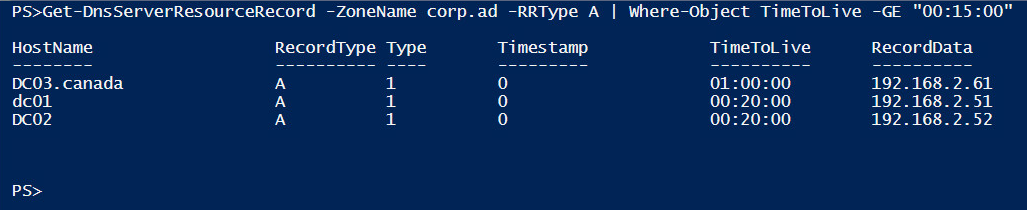
Taking this one step further, you can also search for records in a different DNS zone and even on different DNS servers.
In the example below, we will search for A records in the canada.corp.ad zone on DNS server DC03
PS51> Get-DnsServerResourceRecord -ComputerName DC03 -ZoneName canada.corp.ad -RRType A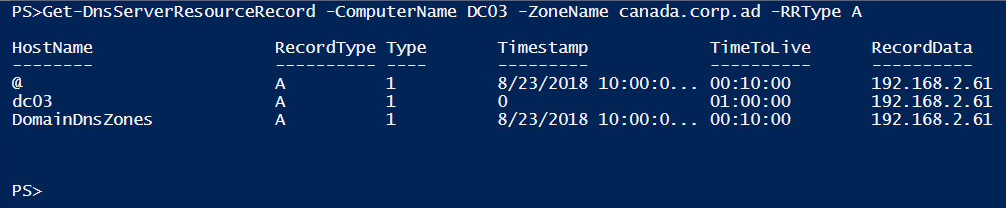
Adding and Removing A Host Records
To add a host record, you will need to use the PowerShell DNS cmdlet Add-DnsServerResourceRecordA. In the example below, you need to add a host record for a new printer that you are adding to the network. It will be added to the corp.ad zone with the name reddeerprint01, and its IP address is 192.168.2.56.
PS51> Add-DnsServerResourceRecordA -Name reddeerprint01 -ZoneName corp.ad -IPv4Address 192.168.2.56
PS51> Get-DnsServerResourceRecord -ZoneName corp.ad -RRType A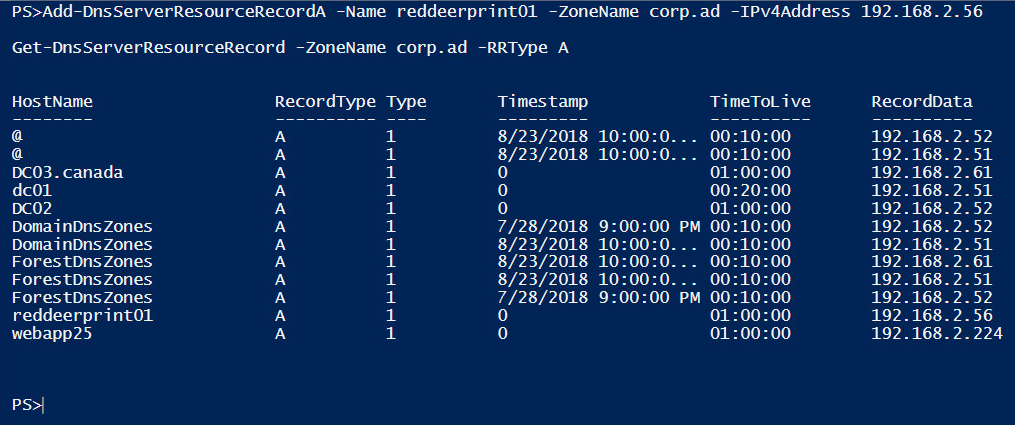
If it turns out that you need to remove a record, perhaps the printer has been decommissioned, you can use the following code to remove the host record that we just created:
PS51> Remove-DnsServerResourceRecord -ZoneName corp.ad -Name reddeerprint01 -RRType AAdding and Removing AAAA Host Records
It is also just as easy to add an IPv6 host record. Of course, these records differ slightly, as they are listed as AAAA records. You may notice that we are now using the PowerShell DNS cmdlet Add-DnsServerResourceRecordAAAA. It’s a subtle change, but an important one.
Add a record to the corp.ad zone for the new IT Intranet server at fc00:0128 and then quickly verify that it has been created with the following command.
PS51> Add-DnsServerResourceRecordAAAA -Name it-intranet -ZoneName corp.ad -IPv6Address "fc00::0128"
PS51> Get-DnsServerResourceRecord -ZoneName corp.ad -RRType AAAA
Adding Reverse Lookup Records (PTR)
Using PowerShell DNS cmdlets, you can also add PTR records. A reverse lookup record allows the client to query a DNS server to request the hostname for a supplied IP address.
Creating a PTR record is a relatively easy process, but there is one important bit of information you will need to know before you start adding PTR records. Reverse lookup zones are not created by default. You will need to set up your reverse lookup zone prior to adding records. Fortunately, it is relatively easy to do.
Creating a DNS Zone
Use the PowerShell DNS cmdlet Add-DnsServerPrimaryZone to create a new DNS zone. In this instance, since you’re creating a reverse lookup zone, provide it with the Network ID.
In this example, I have also chosen to set the replication scope to the entire AD forest, and I have specifically targeted DC03 as the preferred DNS server:
PS51> Add-DnsServerPrimaryZone -ComputerName DC03 -NetworkId "192.168.2.0/24" -ReplicationScope Forest
PS51> Get-DnsServerZone -ComputerName DC03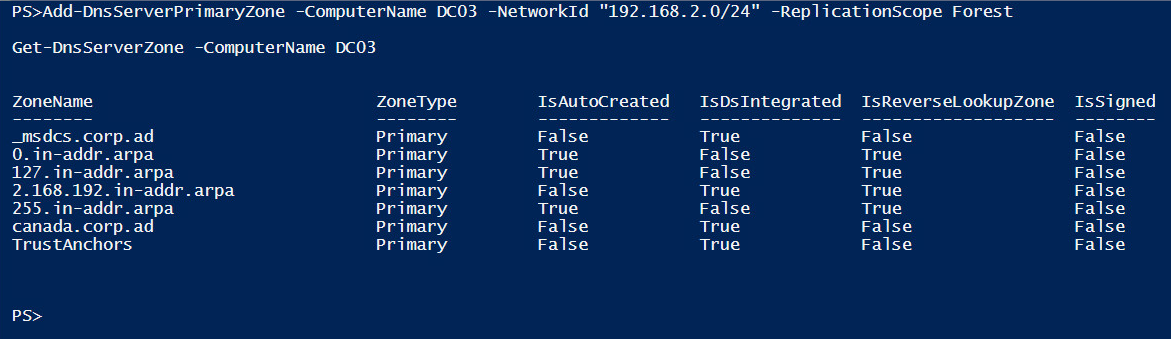
Now that the reverse lookup zone is in place, you can add a PTR record for a new printer called CYQF-Printer-01.canada.corp.ad that has an IP address of 192.168.2.56. As this record is for the canada.corp.ad zone, you will be targeting the DNS server DC03.
Now that the zone is created, let’s create a PTR record using the Add-DnsServerResourceRecordPtr command. When using this cmdlet, it is important to note a couple of things.
- You need to specify the zone name using the network ID in reverse order, then add .in-addr.arpa. So for our 192.168.2.0/24 network ID, the zone name is 2.168.192.in-addr.arpa.
- The
Nameparameter is the host portion of the IP address. For our printer at 192.168.2.56, theNameis 56.
Once you have those pieces of information, the code required to create the PTR record is relatively simple, if a bit long:
PS51> Add-DnsServerResourceRecordPtr `
    -Name "56" `
    -PtrDomainName "CYQF-Printer-01.canada.corp.ad" `
    -ZoneName "2.168.192.in-addr.arpa" `
    -computerName DC03

PS51> Get-DnsServerResourceRecord -ComputerName DC03 -ZoneName "2.168.192.in-addr.arpa"
Adding Alias Records (CNAME)
To finish off this tutorial, create a host alias record or CNAME record using the Add-DnsServerResourceRecordCName cmdlet.
These records allow you to specify an alias for an existing host record in the zone. This becomes especially useful, for example, if you want to provide your finance users with an address for their web-enabled finance app.
You could create an alias called finance, and point it to the webserver webapp25.corp.ad. Once the app is migrated to the new webserver with a new hostname, you’d then change the CNAME record to point finance that points to the new host. This way, the users don’t have to update their bookmarks. They can continue to access their application using the address finance.corp.ad.
PS51> Add-DnsServerResourceRecordCName -ZoneName corp.ad -HostNameAlias "webapp25.corp.ad" -Name "finance"
PS51> Get-DnsServerResourceRecord -ZoneName corp.ad -RRType CName
If you’d like to dive deeper into DNS and see some more advanced capabilities, be sure to check out all of the other DNS posts here.
Summary
This concludes our tutorial on using PowerShell with DNS records. With the knowledge you’ve accumulated here, you should now be able to manage interactively or even automate large swaths of DNS records if you set your mind to it!


