Have you ever wanted to create a PowerShell cmdlet but didn’t know C# or another Microsoft .NET Framework language? Why keep ‘wanting’ when you have PowerShell CmdletBinding at your fingertips?
In this tutorial, you will learn how to use the PowerShell CmdletBinding attribute to enhance functions and make them behave like cmdlets.
Ready? Dig in and make your functions behave like never before!
Prerequisites
This tutorial will be a hands-on demonstration. As long as you have a Windows or Linux PC with PowerShell v5.1 or greater installed, you’re good to go — This tutorial uses a Windows 10 machine with PowerShell v5.1.
Creating a Basic Function to Organize Files with PowerShell
There are cases where you might have so many files of different types in a directory without a good organization. Keeping your files organized is always a good practice, so you’ll create a basic function to move files by file extensions to a specified folder.
A basic PowerShell function is not defined as having just a few lines of code. “Basic” in this context means that the function lacks the features of a PowerShell cmdlet. The function doesn’t have common parameters, and there’s no full control over the parameters available.
1. Open Windows PowerShell ISE as administrator.
2. Copy and paste the code below to the code editor, and run the code. The code below moves all .pdf, .doc, and .txt files on your Desktop to a single folder called Documents.
From this point throughout this tutorial, be sure to replace ADMIN in the Desktop folder path (C:\Users\ADMIN\Desktop\) with your computer username.
Function Group-Files
{
    Param(
    [string]$Path,
    [string]$Folder
    )
    # Check if the destination folder exists. If not, then create it
    If ((Test-Path -Path ($Path + "\" + $Folder)) -eq $False) {
        New-Item -Name $Folder -Path $Path -ItemType Directory
    }
    # Move Items
    Get-ChildItem $Path | ForEach-Object {
				# If the last four characters of the filename ends with .pdf, .doc, .txt
        If ($_.FullName.Substring($_.FullName.Length -4) -in ".pdf", ".doc", ".txt")
				{
            Move-Item -Path $_.FullName -Destination ($Path + $Folder)
        }
    }
}
# Call the Group-Files function
Group-Files -Path C:\Users\ADMIN\Desktop\ -Folder "Documents"
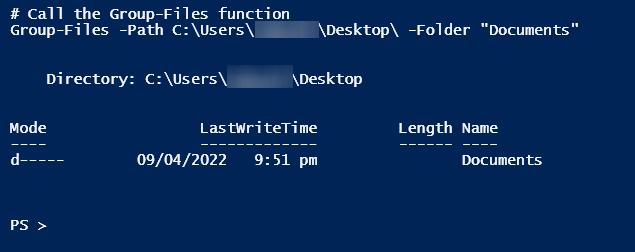
After running the code above, you may have noticed that all the files just moved without asking you to confirm. Moreover, the function didn’t tell you what would happen if you ran the code. You’ll learn more about enhancing the function with CmdletBinding in the following sections.
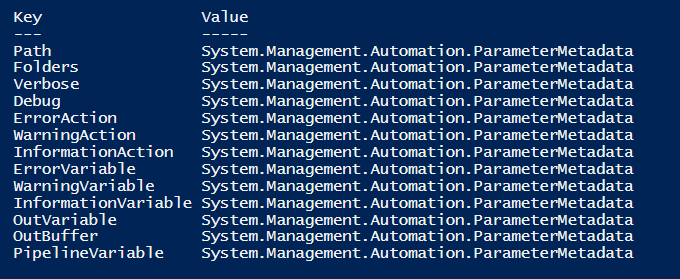
3. Lastly, run the Get-Command below to list all the parameters available for the Group-Files function you created.
(Get-Command Group-Files).Parameters
Gaining Access to Common Parameters with the CmdletBinding Attribute
You’ve seen that a basic function works fine. But perhaps you prefer to make parameters mandatory or add a confirm action dialog box? If so, the CmdletBinding attribute will do the trick! The CmdletBinding attribute allows you to use common parameters available for PowerShell cmdlets.
The following code represents the syntax of the CmdletBindingattribute, including all its arguments.
{
   [CmdletBinding(
        ConfirmImpact=<string>,
				# Default parameter set name you want PowerShell to use
				# if there is no parameter set.
        DefaultParameterSetName=<string>,
				# uri to online help, must begin with http or https
        HelpURI=<uri>,
				# Used when you’re trying to return data from a large database suchas MySQL.
        SupportsPaging=<boolean>,
				# Adds three parameters – First, Skip, and IncludeTotalCount to the function.
        SupportsShouldProcess=<boolean>,
				# positional binding binds positions to parameters
        PositionalBinding=<boolean>) as defined
   ]
	 # It's important to use the Param keyword
   Param ($Parameter1)

   Begin{}
   Process{}
   End{}
}
Now, run the Group-Files function below, adding the CmdletBinding attribute, to give it access to common parameters and display all available parameters.
Function Group-Files
{
    [CmdletBinding()]
    Param(
    [string]$Path,
    [string]$Folder
    )
		#...
}

# Gets all parameters available for the Group-Files function
(Get-Command Group-Files).Parameters
You can now see below that the Group-Files function has more parameters than you previously defined. All the common parameters are now available for the function to use.

Adding -WhatIf Switch to Double-Check Tasks
You’ve seen how a basic function works, but a function is meant for more incredible things. And you can create advanced functions in many ways, like using switch parameters.
Switch parameters in PowerShell allow you to add controls to your functions. If the switch is True, an action will run, and another action will run if the switch is False.
Advanced functions work like PowerShell cmdlets. With an advanced function, you can access all the common parameters available for cmdlets. But as you’ve seen, advanced functions are written in the PowerShell language while cmdlets are written in a Microsoft .NET Framework language, such as C#.
There are only two advanced switches for risk mitigation: WhatIf and Confirm switches. But you’ll start working on the -WhatIf switch in this tutorial. This switch lets you check what will happen (a dry run) if you run a function with high impact.
To see how the switch works, run the following command on PowerShell with the -WhatIf switch. The command displays the “What if” message explaining the operation of running the New-Item command.
New-Item -Name AdamBertram -Path C:\\Users\\ADMIN\\Desktop -ItemType Directory -WhatIf

Now, run the code below with the CmdletBinding added to make the -WhatIf accessible when the function is called.
From this point onwards, you’ll learn how to enhance the Group-Files function progressively and confirm the actions with the Write-Host command. And at the end of this tutorial, you’ll see the final structure of the enhanced function.
Function Group-Files
{   # Set SupportsShouldProcess to True, to make -WhatIf and -Confirm accessible
    [CmdletBinding(SupportsShouldProcess=$True)]
    Param(
    [string]$Path,
    [string]$Folder
    )

    If ($PSCmdlet.ShouldProcess($Path)) {
        Write-Host "WhatIf wasn't used, moving files..."
    }
    Else {
        Write-Host "WhatIf has been used! Doing nothing..."
    }
}
# Calls the Grou-File function
Group-Files -Path C:\\Users\\ADMIN\\Desktop\\ -Folder "Documents" -WhatIf
There is a system variable called $WhatIfPreference, which is set to false by default. But when the variable is true, the Group-Files function will be automatically called with -WhatIf
You can see in the following screenshots that the function prints out two different messages depending on whether you used the -WhatIf switch or not.


Confirming Actions with the -Confirm Switch
Like the -WhatIf switch, the -Confirm switch tells you what a specific function or command will do. But what’s excellent with adding the -Confirm switch in a function is that you’ll get a prompt to confirm the actions to perform.
Adding the -Confirm switch comes in handy when your function is supposed to perform high-risk actions, such as moving or deleting files.
Run the following code to prompt for confirmation (-Confirm) before performing the specified action. The -Confirm parameter only works if SupportsShouldProcess is true, similar to -WhatIf.
Function Group-Files
{
		# Set SupportsShouldProcess to True to make -WhatIf and -Confirm accessibly
    [CmdletBinding(SupportsShouldProcess=$True)]
    Param([string]$Path, [string]$Folders)

    # If the user confirmed Yes, or user didn't use -Confirm
    If ($PSCmdlet.ShouldProcess($Path)) {
        Write-Host "Files Moved"
    }
    # If the user confirmed No
    Else {
        Write-Host "Action Declined"
    }
}

# Calls the Group-Files function
Group-Files -Path C:\\Users\\ADMIN\\Desktop\\ -Folder "Documents" -Confirm
Now, choose an option on whether to perform the action or not. The ShouldProcess method from the $PSCmdlet automatic variable will be used to control if the files are moved or not.

If you choose to confirm the action, you’ll see the message shown below in the PowerShell terminal. Otherwise, you’ll get the message saying “Action Declined” instead.

Setting Impact Levels on Functions
Perhaps you want to set an impact level to your function and not just rely on the -Confirm switch. If so, setting a confirmation impact to your function by adding the ConfirmImpact argument in CmdletBinding will do the trick.
Below is the syntax of the CmdletBinding. The ConfirmImpact argument’s level determines the “destructiveness” of the function’s action to perform.
[CmdletBinding(SupportsShouldProcess=$True, ConfirmImpact='level')]
You can set the ConfirmImpact argument’s level to one of the following:
None– PowerShell will not prompt confirmation for any actions unless you use the-Confirmswitch.Low– Actions with low, medium, or high risk will be automatically confirmed.Medium– The default level of theConfirmImpactargument, where PowerShell prompts confirmation for actions with medium or high risk, such as deleting files.High– PowerShell prompts the user as if the function was called with the-Confirmparameter.
Now, run the code below to see how the ConfirmImpact argument and the preference $ConfirmPreference variable work side-by-side.
The action of ConfirmImpact depends on the $ConfirmPreference variable’s value. You’ll get a confirmation prompt if you set the ConfirmImpact level equal to or greater than the $ConfirmPreference variable’s value.
$ConfirmPreference='High' # Sets confirmation preference
Function Group-Files
{
		# Sets -WhatIf, -Confirm and ConfirmImpact accessible
    [CmdletBinding(SupportsShouldProcess=$True, ConfirmImpact='High')]
    Param([string]$Path, [string]$Folders)

    # If the user confirmed Yes, or user didn't use -Confirm
    If ($PSCmdlet.ShouldProcess($Path)) {
        Write-Host "Files Moved"
    }
    # If the user confirmed No
    Else {
        Write-Host "Action Declined"
    }
}

# Calls the Group-Files function
Group-Files -Path C:\\Users\\ADMIN\\Desktop\\ -Folder "Documents"
Since the ConfimImpact level is equal to the $ConfirmPreference variable value, PowerShell prompts for confirmation even without using the -Confirm switch, as shown below.

Displaying More Information with Write-Verbose Statements
Apart from the parameters you’ve seen in the previous examples, CmdletBinding provides many other common parameters, like -Verbose.
The -Verbose parameter displays more information about what is being done in the code. But how do you utilize it in your function? By adding Write-Verbose statements in your function.
Run the code below to see how Write-Verbose statements work on functions to display messages.
Function Group-Files
{
    [CmdletBinding(SupportsShouldProcess=$True)]
    Param([string]$Path, [string]$Folder)

		Write-Verbose "Creating the folder if it doesn't exist..."

    # If the user confirmed Yes, or user didn't use -Confirm switch
    If ($PSCmdlet.ShouldProcess($Path)) {
        Write-Host "Files will be moved"
				Write-Verbose "Moving files..."
    }
    # If the user confirmed No
    Else {
        Write-Host "Files will not be moved"
    }
}

# Calls the Group-Files function
Group-Files -Path C:\\Users\\ADMIN\\Desktop\\ -Folder "Documents"
You can see below that PowerShell displays the VERBOSE messages in the output when the function is called with the -Verbose parameter.
Printing verbose messages while the functions run is helpful for troubleshooting if anything goes wrong since you know precisely what the function is currently doing beforehand.

One key thing to note is that while cmdlets are available everywhere, advanced functions can only be accessed in the current session. And you can only use a few automatic variables in an advanced function. For example, the $args automatic variable is unavailable for an advanced function.
Controlling Parameters with the Parameter Attribute
The Group-Files function has just two parameters, and that’s all the function needs. But explicitly defining the behavior of the two parameters is good practice.
For instance, running the Group-Files function will not work without parameters, so you’ll set the $Path parameter as mandatory. At the same time, you’ll set a default value for the $Folders parameter.
Below is the syntax for the Parameter attribute and all its arguments.
Param
(
    [Parameter(
        Mandatory=<Boolean>,
        Position=<Integer>,
        ParameterSetName=<String>,
        ValueFromPipeline=<Boolean>,
        ValueFromPipelineByPropertyName=<Boolean>,
        ValueFromRemainingArguments=<Boolean>,
        HelpMessage=<String>,
     )]
    [string[]]
    $Parameter1
)
Now, run the following code to make the $Path parameter mandatory.
Function Group-Files
{
		[CmdletBinding(
				SupportsShouldProcess=$True # Since you're using the common parameters
		)]
    Param(
		[Parameter(
        Mandatory=$True,
        Position=0,
				# Since the Path parameter can also get its value from a pipeline input,
				# provide access to the pipeline input
        ValueFromPipeline=$True,
        ValueFromPipelineByPropertyName=$True
     )]
    [string]$Path,

    [Parameter(
				Mandatory=$False,
				Position=1
		)]
    [string]$Folder = "Documents" # Default value of $Folder parameter
    )

    # If the user confirmed Yes, or user didn't use -Confirm
    If ($PSCmdlet.ShouldProcess($Path)) {
        Write-Host "Files will be moved"
				Write-Verbose "Moving files..."
    }
    # If the user confirmed No
    Else {Write-Host "Files will not be moved"}
}

# Calls the Group-Files function without the -Path parameter
Group-Files -Folder "Documents"

Parameter attribute and all its arguments.Improving Functions with CmdletBinding and Parameter Attributes
Up to this point, you’ve experimented with the CmdletBinding and Parameter attributes, so it’s time to add the finishing touches to the Group-Files function. You’ll use all necessary arguments and attributes to improve the function.
Moreover, you’ll add the validation attributes below to ensure the user inputs the correct values for the parameters.
ValidateScript– Used for the$Pathparameter to make sure the path is a folder and not a file.ValidateCount– Ensures the minimum and maximum arguments for$Folder.
Run the following code containing all the necessary details for the Group-Files function to work more like an advanced function.
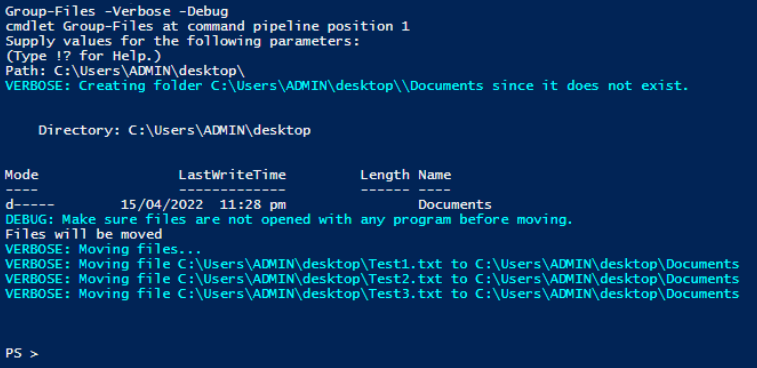
The code below checks your Desktop for files ending in .doc, .pdf, or .txt and asks for confirmation before moving them to the Documents folder.
Function Group-Files
{
    [CmdletBinding(
        SupportsShouldProcess=$True, # Allows the use of -Confirm and -Whatif
        PositionalBinding=$True, # Binds Path and Folder by their position
        ConfirmImpact="Medium" # Confirms before moving files
    )]
    Param(
    [Parameter(
        Mandatory=$True,
        ValueFromPipeline=$True,
        ValueFromPipelineByPropertyName=$True,
        HelpMessage="Enter a source folder path"
     )]
  	# Validate the path is a folder and not a file
    [ValidateScript({Test-Path $_ -PathType Container})]
    [String]$Path,

    [Parameter(
        Mandatory=$False,
        HelpMessage="Enter a destination path"
     )]

    [ValidateCount(1,1)] # Must provide 1 argument/folder name
    [String]$Folder = "Documents"
    )
		Begin {
	    # Uncomment the line below to activate -whatif
	    # $WhatIfPreference = $True

	    # Uncomment the line below not to ask for confirmation when moving each file
			# $ConfirmPreference = "High"
		}

		# Contains the main part of the function
	  Process {
        # Check if folders exist. If not, then create them
        If ((Test-Path -Path ($Path + "\\" + $Folder)) -eq $False) {
            #Write-Host ($Path+"\\"+$_) does not exist!
            Write-Verbose "Creating folder $($Path+"\\"+$Folder) since it does not exist."
            New-Item -Name $Folder -Path $Path -ItemType Directory
        }
        # Debug message
        Write-Debug "Make sure files are not opened with any program before moving."
        # If the user confirmed Yes, or user didn't use -Confirm
        If ($PSCmdlet.ShouldProcess($Path)) {
            Write-Host "Files will be moved"
            # Get all the files in the $Path directory
						Write-Verbose "Moving files..."
            Get-ChildItem $Path | ForEach-Object {
		        # Documents
		        If ($_.FullName.Substring($_.FullName.Length -4) -in ".pdf", ".doc", ".txt") {
								Write-Verbose "Moving file $($_.FullName) to $($Path + $Folder)"
		            Move-Item -Path $_.FullName -Destination ($Path + $Folder)
								}
            }
        }
        # If the user confirmed No
        Else {
            Write-Host "Files will not be moved"
        }
    }
}
# Call the Group-Files function
Group-Files -Verbose -Debug

Conclusion
This tutorial aims to teach you how to enhance a basic function. Did it do well? You’ve progressively created advanced functions and gained features of compiled cmdlets. And at this point, you can already create your own cmdlets with PowerShell functions.
Now, why not enhance the functions in your old scripts to make them advanced!


