


Do you use PowerShell to create, read, update, and delete files? If so, you’ve probably experienced errors when the target files don’t exist or already exist. Lucky for you, there are ways in PowerShell to check if a file exists before doing anything to it.
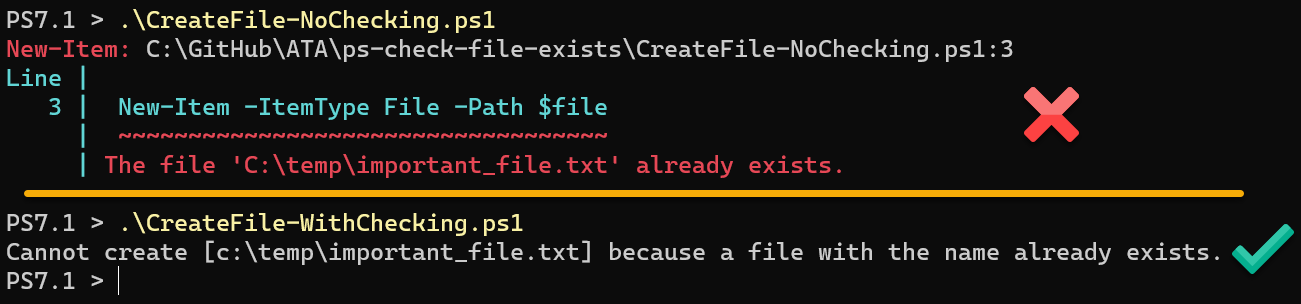
Not a reader? Watch this related video tutorial!For example, instead of letting your code create the file right away, it’s better to test that the file already exists. As shown in the screenshot below, you can write better code and achieve clear output.
In this article, you’ll learn the different ways to use PowerShell to check if a file exists. You’ll also learn how to use each of these ways to produce better code and results with error handling logic.
Prerequisites
Reduce service desk calls & update cache credentials for remote users even off VPN with a self-service password reset solution. Get a Demo of Specops uReset!
This article is a how-to guide in which you’ll learn from different examples. And to follow the examples, you will need the following:
- Code editor. The recommended ones are Visual Studio Code and Atom, which work across platforms. You can also use Windows PowerShell ISE if you’re working on a Windows computer.
- Windows PowerShell 5.1 (Desktop) or PowerShell 7.1 (Core). The commands and scripts in this article apply to both PowerShell editions. Whether you’re using Windows, Linux, or macOS, you’ll be fine as long as you have PowerShell installed.
Related: How to Download and Install PowerShell 7 on Windows, Linux, and macOS
Using PowerShell to Check If File Exists
This article covers three methods with which to use PowerShell to check if a file exists. Using these three methods differ in usage, but the concept and end goal are the same. These three ways are:
Test-PathCmdlet.Get-ItemandGet-ChildItemCmdlet.System.IO.FileClass.
There will be examples and demos of each of these three methods, including how to use them with error handling.
Using Test-Path
The first way is the Test-Path cmdlet, specifically designed to determine whether a path or file exists. When using this cmdlet to test whether a file exists, the result is true or false. The result indicates whether the file exists or not.
Below is the basic syntax to make the Test-Path cmdlet work with checking a file.
Test-Path -Path <PATH to FILE> -PathType LeafFor example, if you need to check such a file with the name C:\temp\important_file.txt exists, use the code below. Note that the -PathType Leaf part tells the cmdlet to check for a file and not a directory explicitly.
Test-Path -Path C:\temp\important_file.txt -PathType LeafWhen you run the command above in PowerShell, the result returns True if the file exists. Otherwise, the result would be False, as you can see from the screenshot below.

Related: How to Use the PowerShell Test-Path Cmdlet
Example: Creating A File If The File Does Not Exist
This example is a typical use-case to create files at a specified location. To avoid the “file already exists” error, the script checks if the file already exists before creating it. If the file exists, the script shows a message and does not attempt to make the file anymore.
Copy the code below and save it in a file called Create-NewFile.ps1. Make sure to change the value of the $path variable should you want to change the file’s output location. After saving the script, run it in PowerShell to test.
# Create-NewFile.ps1

# Full path of the file
$file = 'c:\temp\important_file.txt'

#If the file does not exist, create it.
if (-not(Test-Path -Path $file -PathType Leaf)) {
     try {
         $null = New-Item -ItemType File -Path $file -Force -ErrorAction Stop
         Write-Host "The file [$file] has been created."
     }
     catch {
         throw $_.Exception.Message
     }
 }
# If the file already exists, show the message and do nothing.
 else {
     Write-Host "Cannot create [$file] because a file with that name already exists."
 }
The screenshot below shows the two different outputs. The first is when running the script while the file does not exist. The second is after creating the file, and it already exists.

Related: Back to Basics: How to Run a PowerShell Script
Using Get-Item and Get-ChildItem
The Get-Item cmdlet’s purpose is to get the item at a specified location. In comparison, the Get-ChildItem cmdlet is to get the items and child items in one or more specified locations. The functionality of these two cmdlets is not explicitly to check if files exist.
What happens when you use Get-Item or Get-ChildItem to get an item that does not exist? You’ll get an error for each missing file. Take the commands below as an example.
$file = 'c:\temp\important_file.txt'
Get-Item -Path $file
Get-ChildItem -Path $file
Suppose the file c:\temp\important_file.txt does not exist. Each of the commands above returns an error. As you can see from the example below, the error message for both commands is the same.

Example: Archiving The Existing File And Creating A New File
In this example, the script uses the Get-Item and Test-Path cmdlets. The logic of this script is to do the following:
- Test if the archive folder exists using
Test-Path.- If the archive folder does not exist, the script creates a new archive folder in this format –
yyyy-MMM-dd_hh-mm-ss-tt. - Then, the script moves the old file to the archive folder.
- If the archive folder does not exist, the script creates a new archive folder in this format –
- Test if the file already exists using
Get-Item.- If the file exists, the script moves it to the archive folder first. Then the script creates the new file in the original location.
- If the file does not exist, the script creates the new file.
Copy the code below and save it as Create-NewFileAfterArchive.ps1. After saving the script, run it in PowerShell and verify the results.
# Create-NewFileAfterArchive.ps1

# Full path of the file
$file = 'c:\temp\important_file.txt'

#Full path to the archiving folder
$archiveFolder = "c:\temp\archive_$(get-date -Format 'yyyy-MMM-dd_hh-mm-ss-tt')\"

# If the file exists, move it to the archive folder, then create a new file.
if (Get-Item -Path $file -ErrorAction Ignore) {
    try {
        ## If the Archive folder does not exist, create it now.
        if (-not(Test-Path -Path $archiveFolder -PathType Container)) {
            $null = New-Item -ItemType Directory -Path $archiveFolder -ErrorAction STOP
        }
        ## Move the existing file to the archive.
        Move-Item -Path $file -Destination $archiveFolder -Force -ErrorAction STOP
        Write-Host "The old file [$file] has been archived to [$archiveFolder]"
     } catch {
        throw $_.Exception.Message
     }
 }
 Create the new file
 try {
     $null = New-Item -ItemType File -Path $file -Force -ErrorAction Stop
     Write-Host "The new file [$file] has been created."
 } catch {
    Write-Host $_.Exception.Message
 }
Tip: The
-ErrorAction Ignoreparameter suppresses the error (will not show in the console) and also does not record the error to the$errorautomatic variable.
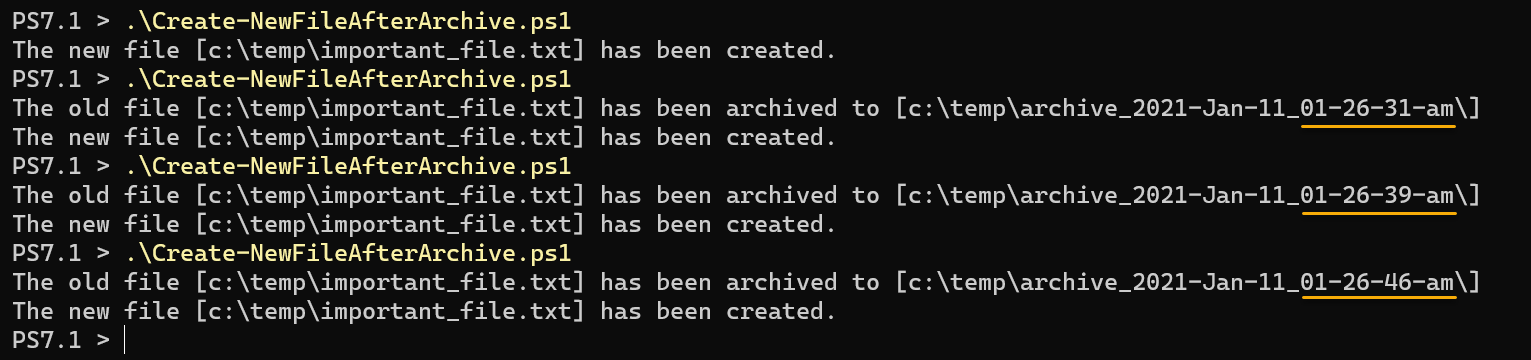
In the screenshot below, the first script run created the file c:\temp\important_file.txt. The succeeding script executions created a new archive folder each time, moves the existing file to the archive folder, and then creates a new file in c:\temp\important_file.txt.
Using [System.IO.File]::Exists() .NET Method
The last method to learn in this article is the System.IO.File .NET class, specifically the Exists() method. One of PowerShell’s strengths its ability to import and use .NET classes and methods.
For example, to use Exists() method in PowerShell to check if a file exists, use the code below.
[System.IO.File]::Exists("PATH")The above method produces a boolean result – true or false. If the result returns true, it means that the target file exists. Otherwise, the result returned is false when the target file does not exist.
In the example code below, the command checks for the existence of the file c:\temp\important_file.txt.
$file = 'c:\temp\important_file.txt'
[System.IO.File]::Exists($file)
As you can see from the result below, the result returns true, confirming that the file exists.

With this .NET method, you can also use ternary operations such as the example below. Instead of showing the default true or false results, you may customize the result message with a shorter implementation. However, the ternary operator in this example only applies to PowerShell 7+.
$file = 'c:\temp\important_file.txt'
[System.IO.File]::Exists($file) ? "The file exists." : "The file does not exist."
Example: Updating The File Contents If The File Exists
This example script updates the text file by appending a new GUID value. However, the content update only happens if the file exists. Otherwise, the script shows a message and does nothing else.
Copy the script below and save it as Update-FileContents.ps1. Change the file path value of the $file variable if you need to. Then run the script in PowerShell to test.
# Update-FileContents.ps1

#Full path of the file
$file = 'c:\temp\important_file.txt'

# If the file exists, append a new GUID value in the file.
if ([System.IO.File]::Exists($file)) {
    try {
        $newValue = ((New-Guid).Guid)
        Add-Content -Path $file -Value $newValue -ErrorAction STOP
        Write-Host "The file [$file] has been updated with [$newValue]"
     } catch {
        throw $_.Exception.Message
     }
 }

# If the file does not exist, show a message and do nothing.
 else {
     Write-Host "The file [$file] could not be updated because it does not exist."
 }
You can see in the screenshot below, the script updated the file during each run. The update happened because the [System.IO.File]::Exists() method confirmed that the file c:\temp\important_file.txt exists.
In the end, using the command gc c:\temp\important_file.txt to read the contents of the file confirmed that the script updated the file with the GUID values.
![Using [System.IO.File]::Exists() .NET Method in PowerShell](https://adamtheautomator.com/wp-content/uploads/2021/01/Untitled-2021-01-12T151948.130.png)
Related: Using PowerShell Data Types Accelerators to Speed up Coding
Conclusion
Reduce service desk calls & update cache credentials for remote users even off VPN with a self-service password reset solution. Get a Demo of Specops uReset!
In this article, you’ve learned that there’s more than one way to use PowerShell to check if a file exists. It is good practice to check the presence of a file before making any file-related modifications.
You’ve learned about using the cmdlets Get-Item, Get-ChildItem, and Test-Path. As well as the [System.IO.File]::Exists() .NET method. The examples showed you how to use techniques and how to combine them with error-handling logic.
Stop enduring those error messages. Overcome them by adding code to check if a file exists before any file-related operations. The techniques you’ve learned here only cover the basics, and it’s up to you now to improve upon them.


