

In Windows, changing directories is a fundamental part of file management, but would you settle for writing full paths of each directory you visit? Luckily, PowerShell change directory commands can make your life easier.
In this tutorial, you will explore the commands available to change directories in PowerShell, helping you navigate your file system effortlessly.
Read on and master the basics of file system navigation with PowerShell today!
Prerequisites
This tutorial will be a hands-on demonstration. To follow along, ensure you have a Windows system with PowerShell installed. This tutorial uses Windows 10 and PowerShell v7.
Switching from One Drive to Another
Each storage device, such as a hard disk or USB drive, is assigned a drive letter (i.e., C:, D:, E:, …Z:). When you open a PowerShell window, the prompt is in your user profile directory on the current drive by default.
Suppose you need frequent access to files or folders stored on a different drive than the one you are currently on. If so, switching from one drive to another is necessary.
To see how to switch from one drive to another:
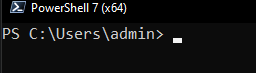
1. Open PowerShell and confirm if the prompt says C:\Users\admin. If so, then you are currently on the C: drive in the admin user’s profile directory, as shown below.
2. Next, open another PowerShell session, but this time, as an administrator.
Below, the prompt starts in a different default directory than launching PowerShell as a regular user. Specifically, the prompt starts in the System32 directory within the Windows directory on the current drive (C:), as shown below.
This default behavior prevents non-administrative users from accidentally modifying critical system files or running sensitive tools.

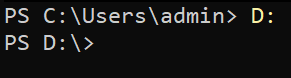
3. Run the below command to change the current drive to D: (or to any available drive). This syntax is a quick way to navigate between different drives in PowerShell.
D:When switching drives in PowerShell with this method, the prompt changes to the root directory of the new drive, as in the output below.
As you can see, regardless of the default directory that PowerShell starts in, you always can switch to another drive.
4. Now, run the below command to attempt switching to the D:\Kitty directory (or to any other subdirectory).
D:\KittyDid you get the same error as below? This error shows since you cannot switch to subdirectories (for example, D:\Kitty) in one go by this method.
Jump to the following section to see how to switch to subdirectories.

Navigating the File System via the cd Command
Navigating multiple subdirectories is a common task in PowerShell. But is there a quick way to navigate through different subdirectories? Yes! The cd command, short for “change directory,” lets you quickly switch to another subdirectory regardless of your current directory.
Back in the day, the
cdcommand was used to navigate between drives and directories in the Command Prompt. Microsoft made thecdcommand backward compatible so you can still navigate between directories in PowerShell.
Read on and see how to navigate your file system with the cd command.
Moving to a Directory in a Different Drive
Jumping to a subdirectory within a different drive may seem like a hassle if you think about it. Well, there is no need to overthink it. You will be surprised how quickly the cd command lets you jump to another drive while moving into one of its directories.
Run the below command to navigate to the subdirectory called Kitty in the D:* drive.
cd D:\Kitty
Moving One to Many Levels Up in the Directory Hierarchy
With file system management, or when working on a project, you may frequently need to move up one or two levels from your current directory. The cd command supports the .. notation that lets you effectively switch to the parent directory of your current directory.
This feature lets you move up a level in your file system without specifying the full path to the parent directory.
1. Run the cd command below, append a space and the .. notation, which tells PowerShell to go up one level in the directory hierarchy.
The space character after the
cdcommand is not required, as the command will work fine without it. But adding a space is a common practice for better readability and consistency with other commands.
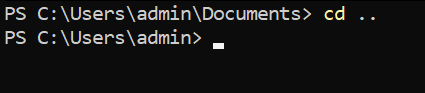
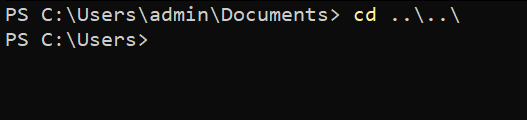
cd ..In the output below, you can see the prompt moves up one level from the C:\Users\admin\Documents to the C:\Users\admin directory. Mind you that you did not have to specify the full path for the C:\Users\admin directory to move up.
2. Instead of moving one level up, run the following command with two .. notations, appending a backslash (\) at the end of each. Doing so lets you move up two levels in the directory hierarchy.
cd ..\..\Below, the output shows you jumped from the C:\Users\admin\Documents straight to the C:\Users directory.
3. Lastly, run the command below to move to the root directory of your current drive.
If you got lost in your file system, this command comes in handy as you can quickly jump to the root directory. This command saves your the hassle of running the cd .. command multiple times.
cd \
Moving Into a Specific Subdirectory
Like moving a level up in the directory hierarchy, moving into a specific subdirectory is also a quick task. Since there might be many subdirectories, appending notations like the previous ones (.., and ..\) will not work, you must specify the subdirectory’s name.
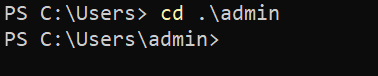
Run the below command to move into one of the subdirectories (\admin) in your current directory (.).
cd .\adminNotice below that you saved time and effort since you did not have to specify the full path of the C:\Users\admin directory.
Navigating the File System with PowerShell Cmdlets
Although the cd command undoubtedly works in PowerShell, Microsoft has introduced many cmdlets, like Set-Location, that let you navigate through your file system.
These cmdlets provide more robust functionality than the cd command that you can use to switch between drives, navigate stacked locations, and cycle through directories in the location history.
Stay tuned and witness how powerful PowerShell cmdlets are in navigating your file system.
Setting a Location from a Different Drive
Like the cd command, the Set-Location cmdlet allows you to jump from one directory to another and navigate straight to one of its directories. But since you are using a PowerShell cmdlet, you must append the -Path parameter to set the path of your target location.
The Set-Location cmdlet sets the current working directory to a specified location. That specified location can be one of the following:
- A directory, or subdirectory on the local file system.
- Any other location supported by a provider in PowerShell.
- Or a registry location.
To see how the Set-Location cmdlet works in navigating your file system:
Run the below command to navigate to the Kitty directory in your D: drive specified in the -Path parameter.
Set-Location -Path "D:\Kitty"
If you feel a bit lazy typing the full
Set-Locationcmdlet, you can also use one of its aliases, likechdirandsl, to navigate your file system. Aliases provide a more convenient way to access frequently used commands.
Now, run the below command to set the working location to a specific registry location. In this case, the HKLM:\ path (a shorthand) refers to the HKEY_LOCAL_MACHINE hive in your Windows Registry.
This command sets the working location to the root of the HKEY_LOCAL_MACHINE hive in the registry. Navigating to a registry allows you to access and modify its subkeys and values via other PowerShell commands.
Set-Location -Path "HKLM:\”
Switching Between Stacked Locations (Push and Pop)
Quickly accessing stacked locations sounds convenient. But is it possible? Yes! The Push-Location and Pop-Location cmdlets let you push and pop locations in a last-in-first-out (LIFO) order from a named stack.
To navigate stacked locations, follow these steps:
1. Run the below Push-Location command to push your current location to a stack called Paths and set the C:\Program Files\PowerShell\ directory as the current directory.
Push-Location -Path 'C:\Program Files\PowerShell\' -StackName "Paths"
2. Next, run the command below to push your current location (C:\Program Files\PowerShell\) to the top of the same Paths stack.
Push-Location -Path 'C:\Program Files\WindowsPowerShell\' -StackName "Paths"
3. Run each command below to set Paths as the default stack and view (Get-Location) the stacked locations.
# Sets the Paths stack as default
Set-Location -StackName "Paths"
# View all stacked paths in the default stack
Get-Location -Stack
Below, you can see you currently have two locations stacked, where the last location you pushed is at the top.

4. Now, run the following Pop-Location command twice to pop the top stacked location from the default stack, which currently is the Paths stack.
Pop-Location
Note that popping the location from the stack removes the location from the stack. The error below indicates that you have popped all stacked locations from the default stack.

Navigating to a Directory Stored in a Variable
You have gone through different ways to navigate directories in your file system. But what if you need to navigate a specific location frequently? Typing full paths multiple times or cycling through the location history can be tedious. Why not store a directory’s full path in a variable instead?
With a declared variable, you can navigate to your target directory without specifying the path off the top of your head.
1. Run the below commands to store the C:\Program Files\PowerShell\ directory to the $psh variable, and set that location ($psh) as the current directory.
# Store a directory path to a variable
$psh = 'C:\Program Files\PowerShell\'
# Set the directory from the $psh variable as the current directory
Set-Location -Path $psh
The output below confirms successful directory change using a variable. Regardless of your current directory, you can quickly navigate to the C:\Program Files\PowerShell\ directory via the $psh variable.
But note that this method only works for the current PowerShell session unless you persist the variable, as demonstrated in the following step.

2. Next, run the below commands, which do not provide output, but persist the ev_psh variable as an environment variable (SetEnvironmentVariable) with the value of the directory’s full path.
# Add psh as an environment variable
[System.Environment]::SetEnvironmentVariable('ev_psh', 'C:\Program Files\PowerShell\', 'Machine')
# Reload the newly-added environment variable (ev_psh)
$Env:ev_psh = [System.Environment]::GetEnvironmentVariable("ev_psh","Machine")3. Lastly, run the below command to set the value from the ev_psh environment variable as the current directory. Ensure that you are in a different directory than the one in your ev_psh variable.
Set-Location -Path $env:ev_psh
Cycling Through Directories in PowerShell’s Location History
Another quick way to cycle through directories in PowerShell is using the location history. The -Path parameter tells the Set-Location cmdlet to navigate to another directory from the location history (previous and following), depending on the specified value (- or +).
To cycle through directories in PowerShell’s location history:
Run the following commands set locations from the history as the current directory. The + character takes you forward in location history, while the - character takes you back.
# Sets the system root directory as the current directory
Set-Location -Path $env:SystemRoot

# Navigates back to the previous directory in history (certificate provider)
Set-Location -Path -

# Navigates back to the previous directory in history again (system root directory)
Set-Location -Path -

# Navigates forward to the following working directory in history (certificate provider)
Set-Location -Path +

# Navigates forward to the following working directory in history (HKEY_LOCAL_MACHINE hive)
Set-Location -Path +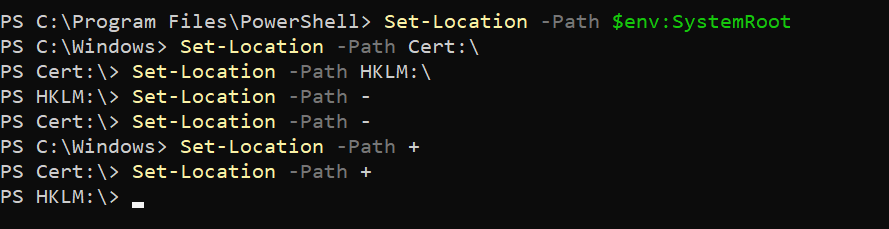
Conclusion
File system navigation can be tricky when your options are limited. But with PowerShell change directory commands, like Set-Location, you have plenty of options. How you wish to navigate your file system more efficiently is entirely up to you.
In addition, mastering the use of Push-Location and Pop-Location to save and recall recent locations is a valuable skill.
These techniques allow you to move quickly and seamlessly through directories and locations in PowerShell. But to further improve, why not consider learning about additional commands, like Get-ChildItem, which can save you plenty of time in your daily tasks?


