@(
	[pscustomobject]@{
		FirstName = 'Joe'
		LastName = 'Jones,Barrett'
		Address = '453 1st St'
		City = 'Phoenix'
		State = 'AZ'
	},
	[pscustomobject]@{
		FirstName = 'Jose'
		LastName = 'Melindez'
		Address = '5663 Main St'
		City = 'Atlanta'
		State = 'GA'
	}
) | Export-Csv -Path ~Employees.csvGet-Content -Path ~Employees.csv
Get-Content cmdlet. This cmdlet isn’t smart; it reads a text file by default and barfs out the content as an array of strings. Let’s check out the type of object Get-Content returns for each CSV row.
Get-Content -Path ~Employees.csv | Get-Member
,(Get-Content -Path ~Employees.csv) | Get-Member
Get-Content -Path ~/Employees.csv | Select-Object -First 1
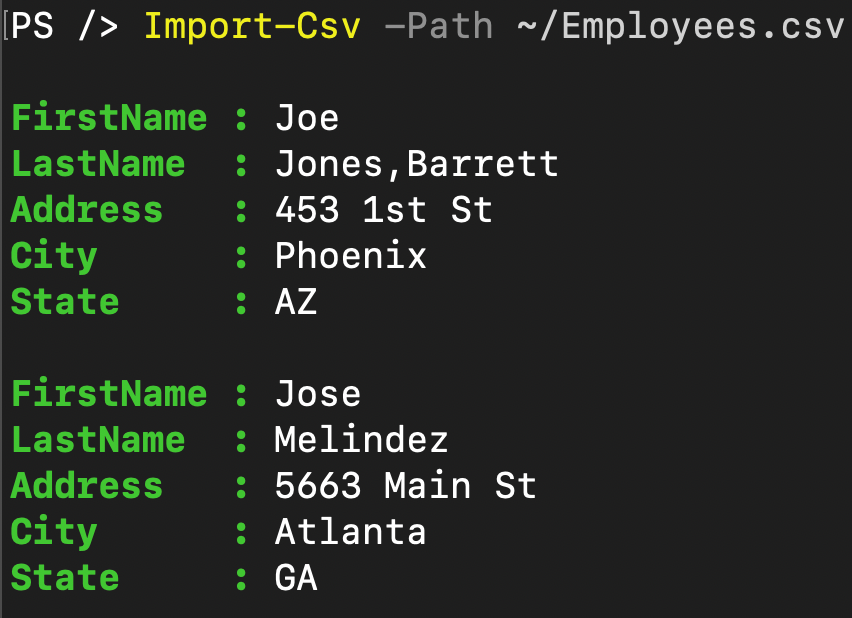
Import-Csv cmdlet.
Import-Csv -Path ~/Employees.csv
Import-Csv -Path ~/Employees.csv | Get-Member
System.Management.Automation.PSCustomObject; not just a string. The Import-Csv cmdlet knew the CSV file’s structure and was able to convert it to a set of PSCustomObjects.
Get-Content -Path ~Employees-withcommasnoquotes.csv
Jones,Barrett. That comma is actually part of Joe’s name. The value Barrett is not his address.
@(
	[pscustomobject]@{
		FirstName = 'Joe'
		LastName = 'Jones,Barrett'
		Address = '453 1st St'
		City = 'Phoenix'
		State = 'AZ'
	},
	[pscustomobject]@{
		FirstName = 'Jose'
		LastName = 'Melindez'
		Address = '5663 Main St'
		City = 'Atlanta'
		State = 'GA'
	}
) | Export-Csv -Path ~Employees.csv

(Get-Content -Path ~Employees.csv).replace('"','') | Set-Content -Path ~Employees-withcommasnoquotes.csvImport-Csv handles this.
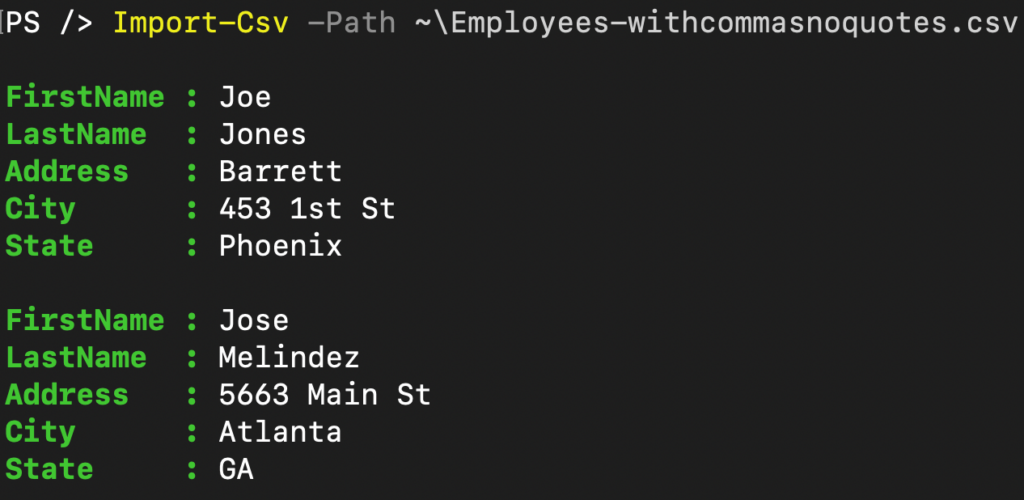
Import-Csv -Path ~Employees-withcommasnoquotes.csv
LastName field are wrong. Import-Csv is using that comma in his name as a field delimiter. And this is where the quotes come in. Quotes define the entirety of a field, the delimiter tells Import-Csv where a field ends and begins.
Import-Csv cmdlet doesn’t like that.
Import-Csv ~/Employeeswithtabs.csv
Import-Csv hasn’t transformed each line into an object. That’s because it was looking for a comma as a field delimiter. If I look at this file…
Get-Content ~/Employeeswithtabs.csv
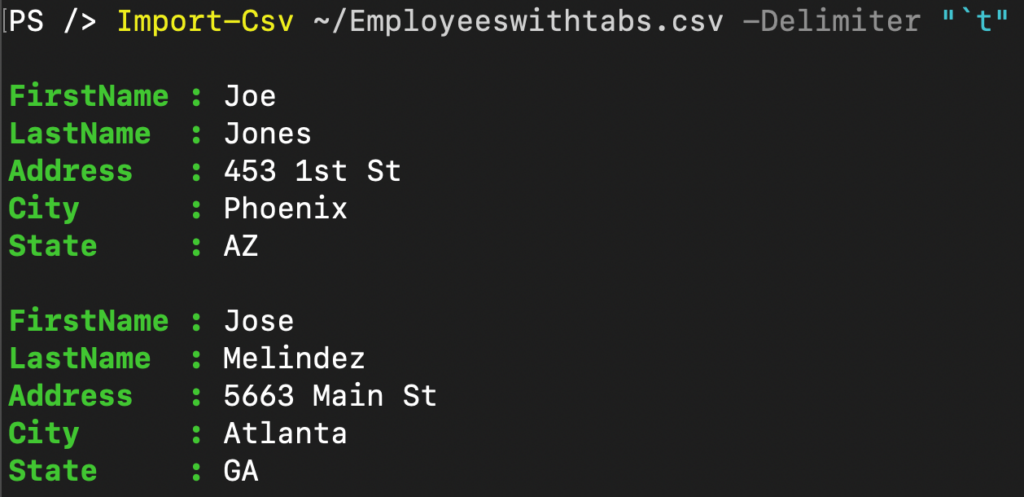
Delimiter parameter.
Import-Csv ~/Employeeswithtabs.csv -Delimiter "`t"
Import-Csv is now looking for tabs as field delimiters instead of commas and is parsing the CSV file correctly.
Get-Content -Path ~Employees-noheaders.csv
Import-Csv, this is what happens.
Import-Csv -Path ~Employees-noheaders.csv
Import-Csv has no field names to associate with values, so it uses the top row as headers and makes them property names. This isn't right. You could modify the CSV and add headers that way, but I always prefer to leave the files unchanged as much as possible. For Import-Csv to have valid headers, use the Header parameter.
Import-Csv -Path ~Employees-noheaders.csv -Header 'FirstName','LastName','Address','City','State'
Header parameter and specify a comma-delimited list, Import-Csv uses that set of values from left to right as field names rather than the first row of the CSV file. This parameter allows you to parse CSV files with no headers without modifying the original file.


