Let’s create an Azure Function for running PowerShell in the cloud. In this demo, we’ll create a simple HTTP-triggered Azure Function that runs a PowerShell script.
Prerequisite Setup
We’ll start from scratch, assuming you already have an active Azure subscription. We’re going to first set up all of the function prerequisites with PowerShell. Later, we’ll use a command-line tool to perform the actual Azure function.
As always, I’ll create a separate resource group just to be able to clean all of this up after we’re done.
New-AzResourceGroup -Name "PowerShellAzFunctionsDemo" -Location "East US"
Now, let’s create a storage account. But before that happens, you’ll need the Az.Storage module installed. Let’s install the Az.Storage module. While we’re at it, I know I’m going to need the Az.Functions module, too, so I’ll include that.
Install-Module Az.Storage,Az.FunctionsNew-AzStorageAccount -ResourceGroupName "PowerShellAzFunctionsDemo" -Name "psazfunctionsdemostorage" -Location "East US" -SkuName "Standard_LRS"
Every Function App needs a storage account to store function code and other function-related content. We’re using “Standard_LRS” (Locally Redundant Storage) because it’s cost-effective for our demo purposes. In a production environment, you might consider more redundant options.
Creating the Function App
Next, we’ll create our Function App. The function app contains all the functions you create.
New-AzFunctionApp -Name "PowerShellFunctionsDemo" -ResourceGroupName "PowerShellAzFunctionsDemo" -StorageAccountName "psazfunctionsdemostorage" -Runtime "PowerShell" -RuntimeVersion "7.2" -OSType "Linux" -Location "East US"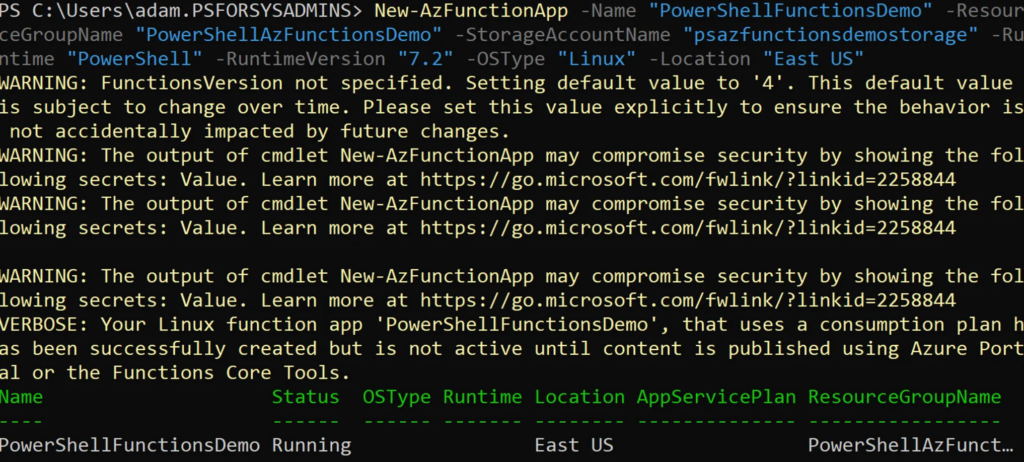
This is where the magic happens. We’re creating a Function App, which is the container that will host our functions. We’re specifying PowerShell 7.2 as our runtime to ensure our scripts run on PowerShell 7.2. We’re using Linux as our OS type because it’s generally more cost-effective and faster than Windows.
It’s telling me that I didn’t use the FunctionsVersion parameter, which is fine. As of this writing, v4 is the recommended version for all functions.
Unfortunately, you can’t go through this entire process with PowerShell alone. You must use Microsoft’s Azure Functions Core tools. To get it, I’ll need to check out a Microsoft help document to download and install it.
start 'https://learn.microsoft.com/en-us/azure/azure-functions/create-first-function-cli-powershell?tabs=windows%2Cazure-cli%2Cbrowser'I now need to restart my PowerShell console so that it can see the tool EXEs in the computer’s path.
Let’s first create the function project. The RunTime tools package requires you to first create a project to which you then add functions.
I’ll get to the root of C first so that the tool can create the function project there.
cd C:\func init PowerShellFunctionProject --powershell
I can create a functions project with the func command. This command creates a few necessary files the function needs once we publish it to Azure. Notice that I’m specifying the runtime as PowerShell. Here, you can also choose options like Python as well.
Let’s see what it created.
gci C:\PowerShellFunctionProject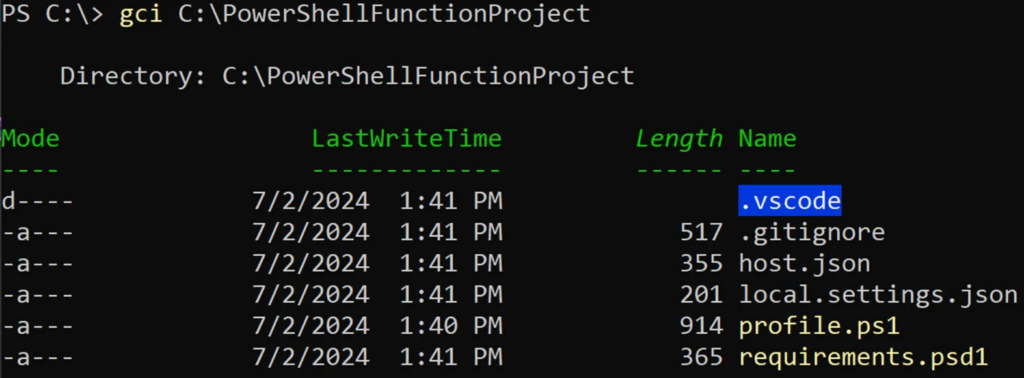
A few files.
- Host.json is a global configuration file that affects all functions within an app. It configures things like logging, function timeout, bindings, and triggers across functions.
- The local.settings.json file is a configuration file for local development. You’ll typically work on your function code here locally and then publish it once complete.
- profile.ps1 – This is a PowerShell script that runs when your function app starts or a new runspace is created. It’s used for global initialization tasks such as setting up authentication, importing modules, and defining variables available to all app functions.
- requirements.psd1 – This PowerShell manifest file lists PowerShell module dependencies for your function app. It specifies which modules and versions should be automatically installed, ensuring all necessary tools are available for your functions to run correctly.
Creating the Azure Functions
But no PowerShell scripts to invoke. That’s up to us to create.
mkdir C:\PowerShellFunctionProject\PowerShellFunctionTo create that, I need to create a subfolder inside of the project folder, which will be called the name of the function.
code C:\PowerShellFunctionProject\PowerShellFunction\run.ps1And then I need to create the script called run.ps1 in the function folder.
using namespace System.Net

param($Request, $TriggerMetadata)

$name = $Request.Query.Name

$body = "Hello, $name. This HTTP triggered function executed successfully."

Push-OutputBinding -Name Response -Value ([HttpResponseContext]@{
    StatusCode = [HttpStatusCode]::OK
    Body = $body
})
This is the heart of our function – the actual PowerShell code that will run. This is a simple example that demonstrates input and output. When the function is triggered via HTTP (since we set that up in the function JSON file), the HTTP request will be represented via the Request parameter. The Request parameter will contain information like the HTTP verb used like GET or POST, the query and the payload or body of the HTTP request for POST requests.
The script will read the Name HTTP query parameter and assign it the name variable and then use it in a simple string.
Finally, the function will output information via HTTP, so we need to apply an output binding. The output binding will “bind” the PowerShell script output stream to the function to send back via an HTTP response. To convert the PowerShell output to an HTTP response that the function understands, we must create an HttpResponseContext object with two properties:
StatusCode: Set to HTTP 200 OK, indicating a successful request.- Body: The greeting message we constructed earlier.
This structure allows Azure Functions to properly format the HTTP response that will be returned to the client.
Now, let’s create the function.json file. I’ll open up a new tab and create the function.json file.
{
  "bindings": [
    {
      "name": "Request",
      "methods": [
        "get",
        "post"
      ],
      "authLevel": "anonymous",
      "type": "httpTrigger",
      "direction": "in"
    },
    {
      "type": "http",
      "name": "Response",
      "direction": "out"
    }
  ]
}
This function.json file is crucial. It defines the bindings for our function. Bindings specify how it’s triggered and how it outputs data.
- We’re setting up an HTTP trigger that responds to GET and POST requests
- This function will use anonymous authentication so we can query the URL it will be exposed to without providing any credentials.
The function will return an HTTP response and be called the $Response variable within the PowerShell script we’ll run.
This needs to be saved in the same folder as the run.ps1 script.
Now, back to my console. I’ll navigate to my function folder first.
cd C:\PowerShellFunctionProjectAnd see if I can start up the function.
func startWhen developing Azure Functions, you should first locally and then publish it when you’re finished. You can run a function locally by running `func start`.
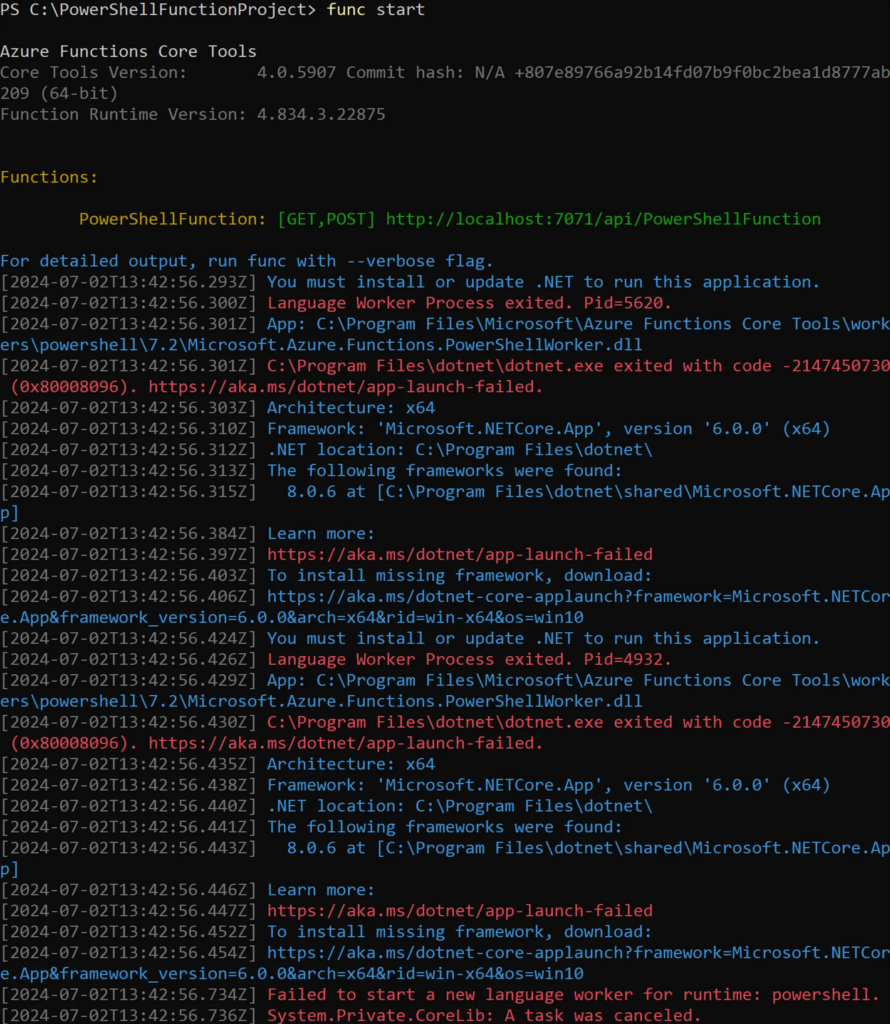
Ah, another dependency. Don’t you love those? Let’s get the .NET Core SDK installed.
start https://www.microsoft.com/net/downloadAll done. Let’s give it another shot. But first, I need to restart my PowerShell console again.
And now, let’s try it again.
func start…and we’re hitting another error. Scrolling up a bit, the red that sticks out to me is “failed to start a new language worker for runtime powershell”. A worker in Azure Functions speak is the host that executes PowerShell. Since we’re runing locally, that’s my local machine. Let’s check the local settings JSON file.
code C:\PowerShellFunctionProject\local.settings.json
It seems that the runtime version is set to 7.2 by default. Let’s check the version installed on my machine.
$PSVersionTable
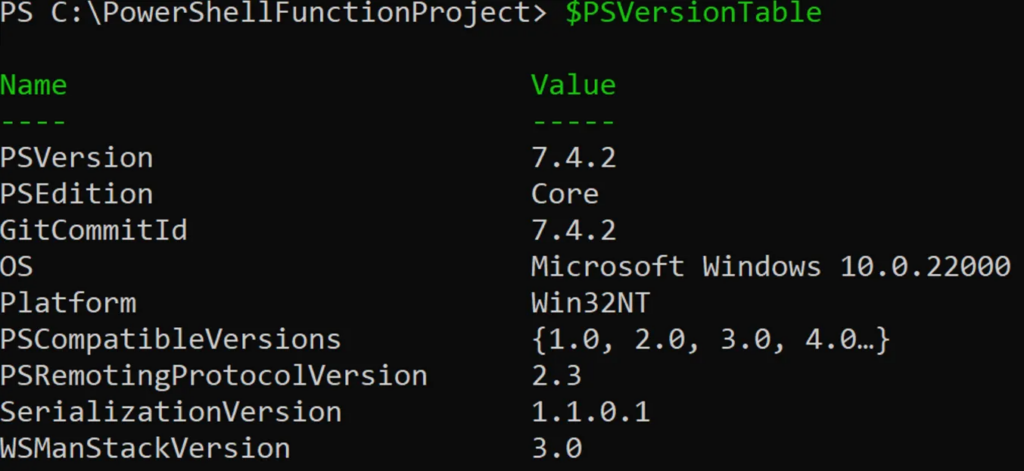
Ah, there’s the problem. I’m on 7.4. Let’s change that.
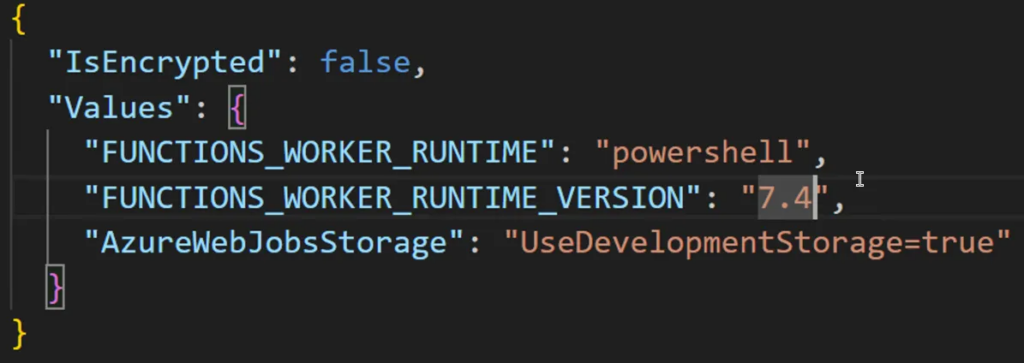
Now, let’s try that again.
func start
It's much better. There's no ugly red. Now, we have a URL we can trigger the script with. Let’s copy that URL and open another console.
Invoke-RestMethod -Uri http://localhost:7071/api/PowerShellFunctionI’ll use Invoke-RestMethod to query the local web server and see what happens.

Yay! The PowerShell text is shown. But wait, there’s nothing after ‘Hello’.
Invoke-RestMethod -Uri http://localhost:7071/api/PowerShellFunction -Body @{Name='Adam'}
Let’s pass the HTTP body with a key of Name that the script is looking at.
gc C:\PowerShellFunctionProject\PowerShellFunction\run.ps1
You can see where $Request.Query.Name is in the script here.
We now know that the function was triggered by the HTTP GET request we just executed to the local webserver. The function ran, executed the PowerShell script, and then sent the PowerShell script output back via an HTTP response.
Our function is complete and tested locally; now let’s publish it to Azure and see if it works up there too.
cd C:\PowerShellFunctionProjectLet me first make sure I’m in my function project directory.
Get-AzFunctionApp -Name "PowerShellFunctionsDemo" -ResourceGroupName "PowerShellAzFunctionsDemo"
Let me verify the name of the Function app I created earlier.
OK, good. It is PowerShellFunctionsDemo.
func azure functionapp publish PowerShellFunctionsDemo
Now I can use the func binary again and publish the function by specifying the name of the function app to push the local function to.
This process zips up all of the files in that function folder, uploads them to the storage account hosting the function app, and then deploys them to a small web app.
Looks good. Time for the final test!
Invoke-RestMethod -Uri 'https://powershellfunctionsdemo.azurewebsites.net/api/powershellfunction' -Body @{Name='Adam'}
Success! It’s now running precisely the same as it was on my local machine. Our Azure Function is deployed and available!


