

Anti-spam detection is not perfect, even in Office 365. Spam emails might get past detection, and some legitimate emails may be falsely identified as spam (false-positive). You may report a false positive and wait for Microsoft to reclassify the message, but false detections may still happen.
If email exchange between domains is crucial and must be unimpeded, one solution is to create an Office 365 Whitelist Domain rule in Exchange Online. This way, you can guarantee an uninterrupted mail delivery from another domain you trust by bypassing anti-spam scans.
Stay tuned and learn ways to implement an Office 365 whitelist domain mail flow rules in your Exchange Online organization.
Microsoft 365 Backup For Dummies eBook addresses the data security challenges by outlining the out-of-the-box security features in Microsoft 365. Get eBook
Prerequisites
This tutorial will be a hands-on demonstration. If you’d like to follow along, be sure you have the following:
- A working Microsoft 365 tenant with Exchange Online. You can request a trial account if you do not have this yet.
- You must have an Exchange Administrator role or Organization Management role group assignment.
- A computer with Windows PowerShell 5.1 or the latest PowerShell 7 version. This tutorial uses Windows 10 with PowerShell 7.2.5.
- The Exchange Online Management (EXO V2) module must be installed on your computer. The examples in this tutorial will use the EXO V2 module version 2.0.5.
Creating an Office 365 Whitelist Domain Rule using the Exchange Admin Center
The Exchange admin center is the primary tool for managing everything Exchange Online and is probably what most admins would use for one-time or manual tasks. Follow these instructions to create the Office 365 Whitelist Domain rule.
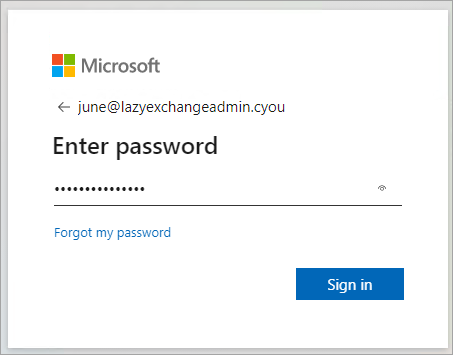
1. Launch the Exchange admin center in your web browser and log in with your credentials.
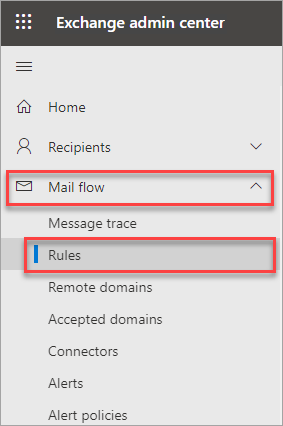
2. Once in the Exchange admin center, expand Mail flow on the left menu and click Rules.
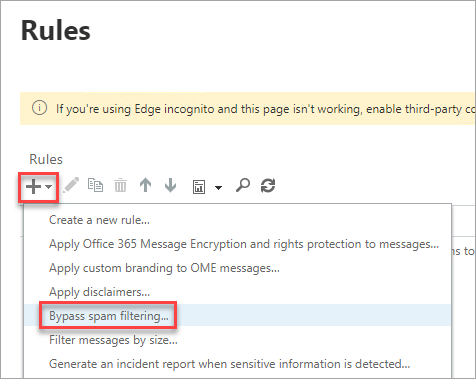
3. On the Rules list, click the down arrow next to the plus sign and click → Bypass spam filtering.
You can create one rule to whitelist one or multiple email domains, which is less secure, or you can create one rule for each organization, which offers granular control. Follow the instructions in the subsections depending on which rule implementation you choose.
Option 1: One Mail Flow Rule for All Domains
One way to implement a whitelist is to create a single mail flow rule where you populate a list of domains to bypass the spam filter. This rule is quick to implement but isn’t the most secure because you’re only basing your filter on the domain and nothing else.
Attackers can spoof a domain in your whitelist. If your whitelist only checks for the domain and no other information, spam messages can pass through undetected.
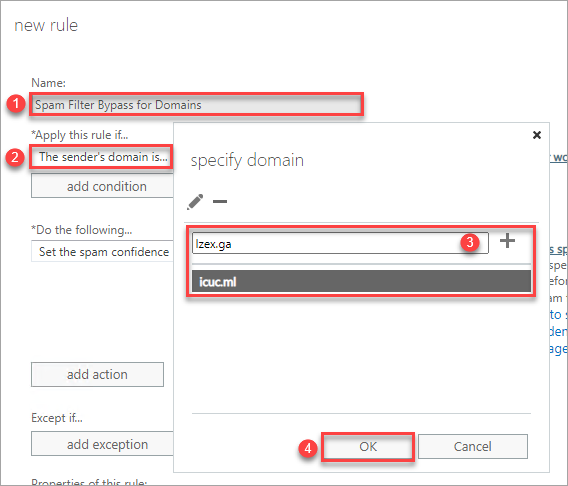
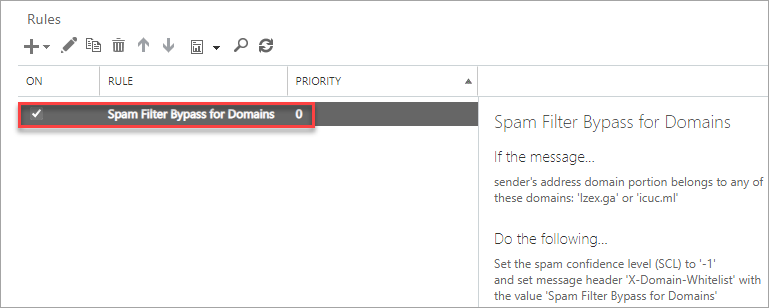
1. On the new rule pop-up dialog that appears, type the new rule’s name, such as Spam Filter Bypass for Domains, in this example.
2. In the Apply this rule dropdown, click The sender… → domain is.
3. On the specify domain list, type the domain you wish to whitelist and click the plus sign to add it to the list. Add more domains as you wish at this point.
Can you add an unlimited number of domains? No. A transport rule must be only up to 8,192 bytes. If your rule reaches this limit, you can no longer add more domains to the whitelist. In which case, you must create a new rule for the new set of domains.
4. Click OK to save the domains list.
5. Back to the new rule, click add action.
6. Click the dropdown box.
7. Select Modify the message properties → set a message header.
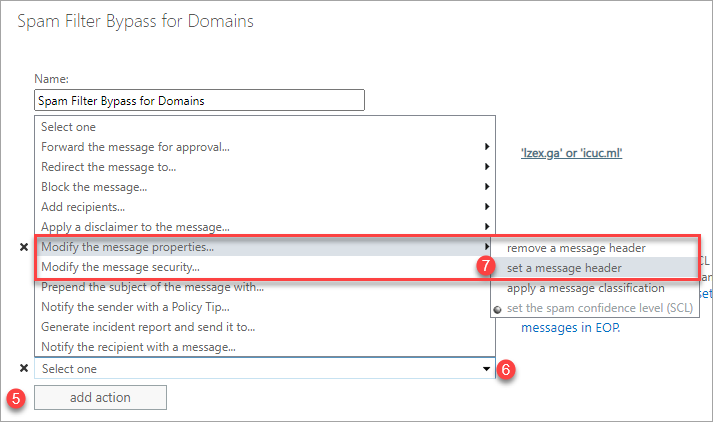
8. Next to the new action you create added, click the first Enter text link and type in X-Domain-Whitelist in the message header box and click OK.
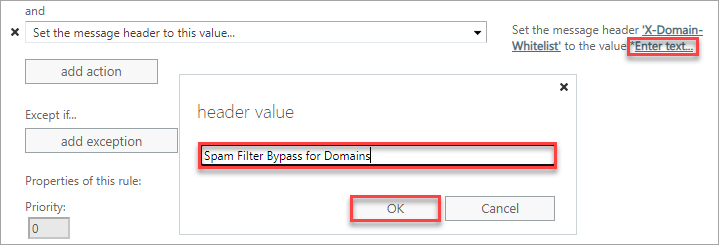
Note: Adding a custom message header and value is optional. This step is only to give you a way to identify that the message passed through the Spam Filter Bypass for Domains rule.

9. Click the second Enter text link, type the words Spam Filter Bypass for Domains in the header value box, and click OK.
10. Back to the new rule, you should see the rule settings, similar to the screenshot below. Click Save to save this rule.
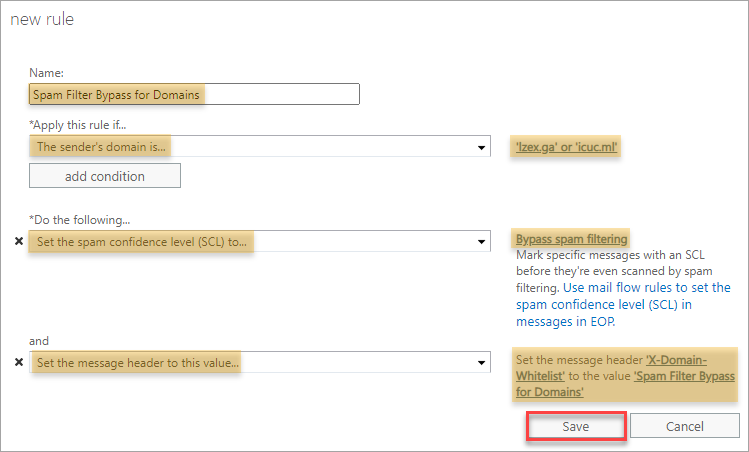
And you now have the new rule in the list.
Option 2: One Mail Flow Rule for Each Source
Implementing a whitelist that checks for other information in the email, like SPF or DMARC results, and source IP addresses is more secure. This type of mail flow rule does not only depend on the domain, which makes it less susceptible to spoofing.
Can you create an unlimited number of mail flow rules? No. There can only be 300 transport rules in Exchange Online.
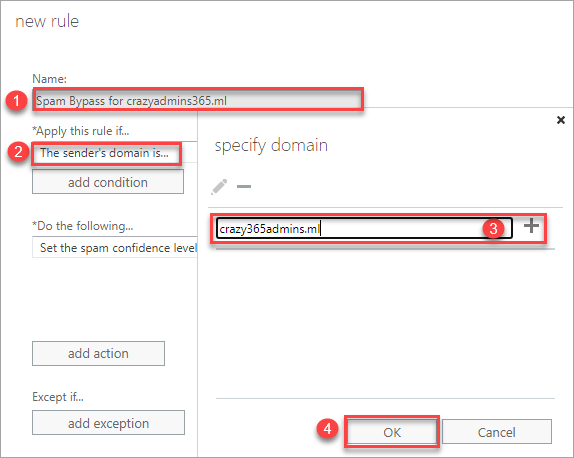
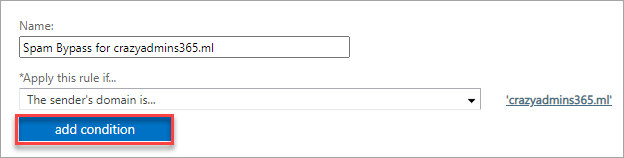
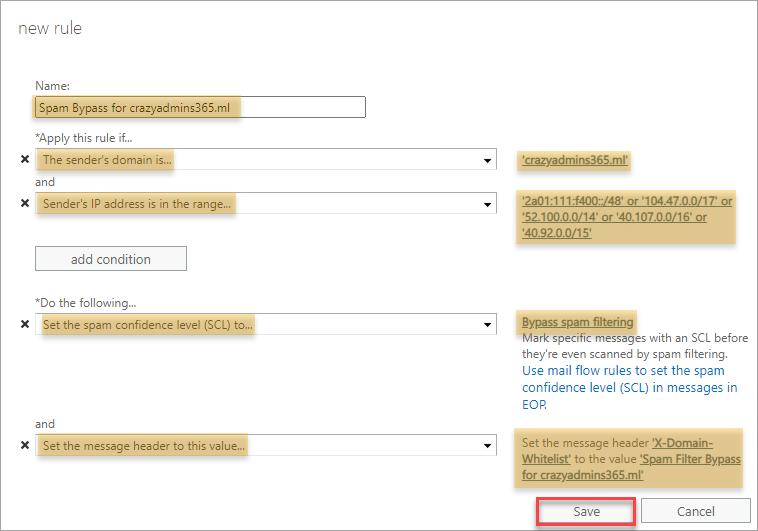
1. In this example, type the new rule’s name, such as Spam Bypass for <domain>, on the new rule pop-up dialog that appears.
2. In the Apply this rule dropdown, click The sender… → domain is.
3. On the specify domain list, type the domain you wish to whitelist and click the plus sign to add it to the list.
Note: A sender organization may have multiple domains from the same source. If you know the other domains, ensure to add those domains to the list.
Click OK to save the domains list.  Add the domain to the whitelist
4. Click OK to save the domains list.
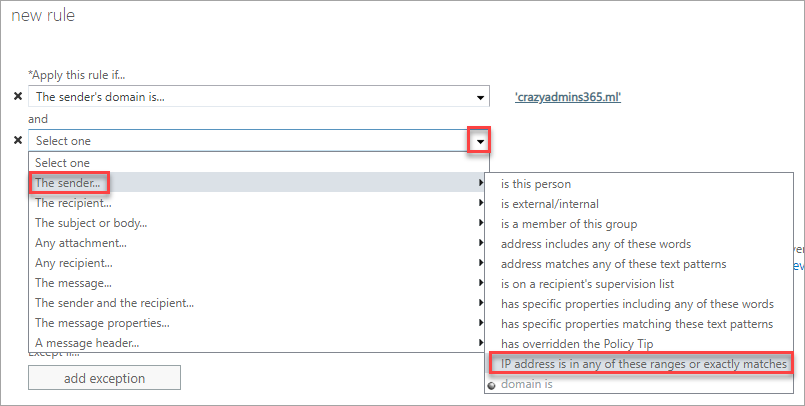
5. Next, click add condition.
6. Click the dropdown box → The sender… → IP address is in any of these ranges or exactly matches.
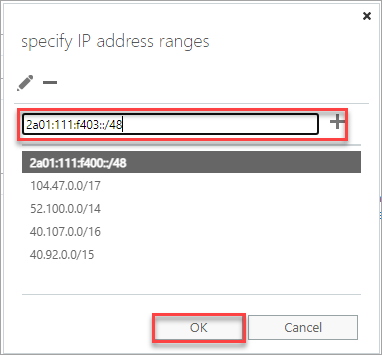
7. On the specify IP address ranges, enter the IP address (e.g., 1.1.1.1) or IP address range (e.g., 1.1.1.1-1.1.1.100), or the CIDR (e.g. 1.1.0.0/16). Click OK to save the IP address list.
Adding this condition introduces another criterion before the transport rule applies to the message. In this case, the message must come from the specified IP addresses apart from the domain for the rule to take effect.
8. Add an action to add a custom message header. Click add action → click the dropdown box → Modify the message properties… → set a message header.
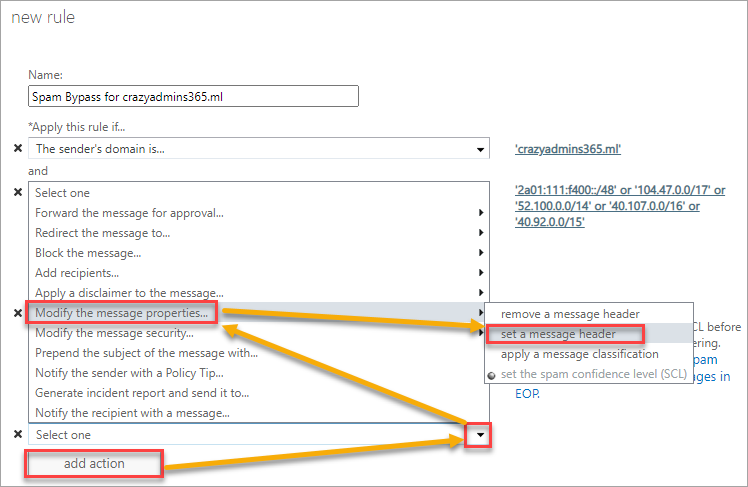
9. Next to the new action you create added, click the first Enter text link and type in X-Domain-Whitelist in the message header box and click OK.
Note: Adding a custom message header and value is optional. This step is only to give you a way to identify that the message passed through the Spam Filter Bypass for Domains rule.
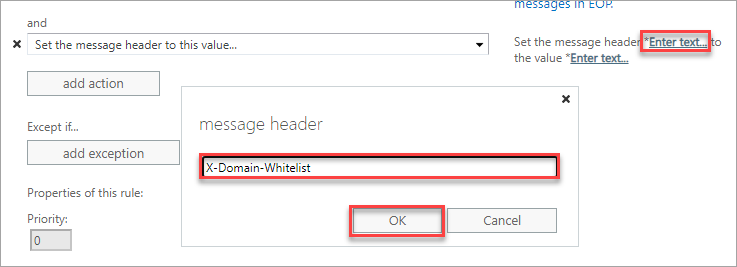
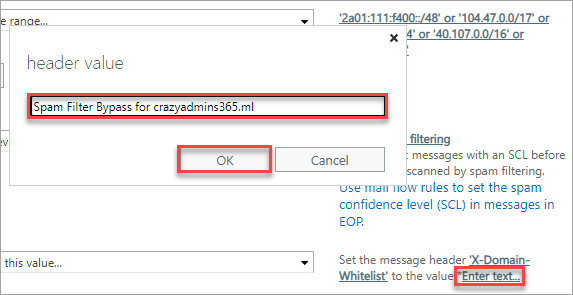
10. Click the second Enter text link, type Spam Filter Bypass for <DOMAIN> in the header value box where <DOMAIN> is the domain you wish to whitelist, and click OK.
11. Your final mail flow rule should look similar to the screenshot below. Click Save to save this new rule.
You’ve successfully created a new Office 365 Whitelist domain rule.

Follow the same steps when you need to add a new Office Whitelist Domain rule.
Verifying the Office 365 Whitelist Domain Rule is Working
Any decent admin wouldn’t be satisfied without finding evidence that the whitelist works. The succeeding sections show you two ways to confirm whether a message went through the Office 365 Whitelist Domain Rule you created.
Running a Message Trace
Follow these steps to run a message trace in PowerShell.
1. Open a PowerShell window and connect to the Exchange Online PowerShell.
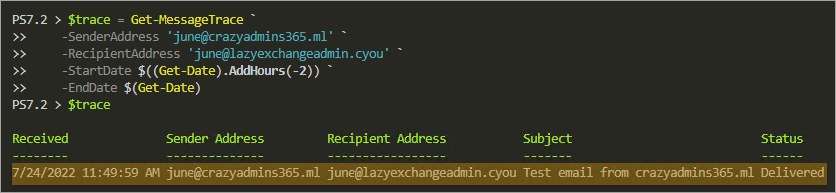
Connect-ExchangeOnline2. Next, run a Get-MessageTrace against the email from the whitelisted domain. For example, the below code will trace the messages from [email protected] to [email protected] within the last two hours. The command saves the result to the $trace variable.
# Run the trace
$trace = Get-MessageTrace `
    -SenderAddress '[email protected]' `
    -RecipientAddress '[email protected]'`
    -StartDate $((Get-Date).AddHours(-2)) `
    -EndDate $(Get-Date)
# Show the trace results
$trace
As you can see below, the trace returned one result and showed the basic information only, such as the sender and recipient. There’s no indication that the message skipped the anti-spam filter based on the whitelist rule.
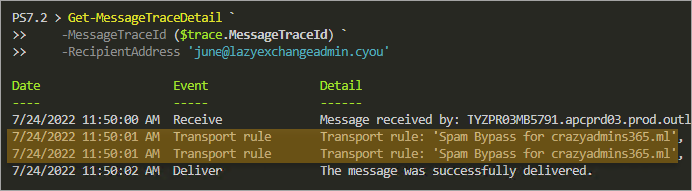
3. Get the message trace result’s details by running the Get-MessageTraceDetail command below.
Get-MessageTraceDetail `
    -MessageTraceId ($trace.MessageTraceId) `
    -RecipientAddress '[email protected]'
According to the result below, the message went through the Office 365 whitelist domain rule named Spam Bypass for crazyadmins365.ml. This result confirms that the mail flow rule works.
4. Finally, disconnect your Exchange Online PowerShell session.
Disconnect-ExchangeOnline -Confirm:$false
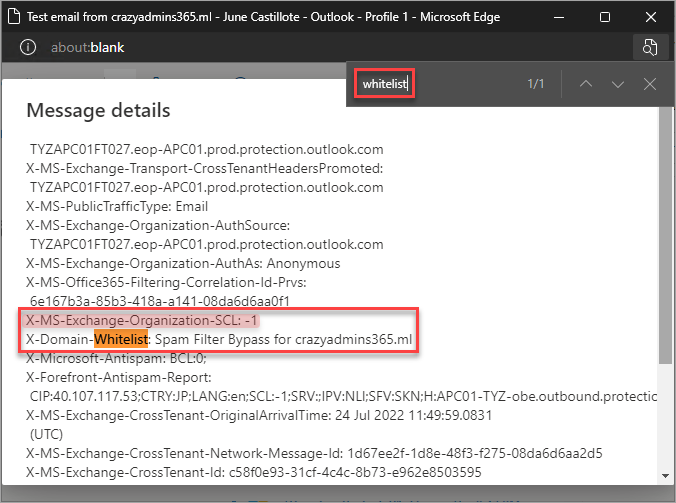
Checking the Custom Message Header
Do you remember adding the custom message header and value to the Office 365 Domain whitelist rule? Good. Now’s the time you’ll learn its value when validating the rule.
1. Open the message in your email client. This example uses the Outlook web app (OWA).
2. On the message reader, click the ellipses button (…) → View → View message details.
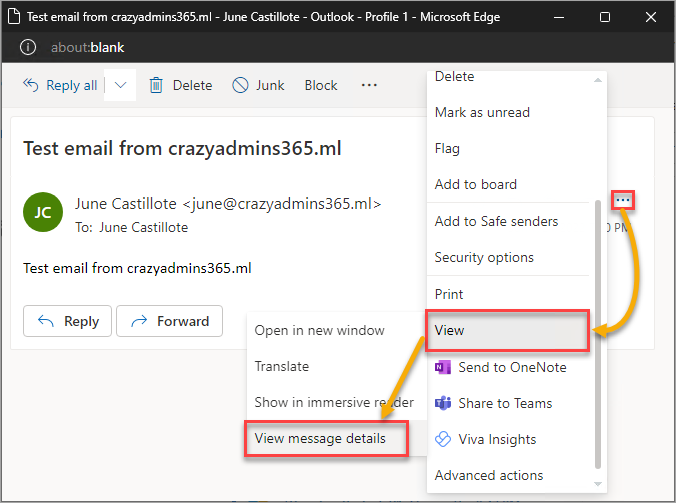
3. On the Message details, press CTRL+F and search for the custom header name. As you can see below, this message contains the custom message the whitelist rule added. Also, the spam confidence level (SCL) value is -1, which means that message bypassed the spam filter.
Microsoft 365 Backup For Dummies eBook addresses the data security challenges by outlining the out-of-the-box security features in Microsoft 365. Get eBook
Conclusion
An Office 365 whitelist domain rule has its benefits when properly implemented. Basing a whitelist only on domain names is not the best practice from a security perspective because attackers can spoof a whitelisted domain.
If possible, always push to create an Office 365 whitelist domain rule with conditions that match more than the domain. Doing so increases your whitelist rule’s effectiveness significantly. But, if you add IP addresses as a condition, regularly ensure that the IP addresses are still valid.
More than the domain and IP address, you can also include the SPF and DMARC results as conditions for the Office 365 whitelist domain rule. Why not try and experiment with more whitelist rules?


