


It is no secret that mail hygiene solutions are not 100% effective. Malicious messages still make their way through without being detected from time to time. In those times, you need to know how to find and delete email from all mailboxes in Office 365.
Not a reader? Watch this related video tutorial!If you are an Office 365 admin, you would be familiar with the situation described above. Spam or Phishing attacks are considered as critical security incidents. Needless to say, email admins must act quickly to minimize the potential threat to the users and the infrastructure.
You can click around in the Office 365 Security and Compliance portal to run a content search, but, to delete those contents, you need to use PowerShell. So, if you’ll end up using PowerShell anyway, why not do everything in PowerShell, right?
In this article, you will learn how to use the Security and Compliance PowerShell cmdlets to search and delete malicious messages from all Office 365 mailboxes.
Requirements
Since this article is essentially a How-To, there are some requirements if you plan to follow along.
- Your admin account must have enough Office 365 permissions to search mailboxes and delete messages.
– Permission required to search mailboxes: The account must be a member of the eDiscovery Manager role group or be assigned the Compliance Search management role.
– Permission required to delete messages: The account must be a member of the Organization Management role group or be assigned the Search And Purge management role
– Permission required to preview messages: The account must be a member of the eDiscovery Manager role group or be assigned the Preview management role - PowerShell must be connected to the Office 365 Security & Compliance Center PowerShell. Follow this link to connect without MFA, or this link to connect with MFA.
Gathering Information About the Message to Delete
Before you start creating the content search for the message that needs to be deleted, you must gather all the pertinent information about the message first. Not unless all information is provided to you already.
Knowing as many details about the message as possible would help you decide how to formulate the search query. For example, some of the most basic information you need to get are:
- What is the sender’s email address?
- What is the message subject?
- Are there file attachments, and what are the filenames?
- What’s the date of the first reported occurrence?
- Who are the recipients?
In most cases, one or two of the information listed above should be sufficient to formulate a search query. Then, it is up to you to determine which of these search parameters would be most applicable.
Creating and Running the Office 365 Email Content Search
When you’re satisfied that you have all the information you need about the message, it is time to fire up PowerShell and start creating the content search.
Suppose the spam/phishing message to delete has the following properties:
- Subject: You must change your bank password now
- Sent: 05/12/2020
Using the New-ComplianceSearch, the message properties listed above will be used to create a search query. The key to keeping the search results as accurate as possible depends on the adequately formulated search criteria.
The New-ComplianceSearch cmdlet comes with several parameters and switches. However, to create a mailbox content search, these are the parameters that will be used.
Name– This accepts the name that will be assigned to the content search object. This can be any name, you don’t need to put too much thought into it.ExchangeLocation– This accepts that Exchange location that will be targeted by the search. This can be a group or a mailbox. In this article, the value to use is All to make sure to target all mailboxes in the search.ContentMatchQuery– This parameter is the main factor that will determine the search results’ accuracy. The query format that is accepted is in the form of a KQL or Keyword Query Language.
To create the content search, copy the code below and paste it into your PowerShell console. Make sure to change the parameter values as appropriate to your situation. In this example, the name of the search is Phish1, the query combines the subject and sent property values.
New-ComplianceSearch `
-Name Phish1 `
-ExchangeLocation All `
-ContentMatchQuery 'subject:"You must change your bank password now" AND sent:05/12/2020'
Visit the Keyword queries and search conditions for Content Search page to learn more about using keywords in content search.
When you run the code above in PowerShell, you should see a similar output as demonstrated below.
At this point, the content search job has been created, but the search hasn’t been triggered yet according to the status (NotStarted).
To start the content search, use the Start-ComplianceSearch cmdlet. You need to supply the cmdlet with the parameter -Identity and specify the name of the content search job that you created.
To start the Office 365 email content search, copy the code below and paste it into your PowerShell console.
Start-ComplianceSearch -Identity Phish1After running the code above, there will be no output on the screen. What you need to do next is to monitor the status of the search. To monitor the search status, use the code below in PowerShell.
Get-ComplianceSearch -Identity Phish1When you run the code above, you should see a similar output as below. In the output below, it shows that the content search job status is Completed.
You’ll notice from the output above that the returned properties are limited and it does not show you the number of found matches. You can run the command below to get all the properties of the content search result.
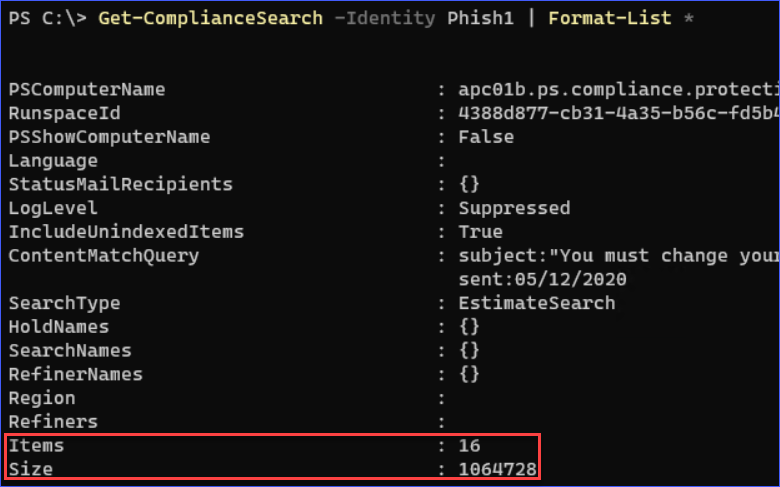
Get-ComplianceSearch -Identity Phish1 | Format-List *After running the command above, you would see a similar result, as shown below. In this case, there are 16 items that matched the search criteria.
Previewing the Search Results (Optional)
Previewing the search results is an optional step, but recommended if you’re the type who’d rather err on the side of caution. You wouldn’t want to delete the wrong message from all mailboxes, would you?
So far, you’ve used the New-ComplianceSearch, Start-ComplianceSearch and Get-ComplianceSearch cmdlets to create, run, and monitor the content search. Now, to be able to preview the search results, you will need to use the New-ComplianceSearchAction cmdlet.
To preview the search results, you now need to create a preview action using the command below.
New-ComplianceSearchAction -SearchName Phish1 -PreviewAs you can see in the output below, the preview job has been created with the name Phish1_Preview, and the job is automatically started.

And when the creation of the preview is completed, you can get the results preview by running the command below to show the results on the screen.
(Get-ComplianceSearchAction Phish1_Preview | Select-Object -ExpandProperty Results) -split ","And once you run the command above, you would get an output similar to the image shown below.
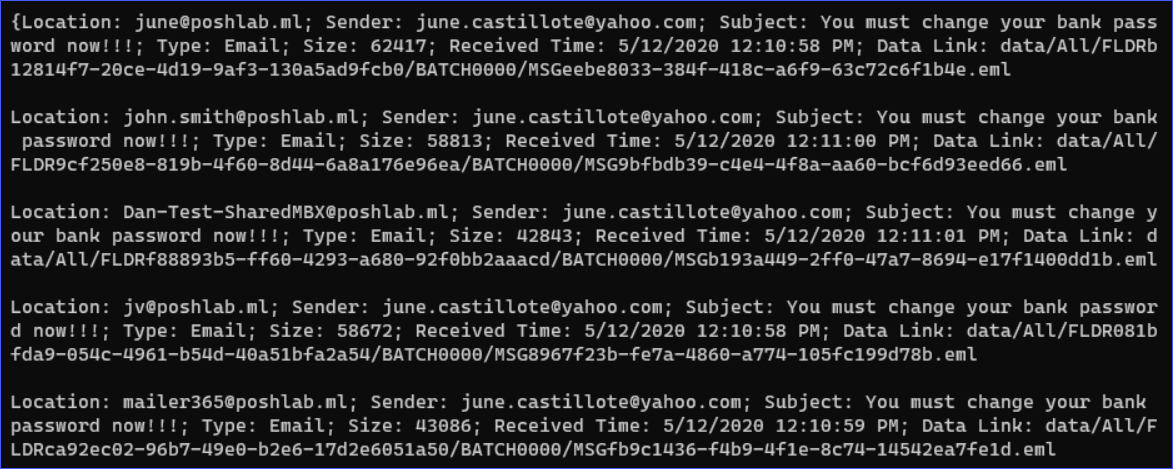
Let’s admit it, the results, as shown above, is ugly. However, you can export the results to a TXT if you prefer. Or, if you want a better-formatted report, you can download the content search report from the Security and Compliance Center portal.
Note: The Preview action does not expose the contents of the messages. It only shows the details of the message matching the search criteria and not what’s inside of each message.
Delete Email From All Mailboxes In Office 365
Now for the final act; running the Office 365 delete email action. Suppose that you’re already satisfied with the search results. You’re now ready to run the message deletion process.
To delete the messages that matched the search criteria, you need to create a purge job using the New-ComplianceSearchAction cmdlet with the -Purge switch and -PurgeType parameter.
The code to create the purge job is shown below. Copy the code and paste in PowerShell to run it.
New-ComplianceSearchAction -SearchName Phish1 -Purge -PurgeType SoftDeleteNote that the -PurgeType SoftDelete parameter/value would remove the messages and put them in the Deletions folder inside the Recoverable Items folder in the mailbox. This means that the message would still be recoverable if necessarry.
After running the code above, the purge job will be created and started.
As you can see on the image below, the purge job is created with the name Phish1_Purge, and it automatically started.

When the purge is complete, you can view the final result using the command below.
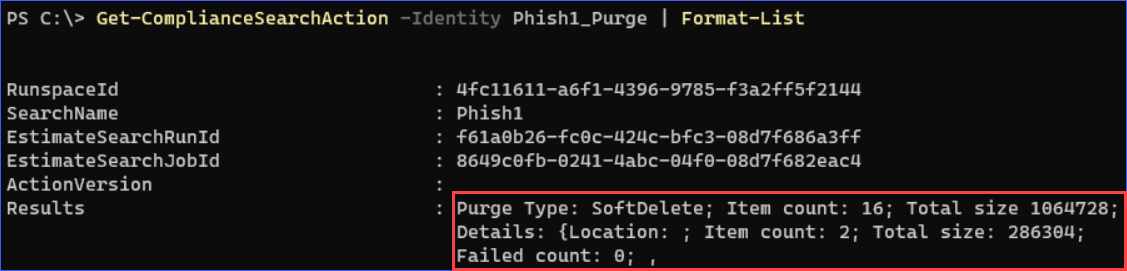
Get-ComplianceSearchAction -Identity Phish1_Purge | Format-ListYou would be presented with similar output, as shown below. In this example, there were 16 messages deleted, and none failed.
And that’s it. You have successfully deleted the spam/phishing messages from all Office 365 mailbox.
Conclusion
In this article, you learned how to use the Security and Compliance PowerShell cmdlets to search and delete messages from all mailboxes in Office 365.
You’ve learned how to put together the details of the message to delete for refining search criteria. Refining the search criteria helps ensure that the results will be at the highest accuracy.
You also learned how to create and start the content searches, create a preview of the results, and ultimately purge the messages that matched the search criteria. Perhaps the best thing about all this is that you never had to leave PowerShell to accomplish these tasks!
With the knowledge you gained from this article, perhaps you can automate the entire search and delete workflow so that even your first-line agents can easily execute it. Maybe then, you will not have to be woken up from your much-needed sleep anymore.


