

Would you like servers to seamlessly stay available even when a core switch dies at work? Do you want to have your server access multiple VLANs without depending on a specific vendor’s particular drivers? Want to simplify your networking configuration for physical and virtual hosts in your environment? If you answered yes to any of these questions, then this article is for you. Let NIC Teaming do that.
Not a reader? Watch this related video tutorial!NIC Teaming can improve fault tolerance for your machines, better utilize network resources (load balancing), configure VLANs for the machine to use, and simplify your networking configuration.
In this article, you will learn what NIC teaming is, special considerations that exist for using NIC Teaming in Virtual Machines, and how to deploy it in your organization.
Prerequisites
You don’t need to be an expert in Windows or Network Administration to understand NIC teaming. But, you do need a few technical and knowledge prerequisites to understand and apply this article. These items are:
- Understanding of how networks function (mac addresses, IP addresses, VLANs)
- Access to Windows Server 2016 (or 2019) with two or more network adapters available – almost everything you see also equally applies to Windows Server 2016, 2012R2, and Windows Server 2012
Understanding NIC Teaming
In a traditional networking setup for a physical server, you provide fault tolerance by plugging multiple network cables from the server into multiple physical switches (possibly part of a single switch stack). Thus, the server has multiple IP addresses active at all times, and load balancing is non-existent.
By deploying a NIC team on your server, you can maintain a connection to multiple physical switches but only use a single IP address. Load balancing becomes readily available. Fault tolerance becomes instant instead of waiting for DNS records to timeout/update and management becomes simpler.
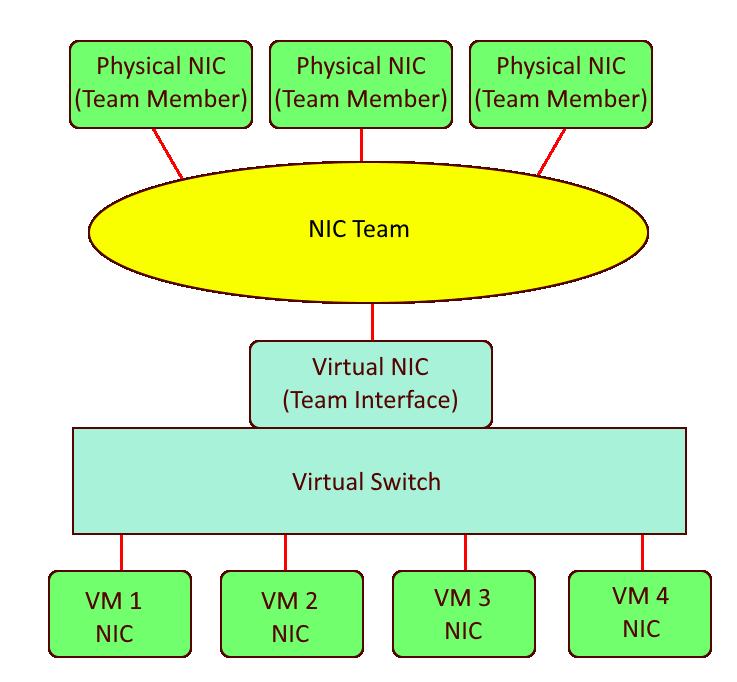
NIC Teaming is a capability in Windows Server that allows you to group NICs into “teams”. Each team consists of one or more team members (NICs that are in the team) and one or more virtual NICs that are available for use.
Team members are the network adapters that the team uses to communicate with the switch. Team interfaces are the virtual network adapters that are created when you make the team. It can be hard to remember which is which since the team interfaces receive an IP address.
What is the difference between NIC teaming and bonding?
NIC Teaming is synonymous with NIC Bonding.
NIC Teaming is available in all editions of Windows Server starting with Windows Server 2012. This capability is extremely flexible and gives administrators a much simpler solution for Link Aggregation/Load Balancing, Failover, and Software Defined Networking (VLANs).
There are similar solutions on certain hardware from certain vendors, however, Microsoft’s implementation of NIC teaming aims to provide these features in a hardware and vendor-agnostic manner.
What is the difference between NIC teaming and bridging?
NIC Teaming allows you to create a NIC interface that spans one or more NIC adapters that are all on the same subnet. NIC Bridging allows you to pair NIC adapters from different subnets to enable communication between the two subnets.
When configuring a NIC Team, you will set the Teaming mode, Load balancing mode, Standby adapter, and Team interface VLAN. Each of these components is explained below.
Teaming Mode
When you create a NIC Team, you must select what Teaming Mode to use. The Teaming Mode determines how the server and switch(es) will split traffic between the multiple links. There are three types of Teaming modes: Switch independent, LACP, and Static.
Switch Independent
Switch independent teaming allows you to connect team members to multiple, non-stack switches. The Switch independent mode is the only teaming mode that uses no configuration changes on the switches that you connect it to. This mode only uses MAC addresses to control what interface incoming data should be sent to.
There are a few situations where you may choose to use Switch Independent Teaming Mode like. This could be when:
- you won’t make configuration changes on your connected switches
- using multiple non-stack switches for the team members
- making a NIC Team inside a VM (more on that in the Considerations for Use in Virtual Machines section below)
If you prefer to use one adapter for traffic and only fail-over to a standby adapter during physical link failure, you must use Switch independent teaming mode and configure a Standby adapter.
A standby adapter is not used often because it reduces the total bandwidth that is available for communicating with the server. The default setting is “None (all adapters Active)”.
Static
Static teaming requires that you manually configure ports on the switch that connect with the NIC team into a Link Aggregation Group (LAG). The server and switch will split traffic between all links that are up.
If a port on either end is connected to some other device, traffic will be split down this link that isn’t expecting it. Thus, it provides no help to isolate errors like incorrectly plugged cables.
You should only use the Static teaming mode when your switches cannot support LACP.
Link Aggregation Control Protocol (LACP)
LACP teaming is similar to Static teaming but it also tracks that each active cable in the link is actually connected to the intended LAG. LACP will not send data through links that are not connected to the expected LAG.
You should use LACP when you want to make the switch aware of the NIC team in order to load balance data that the switch sends to the NIC team.
Important: Static and LACP Teaming modes require you to connect the host to only a single switch or a single switch stack.
Load Balancing Mode
Load balancing mode determines how the team will present interfaces for incoming data and determine what adapters to use for outgoing data. The available options are Address Hash, Hyper-V Port, and Dynamic.
Unlike a “load balancing appliance”, incoming traffic is not going to be evenly split between each link in use by team members.
Address Hash
Address Hash mode will attempt to use the source and destination IP addresses and ports to create an effective balance between team members. If no ports are part of a connection, it will only use IP addresses to determine how to load balance. For cases that there’s no IP addresses are part of a connection, it will use MAC addresses.
When creating a NIC team, you can force the team to use IP+Port, IP only, or MAC address only. IP+Port is the default and provides the best balance among team members. To use IP only or MAC address only, you’ll have to create your NIC team via PowerShell.
While the Address Hash load balancing mode does a good job at splitting outbound traffic between team members, it is unable to adapt to over/under-utilized team members. Also, all inbound traffic uses the MAC address of the primary team interface. This though is limited to a single link if using the Switch Independent teaming mode.
You must use Address Hash when creating a team inside of a virtual machine.
Hyper-V Port
Hyper-V Port mode is intended only for use on Hyper-V virtual machine hosts. This mode will assign a MAC address to each machine on the virtual machine host and then assign a team member to each of the MAC addresses. This allows for a specific VM to have a predictable team member under normal operation.
Predictable team members for each VM means that a VM’s bandwidth is limited to the max of the single link that it operates over. When a Hyper-V host has few VMs on it, using the Hyper-V Port load balancing mode is likely to not be very well-balanced.
You normally don’t need to use Hyper-V Port mode, but may find it beneficial if you must make sure that each VM uses the same link at all times.
Dynamic
Dynamic mode uses the best features from Address Hash and Hyper-V port modes to balance the outbound and inbound network traffic. Like Hyper-V, inbound traffic is split by assigning team members to different MAC addresses. Like Address Hash, outbound traffic is split by a combination hash derived from IP/Port. This mixture provides better balancing compared to either of the above methods.
Dynamic balancing mode comes with one important improvement: dynamic monitoring of traffic. When the dynamic mode algorithm determines that certain team members are over/under-utilized, it will re-balance outbound traffic to other team members as needed.
TCP streams have a natural cadence that makes it possible to predict future traffic amounts/breaks in the TCP; Microsoft calls these flowlets. Dynamic load balancing mode can also anticipate, through flowlets, what team members will become over/under-utilized and re-balance outbound traffic to prepare.
Dynamic mode is almost always the best load balancing option to use.
The Team Interface VLAN
When you create a team, by default, it will create a single team interface. The team interface has a VLAN setting to tag traffic on an interface to a specific VLAN. Setting the team interface VLAN to a tagged VLAN is typically only done when the team members that the NIC Team is made from use the ‘trunk’ mode.
After you create the team, you can create additional team interfaces on different VLANs.
Warning: Microsoft recommends that you never set the VLAN for an interface inside a VM. Instead, use the Hyper-V switch advanced option “VLAN ID” to define VLANs for a VM.
NIC Teaming in Virtual Machines
Setting up NIC teams in a VM comes with some limitations. Microsoft specifically calls out that using “Teams on Teams” (host level teams and VM level teams) can be very unpredictable and cause connection loss.
Traditionally providing fault tolerance for a VM required that the VM must be connected to multiple external virtual switches. You had to plan which VMs would share each virtual switch to ensure none became too congested. Load balancing issues were further complicated with the possibility of congestion from the other VM’s on the host.
Nowadays, you can deploy an NIC team on the VM host with a single network adapter to each VM. All VMs gain full fault tolerance from a physical port or switch failures. All VM’s can have their traffic balanced across team members for much better overall throughput and congestion handling. Your configuration now can look like this:
NIC teaming in a VM is sometimes used to enable SR-IOV for reducing CPU overhead of the networking stack. You also need BIOS support and NIC support for SR-IOV to be functional.
Requirements
Using NIC teaming within a VM includes these requirements to be a “supported configuration”:
- You must be using multiple adapters in the VM.
- The adapters must connect to two virtual switches that are both “external” type.
- If connecting to physical switches, switches must be on the same L2 subnet.
- The VM NIC Team mode must be set to Switch Independent and the load balancing mode must be set to *Address Hash.*
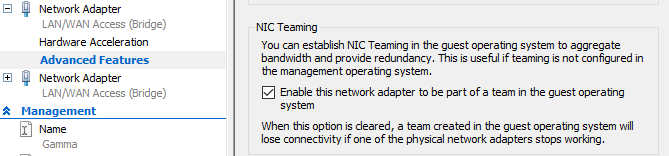
In Hyper-V, you also need to enable NIC Teaming for the VM from each network adapters’ Advanced Features tab that will be part of a team. You can see an example below of what this setting looks like.
Maximizing Performance
While NIC Teaming has good performance out of the box, there are various scenarios where you may need to focus on improving performance. The specifics of these scenarios are out of the scope of this article but if you’d like to learn more about how to performance, focus on the following terms:
- Remote Direct Memory Access (RDMA)
- Switch Embedded Teaming (SET)
- Receive Side Scaling (RSS)
- Single-Root I/O Virtualization (SR-IOV)
Generally, these additional settings reduce some CPU overhead for the networking stack and latency between connections. You can learn more about improving performance in the Software and Hardware technologies explained and Higher performance through RDMA with SET articles.
Creating a NIC Team on Windows Server
Armed with a knowledge of how NIC teaming works and a vision for simplifying your networking, you should now prepared to create a NIC team!
For this demonstration, a NIC team will be created on a VM due to demo environment constraints. Setting up a NIC team on a physical server is the same but if any VM-specific steps are needed, they will be called out.
How do you check if NIC teaming is enabled?
NIC Teaming is enabled in all versions of Windows Server since 2012 (Server 2012, 2012R2, 2016, and 2019).
Deploying NIC Teaming via GUI
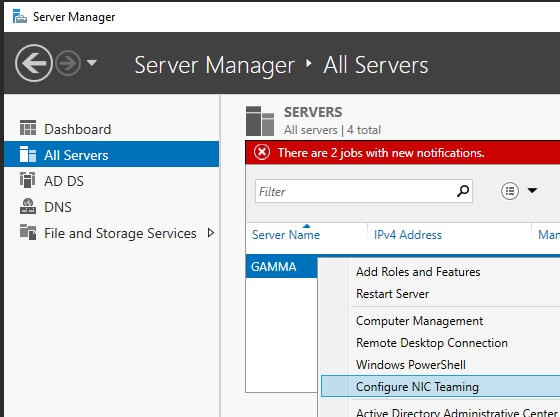
To get started, bring up Server Manager on a Windows Server machine. Ensure you are connected to the machine you’d like to configure the NIC team on.
- First, right-click the server name to create the NIC team on and select Configure NIC Teaming.
2. From the Adapters and Interfaces panel, select the NICs to add to the new team. Next, right-click on the selected adapters and select Add to New Team.
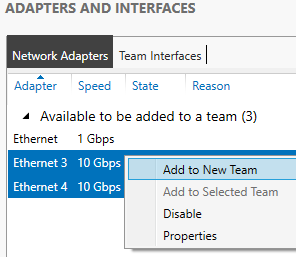
Note: You can configure NIC Teaming with any combination of one or many adapters (max: 32) and one or more team interfaces.
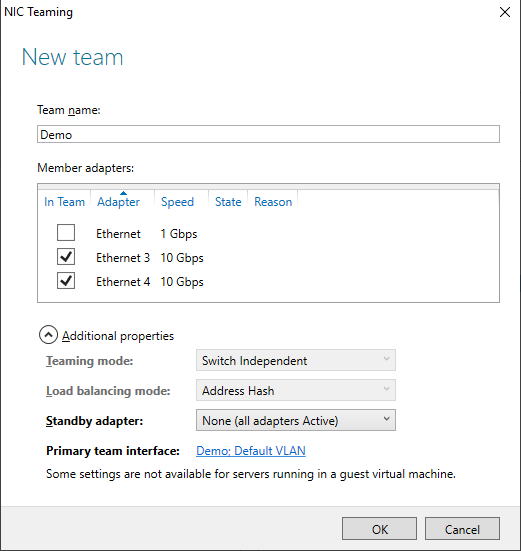
3. Type a descriptive Team name and configure Additional Properties as needed and click OK to create the team.
In this example, the NIC team is being set up on a VM. As a result, the Teaming mode or the Load balancing mode cannot be used. If this demo were on a physical server, you’d probably use Switch Independent or LACP if using a LAG on the switch.
The NIC team should now be created on the Windows Server.
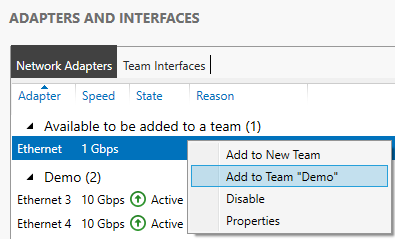
Adding More NICs or Interfaces to the NIC Team
Once created, you can add NICs to a configured team from the same NIC Teaming window. To do so, right-click on an available NIC and select Add to Team “<Team name>”.
You can also add more interfaces to a team by selecting the Team Interfaces tab and then click TASKS —> Add Interface as shown below.
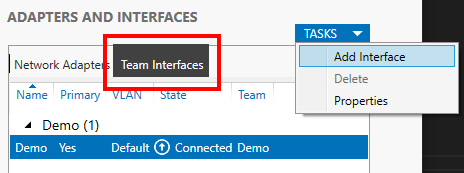
Once the input comes up, type in the VLAN to use and optionally, a name as shown below.

Deploying NIC Teaming via Windows PowerShell
Now that you know how to set up a NIC team the GUI, let’s now check out how to do this via PowerShell.
Finding NIC Names
First, you must decide which NICs you will add to the team. More specifically, you will need to figure out the NIC names.
To find the NIC names, use the Get-Adapter cmdlet. Run this cmdlet and notice your options as shown below.

Once you have noted the names, you can now create the team with PowerShell! For this demo, we’ll be using the NICs Ethernet 3 and 4 for the new NIC Team.
Creating the NIC Team
Now that you have the adapter names in hand, you only have one more cmdlet (New-NetLbfoTeam) to run. You can see an example of running the New-NetLbfoTeam cmdlet and it’s output below.
For the TeamMembers parameter, you’ll use the names of the NICs gathered earlier.
In this example, the TeamingMode is set to SwitchIndependent. If you are configuring the switch ports into a LAG, you’ll probably want to use the LACP value. If you aren’t using a LAG on the switch, you would probably choose to use SwitchIndependent.
The LoadBalancingAlgorithm parameter value of Dynamic is used because this mode provides the most even load balancing across team members.
New-NetLbfoTeam -TeamMembers <NIC Names> -Name "<Desciptive Name>" -TeamingMode SwitchIndependent -LoadBalancingAlgorithm TransportPorts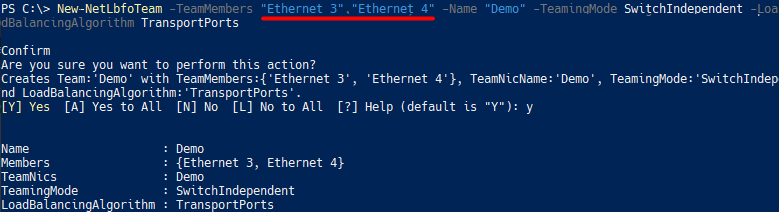
Once completed, you’ll now see a new virtual NIC appear in the adapter list from Get-NetAdapter:

NIC Team on a VM Notes:
– You must use the ‘SwitchIndependent’ TeamingMode.
– You must use one of the Address Hash types for the LoadBalancingAlgorithm (TransportPorts).
– Dynamic load balancing would be used on a physical server instead of TransportPorts.*
Adding More NICs or Interfaces to the NIC Team
Once you have the NIC team build, you can then add NICs and interface to it just like the GUI. To add more NICs to the team, use the Add-NetLbfoTeamMember cmdlet*.*
Add-NetLbfoTeamMember -Name NIC1 -Team Team1You can also add more team interfaces with the cmdlet Add-NetLbfoteamNIC.
Add-NetLbfoTeamNIC -Team Team1 -VlanID 42Summary
You have now learned what NIC Teaming is, how it relates to performance/VM use/simplifying your networking, and how to deploy it via GUI or PowerShell.


