

Data is valuable to people and organizations. Imagine losing a company database with customer or payroll information. Backing up databases is vital as a safety net from possible data loss—and that’s not up for debate.
An excellent way to backup MySQL databases and tables is the mysqldump command. Don’t let the dump in the name fool you; mysqldump is a versatile and powerful tool that comes with your MySQL installation.
Ready? Read on and become a MySQL database backup pro!
Prerequisites
This tutorial will be a hands-on demonstration. If you’d like to follow along, you must have a Linux computer with MySQL already installed. This tutorial uses an Ubuntu 20.04 computer with MySQL 8.0.29. Follow the How to Install MySQL on Ubuntu tutorial first if you haven’t installed MySQL yet.
This tutorial also assumes that you have already opened a terminal session to the Linux computer.
Creating the Test Database
Before you can back up a database, you need to have at least one! In this section, you’ll create two sample databases with tables and data for testing.
This tutorial does not cover in detail the creation of MySQL databases, tables, and inserting data. The instructions or commands in this section are for demonstration purposes only.
1. First, connect to the mysql command shell as root. Type the password when prompted, and press Enter.
mysql -u root -p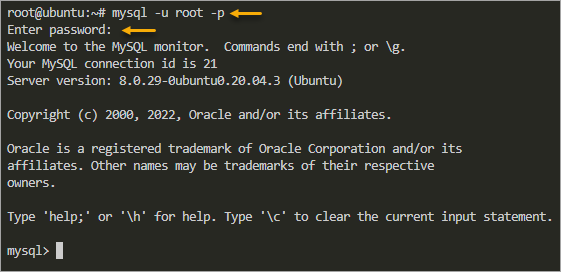
2. Next, copy the below code, paste them to the mysql prompt, and press Enter. Refer to the inline comments to understand what each statement does.
This code will create two databases named menagerie1 and menagerie2, create a pets table inside each database, and insert a sample record inside each table.
/* Create two databases called menagerie1 and menagerie2 */
CREATE DATABASE menagerie1;
CREATE DATABASE menagerie2;

/* Create a new table called pets on the menagerie1 database */
CREATE TABLE menagerie1.pets (
    name VARCHAR(20),
    owner VARCHAR(20),
    species VARCHAR(20),
    sex CHAR(1),
    birth DATE,
    death DATE
);

/* Create a new table called pets on the menagerie2 database */
CREATE TABLE menagerie2.pets (
    name VARCHAR(20),
    owner VARCHAR(20),
    species VARCHAR(20),
    sex CHAR(1),
    birth DATE,
    death DATE
);

/* Insert a new sample record into the pets table on menagerie1*/
INSERT INTO
    menagerie1.pets
VALUES
    (
        'Puffball',
        'Diane',
        'hamster',
        'f',
        '1999-03-30',
        Null
    );

/* Insert a new sample record into the pets table on menagerie2*/
INSERT INTO
    menagerie2.pets
VALUES
    (
        'Good Boy',
        'Karen',
        'dog',
        'm',
        '2000-02-18',
        NULL
    );
3. Now, confirm that the sample data exists inside the tables in your databases by running the below statements.
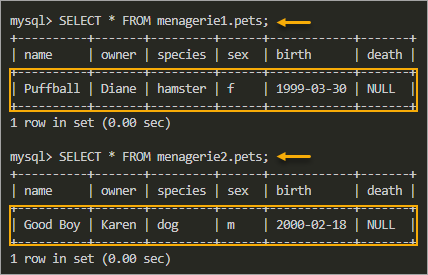
SELECT * FROM menagerie1.pets;
SELECT * FROM menagerie2.pets;
You should see a result similar to the screenshot below. As you can see, the table in both databases has one record each.
4. Lastly, exit the mysql shell by typing quit or \q and press Enter.

Backing Up Entire Databases using the mysqldump Command
You now have MySQL databases, and it’s time to see the mysqldump command in action!
mysqldump is a versatile command-line tool because it lets you back up one or more databases or specific tables only. Also, this tool can generate SQL files that you can use to recreate databases or tables.
There are two ways to back up entire MySQL databases; specific databases and all databases.
IMPORTANT! Each backup method you’ll learn in the succeeding sub-sections overwrites existing backup files with the same filename. Be cautious not to overwrite existing backups in production.
Specific Database Backup
This method creates a backup of one database at a time, which is useful when you want to dump each database into separate backup files. The basic syntax for this method is shown below.
mysqldump [OPTIONS] database_name > backup_file.sql
For example, run the below commands to back up the menagerie1 and menagerie2 databases individually.
# OPTIONS
## * -u root = connect to the MySQL server as the root account.
## * -p = prompt for the account password.
mysqldump -u root -p menagerie1 > menagerie1_db_backup.sql
mysqldump -u root -p menagerie2 > menagerie2_db_backup.sql

Specific Database Backup
The mysqldump command lets you specify one or more databases to back up. As you can see from the syntax below, you must specify the --databases or -B argument followed by the list of databases in the same line.
Note: This method backs up every specified database into one backup file.
mysqldump [OPTIONS] --databases database1 [database2] > backup_file.sql
# OR
mysqldump [OPTIONS] -B database1 [database2] > backup_file.sql
For example, run the below command to create a single backup for the menagerie1 and menagerie2 databases.
mysqldump -u root -p -B menagerie1 menagerie2 > menagerie1_menagerie2_db_backup.sql

All Database Backup
When you need to backup all databases at once without listing each database name, you must specify the --all-databases or -A argument, as shown below.
mysqldump [OPTIONS] --all-databases > backup_file.sql
# OR
mysqldump [OPTIONS] -A > backup_file.sql
To back up all databases into a single backup file, run the below command in your terminal.
mysqldump -u root -p --all-databases > all_db_backup.sql

Note: This method will backup ALL existing MySQL databases, including the default ones, such as sys, mysql, information_schema, and performance_schema. Be mindful when using this backup method.
Inspecting the Database Backup Files
If you followed all instructions, you now have two backup files with the *.sql extension in your current directory. To verify, run the below command in the terminal.
ls -l *.sql
As a result, you should see the four backup files on the list.

Now, open one of the backup files in your preferred text editor, such as nano or Visual Studio Code. Choose the file with the smallest size, which, in this case, is the menagerie1_menagerie2_db_backup.sql.
Can you recognize the formatting in the below screenshot? Yes, those are SQL statements. The mysqldump command generates an SQL script that creates the databases, tables, and records.

Backing Up Tables using the mysqldump Command
Apart from taking backups of entire databases, the mysqldump command allows you to backup specific tables. Taking specific table backups can be more manageable and uses less storage space.
Other benefits of table backups are portability and granularity of data restoration. A smaller backup file size is more portable, and you can restore table backups into a new or existing database.
The syntax for backing up tables is as follows. After specifying the database name, you must append the list of tables to back up. If you do not provide the table names, the mysqldump command will dump all tables in the database.
mysqldump [OPTIONS] database [table1 table2...] > table_backup.sql
Now that you know this syntax follow these steps to back up a database table.
1. Run the below command to back up only the pets table in the menagerie1 database. This command creates a file named menagerie1_pets_tb_backup.sql.
mysqldump -u root -p menagerie1 pets > menagerie1_pets_tb_backup.sql
2. Verify that the backup file creation is successful by listing the *.sql files.
ls -l *.sql
3. Optionally, open the backup file in a text editor or display the contents on the screen.
# Open in the text editor
nano menagerie1_pets_tb_backup.sql
# OR display on the screen
cat nano menagerie1_pets_tb_backup.sql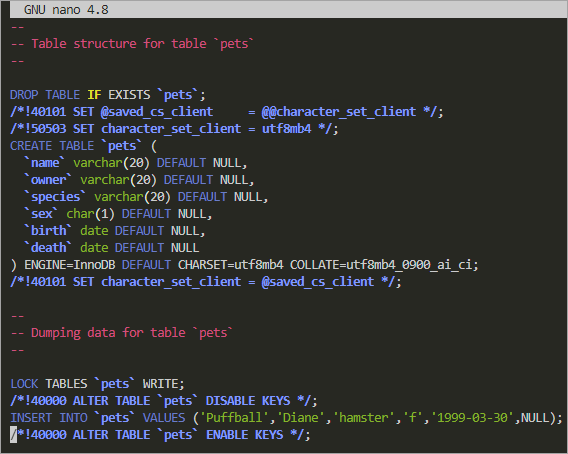
Restoring from Backup
Having backups of your database or tables gives you peace of mind. Knowing that if your database becomes corrupted or someone accidentally deleted it, you have a point in time of the data you can restore.
At this point, the mysqldump command has already done its job to back up the database and tables. Restoring those backups will now be through the mysql command shell.
Restoring Entire Database
Earlier in this tutorial, you created a backup of the menagerie1 and menagerie2 databases to a file named menagerie1_menagerie2_db_backup.sql. In this section, you’ll simulate multiple database losses and restore them from your backup file.
1. First, connect to the MySQL shell.
mysql -u root -p2. Next, drop the menagerie1 and menagerie2 databases to simulate losing multiple databases.
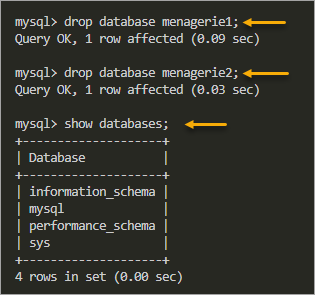
# Delete the databases
DROP DATABASE menagerie1;
DROP DATABASE menagerie2;

# List remaining databases
SHOW DATABASES;
As you can see below, the database deletion was successful. Both databases no longer exist on the MySQL server.
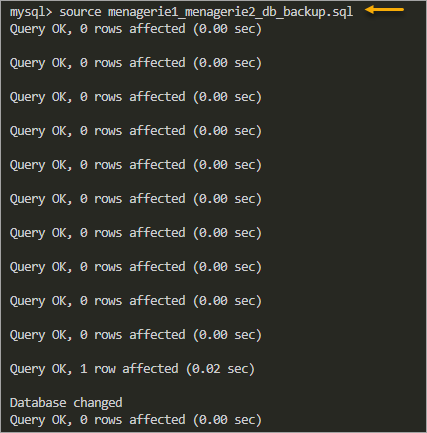
3. Now, restore the databases from the menagerie1_menagerie2_db_backup.sql file. To do so, execute the source or \. command followed by the backup filename (full path or relative path), and watch the magic happen!
source menagerie1_menagerie2_db_backup.sqlYou’ll see a similar output on the screen to the screenshot below.
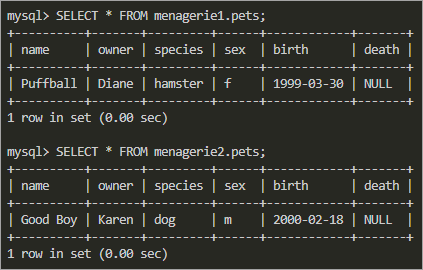
4. Finally, confirm that the databases and their data were successfully restored.
SELECT * FROM menagerie1.pets;
SELECT * FROM menagerie2.pets;
You’ve now successfully restored your databases from backup.
Restoring Database Table
In this example, you’ll be restoring the pets table to the menagerie1 database. You previously created a backup of this table to a file named menagerie1_pets_tb_backup.sql.
1. First, to simulate the loss of the table, run the below commands to delete the pets table from menagerie1.
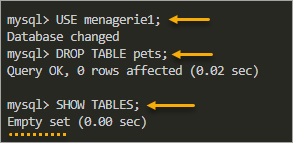
# Switch to the menagerie1 database
USE menagerie1;
# Delete the pets table from menagerie1
DROP TABLE pets;
# List the tables (if any) from menagerie1
SHOW TABLES;
The output below shows that no tables exist in the menagerie1 database after dropping the pets table.
2. Now, execute the source or \. command followed by the table backup file. In this example, the backup file is menagerie1_pets_tb_backup.sql.
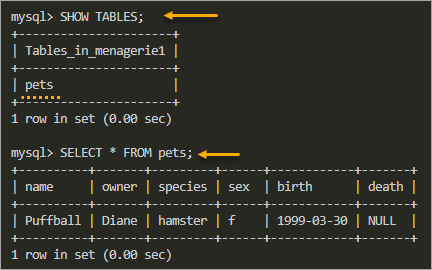
\. menagerie1_pets_tb_backup.sql3. Finally, check that the pet table restoration was successful by running the below commands in the mysql shell.
SHOW TABLES;
SELECT * FROM pets;
As you can see below, the restoration recreated the pets table and data.
Conclusion
Backing up your MySQL databases is an essential task that an administrator should ensure to happen regularly. The mysqldump command makes creating backups of entire databases or individual tables effortless and uncomplicated.
This guide has only covered the basic options of using the mysqldump commands. You can further customize them to suit your needs. Perhaps you should set up a cron job to run the backups on schedule.
In real-life usage, your database is hundred if not thousands of times bigger, and you don’t want your disk filled with SQL files. In that case, you would want to compress your dump file and save it on a network drive or, even better, to cloud storage like the Amazon S3.


