


Knee-deep in managing your MySQL database? As if juggling multiple queries is not enough, you unexpectedly face a hurdle that slows down your progress—a head-scratcher indeed. Well, guess what? MySQL triggers hold the key to streamlining your database workflows effortlessly!
Throughout this tutorial, you will dive deep into the world of MySQL triggers through practical examples. Explore real-life scenarios where MySQL triggers come to the rescue to automate tasks, enforce data integrity, and boost overall database efficiency.
Stay tuned, and say hello to a more streamlined, proactive approach to database management!
Prerequisites
Before you dive head-first into the world of MySQL triggers, ensure you have the following in place to enhance your learning experience:
- A machine running Ubuntu 18.04 or later – This tutorial uses an Ubuntu 20.04.
- MySQL is installed on your machine.
Preparing a Sample Database for MySQL Triggers
Gaining proficiency in using MySQL triggers can significantly improve your ability to manage databases and uphold data integrity. Triggers are automated stored procedures that are activated (fired) in response to specific database events.
These events typically correspond to changes made to the data in the form of insert, update, or delete operations on a table.
To effectively learn and experiment with MySQL triggers, you must prepare a sample database as follows:
Open your MySQL command-line client or terminal and connect to your MySQL server.
Once connected, execute the following SQL statements to CREATE a new DATABASE and a TABLE called users as your playground for triggers.
-- Create a new database called `sampleDB` if it does not already exist
CREATE DATABASE IF NOT EXISTS sampleDB;
-- Switch to the `sampleDB` database
USE sampleDB;
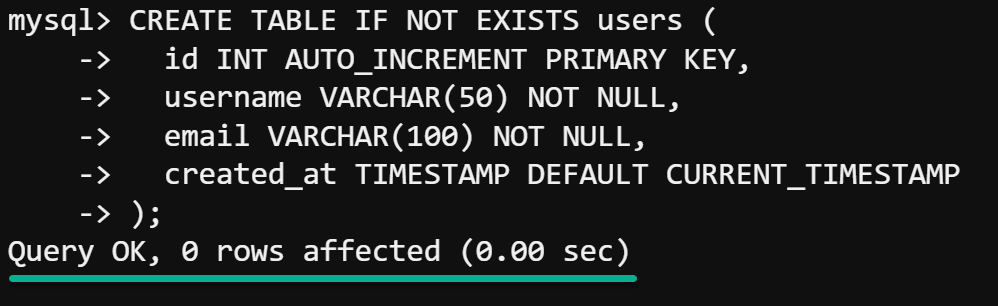
-- Create a `users` table within `sampleDB` if it does not already exist
CREATE TABLE IF NOT EXISTS users (
id INT AUTO_INCREMENT PRIMARY KEY,
username VARCHAR(50) NOT NULL,
email VARCHAR(100) NOT NULL,
created_at TIMESTAMP DEFAULT CURRENT_TIMESTAMP
);
Automating Data Consistency
Manually appending data, such as a username, is harmless if only done once a day. But, the challenge arises when there are thousands of entries to manage. Fortunately, MySQL triggers (BEFORE INSERT) enable preprocessing of data before insertion into your database.
For example, by establishing a BEFORE INSERT trigger, you ensure the standardization of username entries in your database.
To see how automating data consistency works, perform the following:
The following example illustrates how to automatically append the prefix user_ to every new username, fostering consistent formatting across the database.
1. Execute each SQL statement below to define the trigger called before_insert_username (arbitrary).
-- Change the delimiter to prevent conflicts with the semicolon in the trigger body
DELIMITER $$
-- Create a new trigger
CREATE TRIGGER before_insert_username
-- Specify the trigger should fire before an insert operation on the 'users' table
BEFORE INSERT ON users
-- Specify the trigger should operate on each row individually
FOR EACH ROW
BEGIN
  -- Before inserting, modify the 'username' field, prepending 'user_' to the new username value
  SET NEW.username = CONCAT('user_', NEW.username);
END $$
-- Reset the delimiter back to the default semicolon to end the trigger creation
DELIMITER ;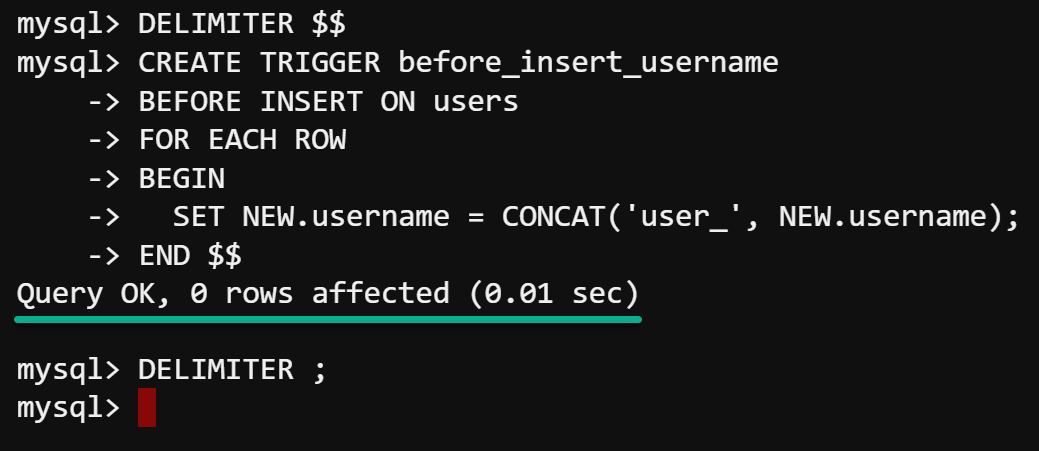
BEFORE INSERT trigger2. With the trigger set up, run the query below to INSERT a new record INTO the users table, deliberately omitting the user_ prefix.
This query lets you test the BEFORE INSERT trigger’s functionality.
INSERT INTO users (username, email) VALUES ('johndoe', '[email protected]');
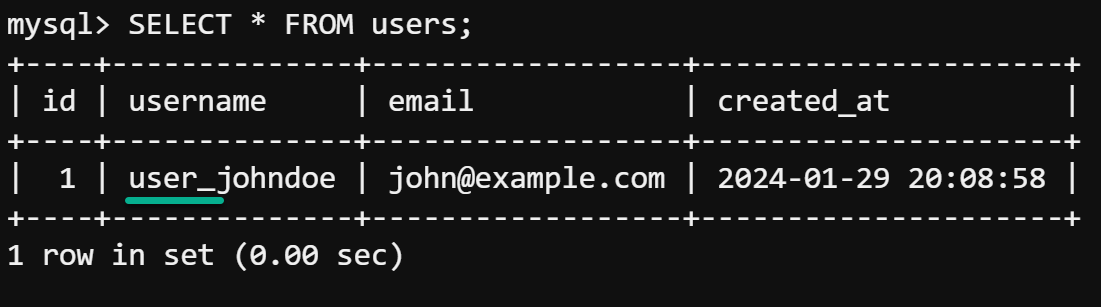
users table3. Now, run this query below to retrieve (SELECT) all (*) data FROM the users table.
SELECT * FROM users;Below, the username value johndoe has been automatically prefixed with user_, demonstrating that the trigger works as expected.
BEFORE INSERT trigger worksEnforcing Data Integrity
Imagine a scenario where the business logic requires that once a username is established, it should remain unchanged to maintain data integrity. A BEFORE UPDATE trigger is the perfect solution, an essential tool for implementing pre-update checks or alterations to a record.
To enforce such a constraint via the BEFORE UPDATE trigger, follow these steps:
Run the below SQL statements to create the BEFORE UPDATE trigger (before_update_username). This trigger compares the existing (OLD.username) and the proposed new (NEW.username) values of the username field.
If there is an attempt to change the username, the trigger intervenes by raising an error, thus ensuring the username’s permanence.
-- Change the delimiter to prevent conflicts with the semicolon in the trigger body
DELIMITER $$

-- Create a new trigger
CREATE TRIGGER before_update_username
-- Specify that the trigger should fire before an update operation is performed on the 'users' table
BEFORE UPDATE ON users
-- Specify that the trigger should operate on each row that is being updated
FOR EACH ROW
BEGIN
  -- Check if the username is being altered in the update statement
  IF OLD.username <> NEW.username THEN
    -- If the username is being changed, raise an error with SQLSTATE '45000'
    -- A generic state representing unhandled user-defined exceptions
    SIGNAL SQLSTATE '45000'
    -- Set the error message to indicate that updating the username is not allowed
    SET MESSAGE_TEXT = 'Updating username is not allowed.';
  END IF;
END $$

-- Reset the delimiter back to the default semicolon to end the trigger creation
DELIMITER ;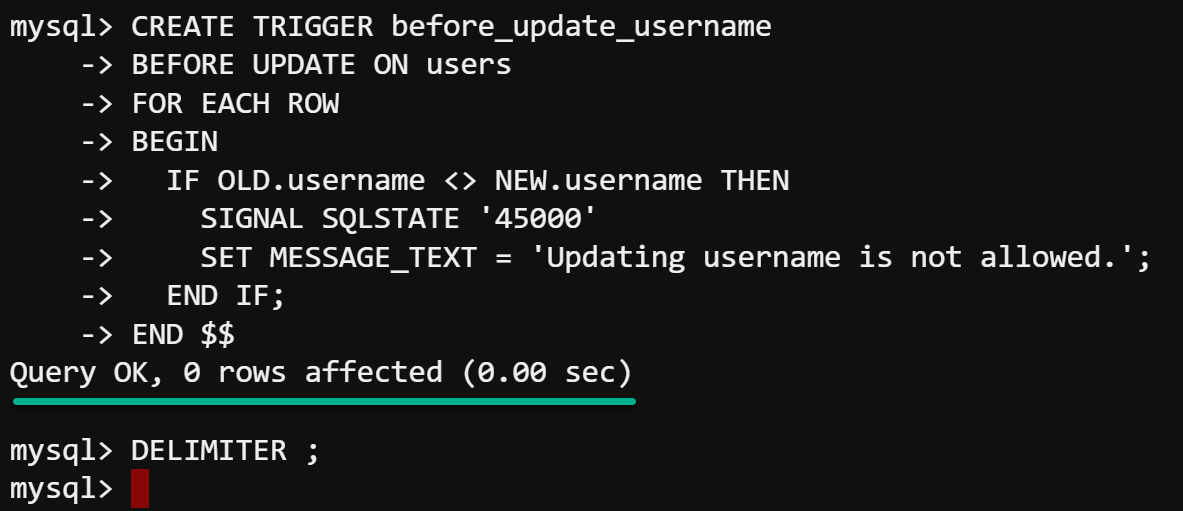
BEFORE UPDATE triggerNow, execute the following query to make an UPDATE to a username janedoe from the users table. This query lets you test the BEFORE UPDATE trigger’s effectiveness.
UPDATE users SET username = 'janedoe' WHERE id = 1;Attempting this update triggers an error, saying Updating username is not allowed, as shown below.
This error confirms that the BEFORE UPDATE trigger actively guards the integrity of the username as intended.

BEFORE UPDATE trigger’s effectivenessCreating a Reliable Audit Trail
Picture this: rows are added, modified, or removed. But how do you track who did what and when? In such cases, creating a reliable audit trail comes into play.
An AFTER INSERT trigger is like the unsung hero of your database, keeping everything in line and ensuring all new records settle in without a hitch. This trigger is crucial for recording transactions for audit purposes and compliance.
To illustrate implementing an AFTER INSERT trigger, carry out the following:
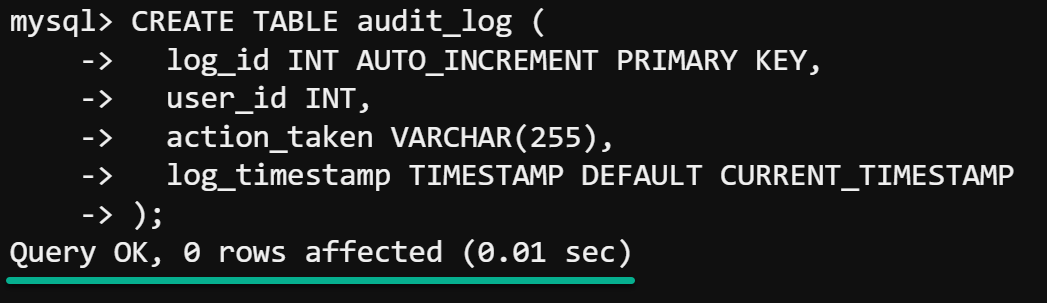
1. First, execute the following SQL statement to CREATE a TABLE called audit_log (arbitrary).
Log entries are stored in this table whenever a new user is added to your database.
-- Create a new table called 'audit_log'
CREATE TABLE audit_log (
  -- 'log_id' is an integer column that auto-increments with each new record.
  -- The table's primary key, meaning each value must be unique.
  log_id INT AUTO_INCREMENT PRIMARY KEY,

  -- 'user_id' is an integer column that presumably references an ID from the 'users' table.
  -- This column is intended to identify which user took the action.
  user_id INT,

  -- 'action_taken' is a variable character string column with a maximum length of 255 characters.
  -- This column is used to describe the action that the user took.
  action_taken VARCHAR(255),

  -- 'log_timestamp' is a timestamp column that defaults to the current timestamp at the moment of row insertion.
  -- This column records when the action was logged.
  log_timestamp TIMESTAMP DEFAULT CURRENT_TIMESTAMP
);
2. Next, run each statement below to define the AFTER INSERT trigger to automatically log (INSERT) user creation events into the audit_log table.
-- Set the delimiter to a custom value to define a multi-statement trigger
DELIMITER $$

-- Create a new trigger
CREATE TRIGGER after_insert_user
-- Specify that the trigger should run after an insert event on the 'users' table
AFTER INSERT ON users
-- The trigger will execute once for each row inserted into the 'users' table
FOR EACH ROW
BEGIN
  -- Insert a new record into the 'audit_log' table
  INSERT INTO audit_log (user_id, action_taken)
  -- Set the values for the new audit log record
  -- NEW.id: The value of the 'id' column for the newly inserted row into the 'users' table
  -- The action is recorded as a string 'User created'
  VALUES (NEW.id, 'User created');
END $$

-- Reset the delimiter back to the default semicolon
DELIMITER ;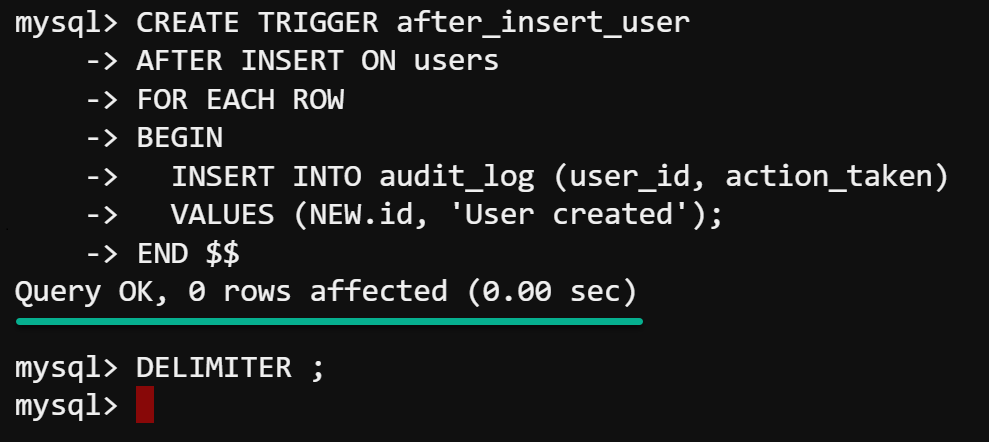
AFTER INSERT trigger3. With the trigger in place, run the query below to INSERT a new record INTO the users table.
INSERT INTO users (username, email) VALUES ('joe', '[email protected]');
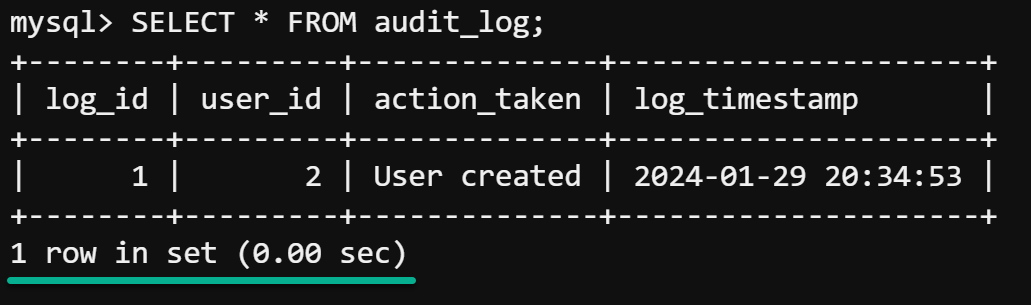
users table4. Now, retrieve (SELECT) all data (*) FROM the audit_log table to verify the AFTEfunctionality of the R INSERT trigger.
SELECT * FROM audit_log;You will see an output similar to the one below, showing a new log corresponding to the newly inserted user record.
This output confirms the successful execution of your AFTER INSERT trigger.
AFTER INSERT trigger’s functionalityMaintaining a Detailed Email Update History
The ability to capture and log every email change users make in your system goes a long way. How? AFTER UPDATE triggers can automatically record changes to user emails in a separate log table, providing a historical record of updates.
To define an AFTER UPDATE trigger to track email changes, proceed with the following:
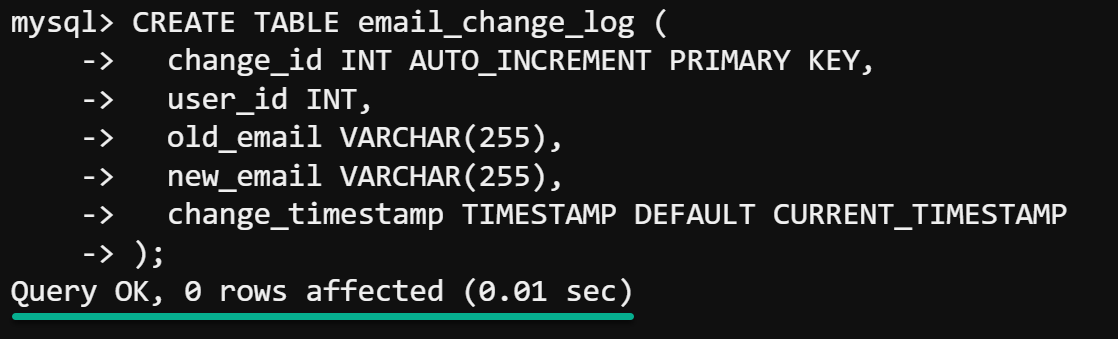
1. Run the following statements to CREATE a log TABLE called email_change_log (arbitrary) to record email changes.
-- Create a new table.
CREATE TABLE email_change_log (

  -- 'change_id' is an integer column that will serve as the primary key.
  -- The value auto-increments, ensuring each record is unique.
  change_id INT AUTO_INCREMENT PRIMARY KEY,

  -- 'user_id' - An integer column referencing the user's ID from the 'users' table.
  -- This column lets you identify which user changed their email.
  user_id INT,

  -- 'old_email' - A variable character string column (max length is 255 characters).
  -- This column stores the user's email address before the change.
  old_email VARCHAR(255),

  -- 'new_email' - A variable character string column (max length is 255 characters).
  -- This column stores the user's new email address after the change.
  new_email VARCHAR(255),

  -- 'change_timestamp' - A timestamp column that defaults to the current timestamp.
  -- This column records when the email change was made during row insertion.
  change_timestamp TIMESTAMP DEFAULT CURRENT_TIMESTAMP
);
2. Next, execute each statement below to define the AFTER UPDATE trigger, which checks if the email field has been modified whenever a users record is updated.
If a change is detected, the trigger inserts a new record into the email_change_log table with the old and new emails and associated user IDs.
-- Set the delimiter to a custom value to define a multi-statement trigger
DELIMITER $$

-- Create a new trigger
CREATE TRIGGER after_update_email
-- Specify that the trigger should run after an update occurs on the 'users' table
AFTER UPDATE ON users
-- The trigger will execute once for each row that is updated
FOR EACH ROW
BEGIN
  -- Check if the 'email' column is being updated
  IF OLD.email <> NEW.email THEN
    -- With email changes, insert a record into the 'email_change_log' table
    INSERT INTO email_change_log (user_id, old_email, new_email)
    -- Identify the user via the old ID
    -- Record both the old and new email addresses
    VALUES (OLD.id, OLD.email, NEW.email);
  END IF;
END $$

-- Reset the delimiter back to the default semicolon
DELIMITER ;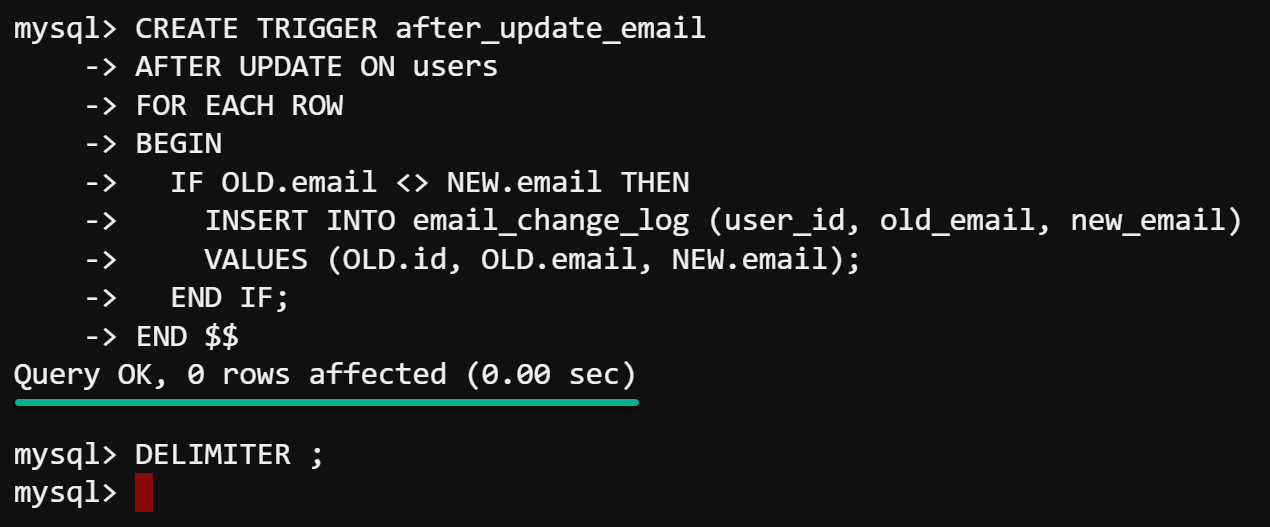
AFTER UPDATE trigger3. Now, execute the query below to UPDATE a user’s data and SET the email value to [email protected].
UPDATE users SET email = '[email protected]' WHERE id = 1;
4. Subsequently, run the following query to retrieve all data from the email_change_log table to validate that the trigger works.
SELECT * FROM email_change_log;If the trigger functions correctly, you will see an entry in the email_change_log table that reflects the update.
The entry below includes the old_email and new_email fields showing the before and after states and the change_timestamp indicating when the change occurred.
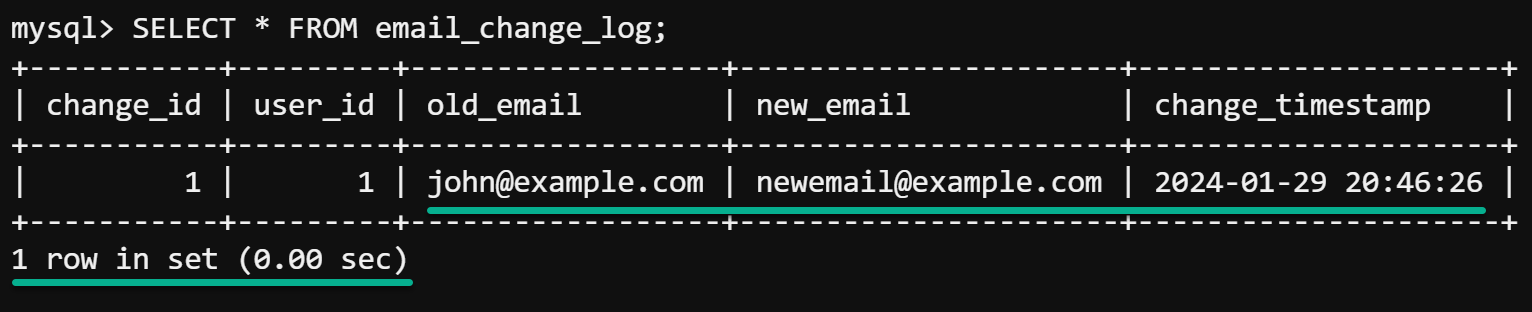
AFTER UPDATE trigger worksSafeguarding Data From Accidental Deletions
Have you ever experienced that sinking feeling when you realize you have accidentally deleted something important? Such mishaps happen, especially in the fast-paced world of database management.
But fear not! You can sidestep those dreaded accidental deletions with a robust solution—the BEFORE DELETE trigger. This trigger is an essential protective measure, providing a strong first line of defense to maintain referential integrity.
To avoid accidental data loss with the BEFORE DELETE trigger, complete the steps below:
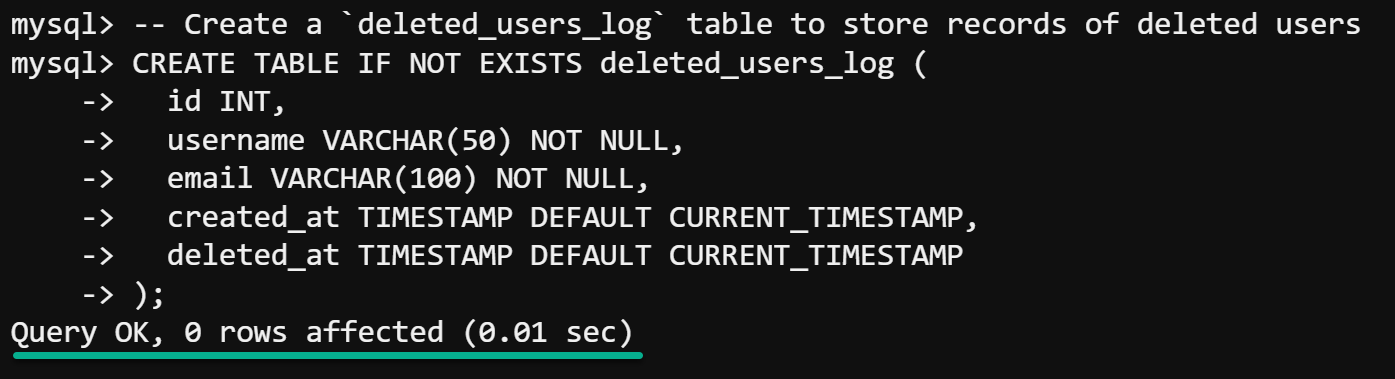
1. Execute the following SQL statement to CREATE a dedicated TABLE (deleted_users_log ) to retain user details at the moment of deletion.
This archival table reflects the structure of the users table but additionally incorporates a timestamp to denote the deletion event.
CREATE TABLE IF NOT EXISTS deleted_users_log (
  id INT,
  username VARCHAR(50) NOT NULL,
  email VARCHAR(100) NOT NULL,
  created_at TIMESTAMP DEFAULT CURRENT_TIMESTAMP,
  deleted_at TIMESTAMP DEFAULT CURRENT_TIMESTAMP
);
2. Next, run each statement below to define the BEFORE DELETE trigger (before_delete_users).
This trigger systematically populates the deleted_users_log table with pertinent data right before a user is removed from the users table. Each archived user entry includes a precise timestamp reflecting the time of deletion.
-- Change the delimiter to avoid conflicts with semicolons in the trigger body
DELIMITER $$

-- Create a trigger that fires before a row is deleted from the 'users' table
CREATE TRIGGER before_delete_users
BEFORE DELETE ON users FOR EACH ROW
BEGIN
  -- Insert a record into the deleted_users_log table with the deleted user's information
  INSERT INTO deleted_users_log (id, username, email, created_at, deleted_at)
  VALUES (OLD.id, OLD.username, OLD.email, OLD.created_at, NOW());
END$$

-- Reset the delimiter back to semicolon
DELIMITER ;
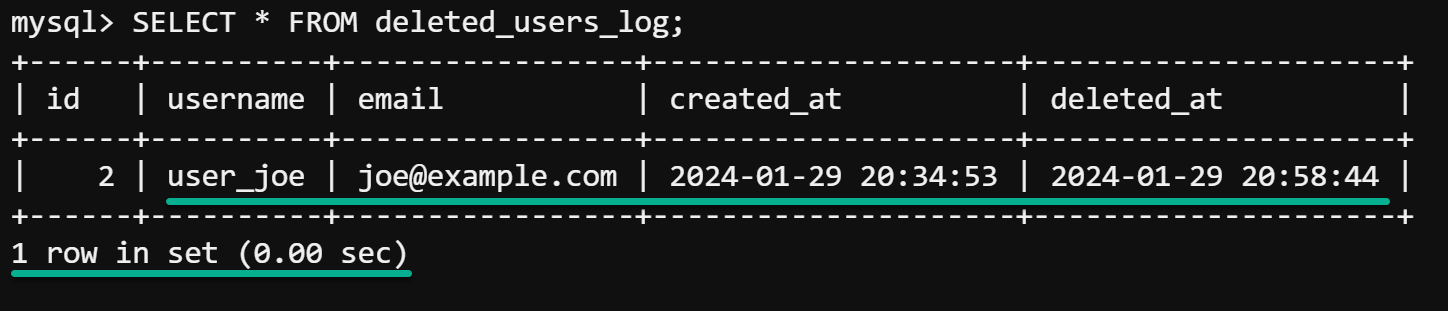
BEFORE DELETE trigger3. After defining the trigger, run the query below to DELETE a specific user with id = 2 FROM the users table.
DELETE FROM users WHERE id = 2;
4. Thereafter, execute the following query to retrieve (SELECT) all data (*) FROM the deleted_users_log table. This query lets you confirm the deletion event has been logged accurately in the deleted_users_log table.
SELECT * FROM deleted_users_log;If the trigger works as expected, you will see the deleted user’s data and the timestamp of when the deletion happened.
This streamlined process ensures each deletion is as clear as day, allowing you to check or retrieve data if needed. Leveraging the BEFORE DELETE trigger is like adding an extra layer of trust and reliability to your database management system.
Managing MySQL Triggers
Managing MySQL triggers effectively is essential for database administration. A key aspect involves proficiency in listing available triggers within the database and removing obsolete ones.
To manage MySQL triggers in your database effectively, execute the following:
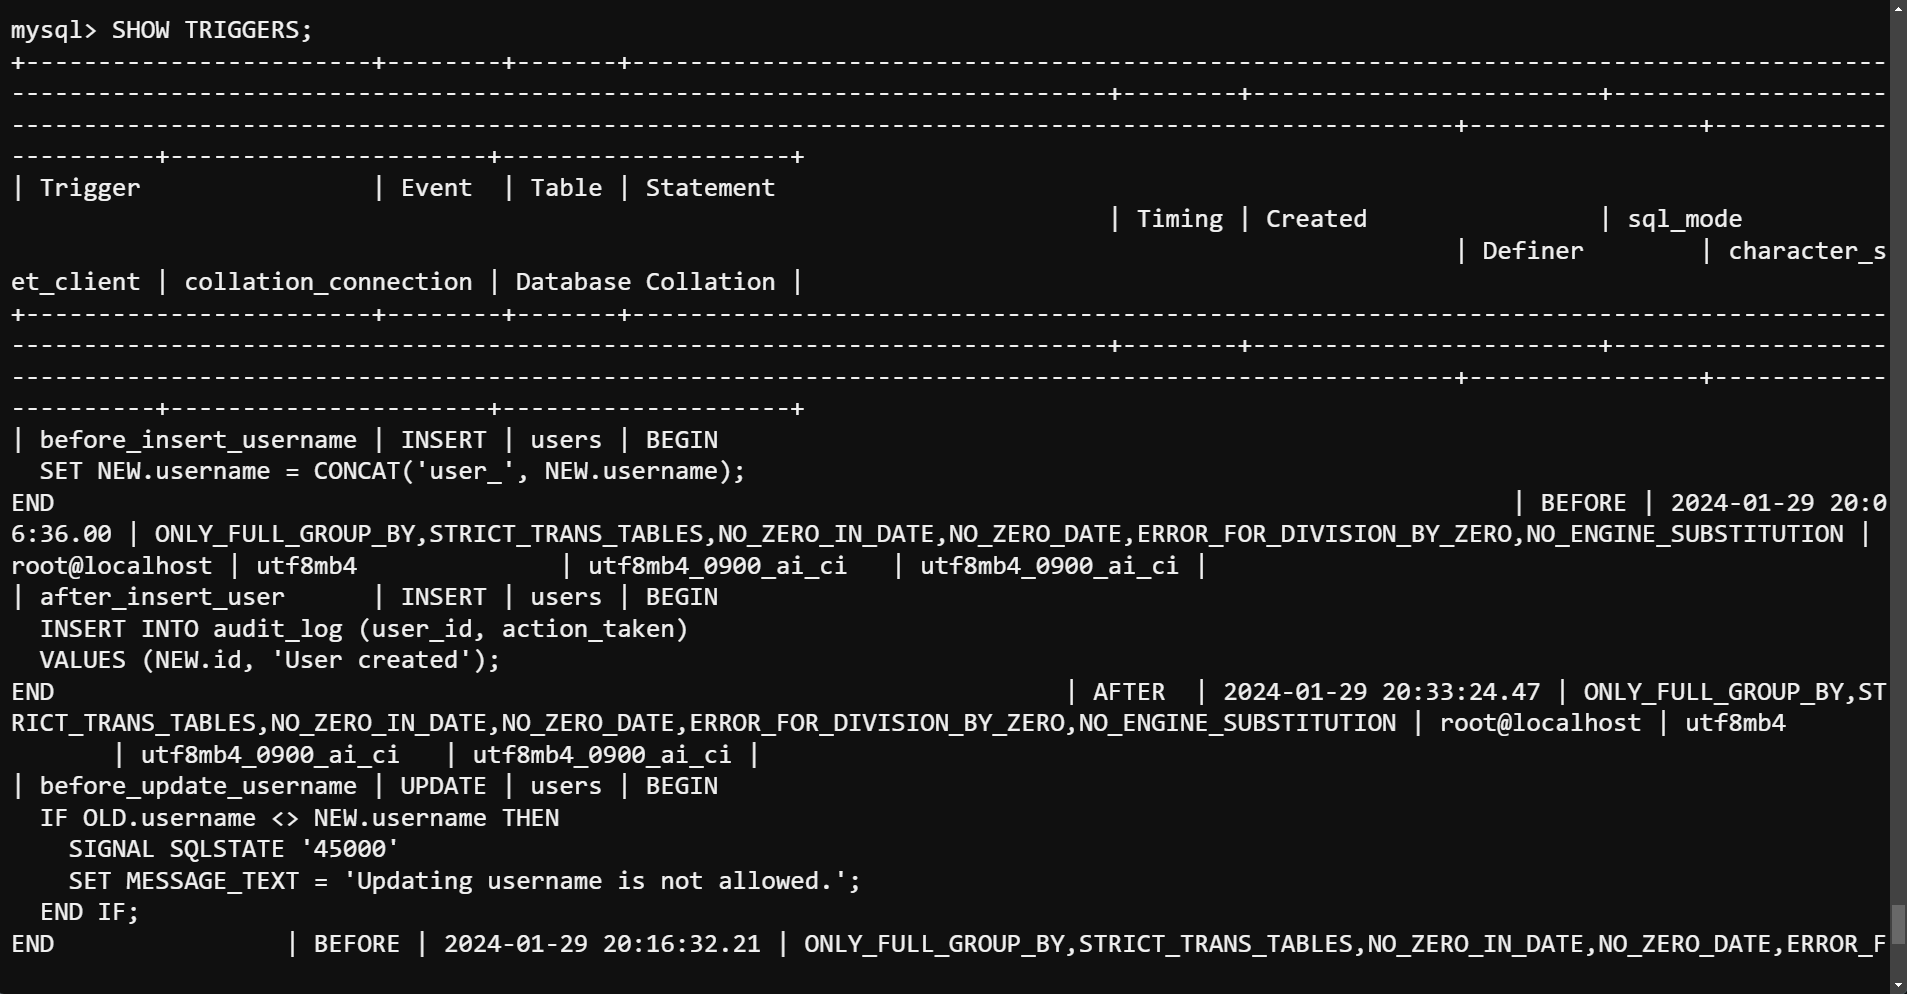
Invoke the following statement to SHOW an overview of all TRIGGERS defined in your current database.
SHOW TRIGGERS;This statement provides you with a detailed list of triggers that includes the following:
- The trigger name.
- The event that activates the trigger (i.e., INSERT, UPDATE, DELETE)
- The timing of the trigger (BEFORE or AFTER).
- The table on which the trigger acts.
Pick one specific trigger that is no longer needed and note down its trigger name (i.e., before_insert_username).
Lastly, run the query below to remove (DROP) a specific TRIGGER of your choice.
Ensure you substitute trigger_name accordingly, and be cautious, as removing a trigger cannot be undone.
DROP TRIGGER IF EXISTS database_name.trigger_name;💡 Beware of any application dependencies on the trigger. Removing a trigger without understanding its role can lead to data integrity issues or break application logic that relies on the trigger.

Conclusion
MySQL triggers are powerful tools that automatically enforce business rules, data integrity, and logging without manual intervention. Through the practical examples in this tutorial, you have mastered MySQL triggers, from enforcing integrity to safeguarding data.
With the foundational knowledge of MySQL triggers now in your skill set, why not explore more advanced concepts, like trigger nesting? Create more complex and dynamic behaviors within your database to automate intricate tasks and maintain data integrity with greater precision.
Go forth and pull the triggers to fire them up to their full potential!


