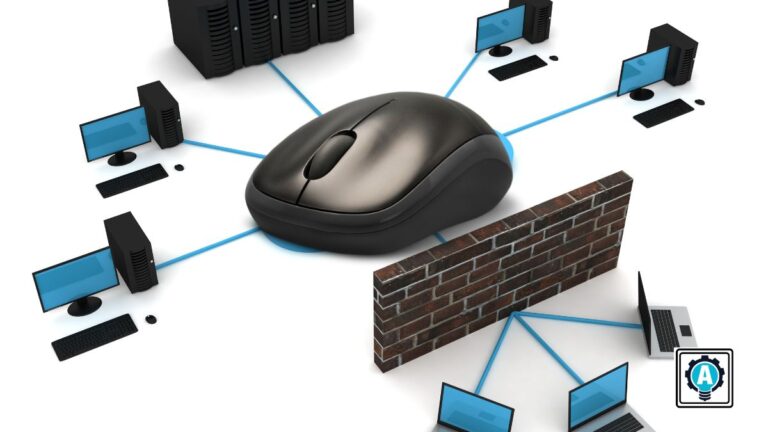


Tired of juggling multiple computers at your workspace? Microsoft’s Mouse without Borders is here to streamline your experience!
In this comprehensive tutorial, you’ll learn how to set up Mouse without Borders, a game-changing solution that allows you to control multiple PCs using just one mouse and keyboard. Let’s dive in and elevate your productivity to new heights.
Read on to discover how Mouse without Borders can make your life simpler and more efficient!
Prerequisites for Setting Up Mouse without Borders
Before you can unlock the full potential of Mouse without Borders, make sure you have:
- At least two PCs connected to the same network.
- Operating systems: Windows 7 or later (this tutorial uses Windows 10 and Windows 11).
Installing Mouse Without Borders on Your Windows PC
Developed by Microsoft, Mouse without Borders is a versatile software application that allows you to effortlessly switch between up to four computers. Say goodbye to the hassle of using separate input devices for each system!
To make the most out of Mouse without Borders, you need to install it on all the computers you intend to control. Here’s how to do it:
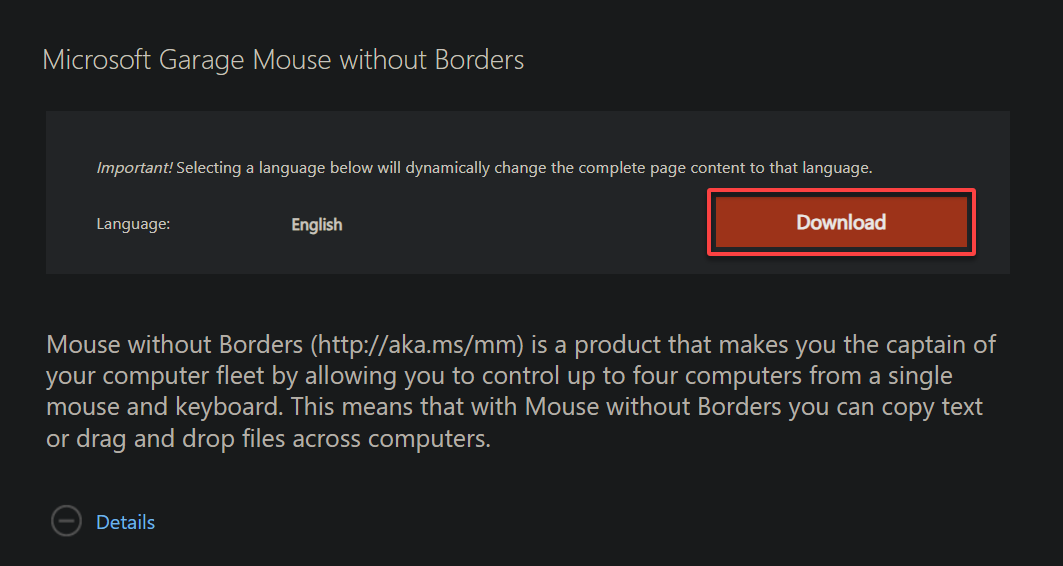
- Step 1: Open your preferred web browser, navigate to the official Mouse without Borders download page, and click Download to get the setup file.
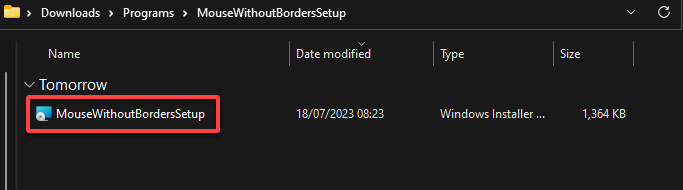
- Step 2: Launch the downloaded MouseWithoutBordersSetup file to start the installation process.
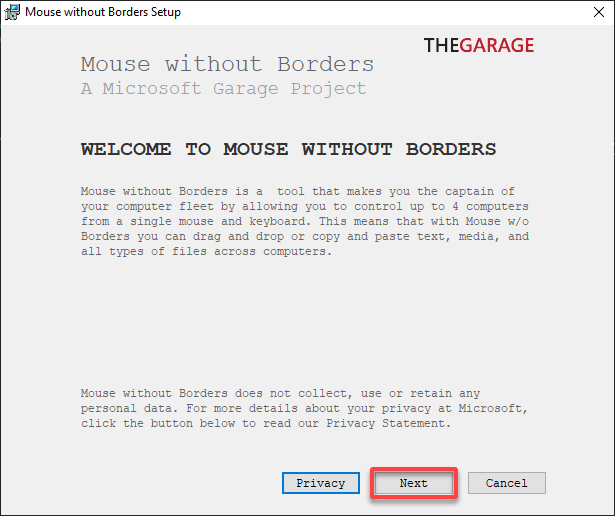
- Step 3: Follow the on-screen instructions to complete the installation.
Once the setup file for Mouse without Borders is downloaded, double-click to open it as shown below.
Next, click Next on the Mouse without Borders setup window to proceed.
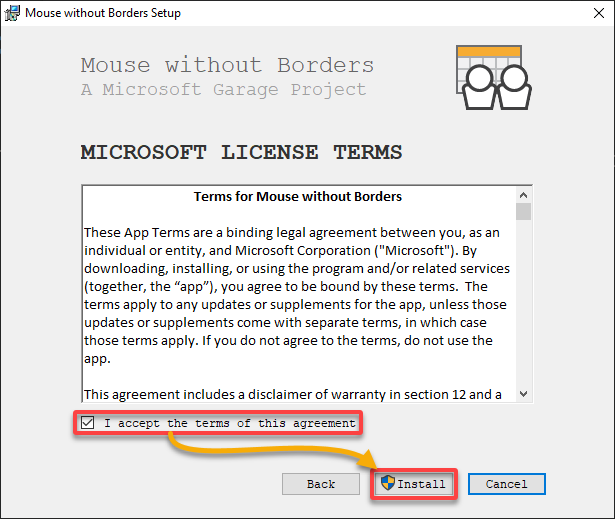
Lastly, check the box to accept the license terms and click Install to finalize the Mouse without Borders installation.
5. Finally, click Finish to wrap up the Mouse without Borders installation and close the setup wizard.
Congratulations! You’ve successfully installed Mouse without Borders on both of your computers.

How to Link Multiple Devices with Mouse Without Borders
With Mouse without Borders now installed on your systems, you’re just a few steps away from experiencing seamless control over multiple devices. Let’s walk through configuring your Mouse without Borders settings.
Here’s how to establish the link between your computers using Mouse without Borders:
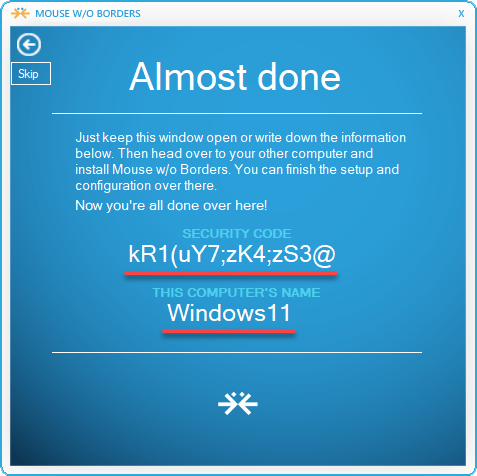
- Step 1: Open Mouse without Borders on your primary computer and click NO, as the secondary computer hasn’t been configured yet.
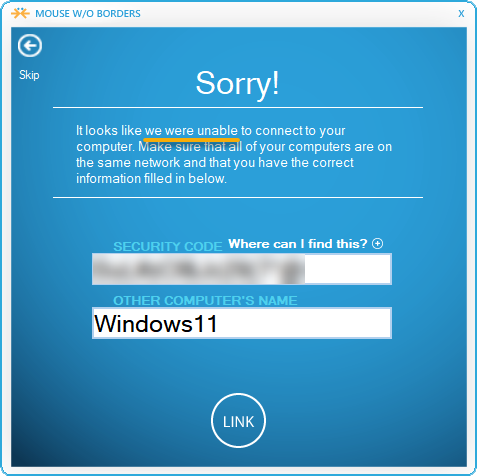
- Step 2: Take note of the SECURITY CODE and COMPUTER’S NAME displayed on the screen. You’ll need these details to link the computers.
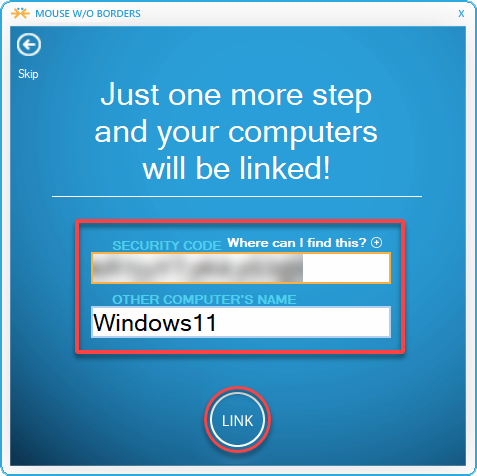
- Step 3: Switch to your secondary computer, open Mouse Without Borders, and select Yes.
- Step 4: Enter the SECURITY CODE and COMPUTER NAME you noted down earlier and click LINK.
- Step 5: Once the devices are linked, click NEXT to finalize the configuration.

2. Make sure to jot down the SECURITY CODE and COMPUTER’S NAME, as these are crucial for linking your computers.
3. Switch to your second computer, and in the Mouse without Borders interface, click Yes this time.

4. Carefully enter the SECURITY CODE and COMPUTER NAME (remember, they’re case-sensitive) and click LINK to establish the connection between your devices.
Note: Ensure you enter the SECURITY CODE and COMPUTER NAME accurately. Both fields are case-sensitive.
5. After successfully linking your devices with Mouse without Borders, click NEXT to proceed.

6. Click DONE to finalize the Mouse without Borders setup process.

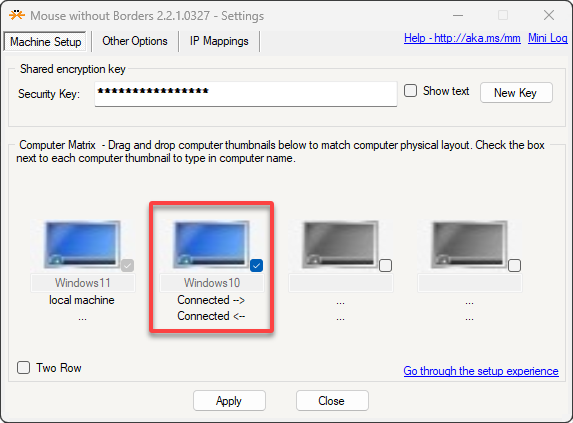
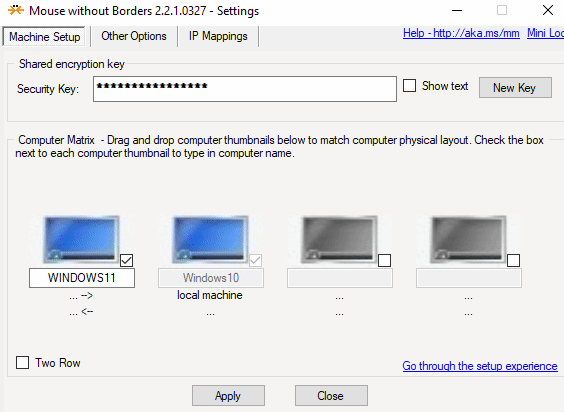
You should now see all your connected computers displayed in the Mouse without Borders main window. Once linked, the software automatically synchronizes your mouse and keyboard, enabling seamless control over all connected computers.
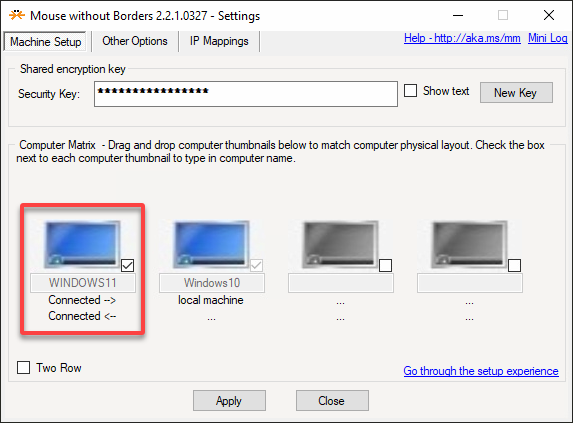
7. To test the setup, simply move your mouse cursor beyond the edge of either computer’s screen. This unique Mouse without Borders feature turns your second monitor into a virtual extension of the first one.
With Mouse without Borders, your dual-system setup now functions almost like a single computer. Your mouse and keyboard can control both systems seamlessly.

Troubleshooting Mouse Without Borders Errors
Occasionally, you might encounter error messages when trying to link computers via Mouse without Borders. But don’t fret; we’ve got solutions for the common issues.
Running Mouse Without Borders as an Administrator
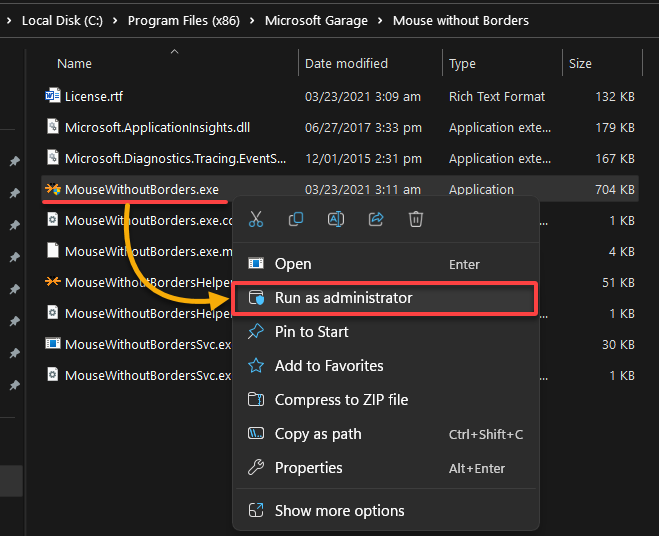
If you encounter errors related to elevated privileges, running Mouse without Borders as an administrator can often solve the issue. This allows the software to access required system resources, bypassing any restrictions.
- 1. Navigate to the Mouse without Borders installation folder, usually located at C:\Program Files (x86)\Microsoft Garage\Mouse without Borders.
- 2. Right-click on the program file and choose Run as administrator from the context menu.
3. Recheck the link status between your computers in the Mouse without Borders application. If the issue remains, move on to the following section for more advanced troubleshooting.
Resolving Compatibility Issues in Mouse without Borders
If running Mouse without Borders as an administrator didn’t resolve the issue, the next step is to tackle any potential compatibility problems. Compatibility issues could arise due to system updates or differences in Windows versions.
To adjust compatibility settings for Mouse without Borders, follow these steps:
1. Right-click on the Mouse without Borders program file and choose Properties from the context menu.
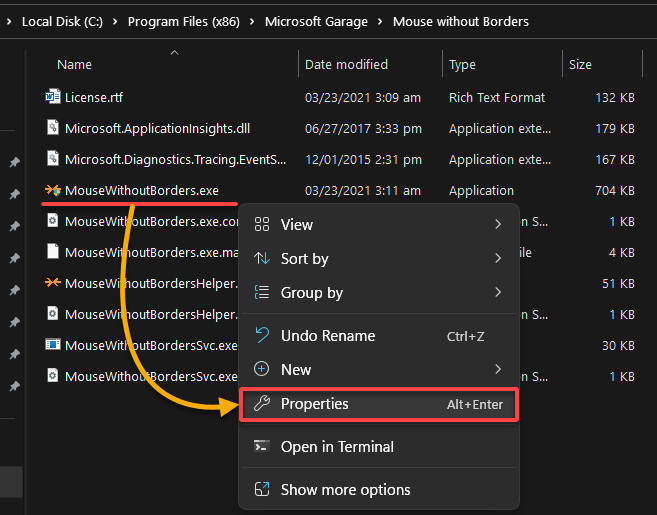
2. In the Properties window, perform the following:
- Navigate to the Compatibility tab.
- Enable the Run this program in compatibility mode checkbox. Then, select a compatible Windows version from the dropdown menu. This setting allows Mouse without Borders to interact with the system as if it’s an older version of Windows.
- Click Apply and OK to save your changes.
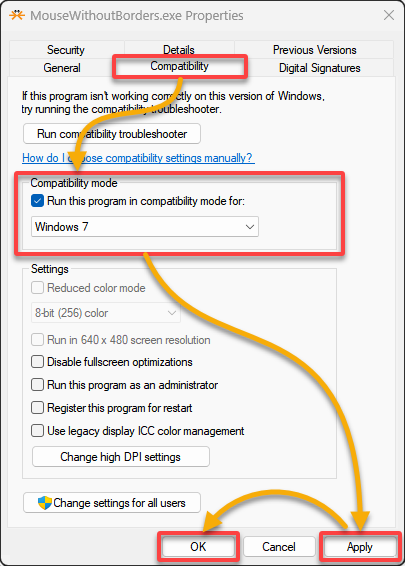
3. After applying these settings, restart Mouse without Borders as an administrator.
4. Recheck the connection status of your computers in Mouse without Borders. If the issue persists, you may need to opt for manual linking, as explained next.
Manual Linking of Devices in Mouse without Borders
Sometimes, Mouse without Borders might not automatically detect all computers on your network. This can happen due to various reasons such as firewall restrictions or specific network configurations.
If you’re struggling with this, a workaround is to manually link the computers using their local IP addresses.
To manually link your devices using Mouse without Borders, adhere to the following steps:
1. On the first computer, launch PowerShell and execute the ipconfig command to obtain the machine’s local IP address.
ipconfig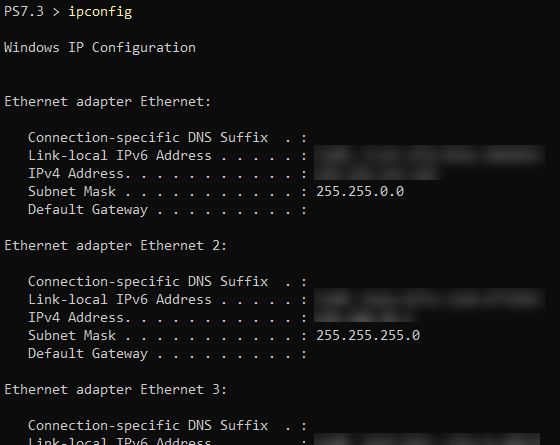
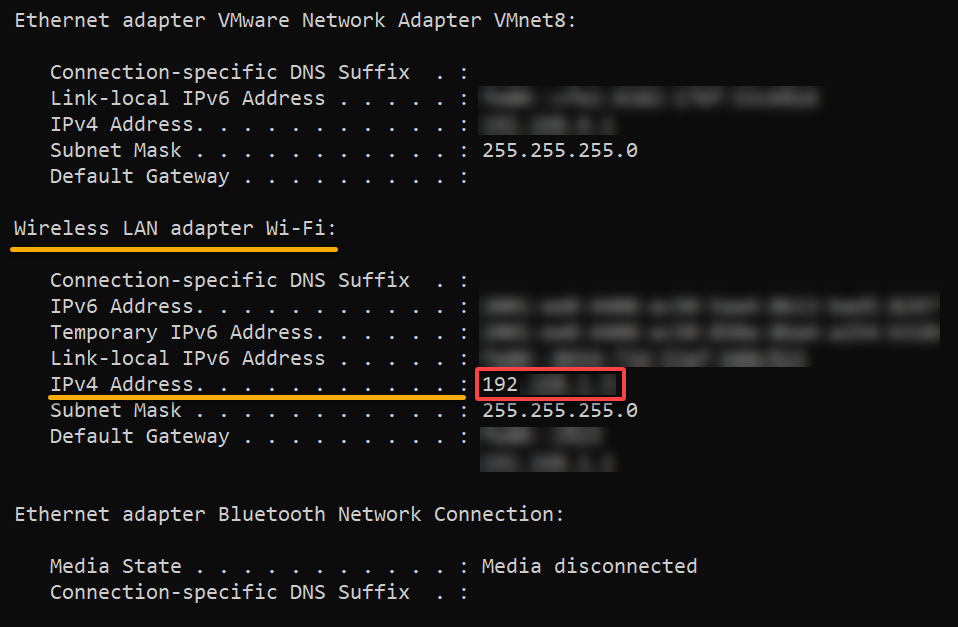
2. Take note of the local IPv4 address (e.g., 192.x.x.x) under your active Wi-Fi or Ethernet adapter. You will use this IP address for manual linking in Mouse without Borders.
3. Move on to the following steps for IP mappings:
- Switch to your second computer, and open the IP Mappings tab in the Mouse without Borders application.
- Enter the name of your first computer and the local IP address you recorded in step two. For example, “WINDOWS11 192.x.x.x”.
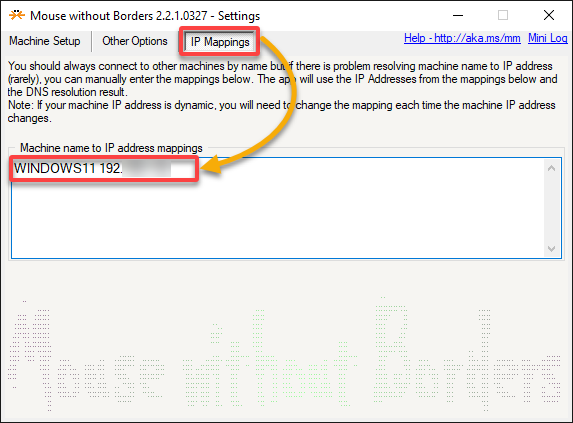
4. Navigate to the Machine Setup tab in Mouse without Borders, and click Apply to save the settings. You should now be able to link your computers successfully.
Unlock the Full Potential of Mouse without Borders
By following this tutorial, you’ve empowered yourself to control multiple PCs using just one mouse and keyboard. Mouse without Borders offers a seamless way to manage multiple devices, enhancing your productivity significantly.
Equipped with this knowledge, you’re now ready to explore the more advanced features of Mouse without Borders. You might want to delve into hotkeys, or learn how to troubleshoot clipboard-sharing issues.
With clipboard sharing, drag-and-drop file transfers, and more, Mouse without Borders is a robust tool for multi-device management. Take your multitasking and workflow to the next level today!


