

Did you know that switching-on modern authentication doesn’t automatically switch off basic authentication? There are steps that you must do to complete the switch to modern authentication Office 365.
Not a reader? Watch this related video tutorial!Microsoft’s momentum in removing basic authentication appears unstoppable now. They’ve started disabling basic authentication on tenants that do not use them. If you haven’t enabled modern authentication in Office 365, let this article help you get started with step-by-step examples.
As of August 1, 2017, newly created tenants already enforced security defaults, which enables modern authentication and blocks basic authentication. If the security defaults are already enabled in your tenant, this tutorial will not apply to you.
Reference: Security defaults in Azure AD.
Prerequisites
Microsoft 365 Backup For Dummies eBook addresses the data security challenges by outlining the out-of-the-box security features in Microsoft 365. Get eBook
This tutorial will be a hands-on demonstration. If you’d like to follow along, you must have Global administrator access to a Microsoft 365 tenant.
Analyzing Basic Authentication Usage in your Tenant
Before tinkering with modern authentication, you must assess whether basic authentication is still in use in your tenant. This way, if there are still users or applications using basic authentication, you can inform the responsible parties that basic authentication will stop working soon.
NOTE: The following subsections involve extracting the Sign-in logs in Azure AD, which require that you have an Azure AD Premium P1 license in your tenant.
Sign-in Logs Report in the Azure AD Admin Center
Follow these steps to export a basic authentication usage report in the Azure AD admin center.
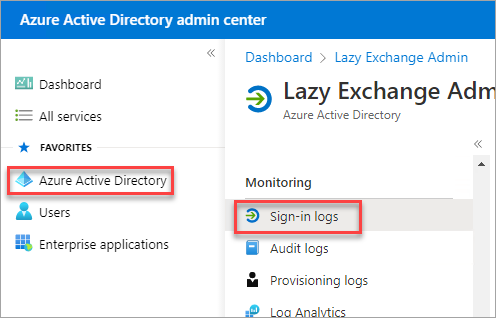
1. Open your web browser and log in to the Azure Active Directory admin center.
2. Next, click on Azure Active Directory → Sign-in logs.
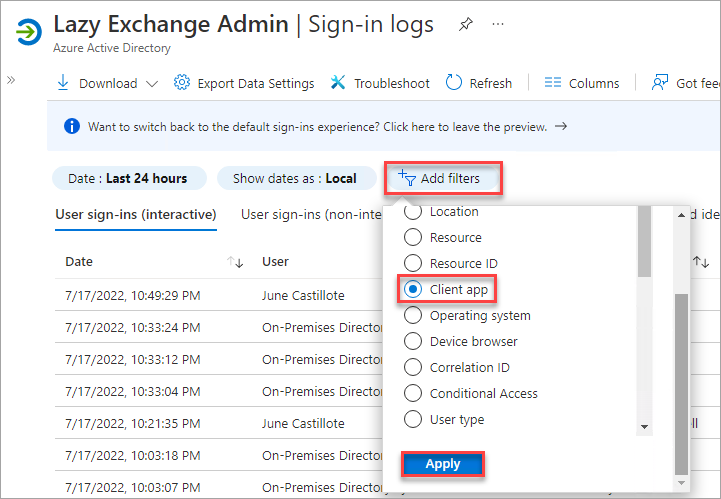
3. When you see the Sign-in logs, click on Add filters → Client app → Apply. This step enables you to filter the records based on the client application.
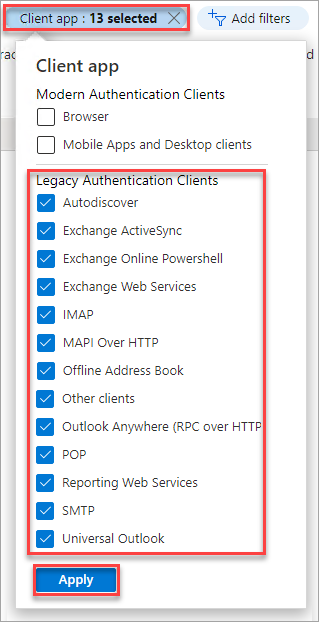
4. Now, click on the Client app filter you added, check every item under the Legacy Authentication Clients section, and click Apply.
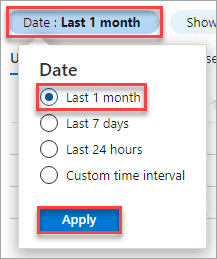
5. Next, adjust the date filter to Last 1 Month, or whichever period you believe is sufficient.
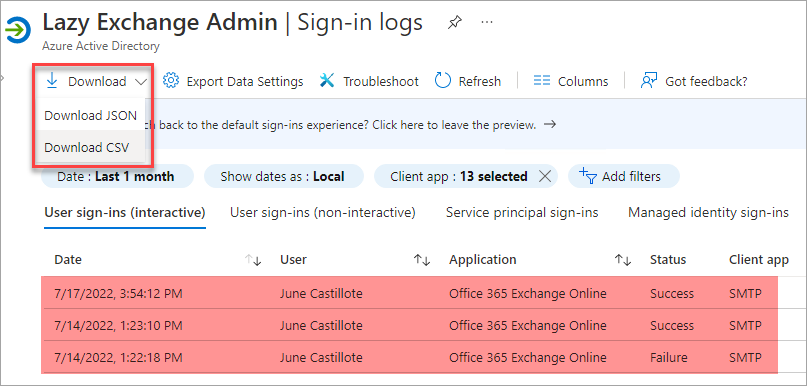
6. If there are results after applying the filter, there are still users or applications using the basic authentication. Click on Download → Download JSON or Download CSV, depending on which file format you prefer for the report and analysis.
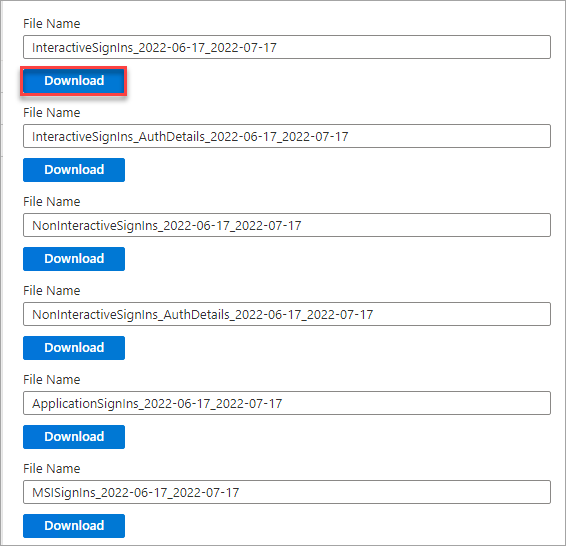
7. Finally, click the Download button under which report you wish to download. This example downloads the Interactive Sign-ins report to a CSV file.
Sign-in Logs Report using the Azure AD PowerShell
If you want more control over the fields to report, you could use PowerShell instead. This method requires the AzureADPreview module, which includes the Get-AzureADAuditSignInLogs cmdlet for extracting sign-in logs.
1. Open an elevated PowerShell.
2. Install the AzureADPreview module if you haven’t installed it yet.
Install-Module AzureADPreview3. Next, connect to Azure Active Directory PowerShell by running the below cmdlet. Log in with your Global administrator credential.
Connect-AzureAD4. Construct a filter with the following conditions and store it in the $filter variable.
clientAppUsedis notMobile Apps and Desktop clientsAND
clientAppUsedis notBrowserAND
clientAppUsedis not empty''AND
createdDateTime is greater than or equal to -30 days.
$filter = @"
ClientAppUsed ne 'Mobile Apps and Desktop clients' and
ClientAppUsed ne 'Browser' and
ClientAppUsed ne '' and
CreatedDateTime gt $((Get-Date).AddDays(-30).ToString('yyyy-MM-dd'))
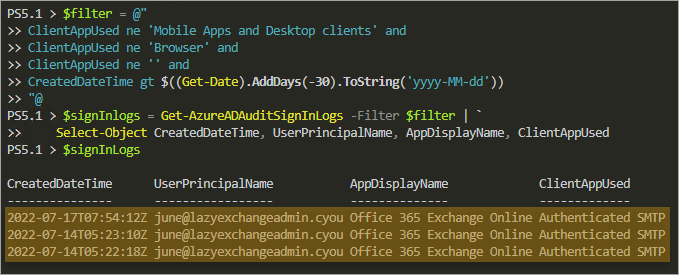
"@5. Run the below command to execute the Get-AzureADAuditSignInLogs cmdlet with the filter and return only the CreatedDateTime, UserPrincipalName, AppDisplayName, and ClientAppUsed properties. The output will export to a CSV file called BasicAuthSignIn.csv.
# Get the sign-in logs
$signInlogs = Get-AzureADAuditSignInLogs -Filter $filter | `
    Select-Object CreatedDateTime, UserPrincipalName, AppDisplayName, ClientAppUsed

# Display the result on the screen
$signInLogs
According to the below results, there is still Authenticated SMTP usage within the last 30 days, which is a form of basic authentication.
The clientAppUsed values other than Mobile Apps and Desktop clients and Browser are using legacy or basic authentication.
6. Optionally, consider exporting the sign-in logs to a CSV file for later use.
$signInlogs | Export-Csv .\BasicAuthSignIn.csv -NoTypeInformationEnabling Modern Authentication in Office 365 Organization
Have you informed your users about the planned switch to modern authentication? If so, and you’ve already completed any other possible preparations your organization may require, you’re ready to start the switch.
The quickest way to enable modern authentication is through the Microsoft 365 admin center, and below are the step to do so.
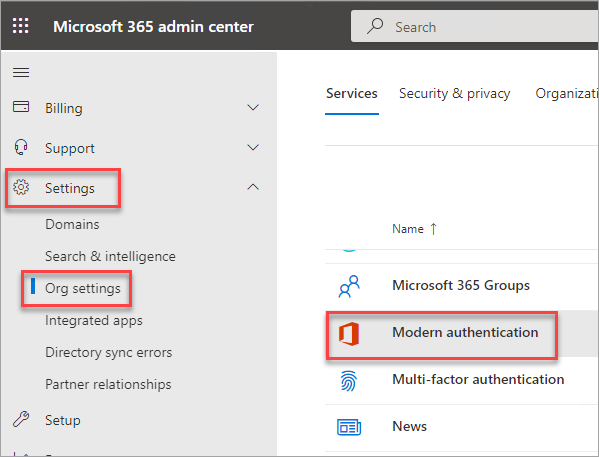
1. Log in to the Microsoft 365 admin center using your web browser.
2. Click Settings → Org Settings → Modern authentication.
3. On the Modern authentication fly-out page that appears, check the Turn on modern authentication for Outlook 2013 for Windows and later (recommended) box and click Save.
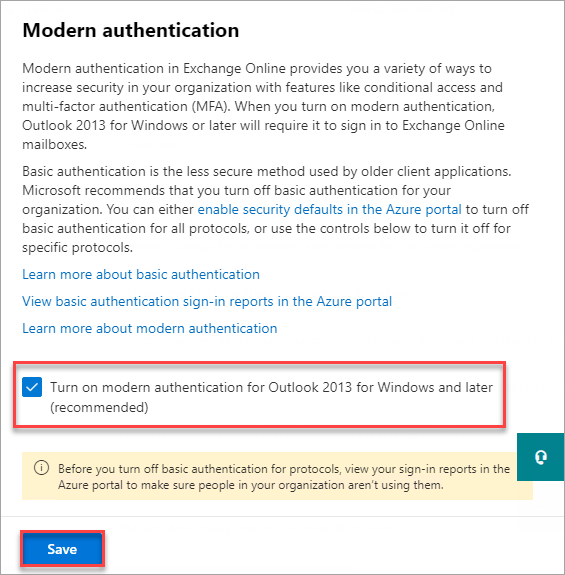
Once you’ve clicked Save to enable modern authentication, additional options will appear: Allow access to basic authentication protocols.
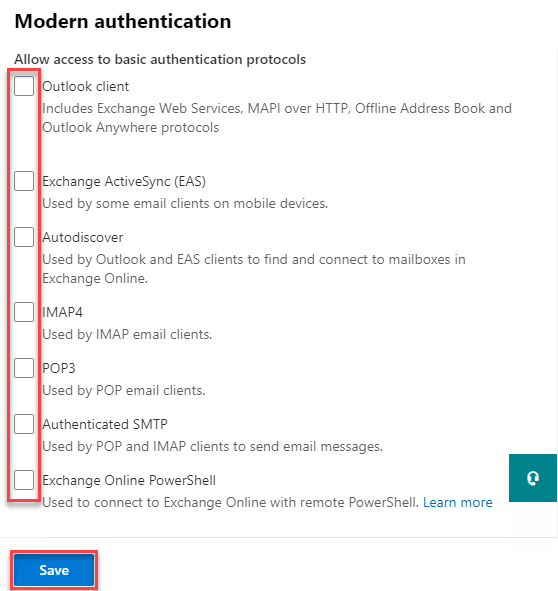
To block basic authentication completely, uncheck the following boxes and click Save. Each checkbox represents a protocol or service.
- Outlook client (including Exchange Web Services (EWS), MAPI over HTTP, Offline Address Book, and Outlook Anywhere)
- Exchange ActiveSync (EAS)
- Autodiscover
- IMAP4
- POP3
- Authenticated SMTP (SMTP AUTH)
- Exchange Online PowerShell
5. Once you’ve saved the modern authentication changes, exit the Moden authentication fly out.
Verifying the Modern Authentication Settings
Do you wonder what happened when you made ticked those modern authentication settings? You should! Understanding how those changes are applied to your tenant is crucial when you eventually need to troubleshoot authentication issues.
The steps in this section require the Exchange Online PowerShell V2 (EXO V2). The latest version, 2.0.5, works with Windows PowerShell 5.1 and PowerShell 7+ on supported operating systems.
1. Open PowerShell and connect to Exchange Online.
Connect-ExchangeOnline -Organization your_tenant.onmicrosoft.com -ShowBanner:$false2. When you turn on modern authentication, you technically set the OAuth2ClientProfileEnabled value in your Exchange Online organization configuration to true. Run the below command to verify that value.
Get-OrganizationConfig | Select-Object OAuth2ClientProfileEnabledAs you can see below, the OAuth2ClientProfileEnabled value is True, which means the modern authentication is on.

3. When you turned off each protocol’s basic authentication in the Microsoft 365 admin center, you technically created a new authentication policy in Exchange Online with the following parameters.
| Parameter name | Value | Protocol or service affected |
| AllowBasicAuthActiveSync | False (Blocked) | Exchange Active Sync (EAS) |
| AllowBasicAuthAutodiscover | False (Blocked) | Autodiscover |
| AllowBasicAuthImap | False (Blocked) | IMAP4 |
| AllowBasicAuthMapi | False (Blocked) | MAPI over HTTP (MAPI/HTTP) |
| AllowBasicAuthOfflineAddressBook | False (Blocked) | Offline Address Book (OAB) |
| AllowBasicAuthPop | False (Blocked) | POP3 |
| AllowBasicAuthRpc | False (Blocked) | Outlook Anywhere (RPC over HTTP) |
| AllowBasicAuthSmtp | False (Blocked) | Authenticated SMTP |
| AllowBasicAuthWebServices | False (Blocked) | Exchange Web Services (EWS) |
| AllowBasicAuthPowerShell | False (Blocked) | PowerShell |
Typically, the authentication policy name starts with BlockAuth*. To verify that authentication policy, run the below code in PowerShell.
$authPolicyParams = @(
'Name','AllowBasicAuthActiveSync',
'AllowBasicAuthAutodiscover','AllowBasicAuthImap',
'AllowBasicAuthMapi','AllowBasicAuthOfflineAddressBook',
'AllowBasicAuthPop','AllowBasicAuthRpc',
'AllowBasicAuthSmtp','AllowBasicAuthWebServices',
'AllowBasicAuthPowerShell'
)
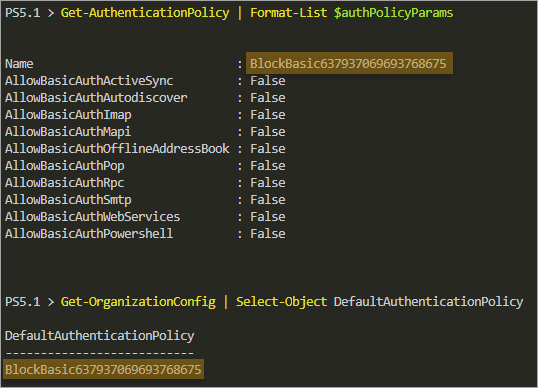
Get-AuthenticationPolicy | Format-List $authPolicyParamsThe result below confirms that the AllowBasic* properties in the authentication policy are set to False, which means blocking basic authentication.

4. So you’ve confirmed the authentication policy blocks all basic authentication. How do you ensure that the authentication policy applies to your organization? To verify, get the DefaultAuthenticationPolicy property value from your Exchange Online organization configuration.
Get-OrganizationConfig | Select-Object DefaultAuthenticationPolicyThe result should show which authentication policy is the default in your organization, as you can see below.
Enabling Modern Authentication Office 365 Outlook Clients
You’ve enabled modern authentication and blocked basic authentication—but your job doesn’t stop there. You must ensure that your Outlook clients on Windows can connect using modern authentication by modifying or adding some registry items.
Note: If the registry entries for your version of Outlook do not exist, don’t panic, you only need to create them.
Note: Outlook 2010 does not support modern authentication, and there are no available workarounds.
Open PowerShell as admin and run the commands appropriate to your Outlook version.
Outlook 2013
Outlook 2013 supports modern authentication by default, but it is not active. To activate, modify the following registry entries.
# The two entries below enable modern authentication in Outlook 2013
Set-ItemProperty -Path HKCU:\\Software\\Microsoft\\Office\\15.0\\Common\\Identity -Name EnableADAL -Value 1 -Force
Set-ItemProperty -Path HKCU:\\Software\\Microsoft\\Office\\15.0\\Common\\Identity -Name Version -Value 1 -Force
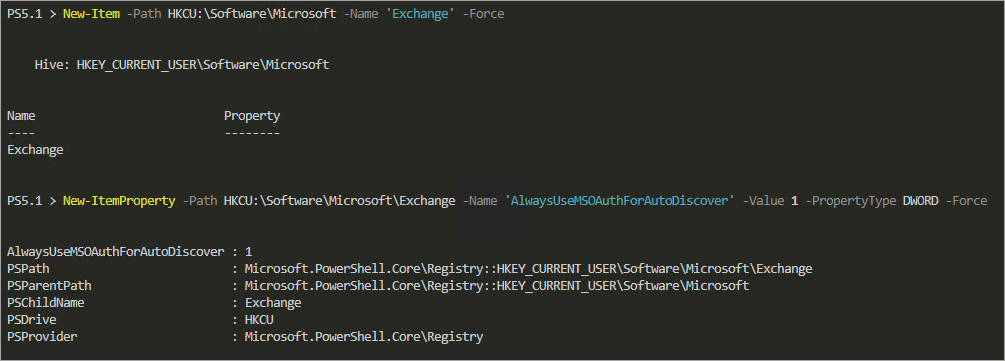
# Create the HKCU:\\Software\\Microsoft\\Exchange\\AlwaysUseMSOAuthForAutoDiscover registry entry.
# This value forces Outlook to always use modern authentication.
New-Item -Path HKCU:\\Software\\Microsoft -Name 'Exchange' -Force
New-ItemProperty -Path HKCU:\\Software\\Microsoft\\Exchange -Name 'AlwaysUseMSOAuthForAutoDiscover' -Value 1 -PropertyType DWORD -Force
Outlook 2016, Outlook 2019, and Outlook 365
Modern authentication is already enabled by default on Outlook 2016 and later versions. But Microsoft recommends setting the AlwaysUseMSOAuthForAutoDiscover value to force the use of modern authentication.
# Create the HKCU:\\Software\\Microsoft\\Exchange\\AlwaysUseMSOAuthForAutoDiscover registry entry.
# This value forces Outlook to always use modern authentication.
New-Item -Path HKCU:\\Software\\Microsoft -Name 'Exchange' -Force
New-ItemProperty -Path HKCU:\\Software\\Microsoft\\Exchange -Name 'AlwaysUseMSOAuthForAutoDiscover' -Value 1 -PropertyType DWORD -Force
If you’re managing a large pool of Windows computers with Outlook clients, consider deploying the registry items via Group Policy Objects.
Confirming Outlook Modern Authentication
Now it’s time to test whether Outlook uses modern authentication.
Open Outlook and log in with your account. After switching to modern authentication, Outlook will ask you to re-authenticate.
Press CTRL, right-click the Microsoft Outlook icon in the system tray and click Connection Status.
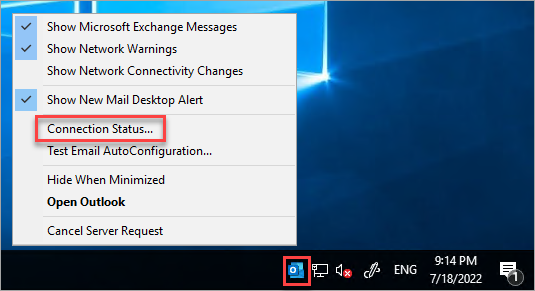
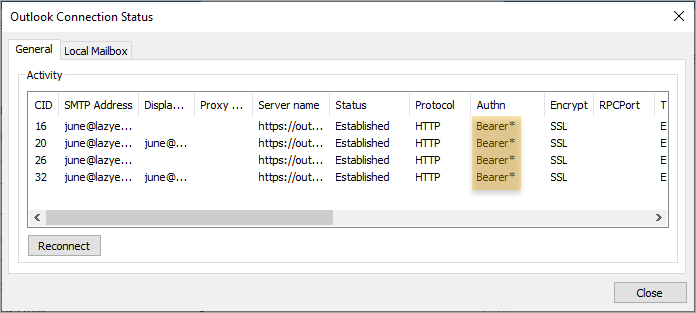
Look at the Authn column. The value should be Bearer*, which means Outlook is now using modern authentication with the OAuth2 Bearer token.
Microsoft 365 Backup For Dummies eBook addresses the data security challenges by outlining the out-of-the-box security features in Microsoft 365. Get eBook
Conclusion
Finally! You’ve finished switching to modern authentication in your Microsoft 365 tenant. You’ve made sure your users are aware of the change by extracting a report of basic authentication.
After enabling modern authentication and blocking legacy sign-ins, you’ve verified the changes using Exchange Online PowerShell commands. Finally, you’ve made sure that the Outlook clients are capable of modern authentication.


