

Do you manage your team’s schedule? What tool are you using? Do you know Microsoft Teams Shifts? I’m sure at some point you’ve used Excel spreadsheets as a scheduling tool. There’s no shame in that, and I believe everyone who’s dealt with plotting schedules has done that, too.
Using Excel for managing shifts is too manual as it is not explicitly designed for such purpose. And quite honestly, you should quit using Excel as a scheduling tool when possible, especially when there’s a better tool designed for that.
If your organization pays for an Office 365 subscription that includes Microsoft Teams, then you’re in luck because now you can transition to using the Microsoft Teams Shifts app.
In this article, you will learn the basics of using Shifts in Microsoft Teams to create, publish and manage your team’s schedule.
What Is Microsoft Teams Shifts App and Who Is It For?
In a nutshell, Shifts is a schedule management tool app that comes pre-loaded in Microsoft Teams. Shifts offer a refined interface that allows team owners to create, publish, and manage shifts and shift assignments of frontline workers.
Frontline workers are those involved in the daily operations of an organization. They are typically the initial point of contact between a customer and your organization.
Before You Begin
Before you go any further, this article will have examples that you can follow along with. And these examples requires:
- Access to Microsoft Teams (non-free). If you do not have this yet, or if you want to try things out using a test environment, you can request for an Office 365 trial subscription.
- Access to Microsoft Teams client applications; desktop, web, mobile.
Finding the Shifts App
When it is your first time exploring the Shifts app, you might get confused as to how to find the Shifts app. The below examples show you how to launch the Microsoft Teams Shifts App using mobile and desktop apps, including Teams web app.
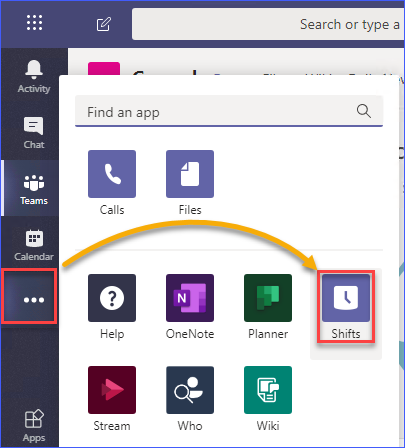
From the desktop client or from the browser, the way to bring up Shifts is precisely the same. First, go to open Teams desktop or Teams web app. Then, on the left pane, click on the More added apps button which is represented by an ellipsis. Once the fly-out menu is shown, click on Shifts.
The below image shows how to access the Shifts app using the Teams mobile app on mobile devices. You must tap on the More button, then click on the Shifts app.
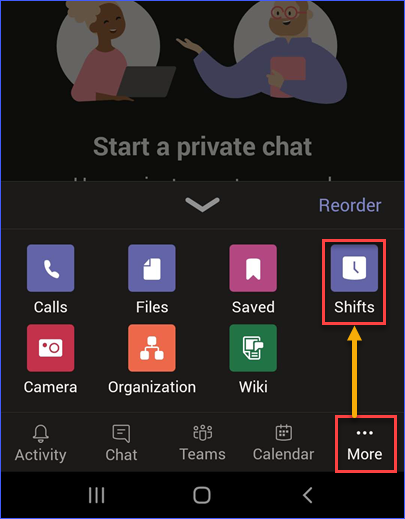
You may have noticed, from the image above, that the placement of the buttons in both the desktop and mobile apps is very similar. However, there is a difference in orientation. The developers and designers of Microsoft Teams did an excellent job of keeping the desktop and mobile experience as consistent as possible.
Creating a Team Schedule
The primary requirement before you can create a schedule for a team is that you must be the owner of a team. If you do not have a Team yet, you will need to create a team, or join an existing team and ask to be added as an owner of that team.
When you’ve squared your team ownership, you can start creating a schedule for your team.
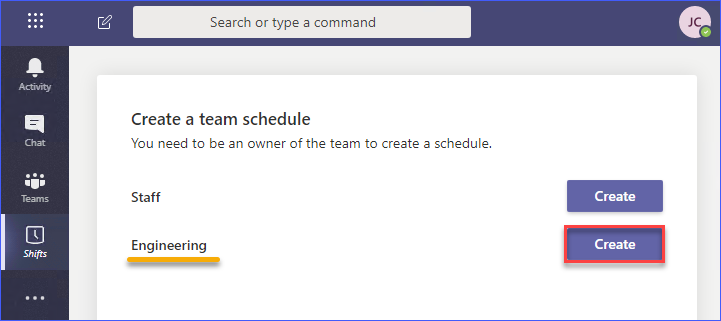
First, launch the Shifts app. You will be presented with the list of teams that you currently own. Click on the Create button next to the team name. In the example shown below, the Engineering team is selected.
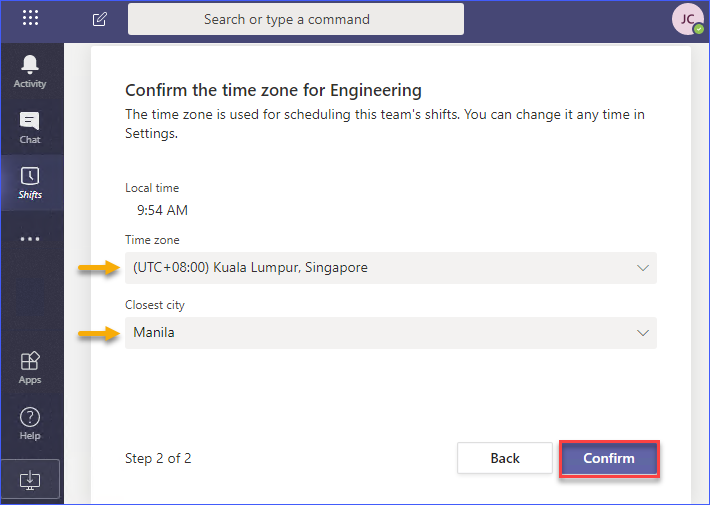
After clicking on the Create button, the next step is to confirm the time zone that is appropriate for the team that you are creating the schedule for. If the team members are spread across different time zones, it is up to you to strategize which time zone should be used.
I the example below, the time zone selected is UTC+8, and the closest city chosen is Manila. Once you’ve made your selection, click on the Confirm button.
Then, wait for the schedule creation for the team to complete. Once the schedule creation is done, you will see a welcome tour message. Depending on your preference, you may click Begin tour or Skip. In the example below, the tour will be skipped.

Adding a Group Name and Group Members
Now that you’ve created a Team schedule, you will need to create a group inside the schedule and also add members to that group. To better understand the hierarchy when it comes to team schedules, please refer to the diagram below.

As can see from the diagram above, a team schedule can have one or more groups in it. And, each group can have multiple members.
After creating a team schedule, one group is automatically created. The group that was created does not have a name. So it only makes sense to add a name that is descriptive of the group.
In the example below, the first group created will be named as Developers, indicating the members of the group are the developers who belong in the Engineering team.

The creator of the team schedule is automatically added as a member of the first group that was automatically created.
Now that your group is appropriately named, it is time to add members to it. Adding members to the group ensures that there are people who you can assign shifts to.
To add members to the group, click on the Add member to group button next to the group name.
You will then be allowed to add people to the group, as shown below. You must type in the name or email address of the person to be added, then click on Add. When you’re done adding people to the group, click on Close.
At this point, you will have successfully created your first team schedule, a named group with group members, and empty shifts. Think of this as a new blank canvass where you will begin strategizing your team’s shift coverage.
Creating and Assigning Shift Schedules
There are several ways you can create and assign shifts and time off schedule. In the next sections, you’ll learn more about these methods.
Assigning Shifts
Shifts can be an Open shift. Open shifts are shifts that are not already assigned that your team may request for. Otherwise, shifts are assigned to team members directly.
To add a shift schedule, click the More options button on the day that is on the row of the person to whom the schedule will be assigned. Then, click on Add shift.
Next, you will need to set up the parameters of the open shift you are creating. You can change things like:
- The color to represent the shift.
- How many open shift slots you are creating.
- The date and time covered by the shift.
- Custom labels. This will be shown instead of the time of the shift.
- The number of minutes counted as an unpaid break.
- Shift note up to 500 characters.
- Any additional shift activities you might want to track along with this particular shift.
When you’re done defining the shift, click on Save. See the example demonstration below on how to add a shift schedule.
Now, you have successfully created and assigned shifts to the people in your team. You can repeat the same steps to add a schedule to more people or to add more days.
Copying Shifts
Instead of manually adding shifts to your team, you can just copy an existing schedule to another team member who can work on the same shift.
To copy a shift, click on the More options button on the particular shift to be copied then paste it to another shift slot. You can refer to the demonstration below on how to copy and paste a shift.
The above only demonstrates how to copy a single shift schedule from one member to another. But, you can also copy multiple shifts and paste them across multiple days.
In the example below, the members will be working their same respective shifts for the entire week. To save time on manual effort, the same schedule can be copied throughout the rest of the week.
Additionally, the same shift schedule for the week can be copied over to future dates using the copy schedule function.
Just click on the Copy schedule button located at the upper right area. Then, choose whether or not to include the Microsoft Teams Shifts notes, Time off, Activities, Open shifts. Lastly, choose the destination date for the copied schedule. Click on the Copy button to initiate the copy process.
Publishing Schedules
At this point, suppose that you’ve already created and finalized your team’s schedule. However, these schedules will not reflect on your team member’s view yet simply because the schedule hasn’t been published yet.
To publish the schedule, click on the Share with team button on the upper-right portion of the screen. Next, choose the range of date of the schedule you want to publish. Then, you can choose whether to send a notification to the entire team or just the ones affected by the published schedule.
Once the schedule has been published, the team members would receive a notification in their mobile app regarding the newly published work schedule. A sample notification and published schedule can be seen from the screenshot below.
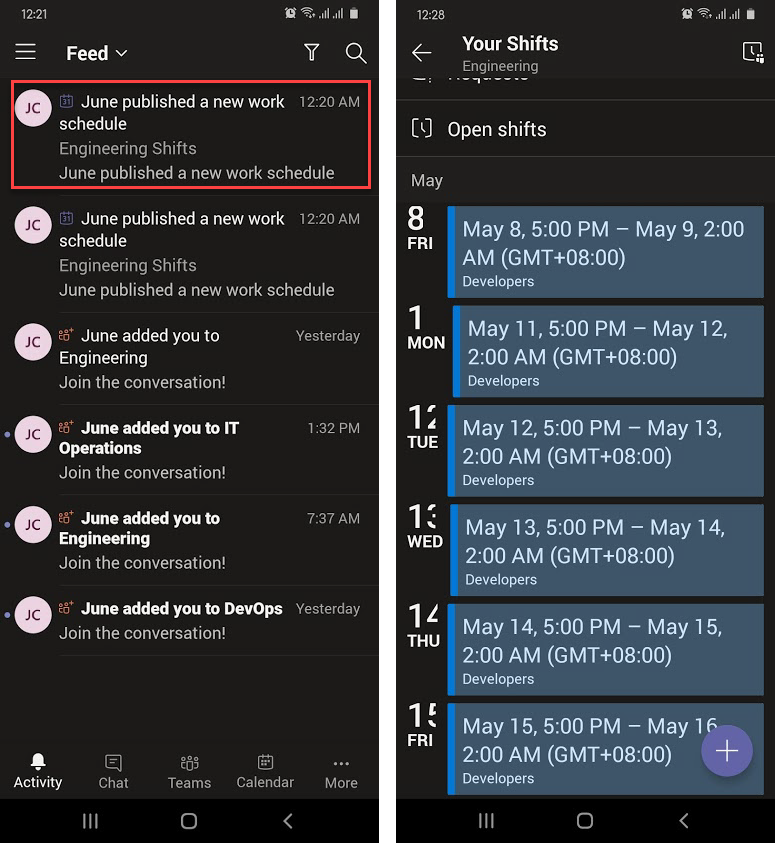
As you can see from the screenshot above, the worker is now able to see the upcoming shifts from the published schedule.
Importing Schedules
Aside from creating and copying shifts, schedules can also be imported using a file into the Shifts app. This option enables you to create schedules offline using Excel, save the file and later on, import the schedule to Shifts.
The Shifts app uses a standard template for importing schedules. This template can be downloaded from Shifts directly.
To download the schedule template, from the Shifts app, click on the More options buttons on the upper right corner. Click on Import Schedule, then click on the link that says Download template.
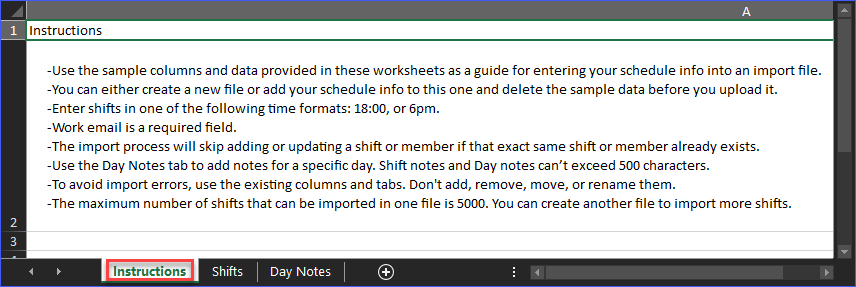
Open the template file once it has been downloaded. You must carefully read the list of instructions that are included in the template as you can see in the screenshot below. Following these instructions helps ensure that the schedule upload will be successful.
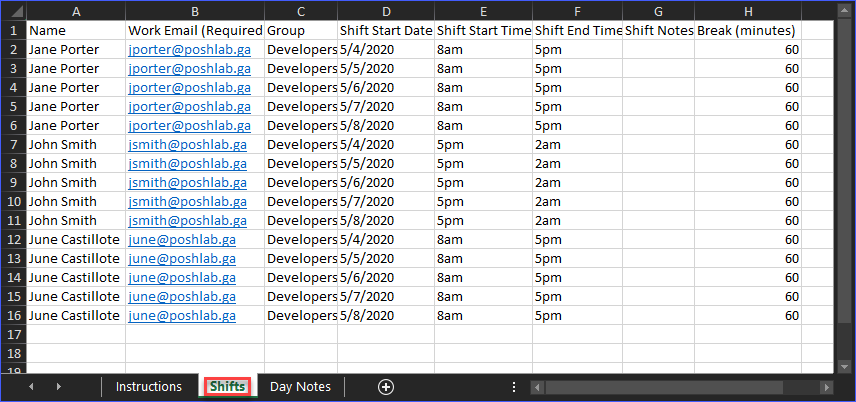
Then, go to the Shifts worksheet and modify to create the list of shifts for your team. In the example below, the schedule being created is for the dates May 4 to May 8. Note that only the Shift Notes column is optional.
After you’ve finalized the schedule, save the file using a filename of your choice. In this example, the file is saved as c:\demo\schedule-may4-to-may8.xlsx.
Now that the schedule file is saved, you can proceed to import it. Go back to the import schedule page and click on the Upload file button.
Next, locate and select the schedule file that you saved. Then, click on Open. The schedule import process should start. At this point, you only need to wait for the import to finish.
After the schedule has been imported, the schedule will automatically be published, and the team members will be notified.
Managing Schedules in Shifts
So far, you’ve learned how to create a team schedule in Shifts and get the schedule to publish for your team’s consumption. In this section, you’ll learn the basics of managing your team’s schedule.
Approving and Rejecting Requests
Team members can request for time off or shift swap, or even offer their shift to someone else in the team. These requests go into the team owner’s queue for approval.
In the example below, the worker Jane Porter requests for time off. The request will be put in pending for final approval status.
In your view, as the owner of the team schedule, you can go to the Requests queue to either approve or reject the request. In the example below, the request for time off is approved.
Viewing Schedules
There are two kinds of views for your team schedule. These views allow you to see the shifts by people or by shift.
The People view is the default view that you have been seeing in this article. This view shows you the list of people as members of the groups where you can see their assigned shifts.
The Shift view shows the list of shifts, along with how many people are assigned to each shift. This is useful when you need to review whether or not shifts are covered.
To change views between People and Shift, click on the View menu on the top right portion of the schedule. Next, click on either the People or Shift menu item to change between the two views. The demonstration below shows you how to switch between the People and Shift views.
Exporting Schedules
At times you may need to view, review or analyze the team schedule offline. Luckily, Shifts include a function to export the schedule to file that can be viewed in Excel.
To export a schedule, click on the More options menu on the top-right corner of the schedule, then click on Export schedule. Then, when the export dialog shows up, select the range of date of the schedule you want to export.
You can also customize the export by disabling or enabling options to include shift notes, include daily hours, and include time off. When you’re done with your selection, click on the Export button.
Enabling Time Clock
Another excellent feature of Shifts is the Time Clock. Enabling time clock allows for a more granular view of the shift and break times consumed by a team member.
Additionally, the time clock feature can also be used to allow workers to clock-in at a specifically authorized location only. (e.g., an office location).
To enable time clock, go to the team schedule’s Settings, scroll down the page until you see the Time clock section. Click on Begin setup, then click Next.
In the Time clock setup page, you are given the option to Include location detection. If you enable location detection, you will need to add an authorized location (including GPS and coordinates). If you don’t want to enable this feature, leave it unchecked then click Turn on.
After enabling the time clock, the members of the team will have access to the time clock and start tracking their shift and break times using their mobile devices.
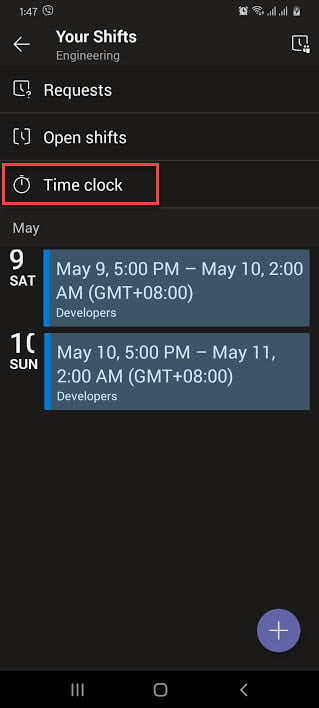
The screenshot below shows that the Time clock option is now available for this team member.
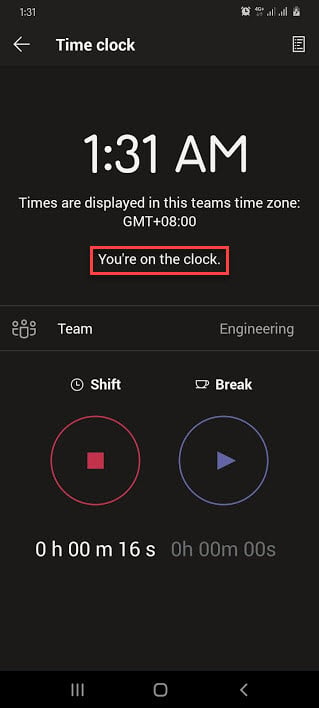
The screenshot below shows what the time clock looks like when the team member is on the clock.
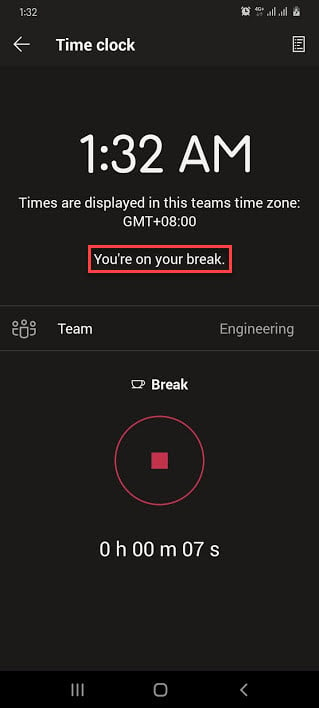
This next screenshot shows what the time clock displays while the team member is consuming their break minutes.
Exporting the Time Clock Report
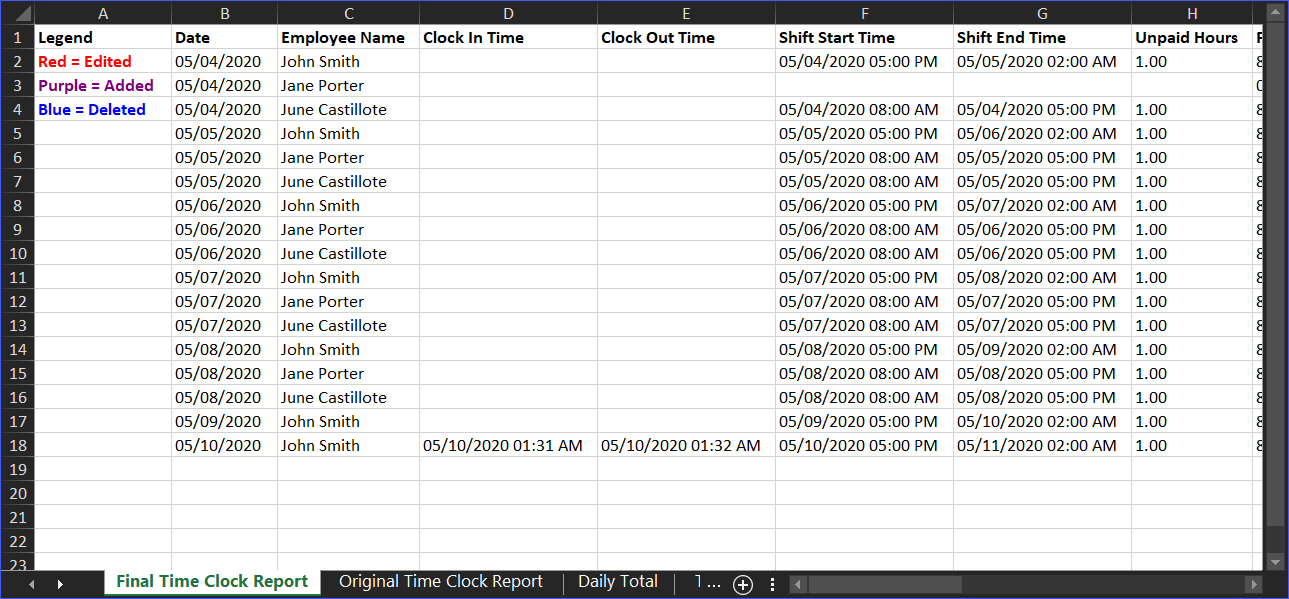
After enabling the time clock and team members started using it, it is only logical that you, as a team owner would want to view the clock in/out report.
To export the time tracking report, you need to go back to the team schedule Settings, then click on Export.
The exported time tracking report can then be opened in Excel. Below is the screenshot of the part of the time tracking report.
Conclusion
In this article, you’ve learned the basics of using the Shifts app in Microsoft Teams to create and manage schedules for teams. Using the shifts app, you can assign shifts to the members of your team and have them notified of changes when published.
The Shifts app makes it convenient for team owners or managers to approve, reject requests in schedule changes. Then, those changes are reflected in Shifts without manual intervention necessary.
You’ve also learned that with the use of the time clock feature, workers’ hours can be tracked more accurately. And, if location detection is enabled, Shifts can also act as the time in/out app for your team.
This article is not an end all be all guide to using the Shifts app, but instead aims to pique your interest and introduce the Shifts app to you. I hope that the knowledge you gained in this article helps you start your transition to using Microsoft Teams Shifts as your go-to scheduling tool.


