

Your organization is generating sensitive data faster than you can secure it. Credit card numbers flowing through email, Social Security Numbers sitting in Teams chat messages, HIPAA-covered health records bouncing around SharePoint—any one of those can end your quarter badly. Microsoft Purview Data Loss Prevention (DLP) is Microsoft’s answer to this problem: a content-aware enforcement layer that monitors, detects, and blocks sensitive data from leaving your environment through channels you’ve already approved for everything else.
This tutorial walks you through configuring DLP policies in Microsoft 365 from scratch. You’ll configure sensitive information types, build your first policy from a compliance template, and extend it to Microsoft Teams and Exchange Online. Then you’ll see how to use simulation mode before going live, and where to look when something goes wrong.
Prerequisites
If you want to follow along, you’ll need:
-
Microsoft 365 E3 or higher license — DLP for SharePoint, OneDrive, and Exchange is included. Teams DLP requires E5 or the Microsoft 365 E5 Compliance add-on, because Teams chat protection is a premium capability.
-
Compliance Administrator role in Microsoft Purview — this role lets you create and manage DLP policies. Global Administrator works too, but least-privilege applies here the same as everywhere.
-
Access to the Microsoft Purview portal — where all DLP policy work lives.
What Are Sensitive Information Types?
Before you configure a policy, you need to understand the detection layer underneath it. Sensitive Information Types (SITs) are pattern-based classifiers that tell the DLP engine what to look for. Microsoft ships over 300 of them out of the box—Social Security Numbers, credit card numbers, passport numbers, IBANs across more than 100 countries.
Each SIT works through a multi-layer validation stack:
-
Primary element: A regular expression or keyword list that finds the candidate match (e.g., a 16-digit number)
-
Supporting elements: Nearby keywords like “credit card” or “Visa” that corroborate it’s actually sensitive
-
Character proximity: How close the supporting element must appear to the primary element to count
-
Confidence level: High, Medium, or Low—based on how many validation layers fired
That last point matters practically. A high-confidence credit card match means the number passed the Luhn algorithm checksum and has a supporting keyword within 300 characters. A low-confidence match found the pattern but nothing corroborating it. When you configure a DLP rule, you choose which confidence threshold triggers action—and getting this wrong means either missing real leaks or blocking every 14- to 19-digit order number in your inventory system.
Key Insight: The instance count threshold is where most DLP policies get tuned wrong. Setting Min: 1 on a Social Security Number SIT will fire on any document containing one SSN—including templates and HR examples. Setting Min: 5 before a block action applies means five unique SSNs must be present, which filters out the single-mention policy document but catches the bulk export.
How to Create a DLP Policy from the Compliance Portal
Step 1: Navigate to DLP Policies
Sign in to the Microsoft Purview portal, expand Solutions in the left nav, then select Data loss prevention. Choose Policies from the submenu.
Click + Create policy to start the wizard.
Step 2: Choose a Policy Template
The template picker is organized by regulation category: Financial, Medical and Health, Privacy, and Custom. Selecting a template pre-populates your policy with the relevant SITs, instance counts, and default confidence levels for that regulatory context.
For a HIPAA-aligned healthcare org, you’d select Medical and Health > U.S. Health Insurance Act (HIPAA) Enhanced. This template automatically configures detection for medical record numbers, DEA numbers, SSNs, and International Classification of Diseases codes—the SITs your auditors actually care about.
The template is a starting point, not a commitment. You’ll customize conditions, actions, and thresholds in the steps that follow.
As you can see below, the template selection screen shows the coverage areas and pre-configured SITs for each compliance framework.
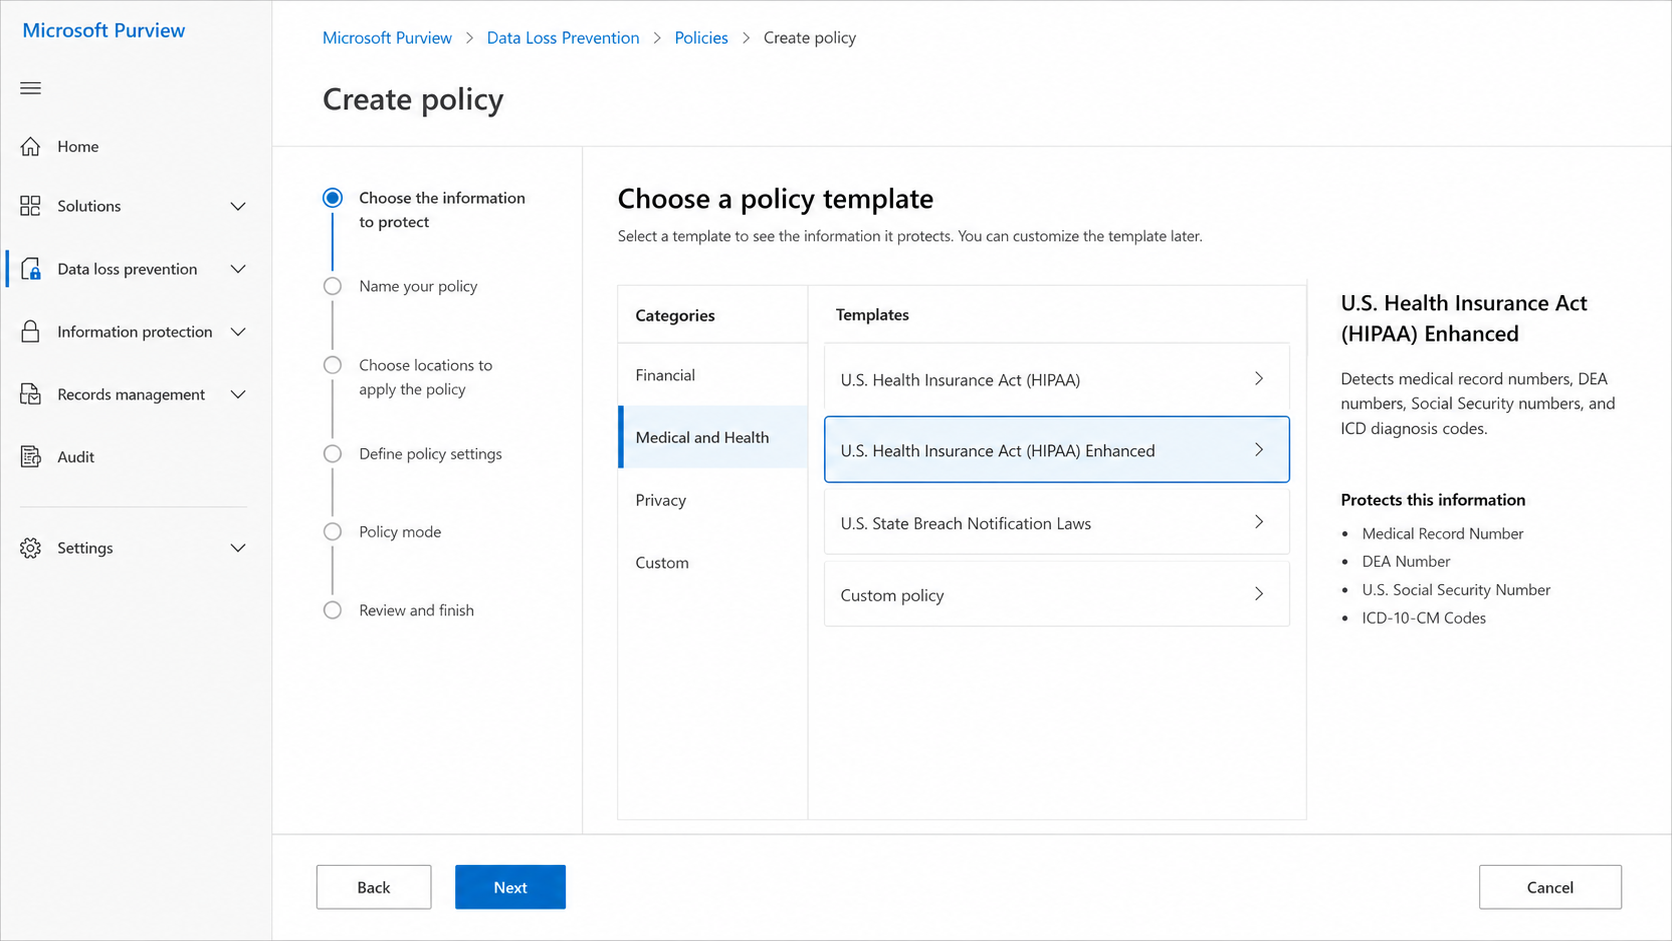
Selecting a template
Step 3: Name and Scope the Policy
Give the policy a name that describes its intent clearly—something like “HIPAA: Block External PHI Sharing” beats “Policy 1.” Compliance administrators reviewing incident logs six months from now will thank you.
Next, configure the locations the policy monitors. Your options include:
| Location | What It Covers |
|---|---|
| Exchange email | Outlook desktop, Outlook Web App, sent items |
| SharePoint sites | Document libraries across all sites |
| OneDrive accounts | Individual and shared OneDrive for Business |
| Teams chat and channel messages | 1:1 chats, group chats, channel posts |
| Devices | Windows 10/11, macOS endpoints via Endpoint DLP |
By default, selecting a location includes all instances of it. You can narrow scope using include/exclude filters—limit to specific SharePoint sites, specific distribution groups for email, or specific Teams accounts.
Step 4: Define Rules and Conditions
This is the core of the policy. Each rule contains conditions that must be true for the action to fire. The DLP rule builder supports Boolean logic—AND, OR, and NOT operators with nested groups.
A typical rule for the HIPAA template looks like:
-
Condition: Content contains SITs
U.S. Social Security Number(High confidence, Min: 2)ANDInternational Classification of Diseases(High confidence, Min: 1) -
Shared with: People outside my organization
-
Action: Block sharing and send policy tip notification
You can add a NOT exception group to exempt specific domains. If your organization shares PHI with a specific business associate agreement (BAA) partner, you’d add NOT > Recipient domain is > trustedpartner.com to prevent the policy from blocking that route.
Step 5: Set Actions and User Notifications
Actions tell the DLP engine what to do when conditions are met. The enforcement options, from least to most restrictive:
-
Audit only: Log the event, take no action. The user never knows.
-
Block with override: Block the action but allow the user to provide a business justification to proceed. The justification gets logged.
-
Block: Hard block. No override option.
For user notifications, enable policy tips—the inline warnings that appear while a user is composing an email or uploading a file. Policy tips are the difference between “your policy caught the problem” and “your policy educated the user before the problem happened.” (Spoiler: auditors prefer the second version.)
Step 6: Configure Enforcement Mode
Before you click Submit, set the policy state. The wizard defaults to full enforcement, which is not how you should start.
Your deployment sequence should look like this:
-
Run in simulation mode — the policy logs matches but takes no action. Run this for at least a week to baseline what the policy would catch and identify false positives.
-
Simulation mode with policy tips — users see warnings but aren’t blocked. You get user feedback on what they consider false positives without breaking workflows.
-
Turn it on right away — full enforcement. Only reach this after you’ve tuned the policy in stages one and two.
Skipping simulation and going straight to block mode is how you get an all-hands Slack message at 9 AM about why nobody can send email.
Extending DLP to Microsoft Teams
Teams is where the real-time collaboration happens, which makes it a high-risk channel for accidental oversharing. Adding Teams to a DLP policy requires E5 licensing, but the configuration itself is straightforward.
In an existing policy, navigate to Edit policy > Choose locations > enable Teams chat and channel messages.
A few Teams-specific behaviors to understand:
When a user sends a message that violates policy, the message is redacted immediately—within seconds. The activity notification preview in Teams (the popover that shows a snippet of the message) is replaced with “Preview Unavailable” to prevent the sensitive data from leaking through the notification layer itself.
The sender sees a red flag on the message with a “What can I do?” link. They can either override with justification or report it as a false positive. The recipient—especially an external guest—sees only “This message was blocked by your organization’s security policy.”
Warning: Teams DLP does NOT send email notifications to users the way Exchange DLP does. If your incident response workflow relies on email notifications as the user-facing signal, you’ll need to account for this. Teams users only get the in-chat flag.
Teams DLP also applies to documents shared in channels, but only if SharePoint and OneDrive are included in the same policy scope. A document dropped into a Teams channel is stored in SharePoint—the DLP scan happens there. Without SharePoint in scope, your Teams policy catches chat text but not file shares.
As you can see below, the Teams DLP scope configuration controls which account types and conversation contexts are covered.
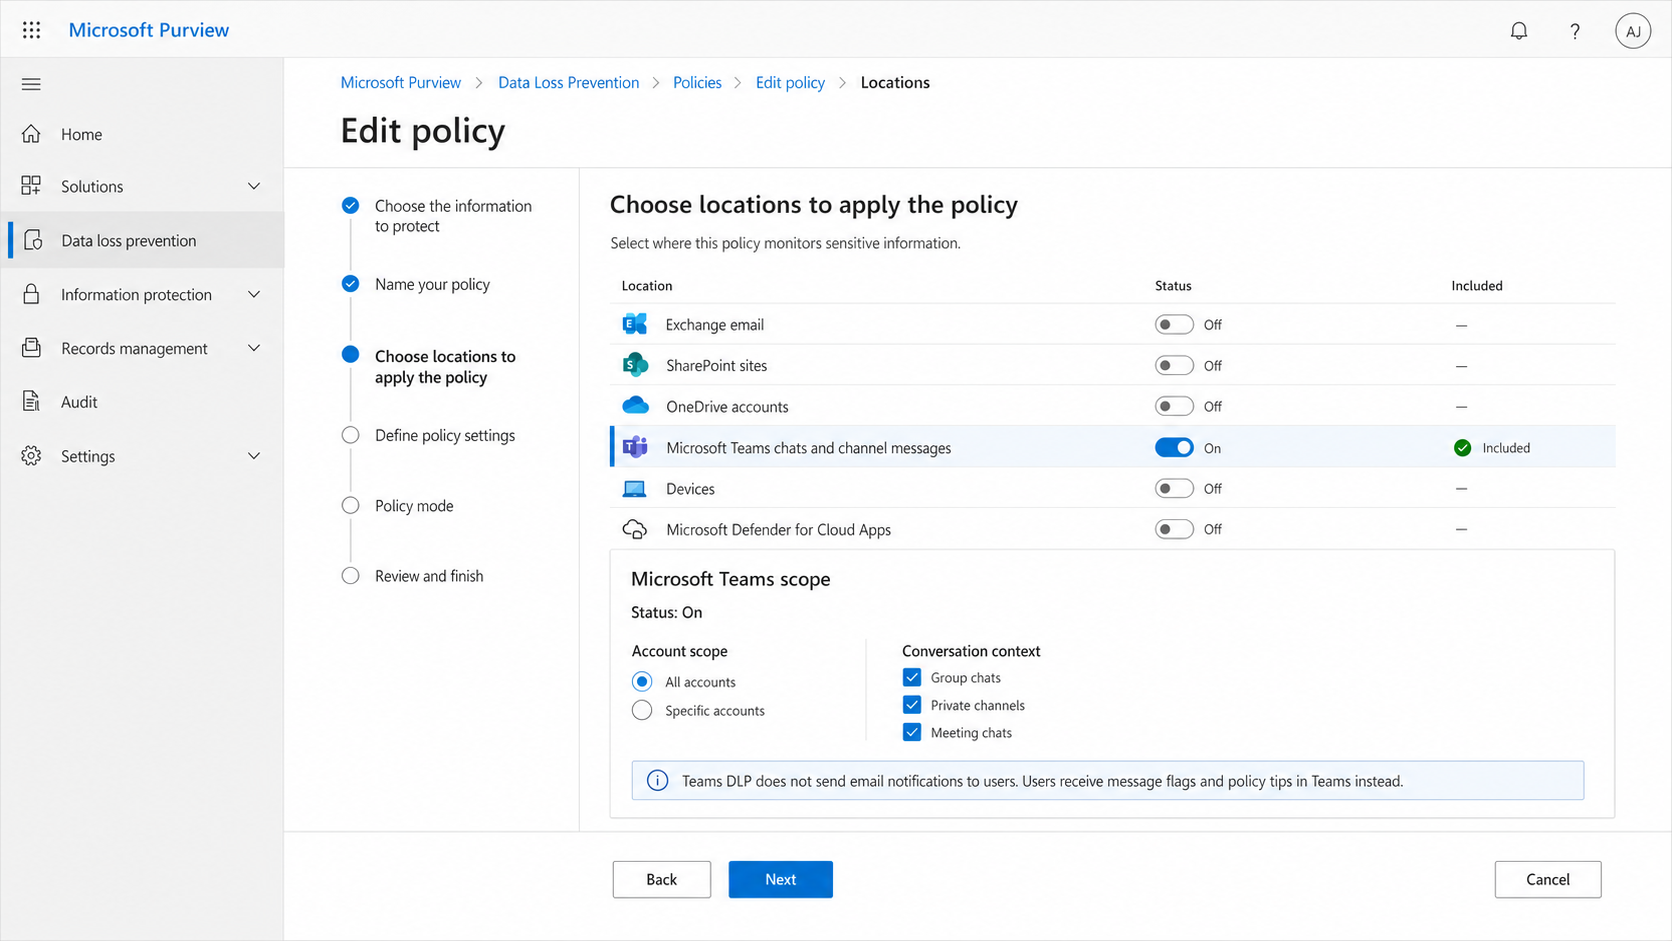
Configuring Teams scope
Configuring DLP for Exchange Online
Exchange Online DLP operates inline—it inspects email as it’s being composed in Outlook or the web client, before it reaches the recipient.
Policy Tips in Outlook
When a user drafts an email that triggers a DLP rule, a policy tip appears at the top of the compose window: “This message contains content that conflicts with a policy in your organization.” The user can see which rule triggered and, if override is enabled, can provide a justification to proceed.
Policy tip text is customizable per rule. If you’re protecting credit card data, your tip can say “It looks like you’re sending payment card data. If this is a legitimate business requirement, select Override and provide a justification.” Generic policy tips get ignored; specific ones create a teaching moment.
Exchange-Specific Conditions
Exchange policies can use additional conditions not available for other workloads:
-
Sender domain is / Recipient domain is: Target or exclude specific domains
-
Sender is member of: Apply different rules to executives vs. general staff
-
Message class: Exclude specific message types (useful for exempting Teams meeting invitations, which contain passcode fields that can trigger password-related SITs)
That last one matters because DLP for Exchange can block Teams meeting invitations. Meeting invites contain “Meeting ID” and “Passcode” fields. If you have a DLP rule detecting the “General Password” SIT, your meeting invites will fail the policy. The fix is an exception condition on MessageClass targeting IPM.Schedule.Meeting.* to exclude calendar items from that rule.
Monitoring DLP Policies
Activity Explorer
Activity Explorer is the 30-day historical audit view for all DLP events. Filter by endpoint actions, specific SITs, egress activities, or policy rules to find exactly which policies are firing and against what content.
Use DLP rule matched events to see what content triggered the rule. Use DLP rule undo events to see when previously matched content was edited to remove sensitive data (useful for confirming user remediation worked).
DLP Alerts Dashboard
The alerts dashboard shows aggregated incidents from your policies. You configure alert aggregation when you build the rule—single-event alerts fire immediately for high-severity individual matches; aggregate alerts fire when a threshold is crossed over a time window (e.g., 10 credit card emails in 48 hours).
For investigation, route alerts to Microsoft Defender XDR. The Defender portal aggregates DLP events with signals from Defender for Endpoint, Defender for Office 365, and other Microsoft security products into unified incidents. This means when a DLP alert and an endpoint behavioral alert both fire against the same user, you see one correlated incident instead of two separate alerts to triage.
Pro Tip: Filter incidents in Microsoft Defender XDR by Service Source: Data Loss Prevention to isolate DLP-originated incidents. From there, you can use Advanced Hunting with KQL to query the DLP audit table and correlate which policies are generating the most false positives.
Wrapping Up
Microsoft Purview DLP closes the gap between “we have a compliance policy” and “we actually enforce a compliance policy.” The pieces that matter: configure SITs with appropriate confidence levels and instance count thresholds, use policy templates as starting points then tune for your environment, start every new policy in simulation mode before enforcing, and connect your alerting to Defender XDR for correlated incident investigation rather than managing DLP alerts in isolation.
The generative AI expansion adds urgency here—a growing share of organizational data security incidents involve AI tools, often because employees are using personal AI accounts with corporate data. Purview DLP policies can extend to Microsoft 365 Copilot and block sensitive data from being passed to external AI grounding sources, which is where this capability is heading next.
Start with one high-risk workload, get simulation data, tune the policy, then expand. That cadence beats a rushed full deployment that generates 500 false positive alerts on day one and causes your compliance team to quietly disable the policy to stop the noise.


