---
title: "How to Install Apache on Windows"
description: "Learn how to install Apache on Windows to start launching web applications on your Apache server in this step-by-step tutorial!"
canonical: "https://adamtheautomator.com/install-apache-on-windows/"
---
# How to Install Apache on Windows
> Learn how to install Apache on Windows to start launching web applications on your Apache server in this step-by-step tutorial!
Source: https://adamtheautomator.com/install-apache-on-windows/
---
ATA Learning
Tap to hide
[
ATA Learning
](/)
* [Home](/)
* [Tutorials](/tutorials/)
* [Instructors](/author/)
* [Advertising](/advertising/)
* [Recommended Resources](/resources/)
* [About Adam](/about-adam/)
Search for:
* [](https://twitter.com/adbertram)
* [](https://github.com/Adam-the-Automator)
* [](https://www.linkedin.com/company/adam-the-automator-llc)
* [](/feed/)

# How to Install Apache on Windows
[Uzma Younas](https://adamtheautomator.com/author/uzma-younas/)11 March 20225 min. read
Categories: [IT Ops](/category/it-ops/)
Tags:[Apache](/tag/apache/)[Windows](/tag/windows/)
Table of Contents
* [Prerequisites](#prerequisites)
* [Downloading Apache on Windows](#downloading-apache-on-windows)
* [Configuring the Apache Installer to Install Apache on Windows](#configuring-the-apache-installer-to-install-apache-on-windows)
* [Allowing External Connections to the Apache Web Server](#allowing-external-connections-to-the-apache-web-server)
* [Launching a Web Application](#launching-a-web-application)
* [Updating Server Name and Administrator Email](#updating-server-name-and-administrator-email)
* [Changing the Root Directory](#changing-the-root-directory)
* [Conclusion:](#conclusion)
The whole business of a web server is to serve websites on the internet, and these are services that the developers of [Apache](https://www.apache.org/) think a server should offer. The Apache software is open-source infrastructure compatible with any operating system, like Windows. But how do you install Apache on Windows? Well, you’re in for a treat!
In this tutorial, you’ll learn how to install Apache on Windows and set up an Apache server to launch a web application.
Ready? Read on and start setting up your Apache server!
## Prerequisites
This tutorial houses step-by-step instructions, but as long as you have a Windows 10 PC, you’re good to go – This tutorial uses a Windows 10 20H2 computer.
## Downloading Apache on Windows
You’ll be launching a web application on your Apache server later in this tutorial. But as a first step, you’ll install Apache on your machine. You can download the Apache HTTP Server from Apache’s official download site.
1\. Open your web browser, navigate to the [Apache HTTP Server download](https://httpd.apache.org/download.cgi) page, and click on the **archive download site** link below. Doing so redirects your browser to the Apache **HTTP Server Source Code Distributions** page (step two).
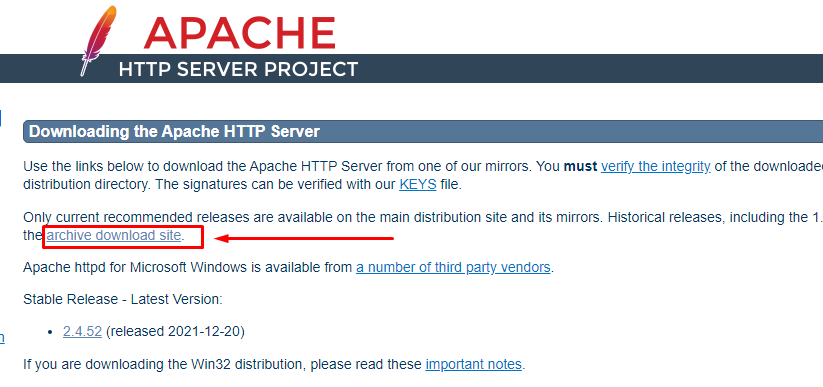
Accessing Apache HTTP Server Official Download Site
2\. Next, find and click on the **binaries/** link to see the contents of the binaries package.
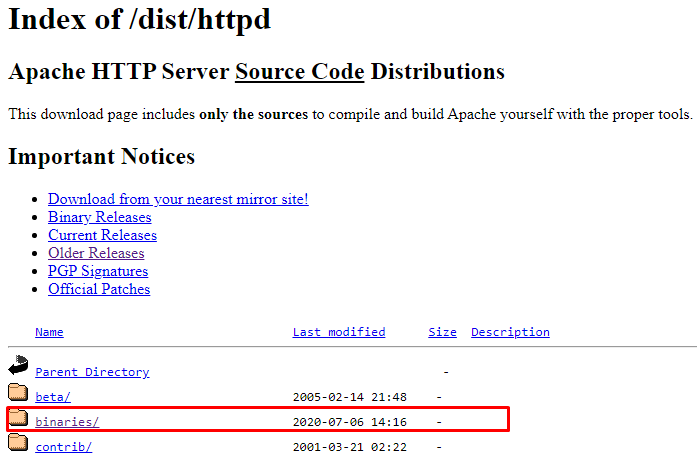
Selecting the binaries package
3\. Scroll down to the end and click on the **win32/** link to see the list of Apache packages you can choose to install on your machine.

Accessing the List of Apache Packages
4\. Finally, look for Apache’s package installer for Windows and click on it to download the Apache package installer. You’ll download Apache 2.0 series for this tutorial, as shown below.

Downloading the Apache installer
## Configuring the Apache Installer to Install Apache on Windows
After downloading the Apache package, you’ll need to configure the installer and set where Apache gets resources to deploy by default.
1\. Run the Apache installer and click **Next** to accept the license agreement until you reach the **Server Information** page (step two).
2\. Next, configure the server information with the following:
* Type **localhost** for the **Network Domain** as well **Server Name**.
* Enter your email address in the **Administrator’s Email Address** field.
* Leave the default setting **for All Users**, and click on **Next**.
> _You can also specify changes in these settings from the configuration files later._
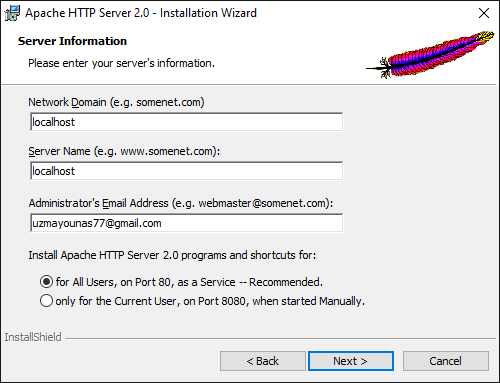
Configuring Server Information
3\. Choose **Typical** in the **Setup Type** page since you’re only working learning about the basics of Apache on Windows, and click **Next**.
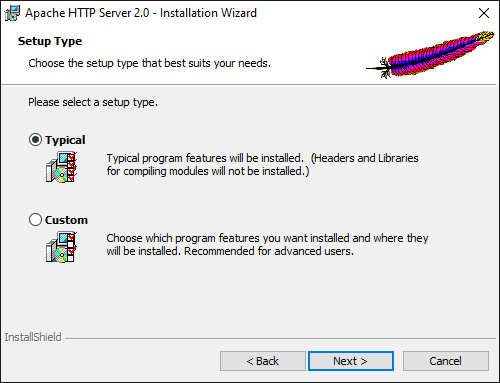
Selecting a Setup Type
4\. Now, leave the default installation path, as shown below, and click on **Next**.
> _You can change the installation path you prefer by clicking on the Change button and selecting your desired path._
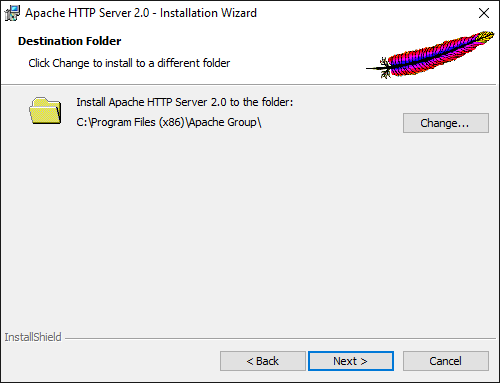
Choosing Installation Folder
5\. Click on **Install** to start installing Apache HTTP Server on your machine.
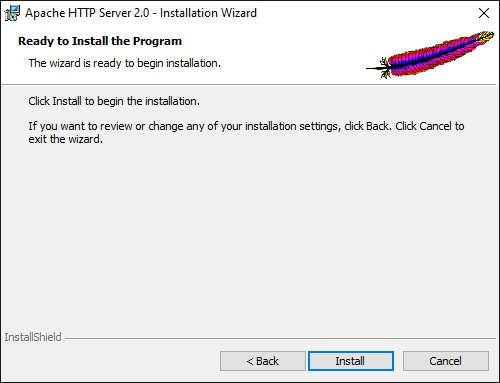
Installing the Apache HTTP Server
6\. Click on **Finish** once the installation completes. Closing the installation wizard starts the Apache server automatically.
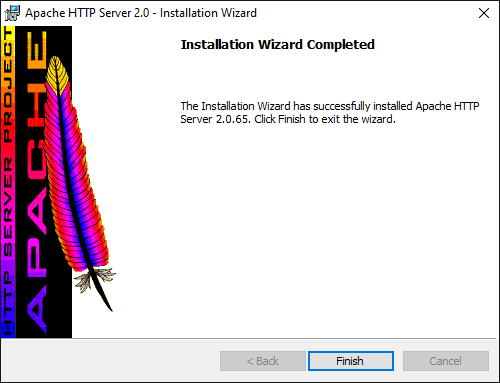
Closing Installation Wizard
7\. Look for the Apache icon in your system tray to verify the Apache server is running.
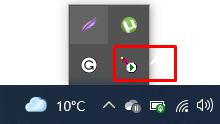
Verifying Apache Server is Running
8\. Finally, open your preferred browser and navigate to **localhost**, as shown below, to test your Apache Server installation.
You will see the following page if the installation is successful.
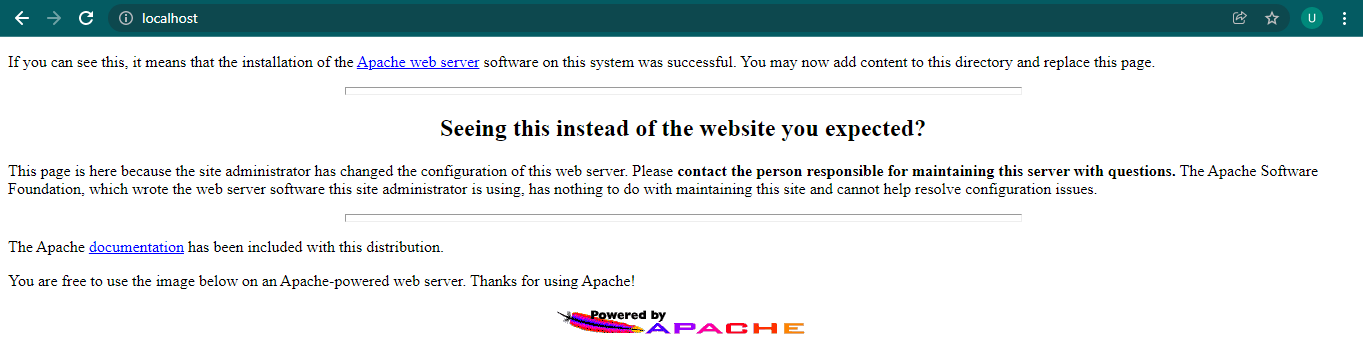
Testing the Apache Server
> _You can also navigate to the loopback address (_http://127.0.0.1/_) to access the Apache Server._
## Allowing External Connections to the Apache Web Server
Although a localhost connection may work for testing, an external system may need to access the web page. Therefore you must open a connection via the Windows Firewall.
1\. First, launch the **Windows Defender Firewall with Advanced Security** console.
2\. Navigate to **Inbound Rules** and click **New Rule**.
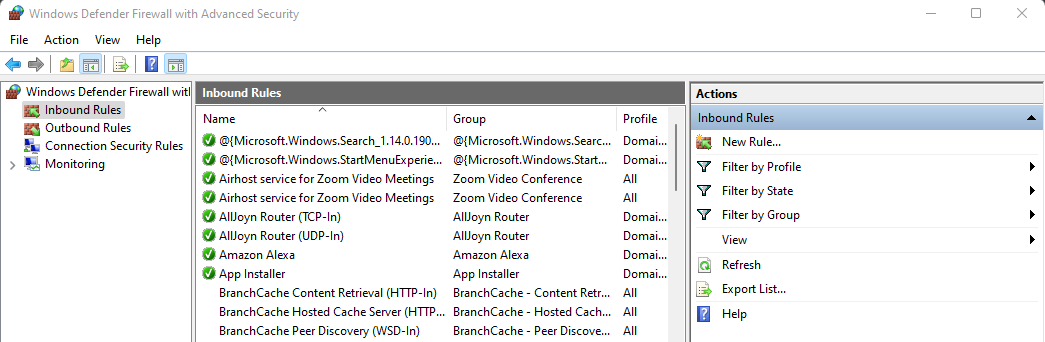
Adding a New Rule
3\. Under **Rule Type**, select **Program**.
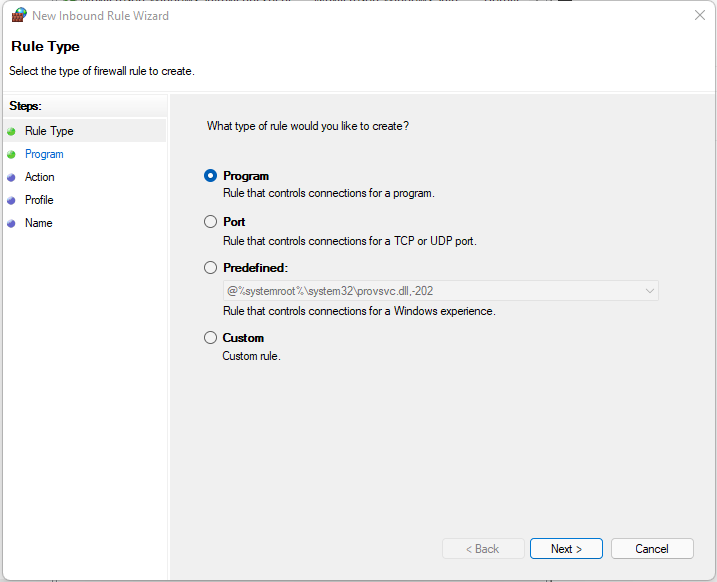
Choosing Program as the Rule Type
4\. Browse, or enter, the path to the Apache server executable.
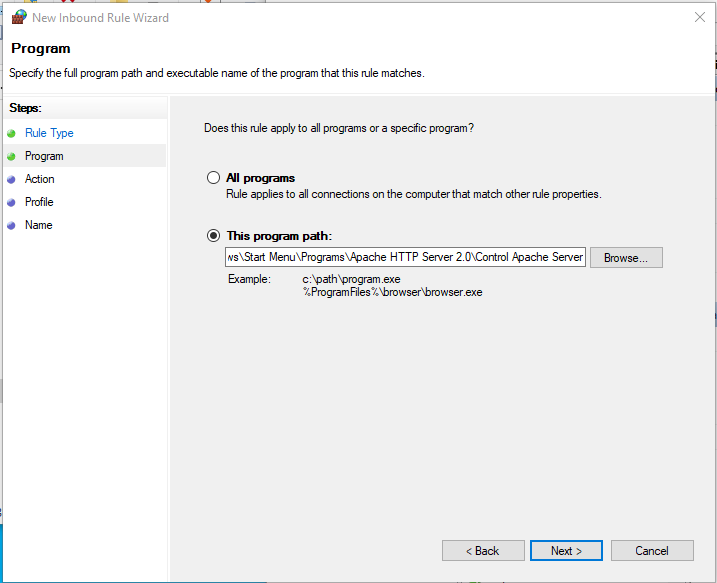
Entering the Apache Server executable path
5\. For the action, choose to **Allow the connection**.
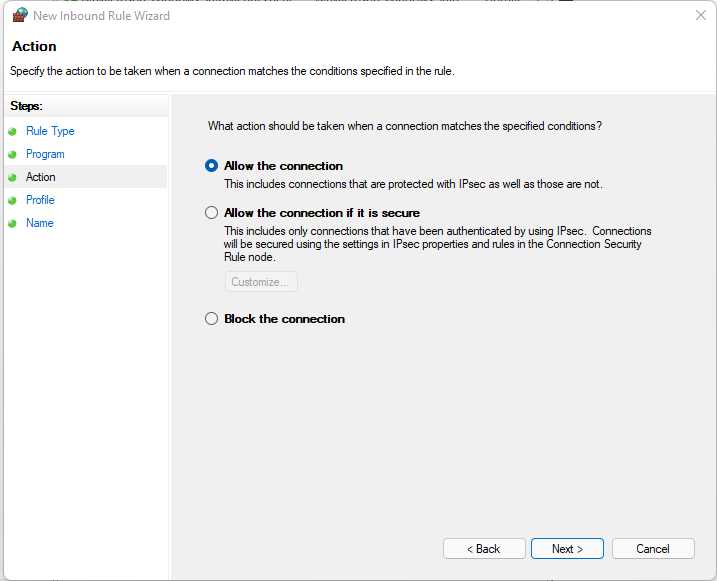
Allowing the connection
6\. Under applied profiles, allow the default of all profiles.
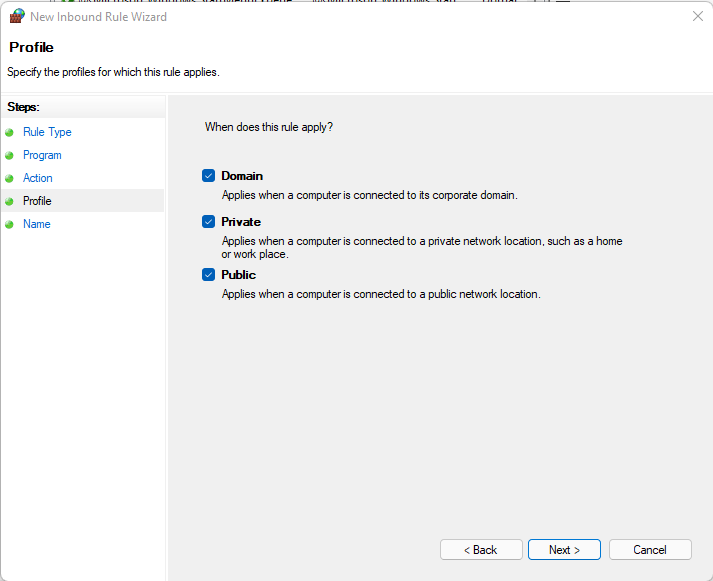
Defining the profiles to apply the rule to
7\. Finally, give the rule a name and click on **Finish**.
## Launching a Web Application
You’re now ready to launch your web application as Apache is running correctly. But where exactly do you store your web application for deployment?
The Apache server root directory (_C:\\Program Files\\Apache Group\\Apache2\\_) contains at least three important subdirectories:
* _conf_ – Contains a file that tells Apache how to respond to different kinds of requests.
* _htdocs –_ Contains the documents, images, or data that you want to serve to your clients.
* _logs –_ Contains the log files that record what happened. You can consult **…/logs/error\_log** whenever anything fails to work as expected.
Apache returns all the files placed in the _C:\\Program Files\\Apache Group\\Apache2\\htdocs_ directory when localhost is launched.
To see how the Apache server works, you’ll create an HTML file as your web application to launch.
1\. First, delete all the default files in the _C:\\Program Files\\Apache GroupApache2\\htdocs_ directory.
2\. Open your preferred text editor to create an _index.html_ file in the _htdocs_ directory, and populate the file with the code below.
The code below prints a message on a page when launched in a web browser.
```markup
Welcome
My first paragraph.
```
3\. Click on the Apache icon at the system tray to restart the Apache server, as shown below.
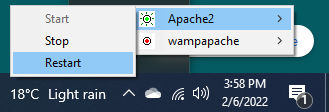
Restarting the Apache server
4\. Lastly, navigate to your IP address or **localhost** on your web browser.
If all goes well, you’ll get the same message as below.
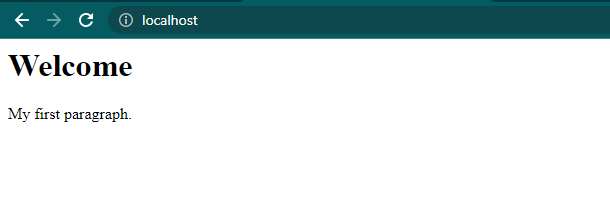
Launching a Web Application
> _You can place an entire project into the htdocs folder and access it from the browser typing localhost/project\_name/._
## Updating Server Name and Administrator Email
By default, the Apache files are read-only. But typically, you’ll want to have more control over your Apache server configuration. How? You need to grant Apache files with **Write** permissions for any modification.
1\. For this demo, [grant permissions](https://www.uwec.edu/kb/article/drives-establishing-windows-file-and-folder-level-permissions/) to the _conf_ directory located in the _C:\\Program Files (x86)\\Apache Group\\Apache2_ directory.
2\. Once you’ve enabled the permissions, open the _http.conf_ file located at _C:\\Program Files (x86)\\Apache Group\\Apache2\\conf._
3\. Lookup for the following line, replace [`localhost`](http://localhost) with your preferred name and save the changes.
ServerName gives the hostname of the server to use when creating redirection URLs
```javascript
ServerName localhost:80
```
4\. Finally, look for the following line, and replace `admin@localdomain` with your preferred email address.
`ServerAdmin` gives Apache an email address for automatic pages generation when some errors occur.
```javascript
ServerAdmin admin@localdomain
```
## Changing the Root Directory
As you already know, Apache returns files from the _htdocs_ folder. But you can also use another folder or drive to make backups and launch on Apache. Or if you just want to test your project without messing up anything in the original project directory.
1\. Create a dummy folder with your preferred name. But for this demo, the folder is named _MyApacheFolder_ in the _E_ drive.
2\. Create a new HTML file named _index.html_ in the _MyApacheFolder_ folder, and populate the file with the code below.
The code below prints the Launching Page From Other Directory message when you launch it on your web browser.
```python
Launching Page From Other Directory
```
Now open the _http.conf_ file and change some values as follow:
* Look for the **DocumentRoot** shown below, and change the value to your dummy folder’s path (_E:\\MyApacheFolder_).

Changing the path for DocumentRoot
* Now, change the **Directory** value below with your dummy folder’s path (_E:\\MyApacheFolder_).

Changing Directory path
* Save the changes you made to the _http.conf_ file. These changes enable the Apache Server to access files from this folder instead of the default directory (_htdocs_).
4\. Lastly, navigate to **localhost** on your web browser, and you’ll see the following message.
The Apache server will now launch all the sites from the new location (_MyApacheFolder_).

Launching Web App from a new directory
## Conclusion:
Throughout this tutorial, you have learned how to download a Windows Apache server and allow running a website without any overhead. Apache server can be an appropriate solution for practically any HTTP protocol situation.
Now you are ready to host a single-page website or an enormous site serving millions of visitors. You can also use Apache as a test-server on personal desktops, writing and trying code in a local environment before publishing it to a broader audience.
Share this article
[Share on X](https://twitter.com/intent/tweet?url=https%3A%2F%2Fadamtheautomator.com%2Finstall-apache-on-windows%2F&text=How%20to%20Install%20Apache%20on%20Windows)[Share on Facebook](https://www.facebook.com/sharer/sharer.php?u=https%3A%2F%2Fadamtheautomator.com%2Finstall-apache-on-windows%2F)[Share on LinkedIn](https://www.linkedin.com/sharing/share-offsite/?url=https%3A%2F%2Fadamtheautomator.com%2Finstall-apache-on-windows%2F)
## Related Posts

### [Solve Azure AD Connect Errors via the Microsoft IdFix Tool](/idfix/)
Fix Azure AD Connect errors fast with the Microsoft IdFix tool—your go-to solution for seamless synchronization and efficient directory management!

### [How to Install Sandboxie on Windows](/sandboxie/)
Secure your Windows system with Sandboxie. Learn how to install this tool hassle-free and safeguard your digital activities!
### [Install NitroShare and Streamline Your File Transfers Today](/nitroshare/)
Simplify cross-platform file transfers with NitroShare. This tutorial guides you through installation and use for fast, effortless file sharing between different operating systems.
## Categories
* [IT Ops](/category/it-ops/)
* [Cloud](/category/cloud/)
* [DevOps](/category/devops/)
* [Home Ops](/category/home-ops/)
* [Information Security](/category/infosec/)
* [Software Development](/category/software-development/)
## Site
* [Home](/)
* [Tutorials](/tutorials/)
* [Instructors](/author/)
* [Advertising](/advertising/)
* [Recommended Resources](/resources/)
* [About Adam](/about-adam/)
Copyright 2026© ATA Learning | [Privacy Policy](/privacy/)