


Microsoft IIS can serve the role of an SMTP quite nicely but requires quite a few steps to get set up. Lucky for you, I’ve set up an IIS SMTP relay server and documented all of the steps!
In this article, we will cover all of the steps needed to successfully set up an SMTP relay server to send an outgoing email with Office 365. Technically, we will use this SMTP relay to relay email to Office 365; it can just as quickly work for any general SMTP relay mail delivery purposes.
Prerequisites
To get IIS set up and follow along with me, be sure you have a Windows Server 2016 machine available. I’ll also be assuming you are logged into the server as an administrator.
Install the IIS SMTP Server Windows Feature
The first task you’ll need to do to get an IIS SMTP relay set up is to install the IIS SMTP Server. You’ll need to install the SMTP Server Windows feature.
Using Server Manager
If you’re unfamiliar with installing Windows features via Server Manager, check out this article entitled Install or Uninstall Roles, Role Services or Features.
Using PowerShell
Installing the SMTP Server feature removes a lot of point and clicking. Open up a PowerShell console as administrator and run the line below:
PS51> Install-WindowsFeature -Name SMTP-Server -IncludeAllSubFeature -IncludeManagementTools -RestartWait for the installation to finish. You should see an output similar to this.

Import a certificate (for TLS only)
If you’ll be sending e-mail via TLS (Office 365), you need to import an SSL certificate in the server’s local machine personal certificate store before you configure the IIS SMTP Server. You can skip this step if your Office 365 SMTP relay is non-TLS.
If you don’t have a certificate, you can get one via your internal PKI (if you have that) or a public certificate using services like LetsEncrypt, Digicert, etc.
Once you have the certificate, you’ll need to import it into the local machine personal certificate store. If you’re unfamiliar with how to import certificates using the Certificates MMC, check out Import and Export Certificate – Microsoft Windows.
When successful, you should get a confirmation window like this. Click OK (1) to confirm.

Back in the main console window, refresh the Personal > Certificates folder and you should be able to see the imported certificate.
Validate the Certificate
Once imported, be sure to verify that the certificate chain is complete and that there are no errors. If all is well, you should be able to open the certificate and see the Valid From field is current and there is a private key associated with the certificate. An example is shown below.

On the Certification Path tab, you should also see a Certificate status stating that the certificate is OK as shown below.

Configure the IIS SMTP Server
You have successfully installed the SMTP server at this point. But before you can use it, the server settings must be configured first.
The SMTP server is running on IIS6 Compatibility mode and it does not come with built-in PowerShell support. This means that you will configure the settings manually using the IIS6 Management Console.
Go to Start –> Run and type in inetmgr6 and hit Enter. This will open the IIS 6 console.
Once the console is open, right-click on [SMTP Virtual Server #1] (1), then select Properties (2).

In the Properties window, check Enable logging (1), then click Properties (2).

Go to the Advanced tab, and check all the boxes in the list (1), then click OK (2).

Back in the Properties window, go to the Delivery tab and click on Advanced (1).

In the Advanced Delivery window, type in the Fully-qualified domain name (1) you’d like to use for the destination SMTP mail server. It does not have to be the same as the FQDN of the computer itself. If you’re configuring this SMTP server to use with Office 365, in the Smart host (2) field, define your Office 365 MX endpoint. and click OK (3).

Add Allowed IPs in the IIS SMTP Server
Now if you have a device that you want to test, you must add its IP address to the relay restrictions first. For this example, the IP address 192.168.0.3 will be added to the relay restrictions. This IP address belongs to a computer that is within the same network as the server.
To add an allowed IP in the relay restrictions, go to the Access tab and click on Relay (1).

Inside the Relay Restrictions window, click Add (1).

Then type in the IP address (1) you’d like to allow then click OK (2).

Back in the Relay Restrictions window, confirm that the IP address is added to the list, then click OK (1) and OK out of the properties window.

Confirm Certificate is Detected by the SMTP Server and Enable TLS Encryption
If your relay server will be sending outbound email via TLS, you’ll need to confirm the certificate is seen by the IIS SMTP Server and enable TLS encryption.
On the Access tab of the SMTP Server properties, you should see a message stating “A TLS certificate is found with expiration date: XXXXXX”. If so, you’re good to go.

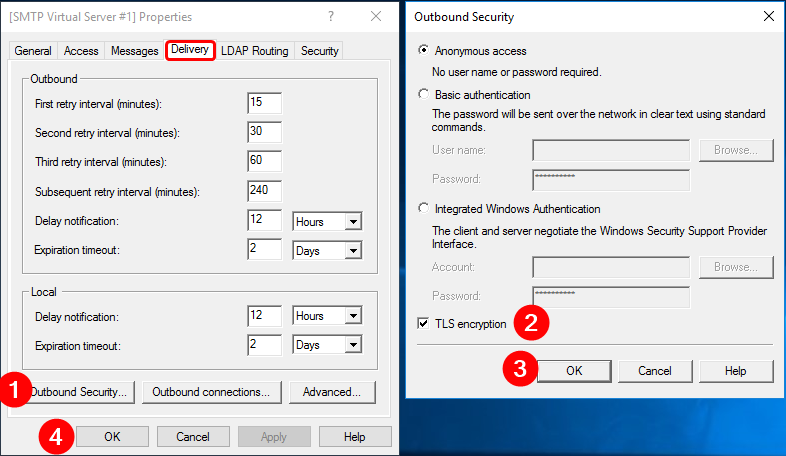
Next, click on the Delivery tab, click on Outbound Security (1), check the TLS encryption (2) box, click OK (3).
This concludes the IIS SMTP Server configuration steps.
Test the IIS SMTP Mail Relay Server
At this point, your SMTP Server should be configured and ready to begin relaying mail. The next step is to test it. You should now test sending email through the SMTP relay to confirm the receiving SMTP server gets the message.
Test with the Pickup Directory
When IIS SMTP Server is installed, it will create a folder on the server at C:\inetpub\mailroot\Pickup. This directory is where the SMTP service picks up newly submitted emails for processing before moving them to the Queue directory.
To test using this method, create a plain text file with content similar to this:
From: [email protected]
To: [email protected],[email protected]
Subject: testing Pickup directory
This is the test message body.
Do not forget to change the From and To values to your own.
Now save this file somewhere other than the pickup directory as mail.txt.
Once you’ve saved the file, copy and paste the file into the C:\inetpub\mailroot\Pickup folder. If successful, the file should quickly disappear. This means that the SMTP service has picked it up and has started processing the message.
After a few seconds to a minute, you should receive the email sent to the specified recipient email address defined in mail.txt.
Test with PowerShell
In this test, you will use PowerShell from the computer whose IP address you added in the Add Allowed IPs in the IIS SMTP Server section.
Open up a PowerShell console and copy/paste the code below. Be sure to edit the values for the From, To and SmtpServer parameters. Depending on how you configured the relay server above, you can use either example below to test a non-TLS or TLS setup.
## Build the message parameters
$mailParams = @{
    SmtpServer                 = 'smtp.server.here'
    Port                       = 25
    #UseSSL = $true
    From                       = '[email protected]'
    To                         = '[email protected]', '[email protected]'
    Subject                    = ('ON-PREM SMTP Relay - ' + (Get-Date -Format g))
    Body                       = 'This is a test email using ON-PREM SMTP Relay'
    DeliveryNotificationOption = 'OnFailure', 'OnSuccess'
}
<# Send the message #>
Send-MailMessage @mailParams
Summary
In this article, you’ve learned how to set up an IIS SMTP relay server for recipient email delivery from Office 365. We covered setting up both a non-TLS and TLS SMTP server using a combination of the GUI and PowerShell. We then tested our setup using PowerShell to confirm all is well.


