
Do you need to ensure that nobody makes modifications to your scripts and pass them as the original? If so, then you need to learn how to sign PowerShell script. Signing adds the publisher’s identity to the script so that users can decide whether to trust the script’s source.
Not a reader? Watch this related video tutorial!
Not seeing the video? Make sure your ad blocker is disabled.
In this article, learn how to ensure that only trusted scripts are run in your environment by learning how to sign PowerShell scripts.
Prerequisites
If you’re going to follow the examples in this article, you need the following.
- A computer running on a recent version of the Windows operating system. This article uses Windows 10 version 20H2.
- Windows PowerShell 5.1 or PowerShell 6+. The examples in this article will use PowerShell v7.1.3.
- A sample PowerShell script for signing. Feel free to create a script with any name and in any folder you want. This article will use a sample script called C:\ATA\myscript.ps1 that contains the code below.
Write-Host "Script Execution - OK"Obtaining a Code Signing Certificate
Before learning how to sign PowerShell script, you need to obtain a code signing certificate first. In the Microsoft world, code signing certificates are also known as Authenticode certificates.
A code signing certificate is one type of digital certificate whose purpose for signing files. Signing a file or code with a code signing certificate adds proof that the file came from the publisher who signed it.
Where you get a code signing certificate depends on where you intend to deploy or distribute your signed scripts. And as always, the cost is a big factor, too.
- Global / Public – You’ll need a certificate whose issuer is a globally trusted Certificate Authority (CA). Examples of such CAs are GeoTrust and DigiCert. These certificates are not free. For example, a DigiCert Authenticode certificate will set you back $474/year as of this writing.
- Internal / Local Intranet – If you have an internal certificate authority (CA) server, you can request and download a signing certificate from your internal CA server.
- Personal / Development – For personal testing or development use, a self-signed certificate should be fine. This type of signing certificate is what you’ll use in this article.
Creating a Self-Signed Certificate for Code Signing
You’ve read in the previous section that in learning how to sign PowerShell script, you first need a code signing certificate. Since you’ll only be doing personal testing in this tutorial, a self-signed certificate would suffice. But where do you get it?
As the name implies, self-signed means that your local computer will issue a code signing certificate to itself. To generate a self-signed certificate, follow these steps.
1. Open PowerShell as administrator on your computer.
2. Copy the command below and run it in PowerShell. This command uses the New-SelfSignedCertificate cmdlet to create a new code signing certificate. The certificate’s name is ATA Authenticode inside the local computer’s Personal certificate store.
The
New-SelfSignedCertificatecmdlet only supports creating certificates in the current user’s personal certificate store (cert:\CurrentUser\My) or the local machine’s personal certificate store (cert:\LocalMachine\My). Certificates in cert:\LocalMachine\My are available computer-wide.
The command also stores the certificate object to the $authenticode variable for use in the next step.
# Generate a self-signed Authenticode certificate in the local computer's personal certificate store.
 $authenticode = New-SelfSignedCertificate -Subject "ATA Authenticode" -CertStoreLocation Cert:\LocalMachine\My -Type CodeSigningCert
3. Next, to make your computer trust the new certificate you’ve created, add the self-signed certificate to the computer’s Trusted Root Certification Authority and Trusted Publishers certificate store. To do so, copy the code below and run it in PowerShell.
# Add the self-signed Authenticode certificate to the computer's root certificate store.
## Create an object to represent the LocalMachine\Root certificate store.
 $rootStore = [System.Security.Cryptography.X509Certificates.X509Store]::new("Root","LocalMachine")
## Open the root certificate store for reading and writing.
 $rootStore.Open("ReadWrite")
## Add the certificate stored in the $authenticode variable.
 $rootStore.Add($authenticode)
## Close the root certificate store.
 $rootStore.Close()

# Add the self-signed Authenticode certificate to the computer's trusted publishers certificate store.
## Create an object to represent the LocalMachine\TrustedPublisher certificate store.
 $publisherStore = [System.Security.Cryptography.X509Certificates.X509Store]::new("TrustedPublisher","LocalMachine")
## Open the TrustedPublisher certificate store for reading and writing.
 $publisherStore.Open("ReadWrite")
## Add the certificate stored in the $authenticode variable.
 $publisherStore.Add($authenticode)
## Close the TrustedPublisher certificate store.
 $publisherStore.Close()
There are three primary reasons to install the self-signed certificates in three different certificate stores.
- The certificate you created in the Personal certificate store is what you’ll use as the code signing certificate.
- Copying the same certificate to the Trusted Publishers store ensures that your local computer will trust the publisher who signed the script. PowerShell checks for the certificate in this store to validate a script’s signature.
- Finally, adding the self-signed certificate to the Trusted Root Certification Authorities ensures that your local computer trusts the certificates in the Personal and Trusted Publishers stores.
4. To confirm that the certificate with the subject ATA Authenticode is in the Personal, Root, and Trusted Publisher certificate stores, run the commands below in PowerShell.
# Confirm if the self-signed Authenticode certificate exists in the computer's Personal certificate store
 Get-ChildItem Cert:\LocalMachine\My | Where-Object {$_.Subject -eq "CN=ATA Authenticode"}
# Confirm if the self-signed Authenticode certificate exists in the computer's Root certificate store
 Get-ChildItem Cert:\LocalMachine\Root | Where-Object {$_.Subject -eq "CN=ATA Authenticode"}
# Confirm if the self-signed Authenticode certificate exists in the computer's Trusted Publishers certificate store
 Get-ChildItem Cert:\LocalMachine\TrustedPublisher | Where-Object {$_.Subject -eq "CN=ATA Authenticode"}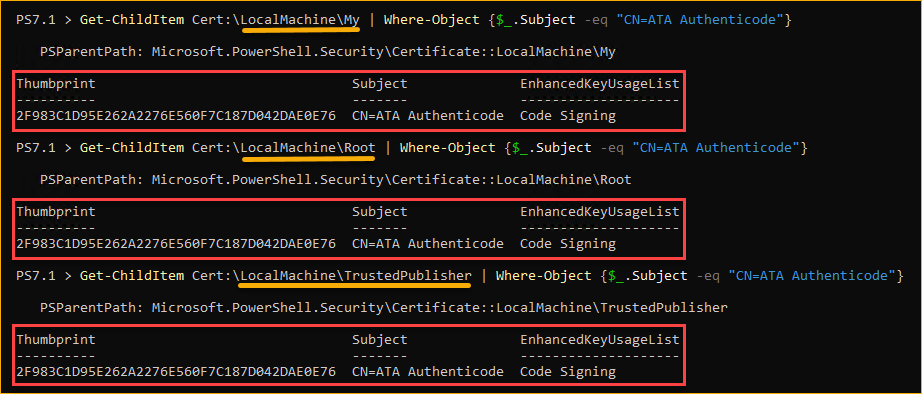
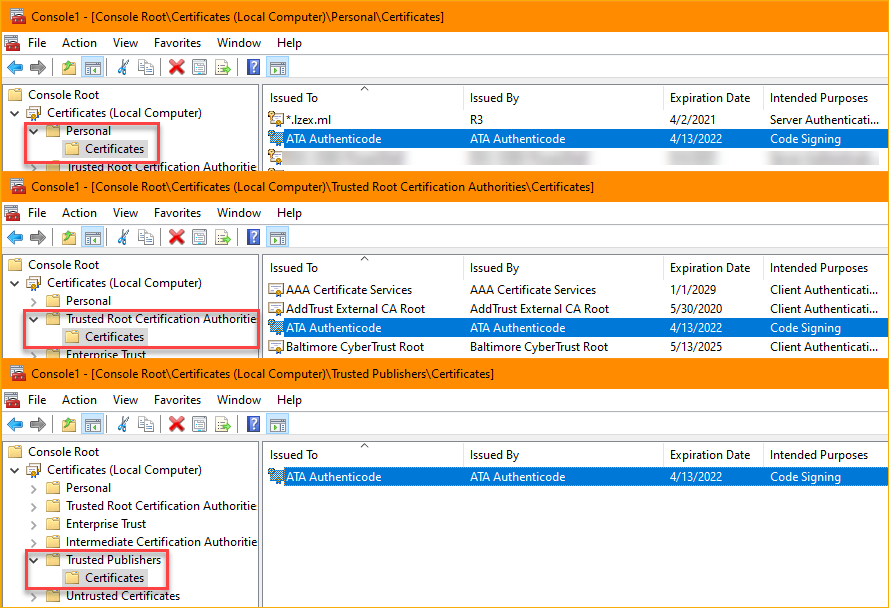
5. To view the certificate in a GUI instead, open the Certificates Snap-in and look for the certificate you’ve created under the Certificates folder inside the Personal, Trusted Root Certification Authorities, and Trusted Publishers certificate stores.
How to Sign PowerShell Scripts
Now that you have created and installed your code signing certificate into the three certificate stores, you’re ready to use it to sign your sample PowerShell script. When you need to sign scripts, the Set-AuthenticodeSignature cmdlet is the main star.
To sign the PowerShell script, run the code below in PowerShell. The first command gets the code-signing certificate from the local machine’s personal certificate store. The second command adds a digital signature to the PowerShell script file.
# Get the code-signing certificate from the local computer's certificate store with the name *ATA Authenticode* and store it to the $codeCertificate variable.
$codeCertificate = Get-ChildItem Cert:\LocalMachine\My | Where-Object {$_.Subject -eq "CN=ATA Authenticode"}

# Sign the PowerShell script
# PARAMETERS:
# FilePath - Specifies the file path of the PowerShell script to sign, eg. C:\ATA\myscript.ps1.
# Certificate - Specifies the certificate to use when signing the script.
# TimeStampServer - Specifies the trusted timestamp server that adds a timestamp to your script's digital signature. Adding a timestamp ensures that your code will not expire when the signing certificate expires.
Set-AuthenticodeSignature -FilePath C:\ATA\myscript.ps1 -Certificate $codeCertificate -TimeStampServer *<http://timestamp.digicert.com>*
Most trusted certificate providers have a timestamp server and you can find them from the providers’ websites. For example, DigiCert‘s timestamp server is http://timestamp.digicert.com and Comodo has http://timestamp.comodoca.com.
After signing the script, you should see a similar output to the screenshot below.

Checking a PowerShell Script’s Digital Signature
So far, you’ve signed a PowerShell script using the self-signed certificate that you created. But how do you know if the script does have a digital signature?
Opening the Code
One way to confirm a script’s digital signature is to open the script and view the code in a text editor. Like the example below, the signed script has a signature block at the end of the code. The signature block begins with # SIG # Begin signature block and ends with # SIG # End signature block.
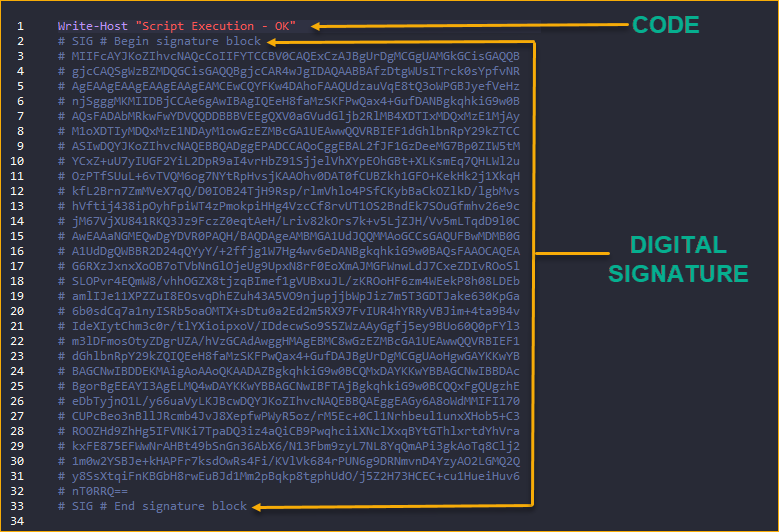
Deleting the digital signature block from the script’s code will revert the script to being non-signed.
Opening the Script’s File Properties
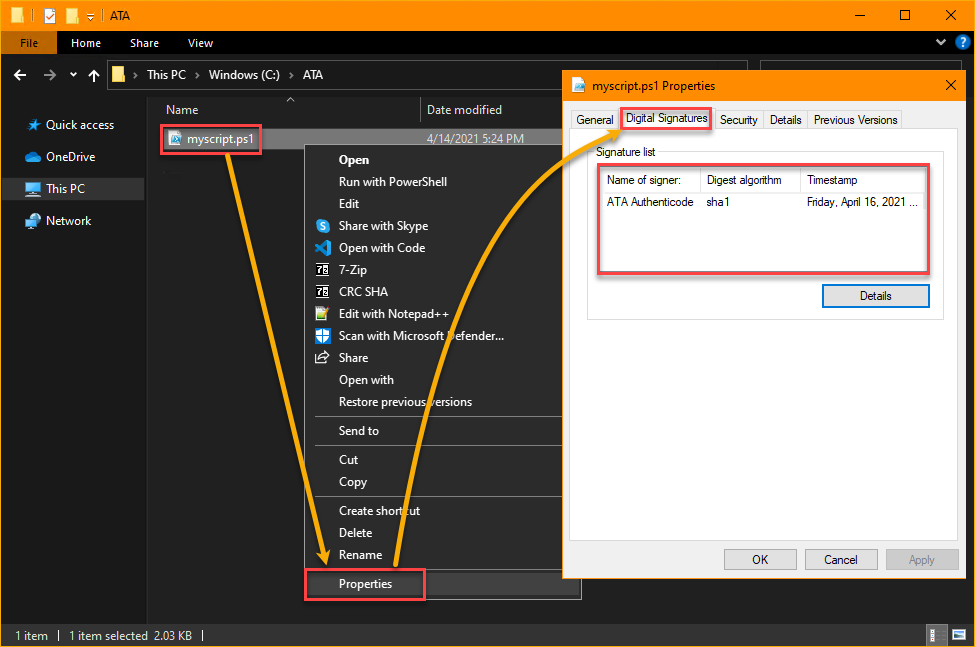
Another way to check the script’s digital signature is to open the script’s file properties in Windows Explorer. To do so:
- In Windows Explorer, navigate to the PowerShell script’s location. In this example, the script is in C:\ATA\myscript.ps1.
- Right-click the script and click on Properties.
- On the file’s Properties window, click the Digital Signatures tab, and you should see a digital signature under the Signature list.
Using Get-AuthenticodeSignature
Would you be surprised that you can also check a script’s signature inside PowerShell? Probably not. The cmdlet that you can invoke to retrieve the signature of a file is Get-AuthenticodeSignature.
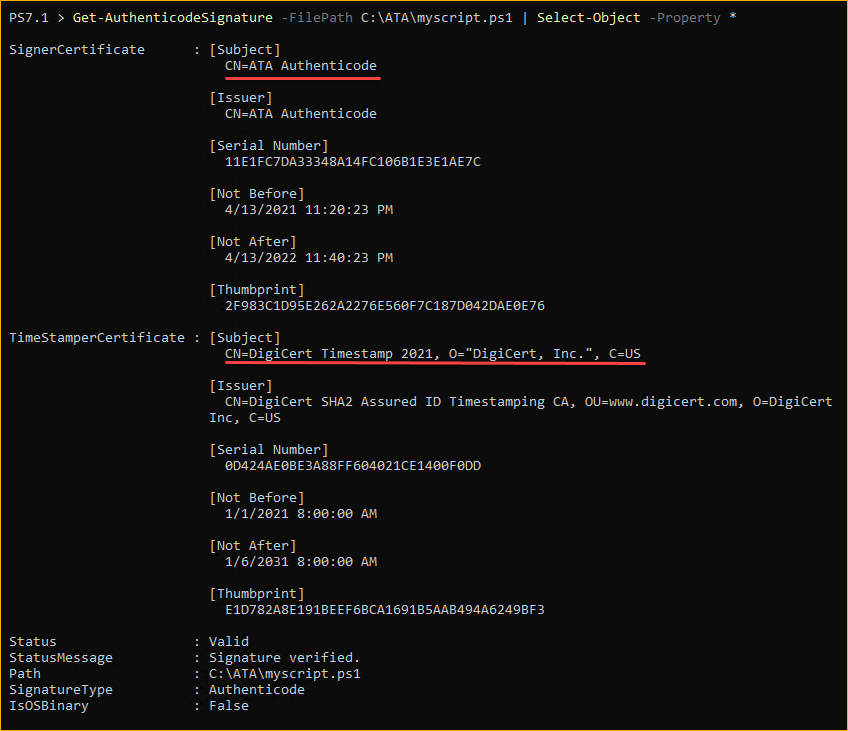
To get the digital signature of the script, run the command below. This command gets the signature of the C:\ATA\myscript.ps1 file. The Select-Object -Property * cmdlet displays all the details of the signature.
Get-AuthenticodeSignature -FilePath C:\\ATA\\myscript.ps1 | Select-Object -Property *After running the command, you should see a similar result as the screenshot below. As you can see, the SignerCertificate property shows the details of the signing certificate. While the TimerStamperCertificate property shows the certificate of timestamp server.
Running a Signed PowerShell Script
At this point, you’ve signed a PowerShell script and confirmed that the digital signature is present. But, the ultimate test of whether you’ve done all the steps correctly is to execute the script and confirm that it runs.
PowerShell has a safety feature that protects users from unintentionally running scripts. This safety feature is called Execution Policies. Depending on the execution policy, PowerShell may prevent or allow scripts to run.
To learn about the different execution policies and how they affect script execution, refer to PowerShell Execution Policies: Understanding and Managing.
To run a signed PowerShell script, follow these steps.
First, change the execution policy to AllSigned to ensure only signed scripts can run. Without doing this step, you cannot accurately test whether your signed script works. To do so, invoke the Set-ExecutionPolicy cmdlet by running the command below in PowerShell as admin.
Set-ExecutionPolicy AllSignedNext, execute the signed PowerShell script.
C:\ATA\myscript.ps1The script should run and without errors or warning, as you can see in the result below.

But, if somehow the script was not correctly signed or not signed at all, you’ll get an error similar to the image below. In which case, revisit your steps and try signing the script again.

What if you eventually updated your script? Will the digital signature still be valid? The answer is no. Any modification to the signed script will invalidate the script’s digital signature. Running the modified script will fail and result in an error.
Follow these steps to test a modified signed script.
1. Open the signed myscript.ps1 script in a code or text editor.
2. Modify the code to add a character, such as an underscore in this example. Do not change anything else.
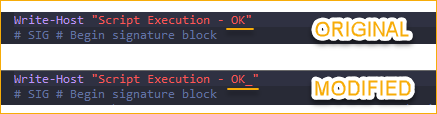
3. Save the script after modifying the code.
4. Finally, execute the modified script in PowerShell by running the command below.
C:\ATA\myscript.ps1Since you’ve modified the signed script, executing the script will result in the error shown below. You’ll need to sign the script again to update and fix its digital signature.

A digital signature does not guarantee that nobody modified the script from its original version. Any PowerShell script with malicious code may be digitally signed, too. Always practice caution when running scripts from sources you do not fully trust.
Conclusion
In this article, you learned why signing PowerShell scripts may be necessary depending on the execution policies. You also learned how to distinguish between a signed and non-signed script. Finally, you’ve learned how to sign PowerShell scripts digitally and how to test and run them.
Now that you know how to sign PowerShell scripts, will you start signing scripts before you distribute or deploy them?


