


Do you need to install Microsoft Teams on your machine? Perhaps you need to deploy Teams to more people? Deploying Teams might seem tricky, but it doesn’t have to be. And the Teams Machine-Wide installer will help you ensure that everyone benefits from Teams’ awesomeness.
In this post, you’re going to you’ll learn several ways to set up the Teams Machine-Wide installer. You’ll also learn how to uninstall it for good if needed. If you’re ready to go, let’s dig in!
Prerequisites
This article will be a tutorial. And if you will follow along, you will need a Windows 10 computer. This tutorial will use Windows 10 Build 19043.
Discovering the Teams Installation Scope
There are two versions of Teams installation. User-based, which installs Teams for one user, and machine-wide, which installs Teams for all users. How can you tell which one you have?
To determine what type of Teams installation exists on your machine, check the Apps & features list. To do so, follow the steps below.
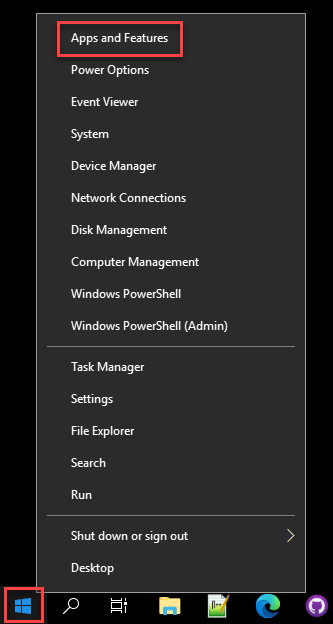
First, open the Apps & features window. To do so, right-click on the Start button or press WIN+X to bring up the context menu. Next, click Apps and Features menu item, as in the screenshot below:
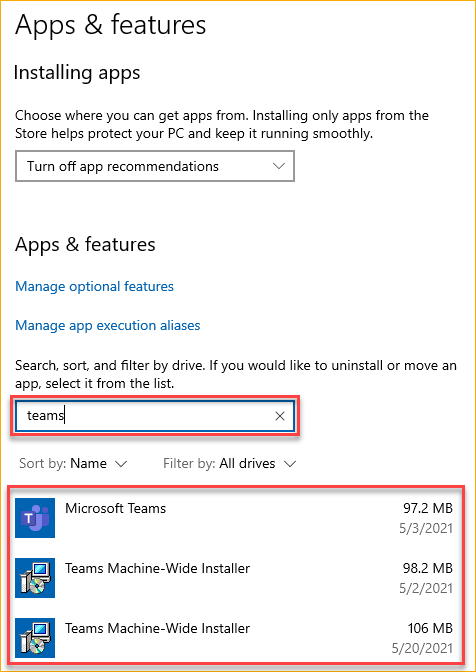
On the Apps & features page, filter the apps list by typing teams into the search box. As you can see below, there are three Teams-related apps on this computer—Microsoft Teams and two instances of Teams Machine-Wide Installer.
In some cases, you might have two instances of Teams Machine-Wide installer on the application list. For example, the double installation might happen when the first Teams MSI installation happened in the user context.
The subsequent installation, if using the system account, won’t detect the existing user installation. Consequently, two instances of Teams Machine-Wide Installer will be visible on the list.
Double installation doesn’t interrupt any mechanisms embedded in the installer. You don’t have to uninstall any of the entries from the list.
Depending on the installer version, the Teams Machine-Wide Installer default locations are ‘%PROGRAMFILES(X86)%\Teams Installer’ for 32bit and ‘%PROGRAMFILES%\Teams Installer’ for 64bit.
If the Teams Machine-Wide Installer is present, it means that the installer will try to deploy Microsoft Teams to any user profile on that machine. But, if the user profile already has the Microsoft Teams client, the installer will not install Teams again.
On the other hand, if you only see the Microsoft Teams in the apps list, it means that Teams is only available to your user profile. If other users on the computer want to have Teams, they will need to install it separately.
Setting Up Teams Using an MSI
MSI files give administrators flexibility and customization options when installing software. The Teams MSI installer is no exception. And if you’re going to deploy Teams, there are several options you can take based on your requirements.
Before installing Teams, depending on your system architecture, download the 32-bit or 64-bit MSI installer first.
Installing the Teams Machine-Wide Installer
After you downloaded the MSI installer, you’re ready to install the Teams Machine-Wide Installer. To do so, open PowerShell as administrator and run the command below.
Using the ALLUSERS=1 parameter makes the Teams Machine-Wide Installer appear in the Programs and Features in Control Panel and Apps & features in Windows Settings after installation. In which case, any user with admin access to the computer can uninstall the Teams Machine-Wide Installer.
msiexec /i Teams_windows_x64.msi ALLUSERS=1When installing Teams to a Virtualized Desktop Infrastructure (VDI), admins can use the
ALLUSER=1parameter to specify per-machine installation (notice the lack of ‘S’ in the parameter name). This parameter is not the same as theALLUSERS=1parameter.
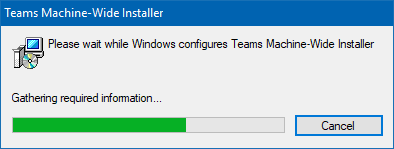
During the installation, you should see the installation progress like the one shown below. The installation process should take only a few seconds.
In rare cases when a bug impacts the latest version, installing a previous version of Teams is an option while waiting for the fix. The installation process is the same. The only difference is that you’d be referencing an older version of the Teams installer.
Disabling Teams Autostart From the Command Line
By default, the Teams client starts automatically when the user signs in. But you can prevent that behavior by specifying the noAutoStart=true option during the Teams Machine-Wide Installer installation.
Having Teams disabled from the autostart might be useful in the process of migration. For example, you can give your users the ability to opt-in for Teams usage.
To install the Teams Machine-Wide Installer and disable Teams autostart, run the command below in PowerShell as administrator.
msiexec /i Teams_windows_x64.msi OPTIONS="noAutoStart=true" ALLUSERS=1Disabling Teams Autostart using Group Policy
If you use Group Policy Objects (GPO), you can enable the Prevent Microsoft Teams from starting automatically after installation setting. You can find this in User Configuration\Policies\Administrative Templates\Microsoft Teams.
Using Group Policy Objects to prevent Microsoft Teams from starting automatically after installation is suitable to control this setting centrally. For example, you can have the default option to start Teams, but not for a specific group of users.
Deploying group policies is out of the scope of this article. But, to test or verify this policy locally, you can do so using the group policy editor. To do so, proceed as follows.
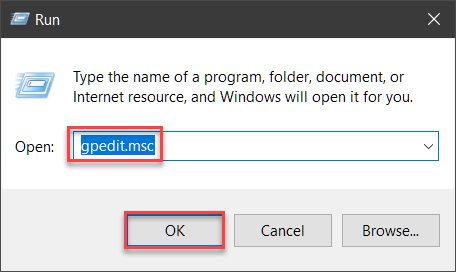
1. First, to open the Group Policy Editor, click Start —> Run. On the Run window, type gpedit.msc in the Open box and press Enter or click OK.
2. On the Group Policy Editor window, navigate to User Configuration\Policies\Administrative Templates\Microsoft Teams. Next, double-click the Prevent Microsoft Teams from starting automatically after installation setting to edit.
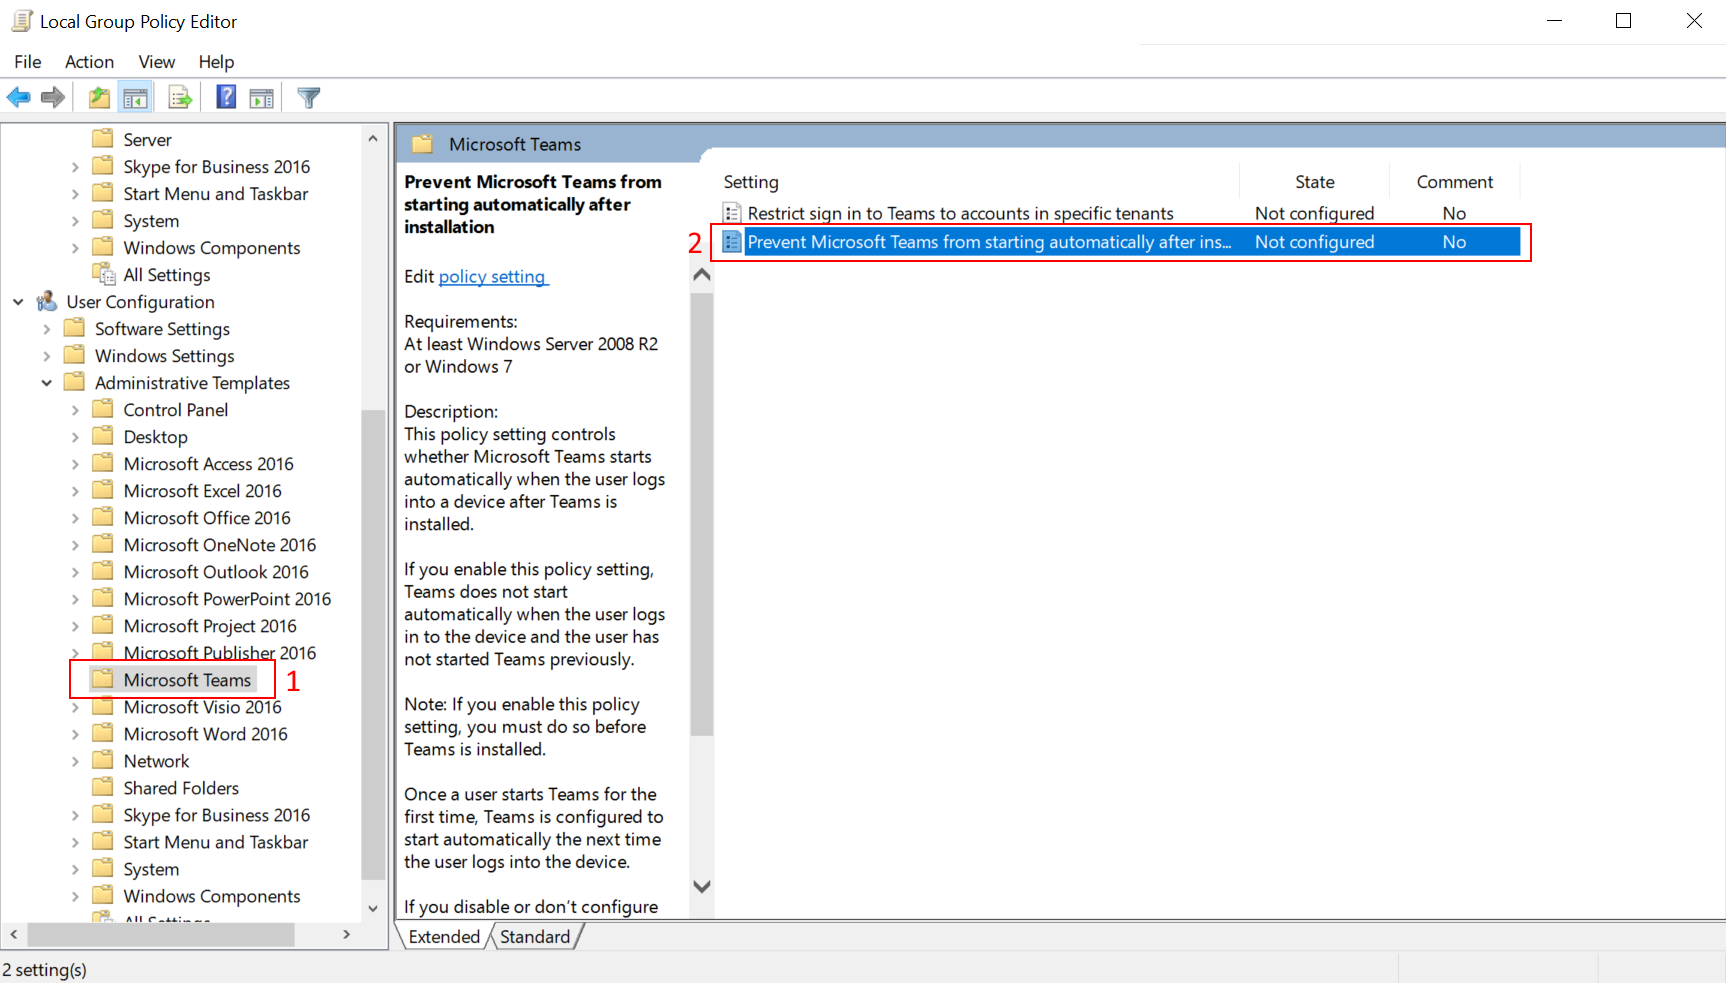
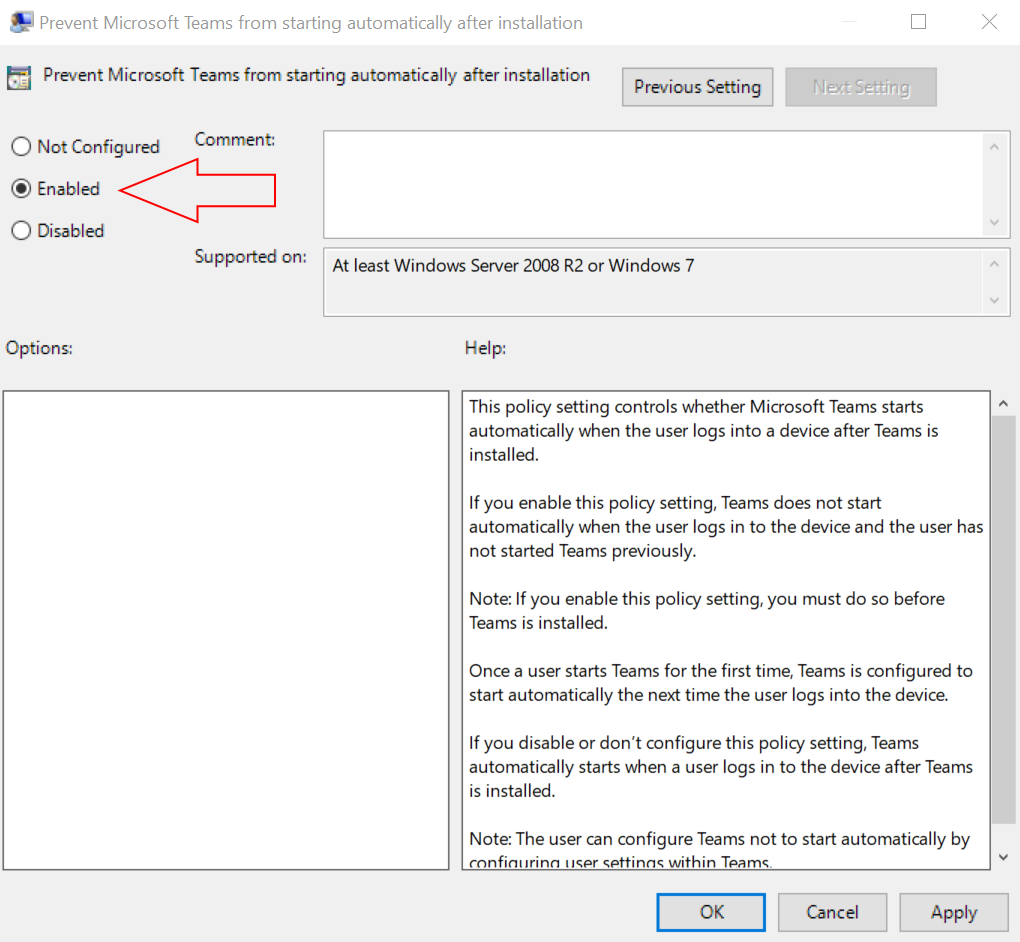
3. Once you’re on the setting window, click the Enabled option. Enabling this setting prevents Teams from starting when the user logs on to the computer. Click OK to apply the change and close the setting window.
Performing a Quiet Installation
You can deploy Teams Machine-Wide Installer in the background. This option is more user-friendly, as it doesn’t disturb the user. To install in quiet mode, use the /qn switch.
The command below performs a quiet installation in addition to disabling Teams autostart. Remember to run the command below in PowerShell as administrator.
msiexec /i Teams_windows_x64.msi /qn OPTIONS="noAutoStart=true" ALLUSERS=1Setting Up Teams with Microsoft 365 Apps for Enterprise
Another way to install Teams is by deploying Microsoft 365 Apps for Enterprise. Microsoft 365 Apps for Enterprise already includes Teams, starting with version 1902. This installation method will install the Teams Machine-Wide Installer on the computer, which will, in turn, install the Teams client.
Installing Teams with Microsoft 365 Apps for Enterprise
To install Microsoft 365 Apps for Enterprise, including Teams, follow the steps below.
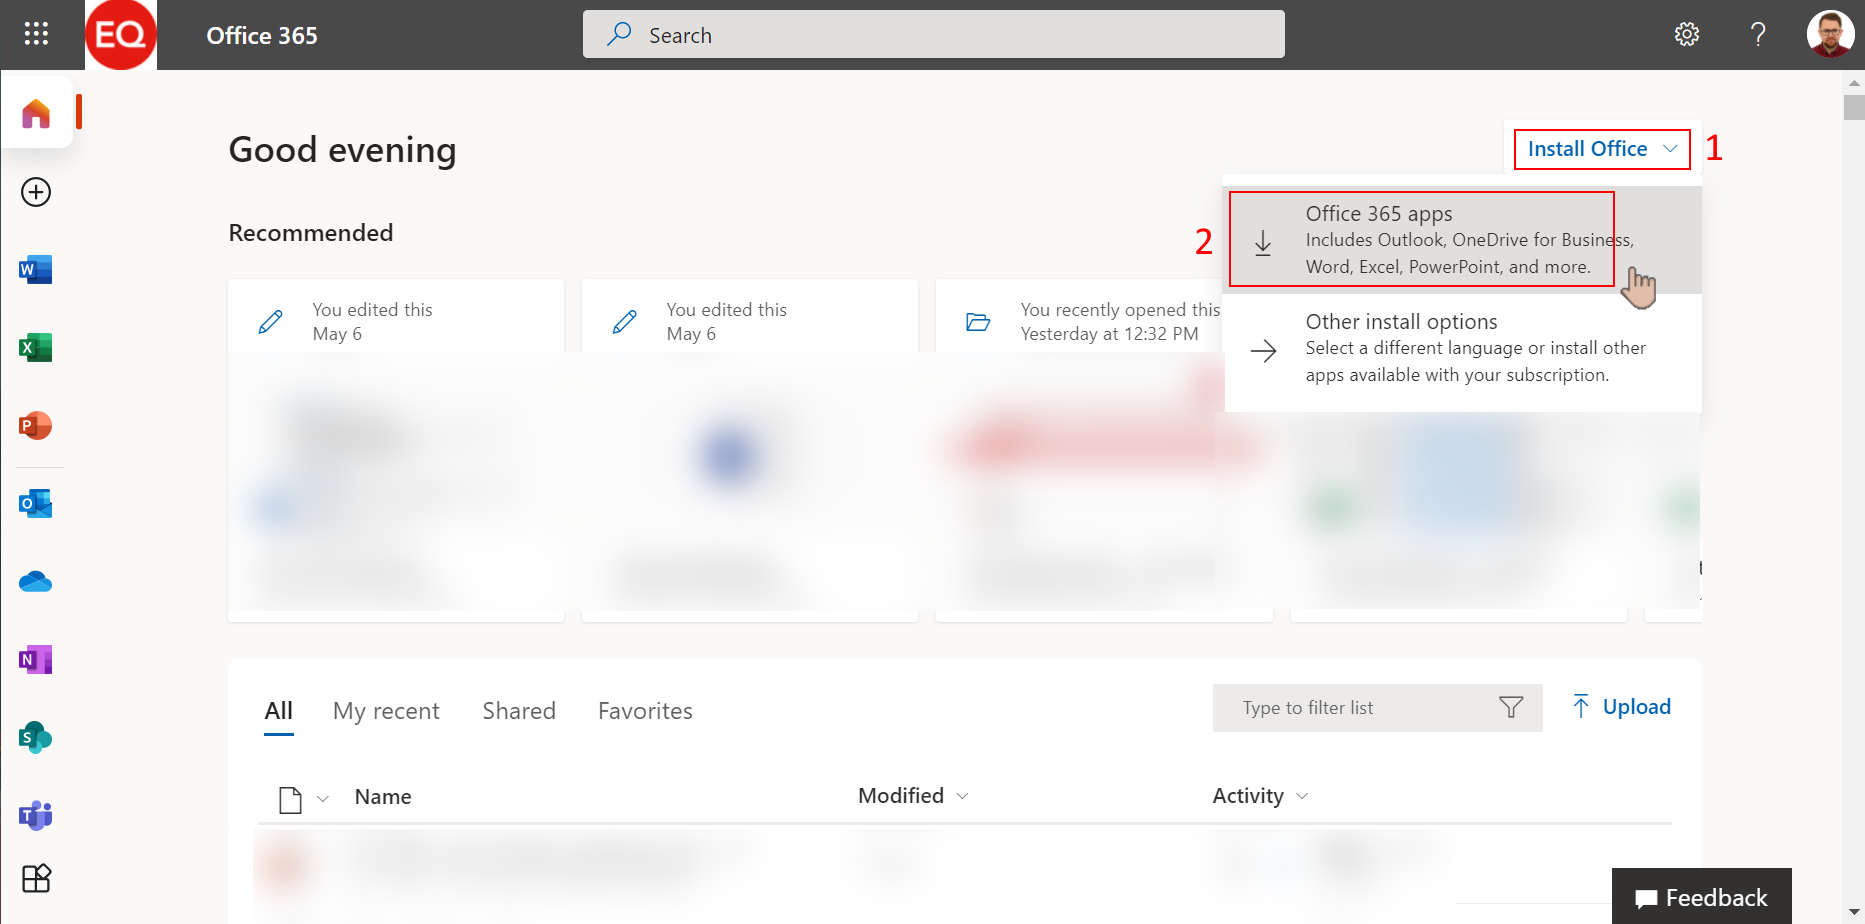
1. Open your web browser and navigate to the office.com webpage.
2. Sign in using your Microsoft 365 account.
3. Once signed in, click the Install Office button at the top-right corner. Then choose Office 365 apps, as pictured below.
If you don’t have Office 365 apps available, your license does not include them, or your administrator disabled the option to download them by the end-users.
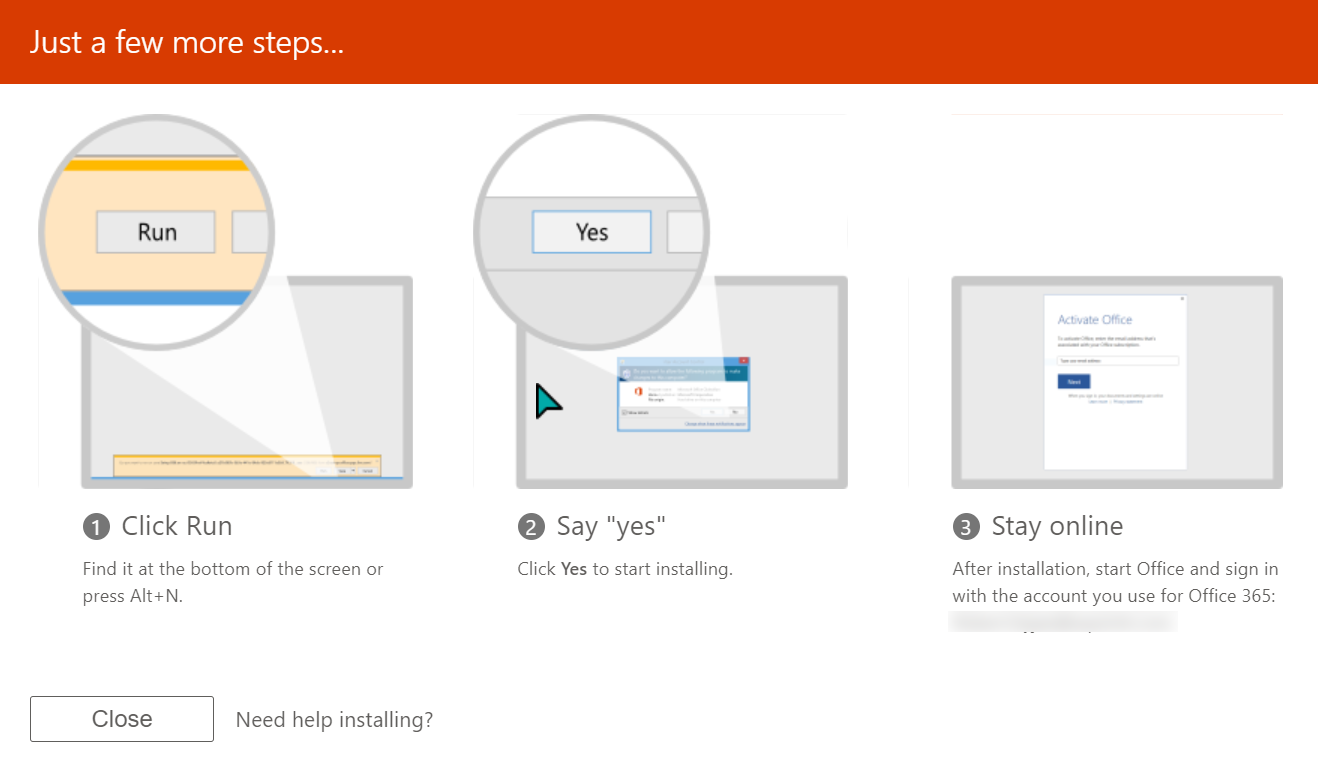
4. To start the installation, follow the three-step instruction from the browser. Click Run (1) to execute the OfficeSetup.exe installer. Click Yes (2) at the prompt to start installing. Stay online (3) after the installation, launch Microsoft Office, and sign in using your account.
Excluding Teams Installation from the Office Deployment Tool
There are some cases in which you’d like to skip the installation of Microsoft Teams with Microsoft 365 Apps. For example, you might already have the working solution for deploying Teams.
Separating Teams from Microsoft 365 Apps is also useful for shared remote desktops. To minimize the delays, you usually want your users to use Teams directly on their machines.
Microsoft provides multiple ways to install Microsoft 365 Apps without Teams. Let’s dig into them!
Installing Microsoft 365 Apps using the Office Deployment Tool (ODT) is out of the scope of this article. Therefore, the examples here will only demonstrate creating the configuration file to exclude Teams when installing Microsoft 365 Apps via ODT.
If you use ODT to deploy Microsoft 365 Apps, you can manually specify the ExcludeApp element in the configuration.xml file to exclude Teams. For example, the configuration file below would exclude Teams and legacy OneDrive from the Microsoft 365 Apps installation.
<Configuration ID="8182a584-99e8-486f-babb-8b873ad77e10">
  <Add OfficeClientEdition="64" Channel="Current">
    <Product ID="O365ProPlusRetail">
      <Language ID="en-us"/>
      <ExcludeApp ID="Groove"/>
      <ExcludeApp ID="Teams"/>
    </Product>
  </Add>
  <Updates Enabled="TRUE"/>
  <RemoveMSI/>
</Configuration>
If you don’t like to edit the configuration.xml file manually, another option is to create a new configuration file using the Office Customization Tool (OCT). Follow the steps below to create a configuration file the excludes Teams.
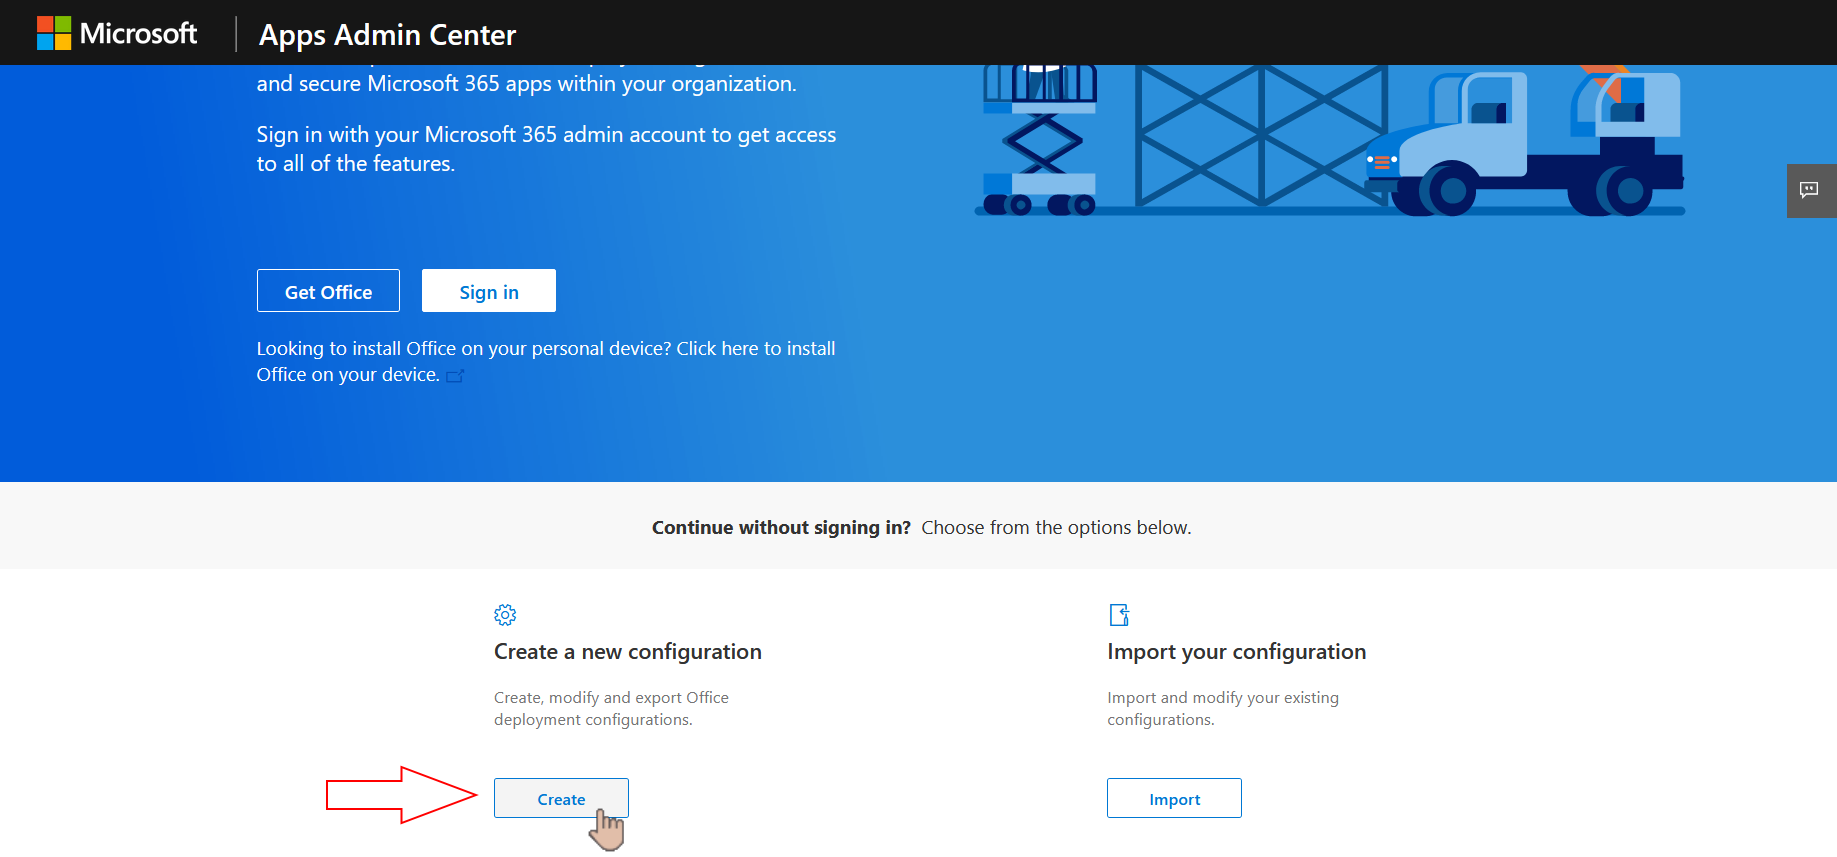
1. First, open your browser and navigate to https://config.office.com/.
2. Once on the App Admin Center page, scroll down to the bottom of the page and click the Create button.
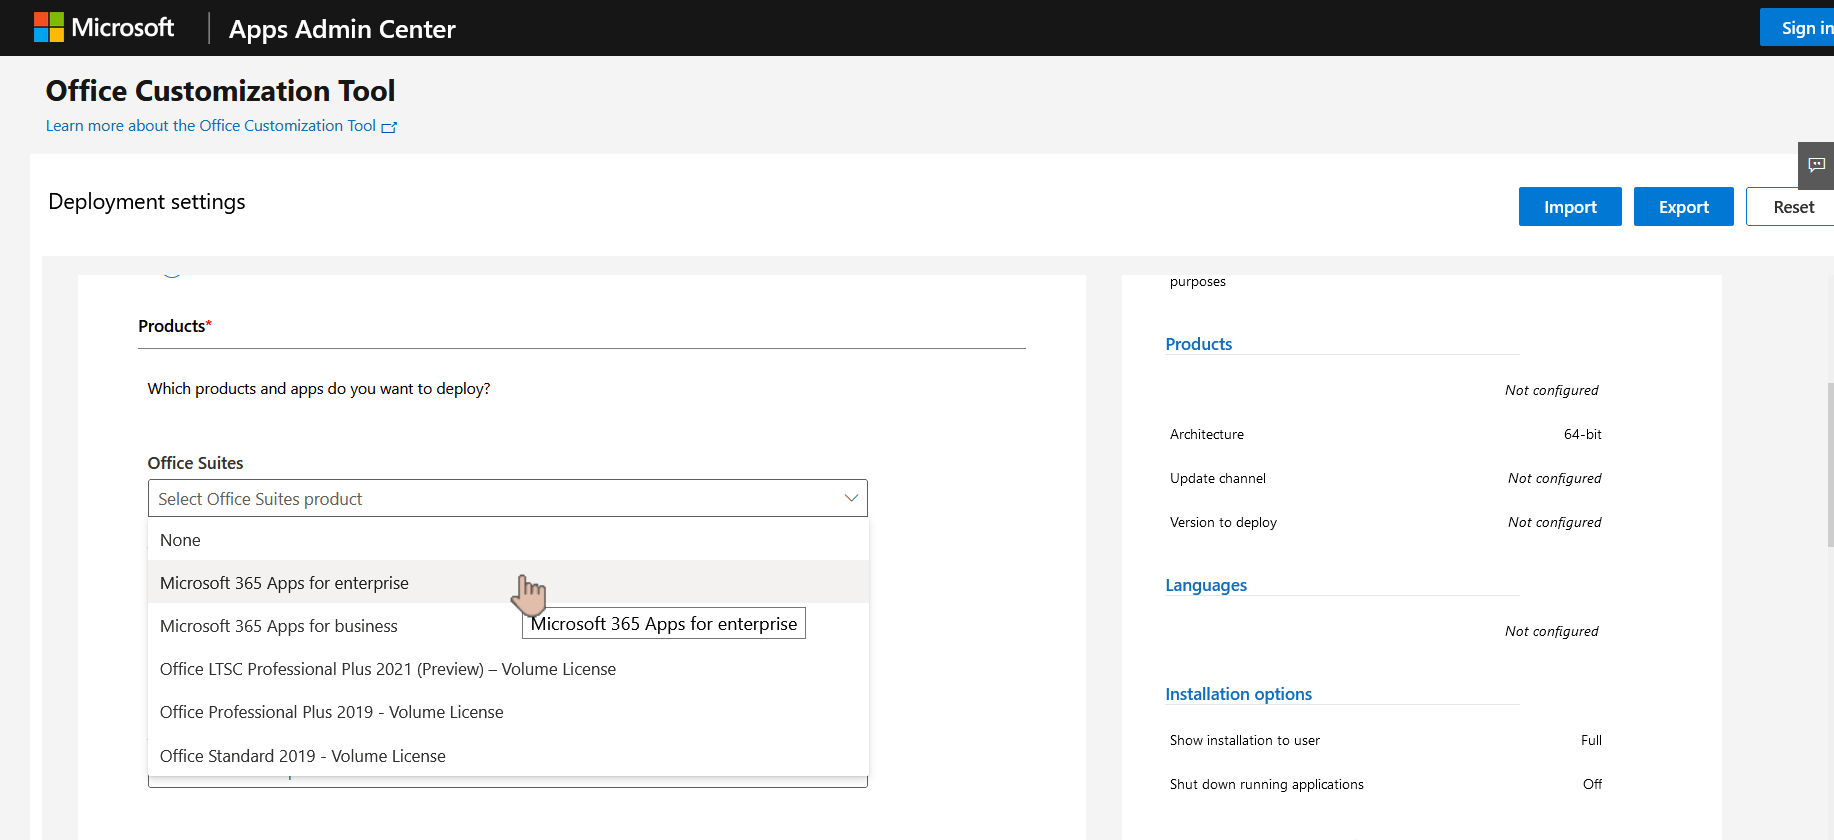
3. Under the Products and releases —>Products section, click the Office Suites dropdown and choose Microsoft 365 Apps for Enterprise.
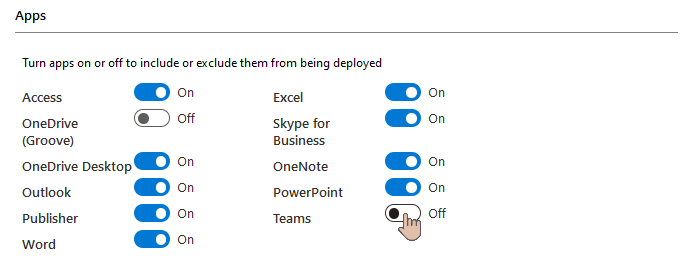
4. Scroll down to Apps and switch off the Teams app.
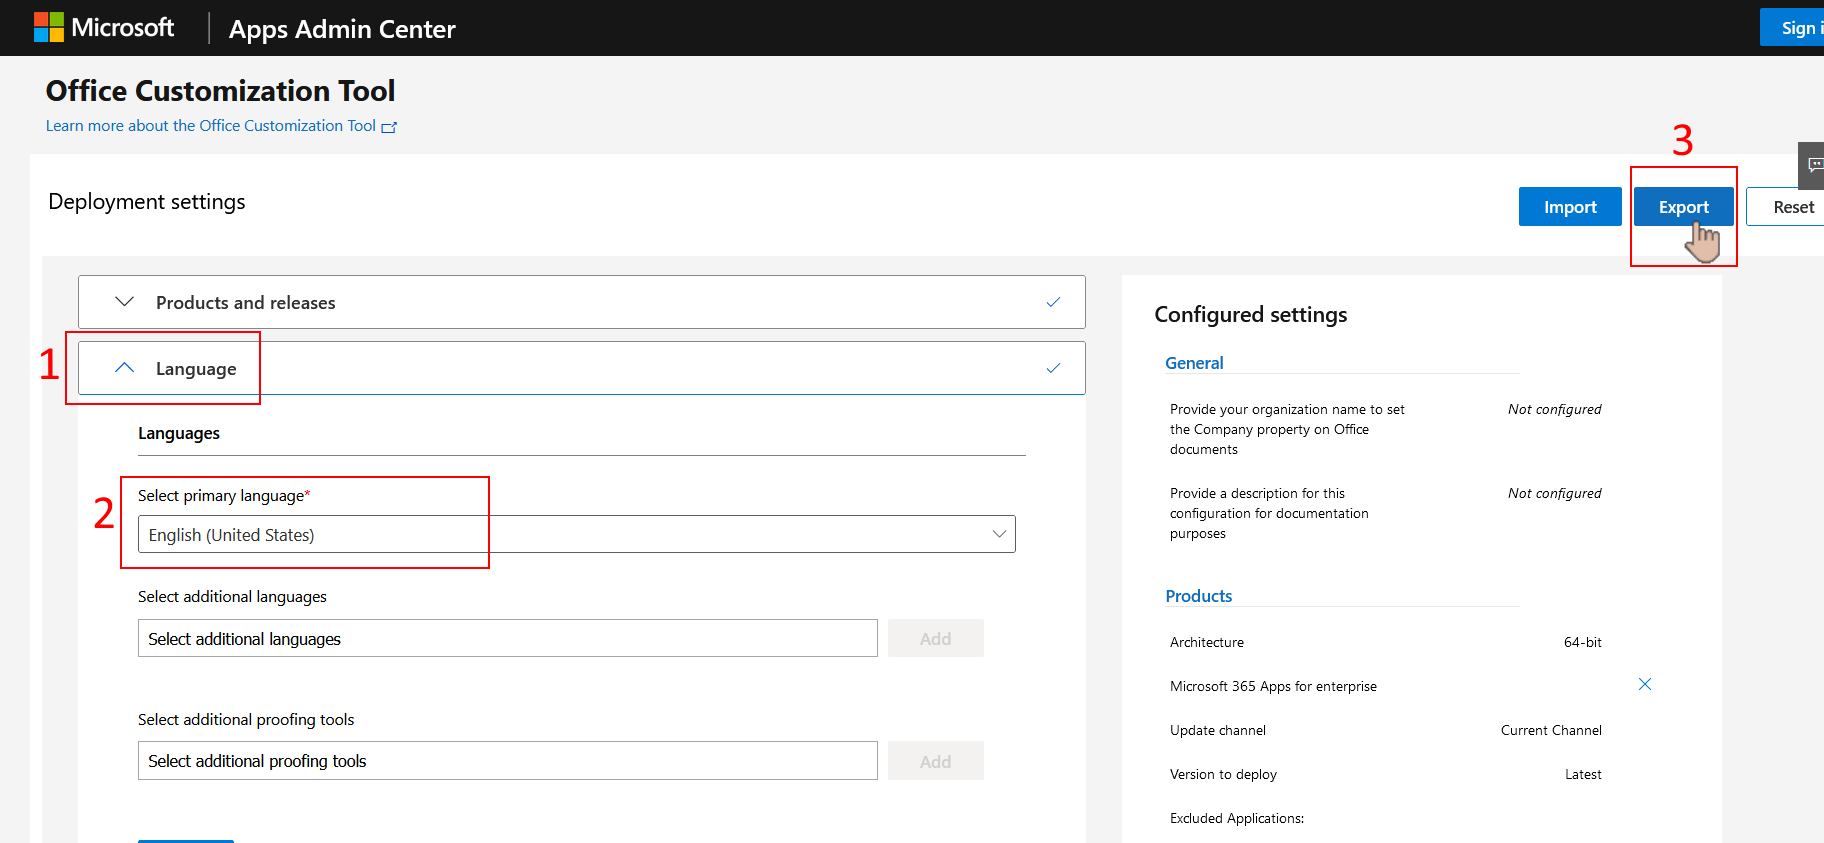
5. Next, click to expand the Language section. Click the dropdown box under Select primary and choose the primary language for the installation. This example will choose English (United States). After selecting the language, click Export.
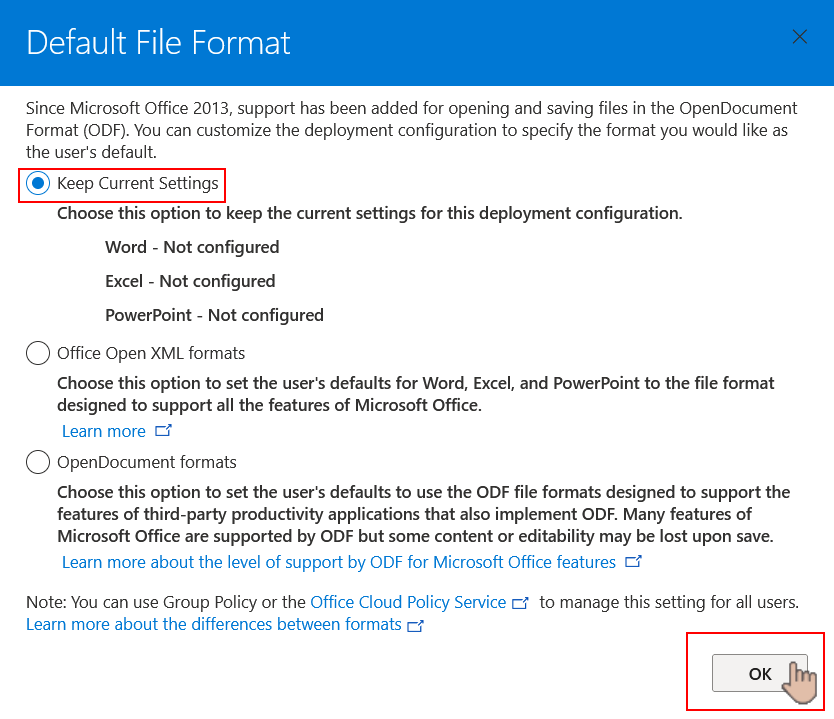
6. At the Default File Format pop-up page, choose your preferred option from the list. This example will choose the Keep Current Settings option. After making your selection, click OK, and your browser will start downloading the configuration.xml file.
Excluding Teams Installation from the Microsoft Endpoint Manager
Similar to the OCT, there are options to exclude Teams when deploying Microsoft 365 Apps for Enterprise using Microsoft Intune and Microsoft Endpoint Configuration Manager.
Follow the steps below to add the Microsoft 365 Apps to Microsoft Intune without Teams.
1. Open your web browser, navigate to https://endpoint.microsoft.com, and sign in using your account.
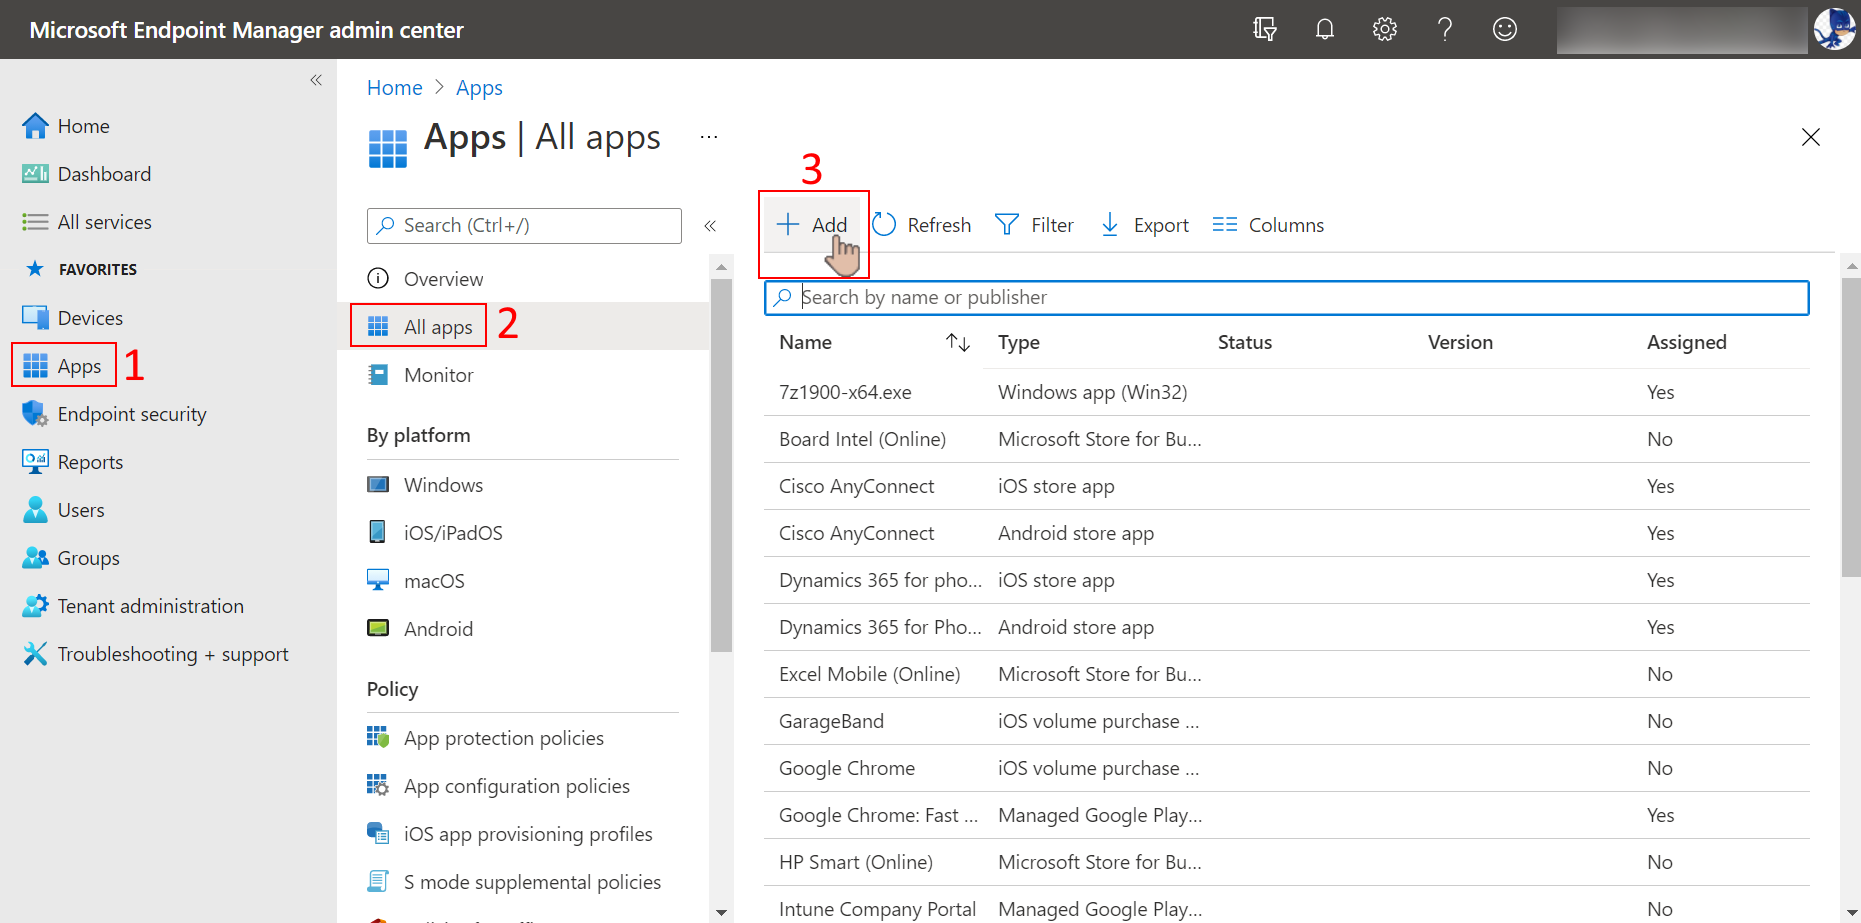
2. After signing in, click Apps (1) —> All apps (2) —> Add (3).
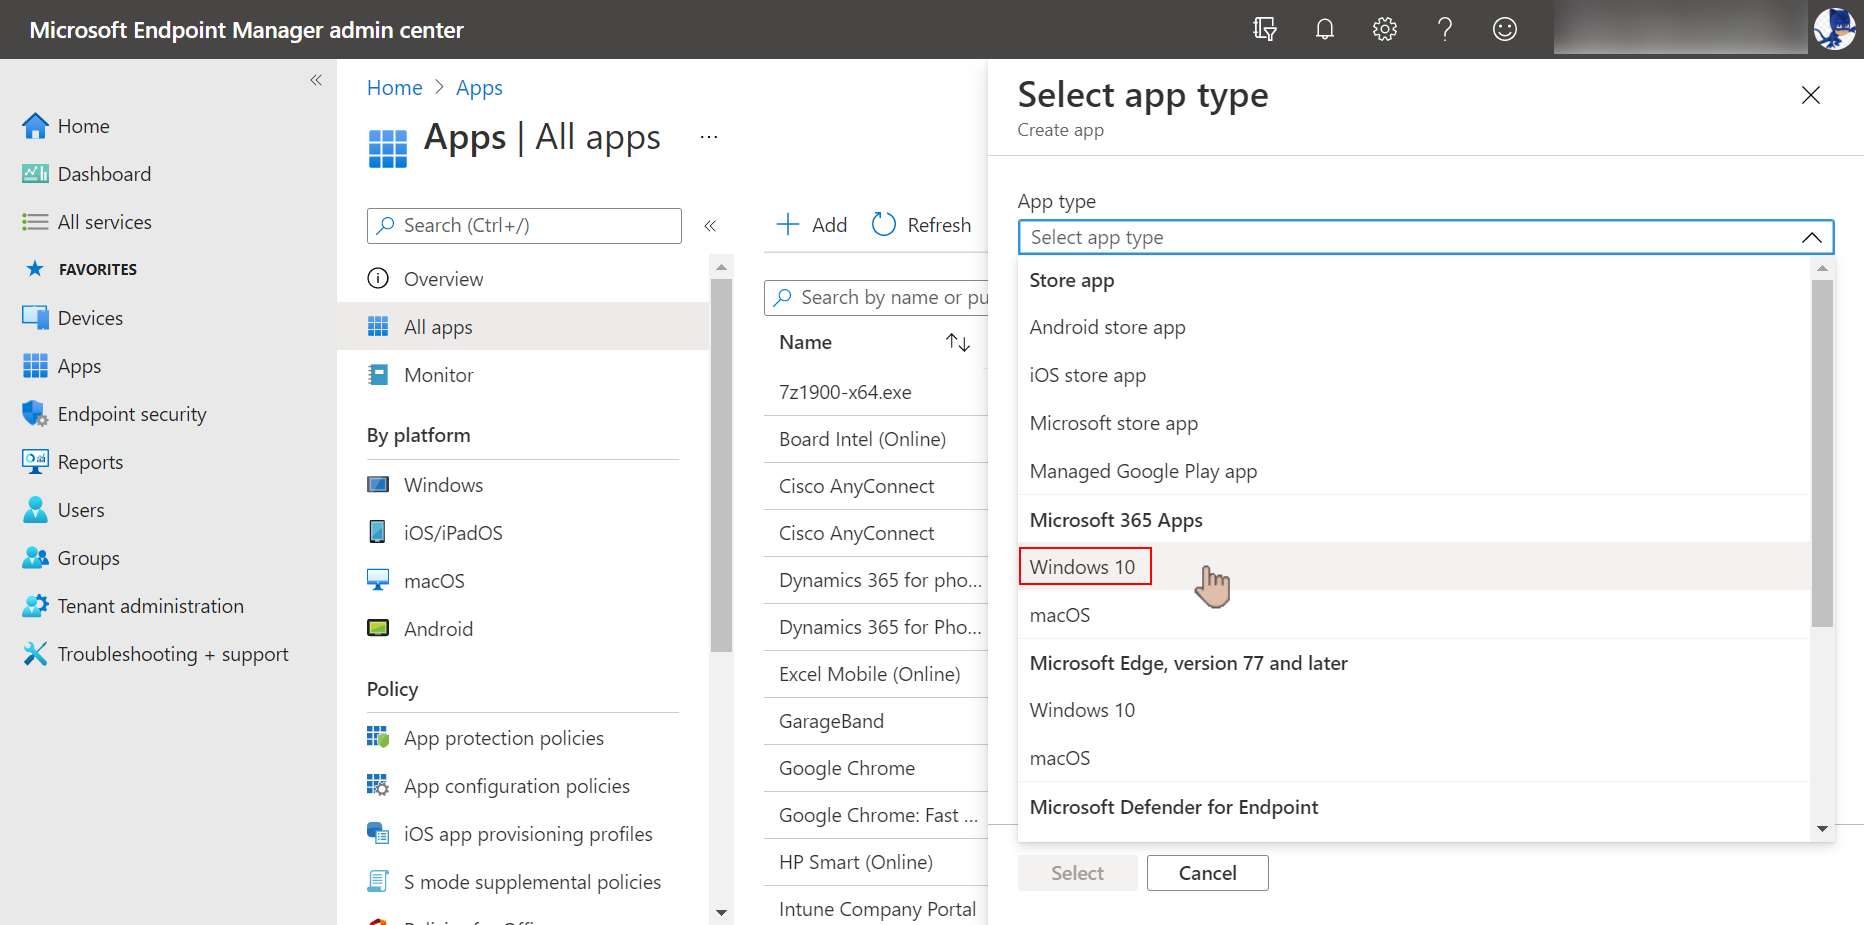
3. Under the Select app type fly-out, click the App type dropdown, and click to select Windows 10 under Microsoft 365 Apps.
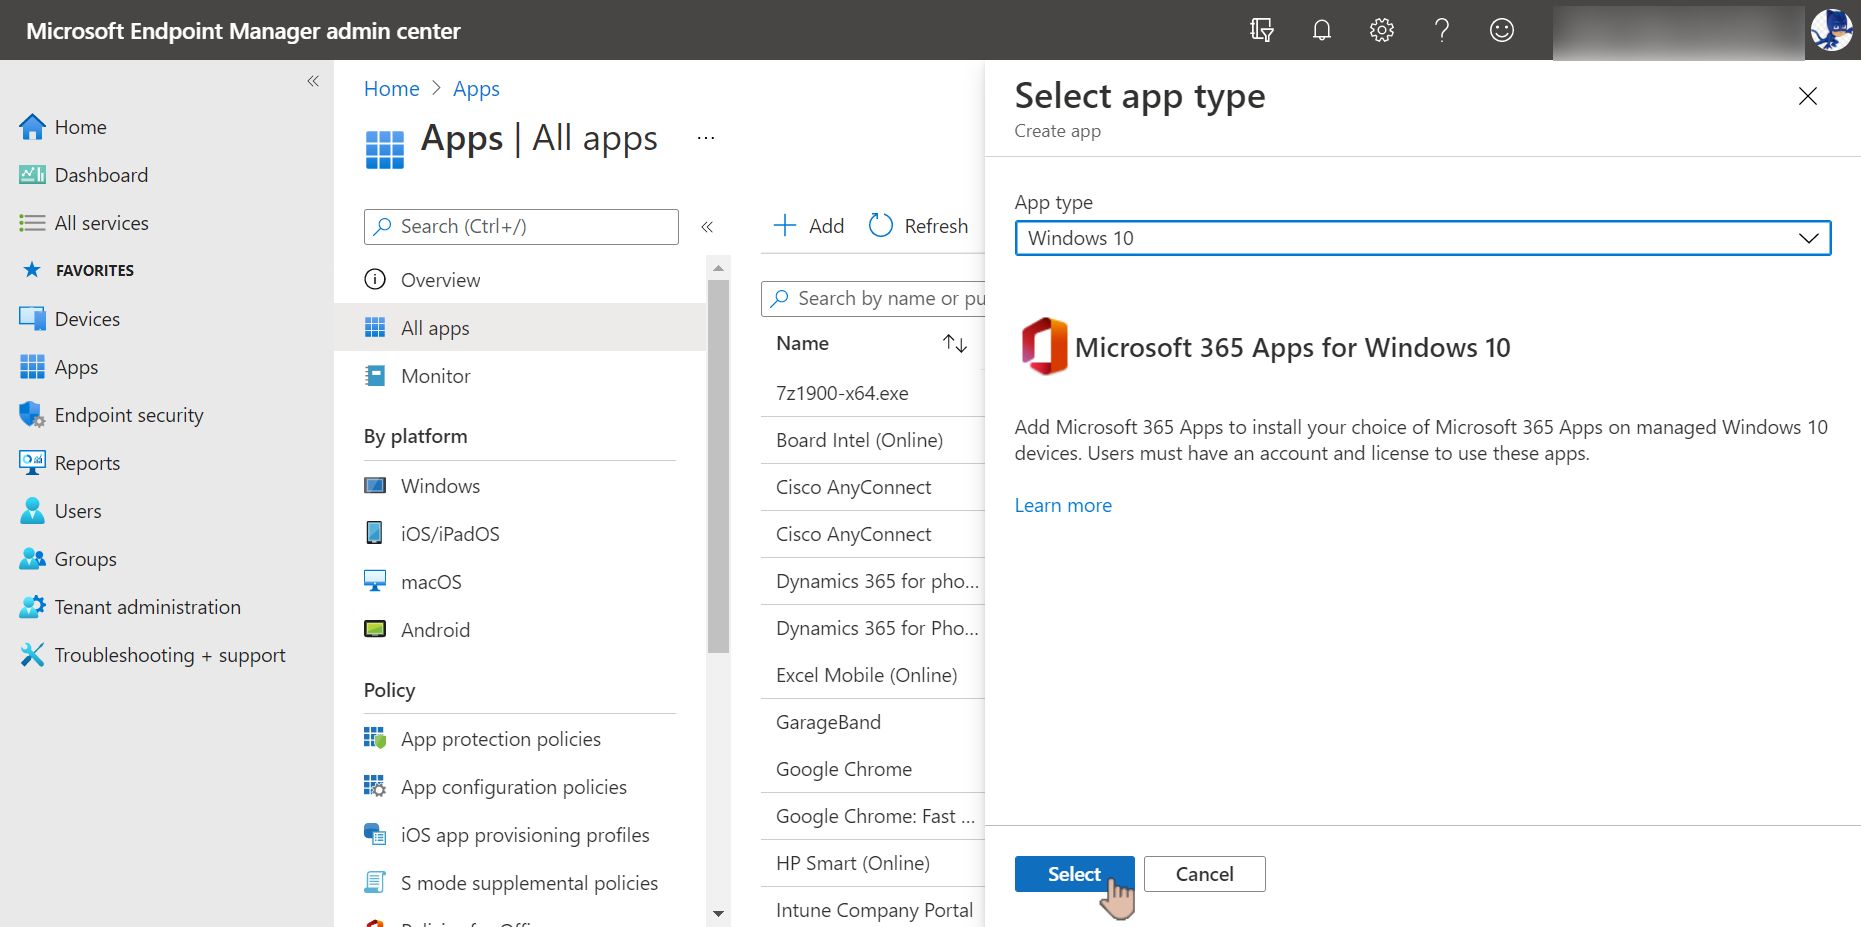
4. After selecting the App type, click the Select button.
5. Under the App suite information tab, leave the default values and click Next.

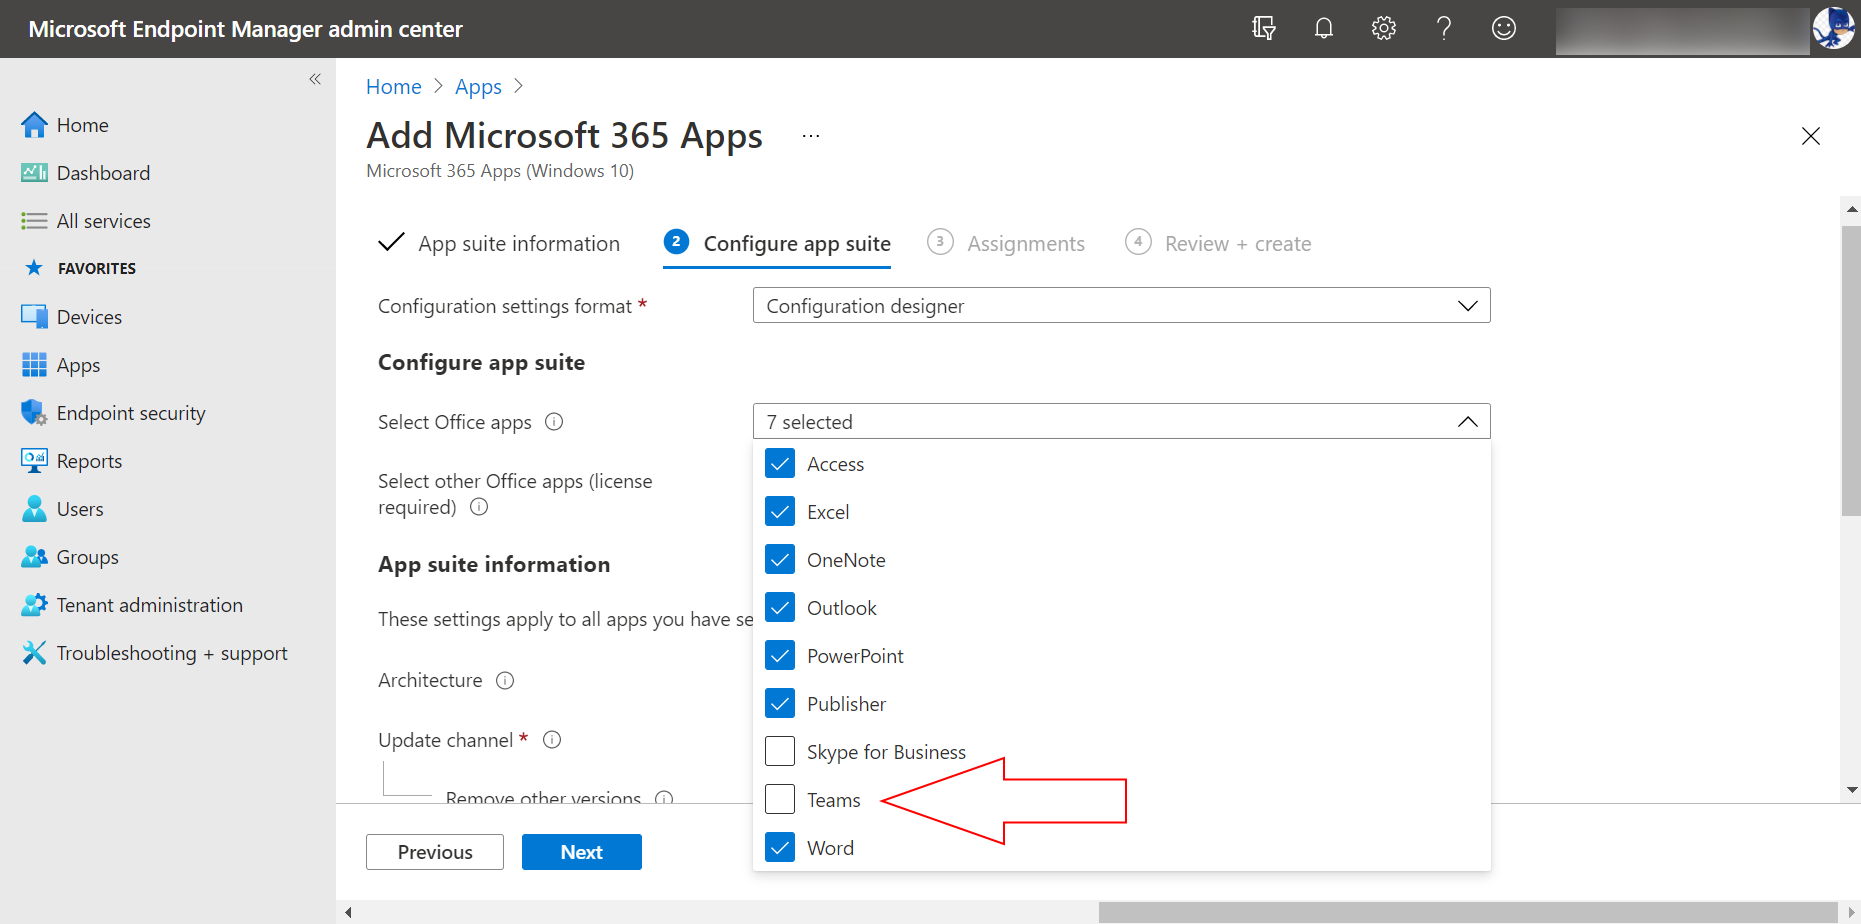
6. Under the Configure app suite tab, click the Select Office apps dropdown and uncheck Teams.
7. Next, click the Update channel (1) dropdown and choose which update channel to use. This example will choose the Semi-Annual Enterprise Channel (2) and leave all the other settings as default. Finally, click Next (3).

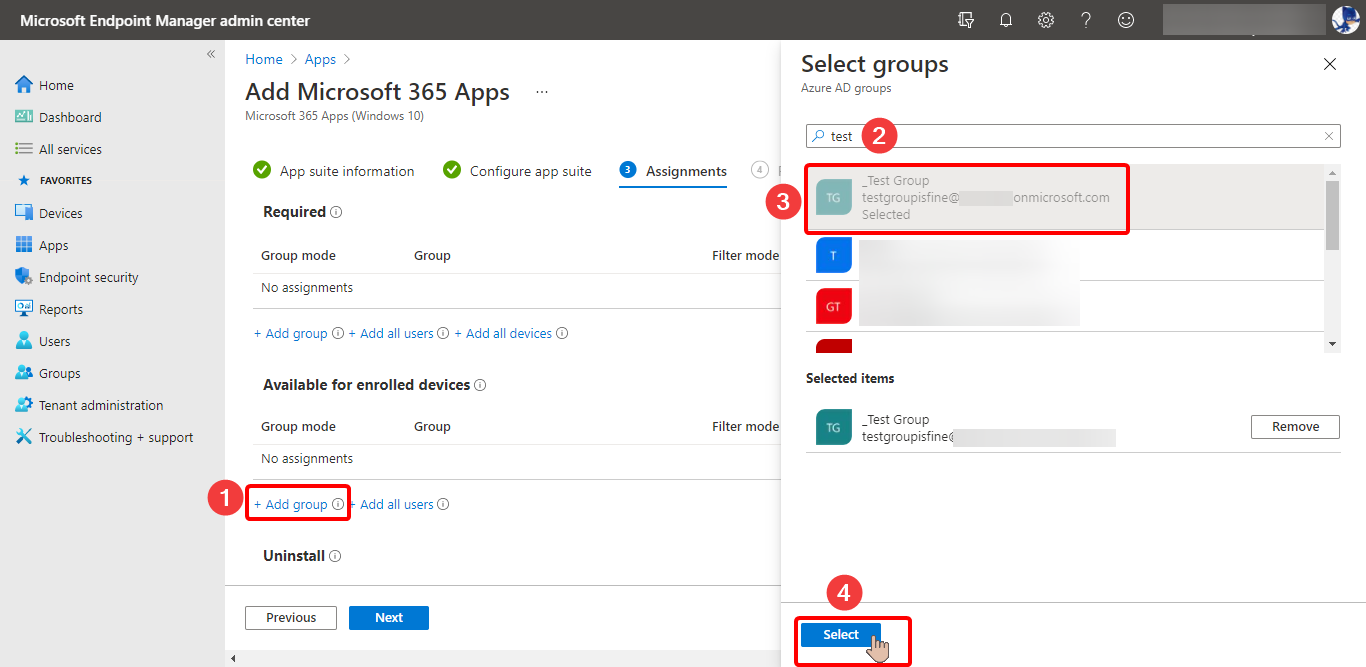
8. Under the Assignments tab, choose the users or groups to make Microsoft 365 Apps available. This example will add the group named _Test Group.
Under the Available for enrolled devices section, click the Add group (1) link. On the Select groups fly-out, type to search the group you want to add (2), then click (3) the group name(s) from the results. Lastly, click Select (4) to finalize your selection.
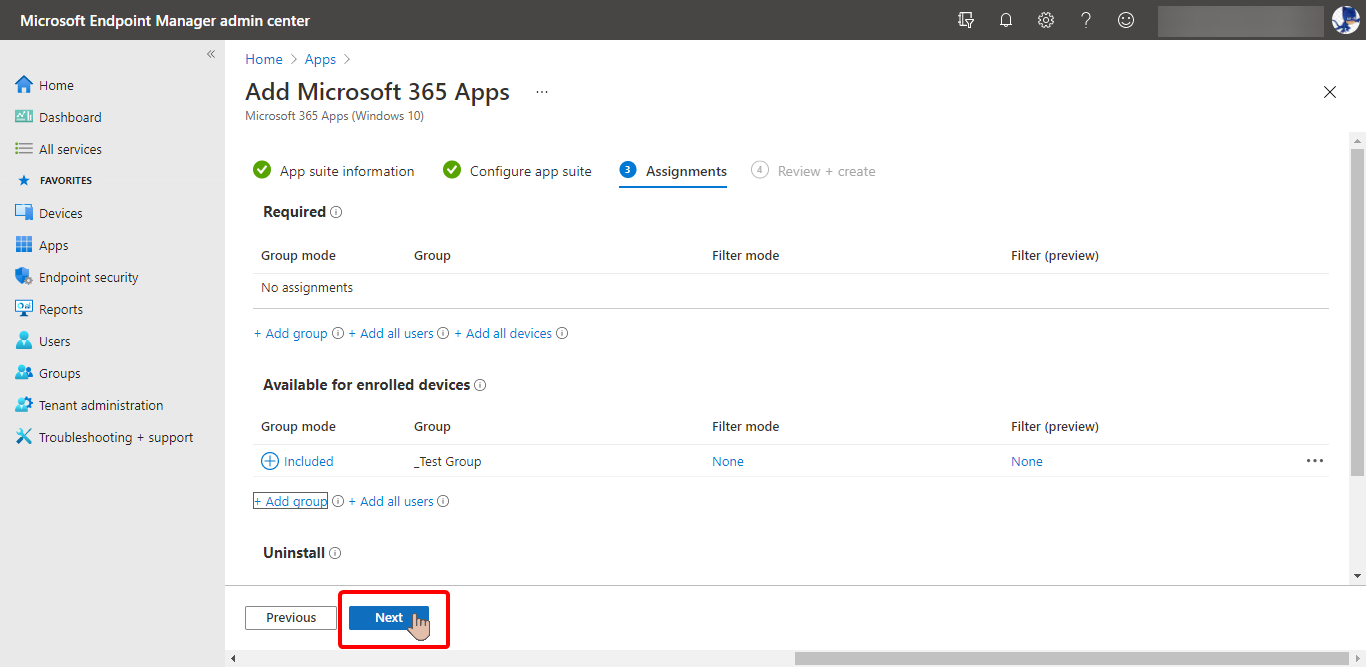
9. You should now see the groups or users you’ve added under the Available for enrolled devices list. At this point, you have the option to repeat the process to add or remove groups and users if necessary. When you’re satisfied with your selection, click Next.
10. Now you’ll see the summary under the Review + create tab, similar to the screenshot below. After reviewing the new app settings, click Create.

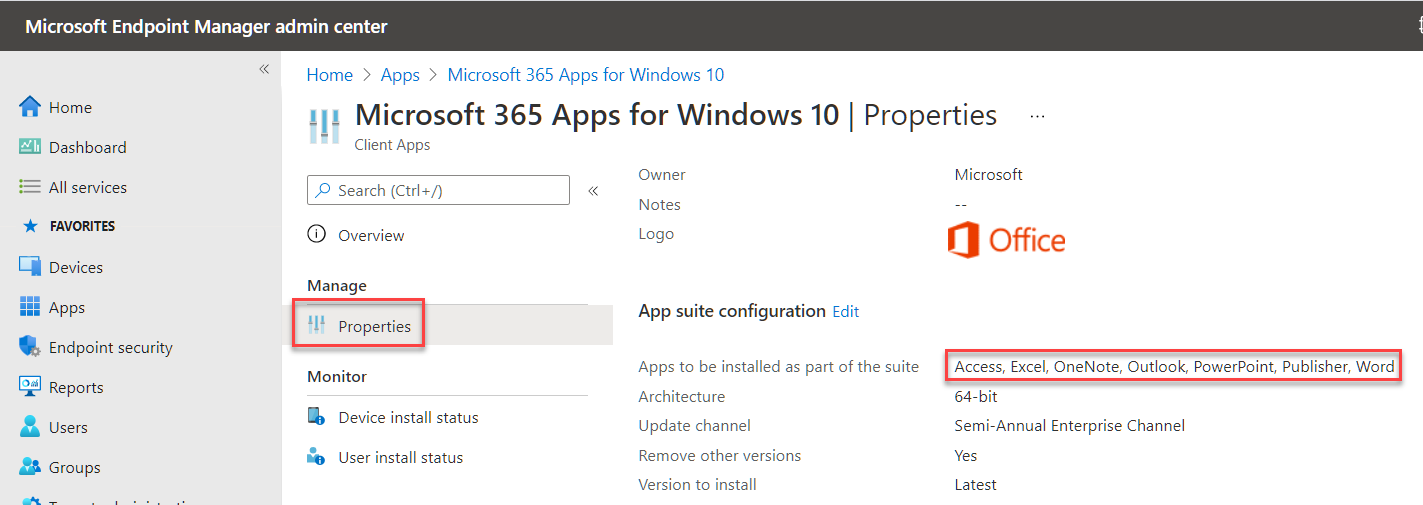
11. After adding the app to Intune, click the Properties menu to view the app’s settings. As you can see below, the Apps to be installed as part of the suite value do not include Microsoft Teams.
Now that you’ve added the Microsoft 365 Apps without Teams in Intune, users install the app from the Company Portal app or website.
Preventing Teams Installation using Group Policy
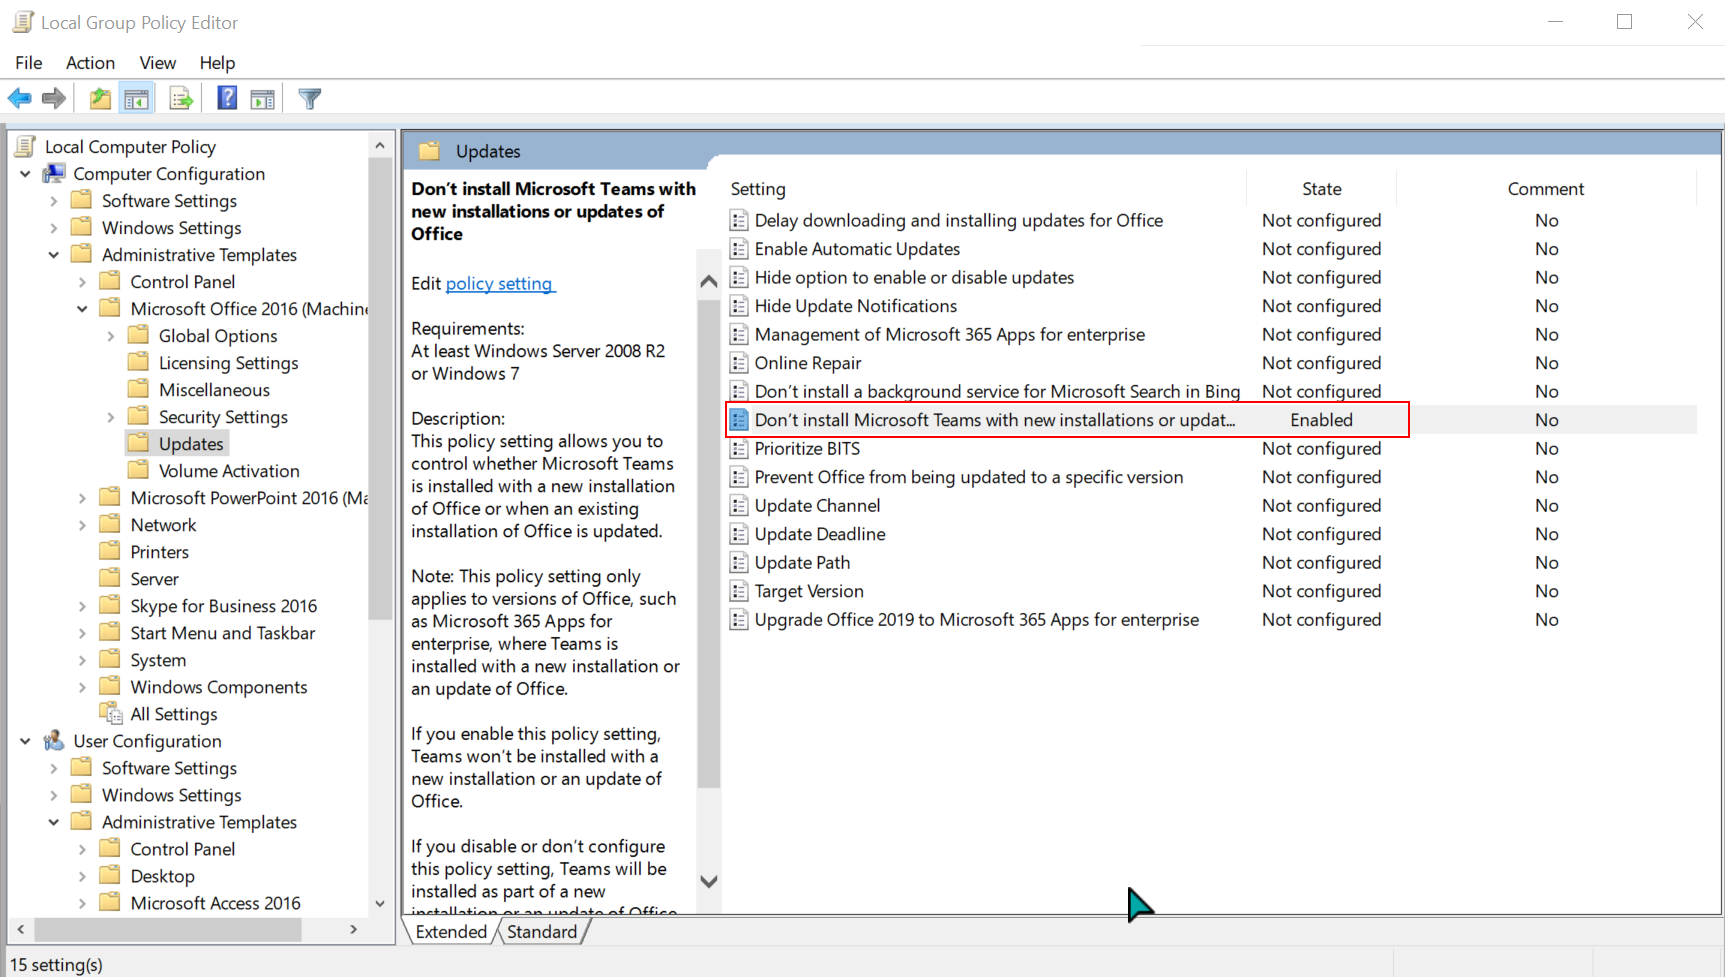
Another alternative option is to use the GPO setting Don’t install Microsoft Teams with new installations or updates of Office. You can find this policy setting under Computer Configuration\Policies\Administrative Templates\Microsoft Office 2016 (Machine)\Updates.
Make sure you have version 4882.1000 or above of the Administrative Template files (ADMX/ADML). The editor window looks like in the screenshot below.
Preventing Teams Installation using the Registry
Last but not least, you can edit the registry to prevent Microsoft 365 Apps from automatically installing Microsoft Teams. You can set this behavior by creating the preventteamsinstall DWORD value in the registry and setting the value to 1. Follow the steps below to do so.
Editing keys under ‘HKEY_LOCAL_MACHINE’ requires administrative privileges on the computer.
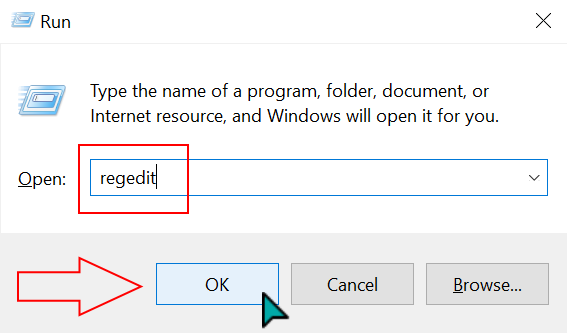
1. To open the registry editor, press WIN+R on your keyboard. The Run window will pop up. Next, type regedit into the box and click OK, as shown below.
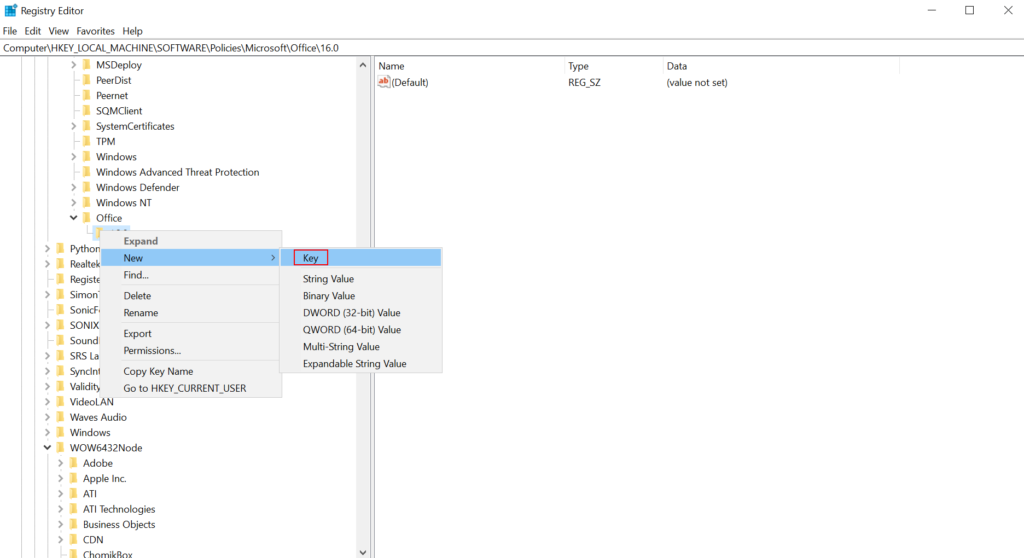
2. After opening Registry Editor, navigate to the HKEY_LOCAL_MACHINE\SOFTWARE\Policies\Microsoft\Office\16.0\common key. If the keys from the path do not exist, create them by right-clicking and creating a new key.
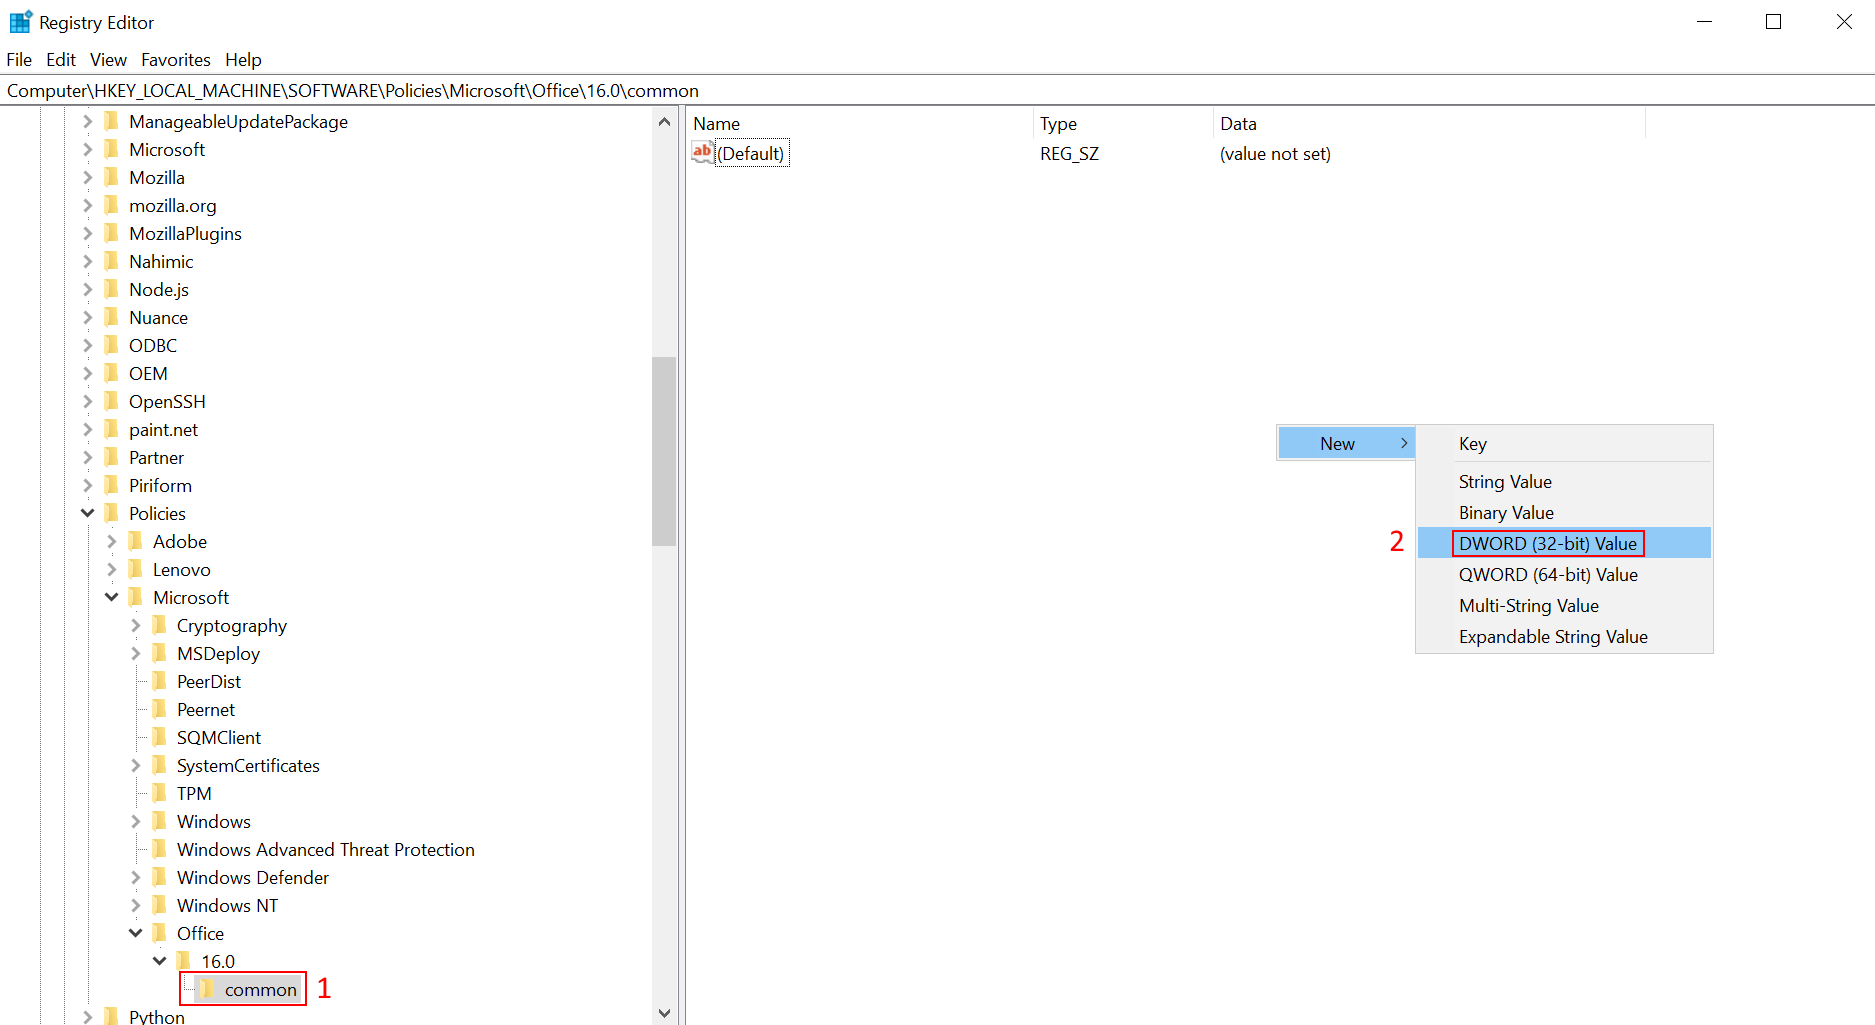
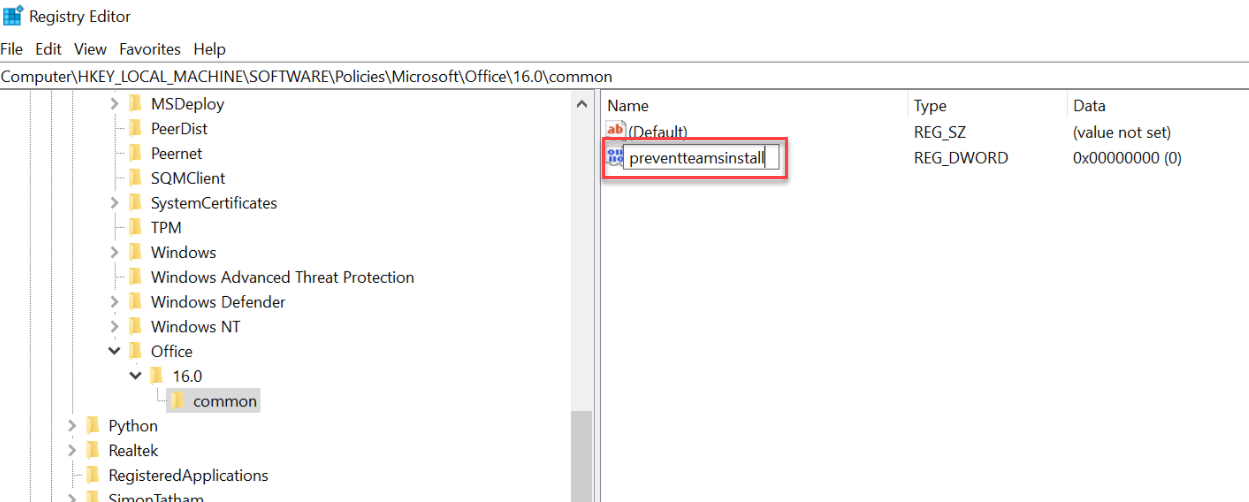
3. Inside the common (1) key, right click the space on the right pane and click New —> DWORD (32-bit) Value (2).
4. Enter the name preventteamsinstall and press Enter to create the new value.
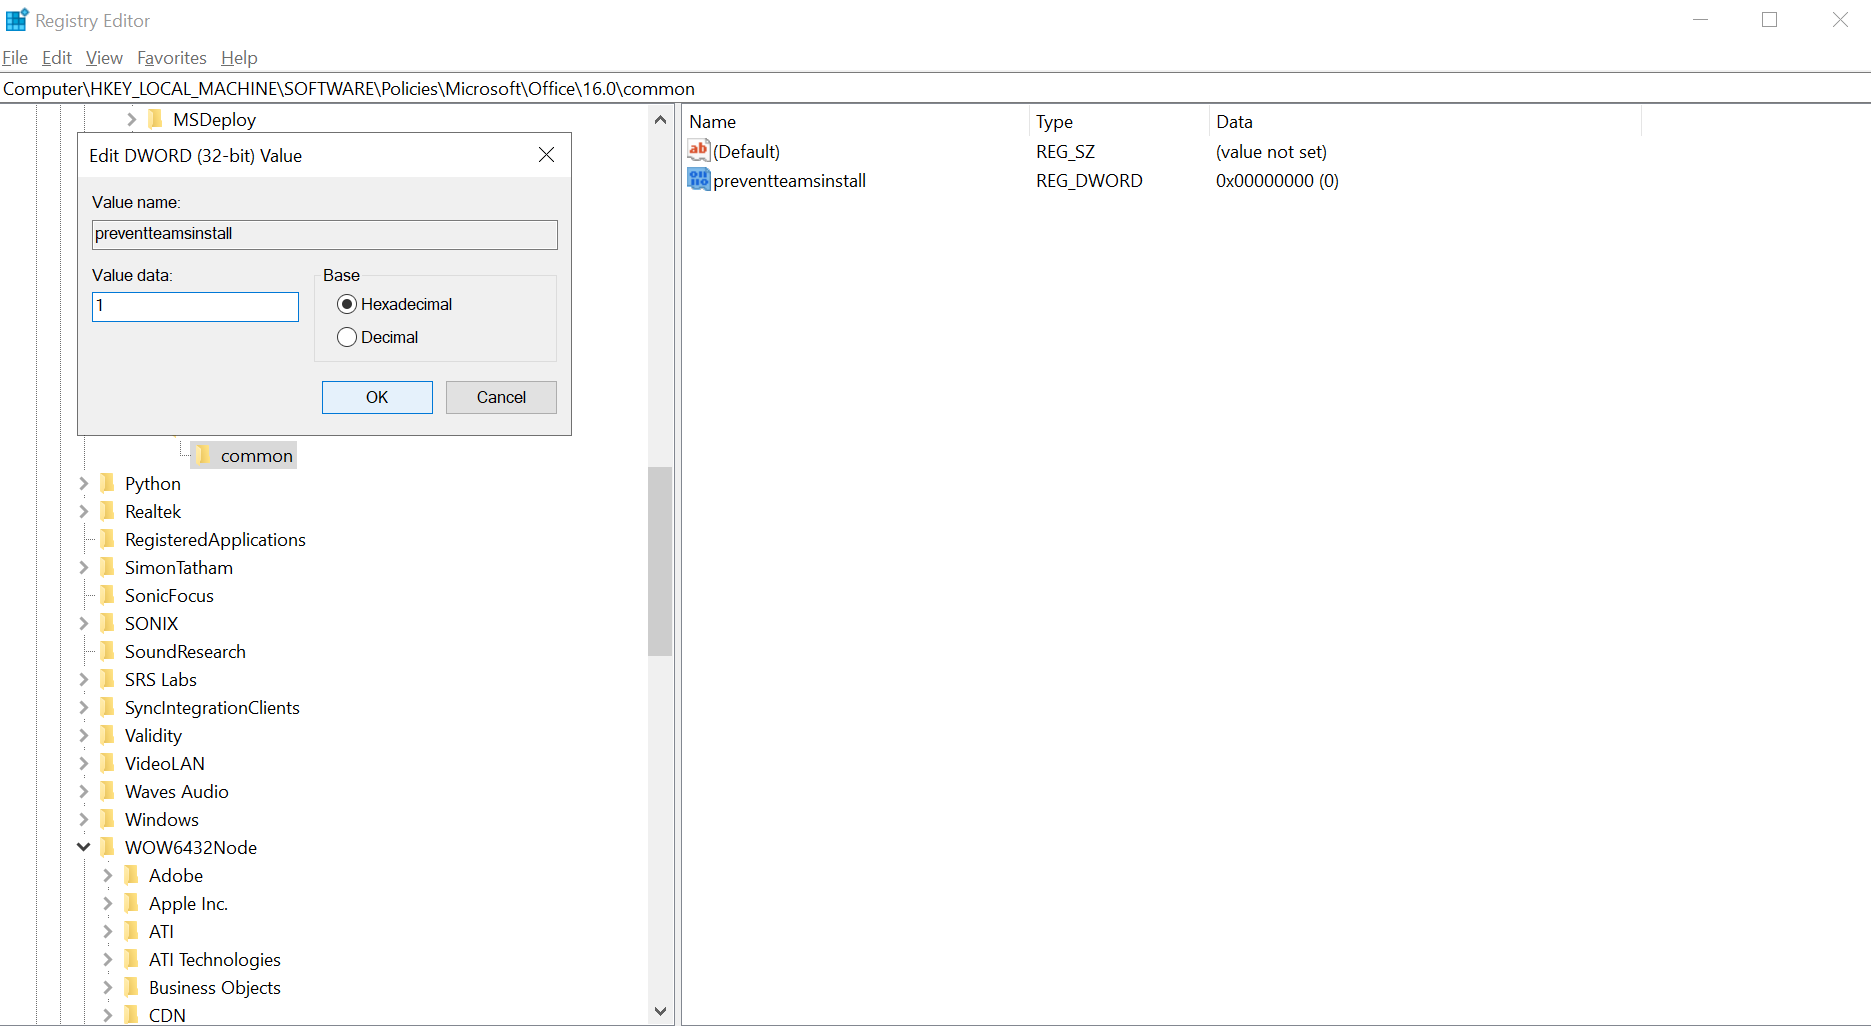
5. Double-click the preventteamsinstall value that you’ve created to edit its value. On the Edit DWORD (32-bit) Value window, change the Value data to 1 and click OK.
As a result, installing Microsoft 365 Apps on the computer will no longer include Microsoft Teams.
Updating Machine-Wide Teams Installations
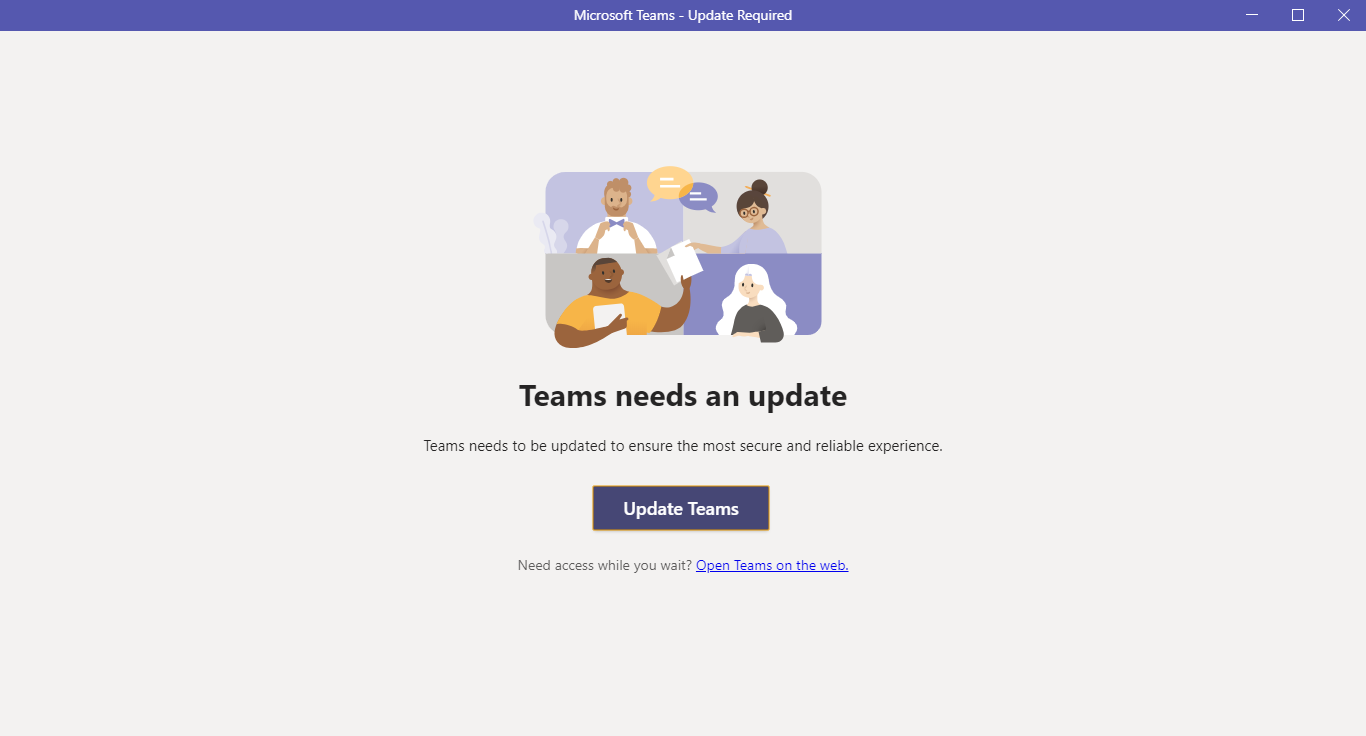
Microsoft Teams itself includes a mechanism that checks for updates. For example, if your version of the machine-wide installer is outdated, Teams will ask for an update if one is available.
When the users receive the update prompt similar to the screenshot below, they have to click Update Teams to proceed with the Teams client update.
For clarity, note that updating the Teams client does update the Teams Machine-Wide Installer. Therefore, if new users log in to the computer, the machine-wide installer will install the Teams version in their profile that originally came with the installer.
For VDI environments with per-machine Teams installation, Teams update is not available to users. Instead, admins must uninstall the current Teams MSI and install the newer version to update the Teams client.
Waiting for an update does not provide a great user experience. Admins have to regularly keep the installer up-to-date to ensure that new users receive the latest Teams version.
Removing and Reinstalling Machine-Wide Teams Installation
Uninstalling the Teams client and the Teams Machine-Wide Installer have different outcomes that admins and users alike need to watch out for.
Microsoft provides a sample script for Teams deployment clean-up. This script uninstalls the Teams app and removes the folder containing application data.
For instructions on uninstalling the Teams client and the Teams Machine-Wide Installer, visit the How to Uninstall Microsoft Teams on Windows 10 (For IT Pros) article.
Uninstalling the Teams client automatically creates a new registry entry—HKEY_CURRENT_USER\Software\Microsoft\Office\Teams\PreventInstallationFromMsi. This registry will prevent the Teams Machine-Wide installer from reinstalling the Teams client on the same user’s profile.
Should you need the Teams Machine-Wide installer to reinstall Teams on the next login, you need to remove the PreventInstallationFromMsi registry entry first. To do so, run the command below in PowerShell.
Remove-ItemProperty -Path 'HKCU:\Software\Microsoft\Office\Teams' -Name 'PreventInstallationFromMsi'On the other hand, uninstalling the Teams Machine-Wide Installer will also uninstall the Teams client. This action is useful if you plan to reinstall a newer version of the Teams Machine-Wide Installer. You can then reinstall Teams using any of the methods you learned earlier in this article.
Conclusion
Setting up the Microsoft Teams Machine-Wide installer might seem daunting. Mainly because there are many options to deploy (or not deploy) and seemingly complex initial configuration. This article aimed to provide you the information you need to help you with the Teams Machine-Wide installer setup.
Did this article miss anything? Let us know in the comments. Check out other Microsoft Teams-related articles to learn more!


