


Are you looking for a quick way to create an Active Directory (AD) report using PowerShell? You’ve come to the right place! In this article, you will learn how to create custom reports of user accounts in your AD environment using the Get-ADObject cmdlet.
Imagine that you are working at a startup company and learn that the company was given funding by investors to grow the company by hiring new people for several positions. Your manager gives you a request to provide her with a report on the head count for each office to make sure that the workplace has sufficient office space.
Normally, you would manually view AD accounts by using the Active Directory Users and Computers (ADUC) application console installed on your desktop computer. However, using ADUC takes on average one minute per new employee to review information for each AD account.
You quickly search the Internet for some options and discover that you can automate collecting the AD report data using a PowerShell cmdlet called Get-ADObject. In this article, you’ll learn what the Get-AdObject PowerShell cmdlet does and how to correctly use this handy AD PowerShell cmdlet to automate report creation.
Prerequisites/Requirements
This article will be a walkthrough using Get-ADObject. If you plan to follow along, be sure you have the following prerequisites in place:
- Logged onto a domain-joined Windows 10 PC as a user with rights to query AD users
- In a Windows Server 2016 or higher Active Directory environment. The lab you’ll be working with in this article is called mylab.local.
- Remote Server Administration Tools (RSAT) package
Quick tip: If you don’t have RSAT installed and you’re on the latest version of Windows 10, you can quickly install it using the PowerShell command
Install-WindowsFeature -Name RSAT-AD-PowerShell.
Get-ADObject: It’s Options and Parameters
The main purpose of the Get-ADObject cmdlet is to connect to an AD domain controller or Lightweight Directory Service (LDS) server and return information about various Active Directory objects.
To query AD objects, the Get-ADObject cmdlet has a number of parameters allowing you to connect to different domain controllers, search a global catalog, authenticate via alternate credentials and also specify LDAP filters and limit objects returned by scope for a search base.
Note that, by default, the
Get-ADObjectcmdlet will only return a single set of 1000 AD objects. The best way to override this configuration is to use theResultSetSizeparameter specifying the maximum number of objects to return. If you want to receive all of the objects, set this parameter to $Null (null value). Then you can use Ctrl+C to stop the query and return of objects.
For more information about Get-ADObject‘s parameters, check out the Get-ADObject help documentation.
Learning Project Outline
This article will teach you the Get-ADObject PowerShell cmdlet by applying it to a real-world scenario. You’ll learn by approaching the scenario explained in the introductory paragraphs.
The Scenario
In this article, you’re going to learn how to use Get-ADObject to generate two reports to send to your manager. The first report will break down all user accounts in each department. The boss would like separate CSV files for each department. The second task will query all disabled user accounts in a specific OU and it’s child OUs.
By the end of the article, you’ll be able to generate CSV files that look like the following:


The AD Environment
The Active Directory organizational unit (OU) structure you’ll be working with in this article looks like below. You can see that we have a parent Department OU with three child OUs called Accounting, Marketing and IT. Inside of each of those child OUs are two grandchild OUs called Users and Computers.
- Department (OU)
– Accounting (OU)
– Users
– Computers
– Marketing (Nested OU)
– Users
– Computers
– IT (Nested OU)
– Users
– Computers
Shortcut: You can build these OUs with the
New-ADOrganizationalUnitPowerShell cmdlet. For a script to make quick work of this check out the Create-OU-Structure.ps1 script.
You’ll also be working with dozens of different AD user accounts located inside of each of the Users OUs as shown below. These names were chosen at random.
- Accounting (accountant_user1-5)
- Marketing (market_user_user1-5)
- IT (it_user1-5)
Shortcut: If you’d like to quickly create these user accounts inside of the aforementioned OUs, download and run the Populate-AD_Accounts.ps1 script.
Creating Active Directory Reports using Get-ADObject
Enough introduction and background information on Get-ADObject. Let’s finally get down to learning how this PowerShell cmdlet works in the real world!
In this first example, you’re tasked with providing your manager a CSV file with a report for all user accounts that exist in the Accounting, Marketing and IT department OUs.
Understanding the Filter Parameter
The only required parameter of the Get-ADObject PowerShell cmdlet is Filter. This is a parameter is one way to limit the number of objects returned. Since it’s a required parameter, you must define it even if you’d like to return all objects using a wildcard character (*). This tells Get-ADObject to return all objects.
The simplest example of using the Filter parameter is to return all objects in an entire AD domain like below.
PS51> Get-ADObject -Filter *You’ll see the Filter parameter used to both return all objects and to limit the scope of returned objects throughout this article.
For more information on the
Filterparameter’s syntax, runGet-Help about_ActiveDirectory_Filterin the PowerShell console.
Limiting Search Scope using the SearchBase Parameter
The example you’re working with is a perfect use case for Get-ADObject‘s SearchBase parameter. The SearchBase parameter allows you to limit the search query and thus objects returned via Get-ADObject by limiting the scope to a particular OU.
By limiting scope, this reduces the time that it takes for Get-ADObject to run by excluding other OUs in AD and only targeting the specific OU that is relevant for retrieving the data that you need.
The SearchBase parameter value is defined via a distinguished name (DN) in the form of OU=<OU_name_here>,DC=<short domain name>,DC=<root extension>. For example, to only find objects in the Department OU in a domain called mylab.local, the DN would look like OU=Department,DC=mylab,DC=local.
In this example, pull out all the AD users in the parent Department OU and all child OUs like below. This will return all users in the Department OU and in all child OUs.
PS51> Get-ADObject -Filter * -SearchBase 'OU=Department,DC=mylab,DC=local'Leveraging the Filter Parameter
As of now, you’re able to query all user objects in the Department OU and all child OUs. But that’s not required at this point. Instead, let’s just pull out all of the Accounting users first. One way to do that is to actually use the Filter parameter rather than just providing a wildcard value.
To limit the results, use the Filter value of Department -eq 'Accounting'. This limits the results to only those objects in the Department OU that have an AD department attribute set to Accounting.
You can see below that you’re storing all objects in the $accounting_users variable. This will be used later.
PS51> $accounting_users = Get-ADObject -SearchBase 'OU=Department,DC=mylab,DC=local' -Filter {Department -eq "Accounting"}Outputting AD Objects to a CSV File
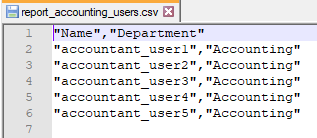
Now that $accounting_users contains all of the applicable objects, you can pipe only the Name and Department properties for each object to the Export-Csv cmdlet. This cmdlet creates a new CSV file and stores each AD object as a row.
PS51> $accounting_users | Select-Object -Property Name,Department | Export-Csv -NoTypeInformation -Path C:\users\$env:username\Desktop\report_accounting_users.csvYou should now have a CSV file called report_accounting_users.csv on your desktop looking like the screenshot below.
Collecting the Other User Objects
Now that you know the basics of how to use Get-ADObject to find AD users, extend that to find the user objects for the other departments. You will use the same general concept as before.
First, find all of the AD users in the San Francisco office.
#Get report of all department users that work in the San Francisco Office
$sf_users = Get-ADObject -SearchBase 'OU=Department,DC=mylab,DC=local' -Filter { physicalDeliveryOfficeName  -eq 'San Francisco' } -Properties Name,physicalDeliveryOfficeName,Department
$sf_users | Select Name,physicalDeliveryOfficeName,Department | Export-Csv -NoTypeInformation -Path C:\users\$env:username\Desktop\report_sanfrancisco_office_users.csv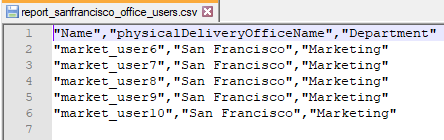
Next, find all users that work in the Florida office. This example is a bit different because you’re using the Select-Object cmdlet’s calculated properties. This allows you to transform the object property name from simply st that comes from Get-ADObject to a more descriptive State.
#Get report of all department users that work in the Florida Office
$fl_users = Get-ADObject -SearchBase 'OU=Department,DC=mylab,DC=local' -Filter { St -eq 'FL' } -Properties Name,St
$fl_users | Select-Object -Property Name,@{N='State'; E={$_.st}} | Export-Csv -NoTypeInformation -Path C:\users\$env:username\Desktop\report_florida_state_users.csv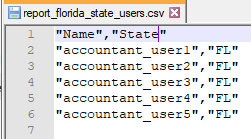
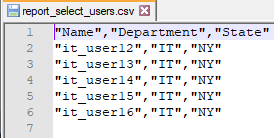
Finally, collect all of the IT users. This time, instead of using the Department AD attribute, use the Filter parameter to find all objects with a name starting with it.
#Get report of all select department users that have a name that contains "user"
$select_users = Get-ADObject -SearchBase 'OU=Department,DC=mylab,DC=local' -Filter {Objectclass -eq 'user' -and name -like 'it*'} -Properties Name,Department,st
$select_users | Select-Object -Property Name,Department,@{N=’State’; E={$_.st}} | Export-Csv -NoTypeInformation -Path C:\users\$env:username\Desktop\report_select_users.csv
Note: Instead of using
objectClass -eq 'user'in the previous example, you could have also used theGet-AdUsercmdlet.
Finding Disabled Accounts with the LDAP Filter
In the previous example, you used the Filter parameter to limit the objects returned by Get-ADObject. Another way to do that is to use the LDAPFilter parameter. This parameter performs the same task but allows you to specify a filter via an LDAP query search string. The LDAPFilter parameter is considered a more advanced option to search Active Directory.
Let’s now create a report to find all disabled users in your organization using the LDAPFilter and SearchBase parameters to target a specific OU.
The useraccountcontrol:1.2.840.113556.1.4.803:=2 setting is an AD attribute specified for all disabled users in the Active Directory NTDS database. It’s a way for AD to flag accounts that are not active (logon is disabled). Here are more sample LDAP queries that you might find useful.
Below you can see we’re using the LDAP query string of (&(objectclass=user)(objectcategory=user)(useraccountcontrol:1.2.840.113556.1.4.803:=2)). Although complex, it does the job well. To understand the LDAP query search string, check out Demystifying Active Directory and LDAP Search Strings.
The command below runs the LDAP filter parameter used to show only disabled users and then creates a report using the Export-CSV cmdlet as you’ve done previously.
$disabled_users = Get-ADObject -LDAPFilter "(&(objectclass=user)(objectcategory=user)(useraccountcontrol:1.2.840.113556.1.4.803:=2))" -SearchBase 'OU=Department,DC=mylab,DC=local'
$disabled_users | Select-Object -Property Name | Export-Csv -NoTypeInformation -Path C:\users\$env:username\Desktop\report_disabled_users.csv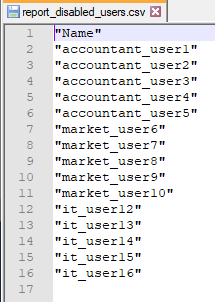
The End Result
You should now have five CSV files on your desktop ready for your manager!
- report_accounting_users.csv
- report_sanfrancisco_office_users.csv
- report_florida_state_users.csv
- report_select_users.csv
- report_disable_users.csv
Summary
In this article, you learned how to search Active Directory using the Get-ADObject PowerShell cmdlet.
What next?
To take what you’ve learned farther, take this process of generating AD reports to the next level by exporting the data to a database perhaps. Once in a database, you could have the AD report data accessed using either a custom-built website or an application such as Microsoft SharePoint. This is only one idea. There are countless others!
The ability to search Active Directory is a fundamental skillset needed in many organizations and one that will ultimately save you and your team hours of time.


