


When introduced, IPv6 was set to eliminate the world’s insatiable appetite for more IPs. But IPv6 adoption has been slow, and some choose to disable IPv6 on Windows for troubleshooting purposes. Let’s learn how.
In this tutorial, you’ll learn how to disable IPv6 through various methods, both via GUI and command-line terminal.
Ready to take the leap? Let’s go!
Prerequisites
This tutorial comprises hands-on demonstrations. If you’d like to follow along, be sure you have the following:
- This tutorial uses Windows 10 build 20H2, but any build of Windows 10 will work.
- Log into Windows as a user with administrative access.
- The PowerShell example uses the Windows 10 built-in Windows PowerShell environment.
Disabling IPv6 via the GUI
First, you need to disable IPv6 via the Windows 10 Network Connections app. To do so, you must access your network adapter’s properties to disable IPv6.
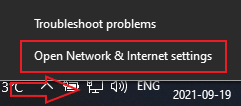
1. Right click on the network / Wi-Fi icon at the system tray and choose Open Network & Internet Settings to access your network settings.
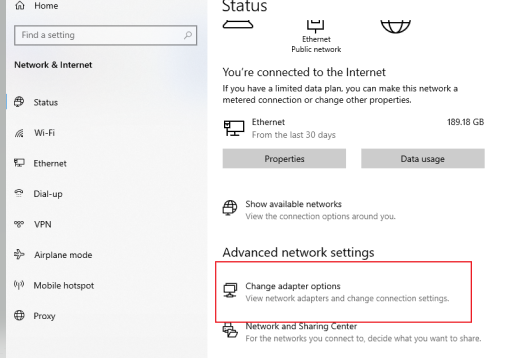
2. Under Advanced Network Settings, select Change Adapter Options to see all the adapters (network cards) used on your computer.
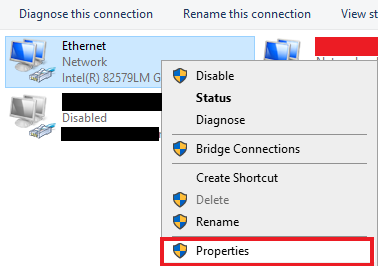
3. Now, right-click your Ethernet adapter and select Properties. Doing so opens the “Properties” window for the network card you selected.
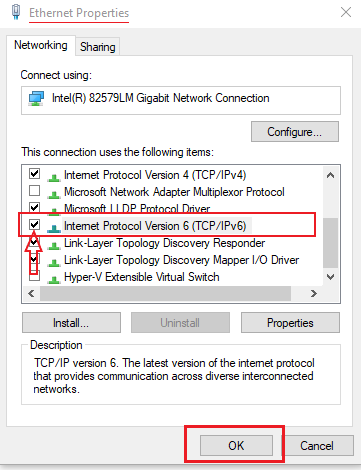
4. Find the Internet Protocol v6 (TCP/IPv6) option from the list under the Networking tab. If the option is checked, click on the check box to disable it, as shown below, then click on OK.
After disabling IPv6, you’ll notice no change in your computer’s internet connectivity since IPv4 adapter settings are configured by default.
Disabling IPv6 via PowerShell
Perhaps you prefer a command-line environment instead of a GUI when managing Windows network configuration. If so, run the following commands in PowerShell to disable IPv6 network adapters.
1. Open PowerShell as administrator, and run the Get-NetAdapterBinding command below to view the list of bindings for network adapters, their component ID, and status. Additionally, filter all adapters where the ComponentID equals the ms_tcpip6 with the Where-Object command.
Get-NetAdapterBinding | Where-Object ComponentID -EQ 'ms_tcpip6'In the returned values, note the DisplayName and ComponentID of the adapter that you want to disable; you’ll need them in the next step. In the example below, the Ethernet adapter is chosen.

2. Run the Disable-NetAdapterBinding command below to disable your network adapter.
Below, the Ethernet adapter with the ms_tcpip6 component is disabled, but replace the name and component ID with your intended target. If successful, no output is shown.
Disable-NetAdapterBinding -Name 'Ethernet' -ComponentID 'ms_tcpip6'
3. Finally, run the Get-NetAdapterBinding command below to verify if IPv6 for your network adapter is now disabled.
You can see below, the Ethernet adapter is shown, but replace it with your intended target.
Get-NetAdapterBinding -Name 'Ethernet' -ComponentID 'ms_tcpip6'
Perhaps you have no plans to keep IPv6 enable on any of your network adapters. If so, run this command instead
Disable-NetAdapterBinding -Name "*" -ComponentID ms_tcpip6to go nuclear and disable IPv6 on all network adapters.
Disabling IPv6 for all Network Adapters via Command Prompt
As an alternative to PowerShell, you can turn to the command prompt instead. The command prompt also lets you disable the IPv6 of your network adapters by running a different set of commands than PowerShell.
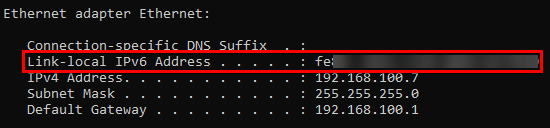
1. Open the command prompt as administrator, and run the ipconfig command. The ipconfig command displays all current TCP/IP network configuration values, so you can verify if IPv6 is enabled on your network adapter.
ipconfigBelow, you can see that IPv6 is enabled for the ethernet adapter.
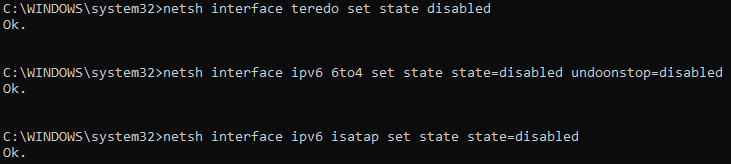
2. Run the series of commands below to disable all IPv6 connectivity for every network interface.
The preceding
::before text indicate comments, just in case you copy-paste the commands into the terminal below.
:: Disables the Teredo tunneling. Teredo is a transition technology that gives
:: full IPv6 connectivity and host-to-host automatic tunneling
:: for unicast IPv6 traffic.
netsh interface teredo set state disabled

:: Disables the 6to4 tunnels that support communication with IPv6 internet
netsh interface ipv6 6to4 set state state=disabled undoonstop=disabled

:: Disables all IPv6 transition technologies
netsh interface ipv6 isatap set state state=disabled
If successful, you’ll get an Ok message after running each command, as shown below.
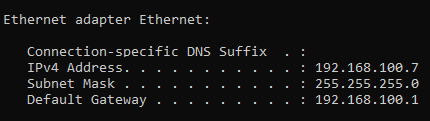
3. Finally, rerun the ipconfig command to see verify if you’ve successfully disabled IPv6.
ipconfigNotice below that IPv6 is not listed, which indicates IPv6 is now disabled.
Conclusion
Throughout this tutorial, you’ve learned what IPv6 is and how to disable it in Windows. You’ve also learned commands that disable IPv6 both on command prompt and PowerShell.
Now would you include disabling IPv6 on your network troubleshooting routine?


