


When you make changes to a user account in Active Directory (AD), do you wonder how long before the changes reflect in Azure Active Directory (AAD)? Or perhaps can you force the synchronization to happen faster? Yes, you can, with Delta Sync.
Azure AD Connect ensures that object synchronization happens at least every 30 minutes by default. But what if you’re working on a task that requires immediate synchronization of changes from your on-premises AD?
Continue reading, and this tutorial will show you how to leverage the Azure AD Connect delta sync to force an out-of-cycle synchronization.
Prerequisites
This tutorial will be a hands-on demonstration. If you’d like to follow along, be sure you have the following:
- An Azure AD tenant. Register a free account if you don’t have one.
- An on-premises Active Directory environment already configured with the latest Azure AD Connect. This tutorial uses a Windows Server 2019 Datacenter with Azure AD Connect 2.1.15.0.
- This tutorial assumes that you have installed the MSOnline PowerShell module on your Azure AD Connect server. The latest version as of this writing is 1.1.183.66.
Note: The MSOnline and ADSync modules are not compatible with PowerShell Core. For best results, use only Windows PowerShell 5.1.
Inspecting the Current Delta Sync Schedule
By default, Azure AD Connect sets up a regular synchronization schedule during installation. The sync interval is every 30 minutes.
To inspect the current delta sync schedule, follow these steps:
1. Open a PowerShell window on your computer.
2. Import the ADSync module into your PowerShell session. This command doesn’t provide output, but you’ll verify the module in the following step.
Import-Module ADSync3. Next, run the cmdlet below to display the current sync schedule.
Get-ADSyncSchedulerYou should see a similar output to the screenshot below. Based on the result, the current schedule is to run a Delta Sync with an interval of 30 minutes.
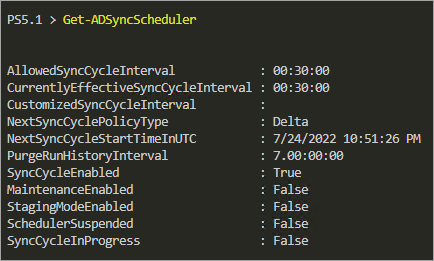
What do these properties mean?
AllowedSyncCycleInterval– Is the minimum interval allowed between (scheduled) synchronization cycles. This value means that even if you customize the sync schedule to a lower interval, theAllowedSyncCycleIntervalvalue still prevails.
CurrentlyEffectiveSyncCycleInterval– The current sync cycle interval in effect. This value should be the same as theCustomizedSyncCycleIntervalif the value is not higher than theAllowedSyncCycleInterval.
CustomizedSyncCycleInterval– The customized sync interval. This value is default blank or null, which automatically follows theAllowedSyncCycleInterval. If you set this value to lower thanAllowedSyncCycleInterval, the sync schedule will not take effect. Only the same or higher interval is acceptable.
NextSyncCyclePolicyType– The next sync cycle’s policy type. The two valid values areDelta(sync changes since the last cycle) andInitial(sync everything).
NextSyncCycleStartTimeInUTC– Shows when’s the next scheduled sync.
PurgeRunHistoryInterval– The duration to keep the operations logs. You can view the logs in the Synchronization Service Manager. The default duration is seven days.
SyncCycleEnabled - Indicates whether the scheduler is enabled.
MaintenanceEnabled– Indicates whether the scheduler is maintenance enabled. During maintenance, the scheduler renews the certificates and purges the operations logs.
StagingModeEnabled - Indicates whether the Azure AD Connect is in staging mode.
SchedulerSuspended– Determines if the scheduler is currently suspended from running. Only Azure AD Connect can set this status.
SyncCycleInProgress– Indicates whether the synchronization cycle is in progress.
Forcing a Delta Sync using the ADSync PowerShell
When you install Azure AD Connect, the ADSync PowerShell Module comes with it. This module provides you with cmdlets when interacting with AD Connect in PowerShell. One of these cmdlets is the Start-ADSyncSyncCycle, which forces the delta sync on demand.
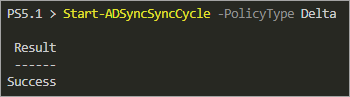
To run a delta sync immediately, run the below command in PowerShell. The -PolicyType Delta parameter tells the cmdlet to run a delta sync.
Start-ADSyncSyncCycle -PolicyType Delta
If the Azure AD Connect application is open, synchronization cannot run, and you will get the error below.

What’s the solution? Run the below command to force-close the AzureADConnect process.
Get-Process AzureADConnect | Stop-Process -Force -PassThru
The result should be similar to the screenshot below.

Another possible error is that the Connector: <domain> is busy, where <domain> is the domain name. This error means that another synchronization is already in progress. All you can do is wait for the current sync to finish.

Finally, if the delta sync execution is successful, you will only get a Successful result on the screen.
Forcing a Delta Sync using the Synchronization Service Manager
Another way to force a deal sync is through the Synchronization Service Manager, a GUI application that came with the Azure AD Connect installation.
Forcing a delta sync in the Synchronization Service Manager requires six actions. These actions are what the scheduler executes within the sync cycle or by running the Start-ADSyncSyncCycle cmdlet.
- Local Connector – Delta Import
- AAD Connector – Delta Import
- Local Connector – Delta Sync
- AAD Connector – Delta Sync
- AAD Connector – Export
- Local Connector – Export
There are many steps, but each allows you to inspect the changes before executing the synchronization.
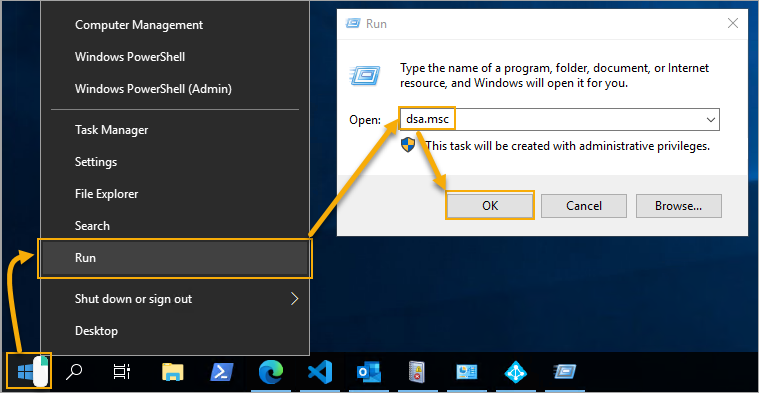
1. Open the Active Directory Users and Computers console. Right click Start → Run → type dsa.msc → press Enter.
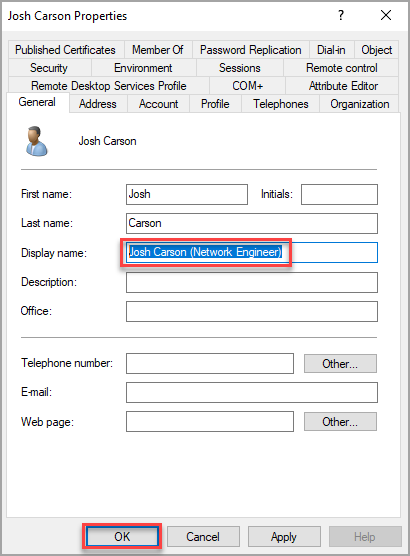
2. Next, look for a user and change its display name. This example shows changing the display name for user Josh Carson to Josh Carson (Network Engineer).
Once changed, click OK to save the change.
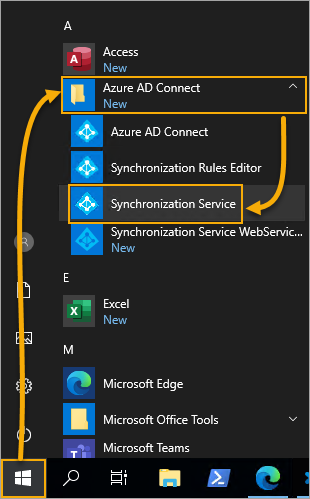
3. Now, open the Synchronization Service Manager by clicking on Start → Azure AD Connect → Synchronization Service.
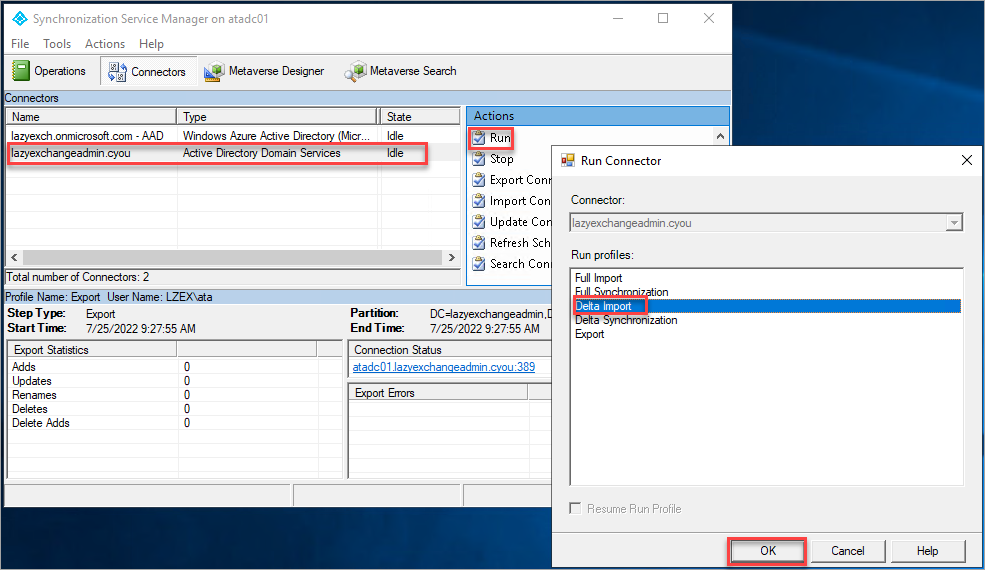
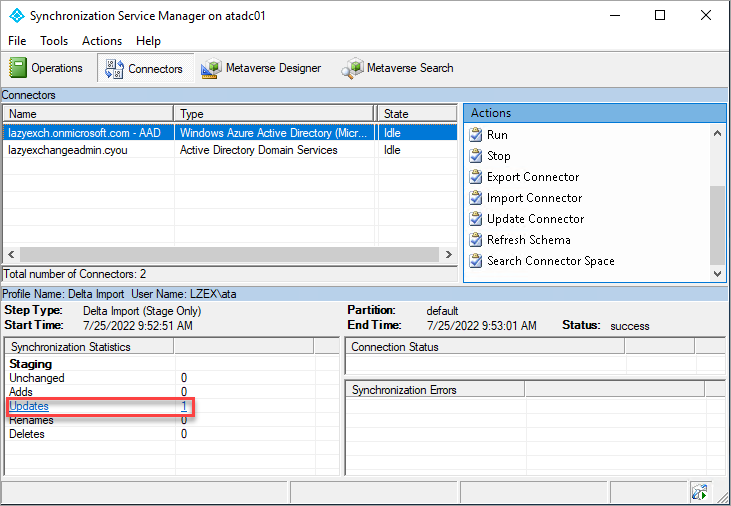
4. Click the Connectors tab to see your AAD and Local connectors. When you do, click the local connector → Run → Delta Import → OK.
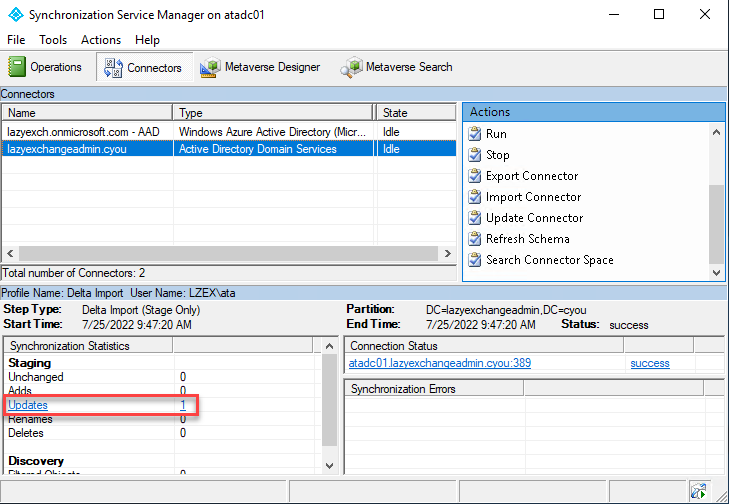
As you can see below, the sync manager picked up one update.
5. Now, click the AAD connector → Run → Delta import → OK.
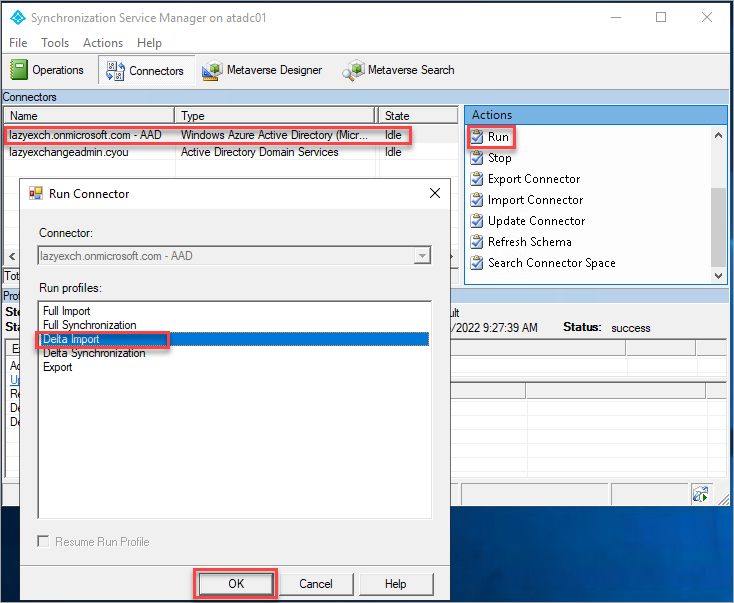
At the confirmation prompt, click Yes.
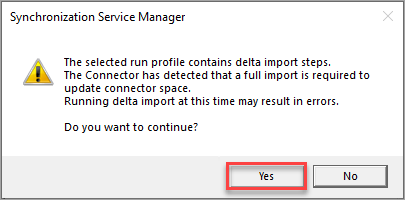
The AAD connector also picked up one update, as you can see below.
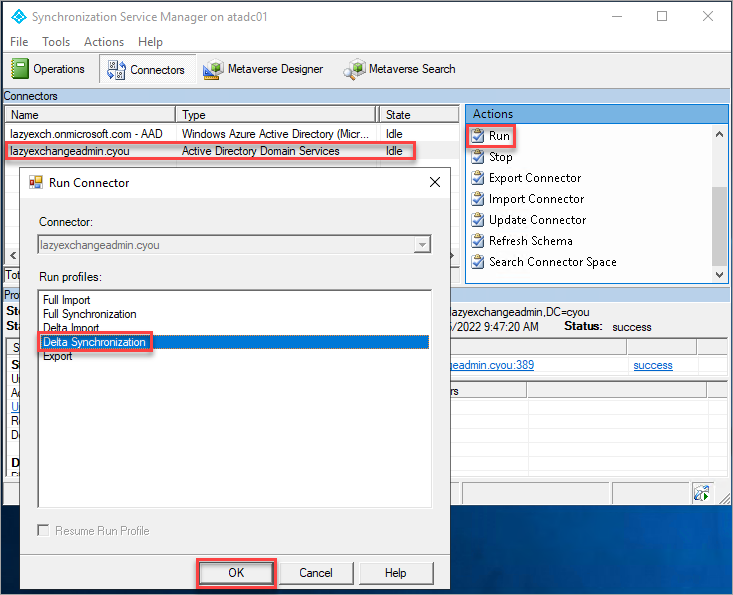
6. Next, click the local connector → Run → Delta synchronization → OK to run the delta sync step on the local connector.
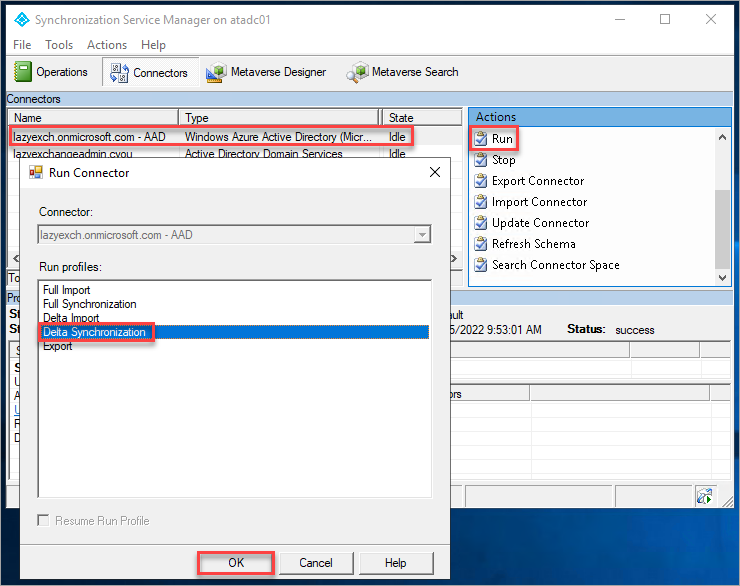
7. Perform the delta sync step on the AAD Connector. Click the AAD connector → Run → Delta synchronization → OK.
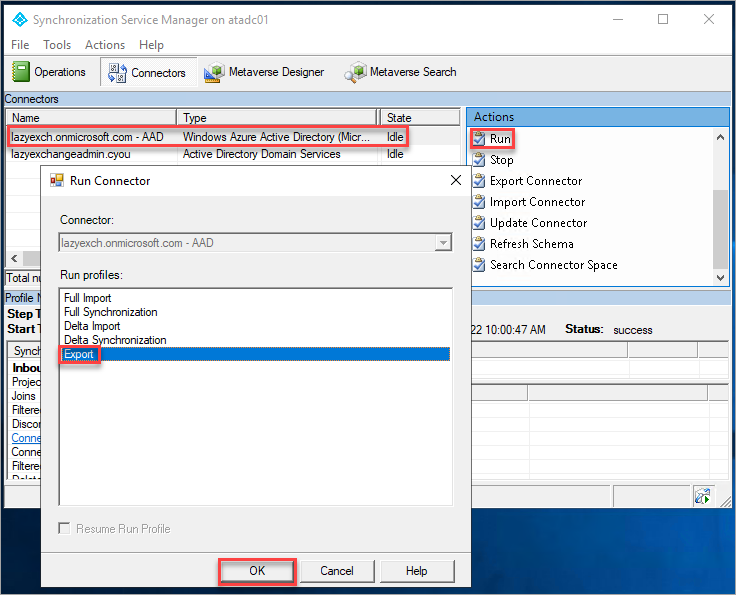
8. Now, run the Export step on the AAD connector. Click the AAD Connector → Run → Export → OK.
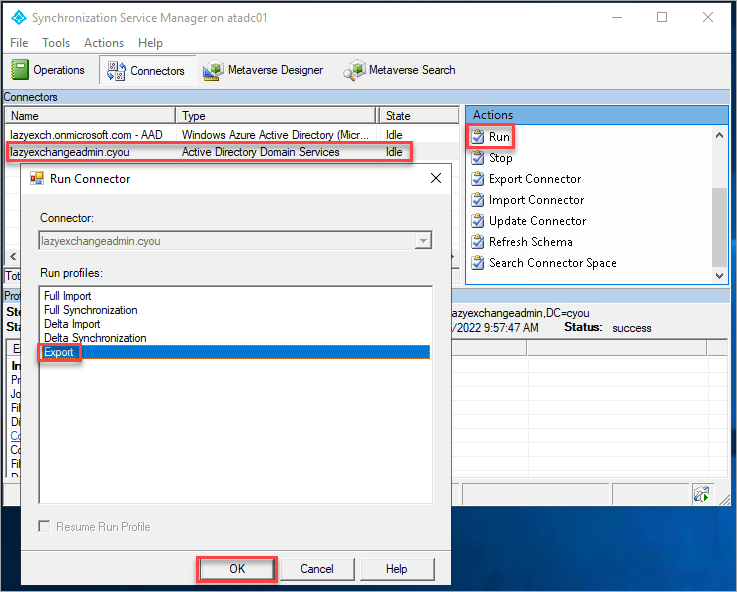
9. Lastly, run the Export step on the local connector. Click the local connector → Run → Export → OK.
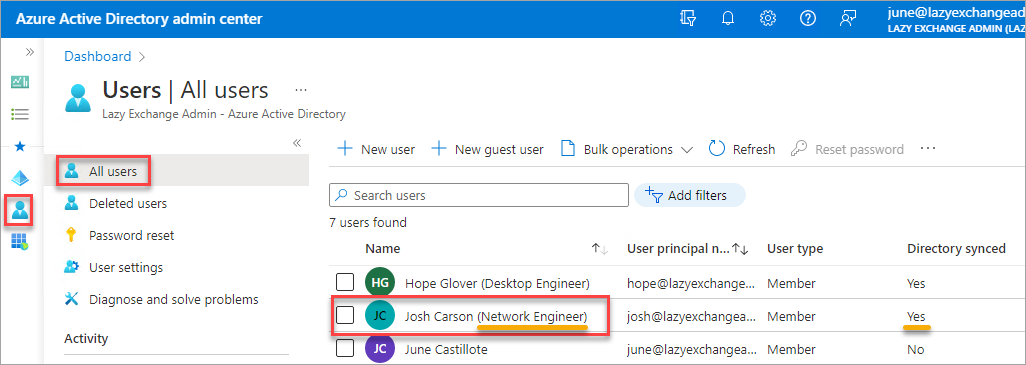
10. Now, open your web browser and log in to the Azure Active Directory admin center.
On the AAD admin center, click Users → All users. Look for the user account you modified and confirm that it now reflects the display name change.
Customizing the Delta Sync Interval
You’re now aware of the current delta sync schedule and how to run the delta sync on-demand. Suppose, for some reason, you require the delta sync schedule to run at a custom interval. How would you do it?
The answer depends on whether you want the interval longer than 30 minutes. If so, then yes, you can increase the sync cycle interval. In contrast, you can set the interval below 30 minutes, but the scheduler will ignore it and honor the lowest interval possible of 30 minutes.
You may experiment with creating a scheduled task in the Windows Task scheduler that runs Start-ADSyncSyncCycle -PolicyType Delta with a shorter interval. But remember that Microsoft does not officially support any sync schedule outside the scheduler.
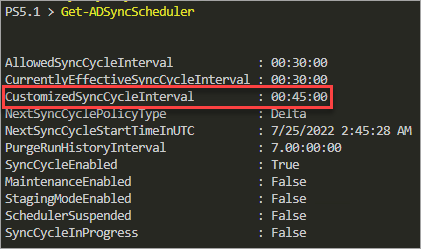
If you wish to increase the delta sync interval (31 minutes and above), run the Set-ADSyncScheduler command with the -CustomizedSyncCycleInterval HH:mm:ss parameter. This example changes the sync cycle interval to 45 (00:45:00) minutes.
Set-ADSyncScheduler -CustomizedSyncCycleInterval 00:45:00
You’ll get a warning saying that the new schedule will not take effect until after the next scheduled delta sync happens. You can ignore this warning.

Confirm that your intended change in the schedule reflects in the scheduler.
Checking the Synchronization Status in Azure Active Directory
So you’ve executed the delta sync. How do you verify that the sync status is healthy in Azure Active Directory? Here are two ways.
Check the Azure AD Connect Sync Status in the Azure AD Portal
If you like a fancy GUI to check the Azure AD Connect sync status, turn to Azure AD Portal, as follows:
1. Open your browser and log in to the Azure Active Directory center.
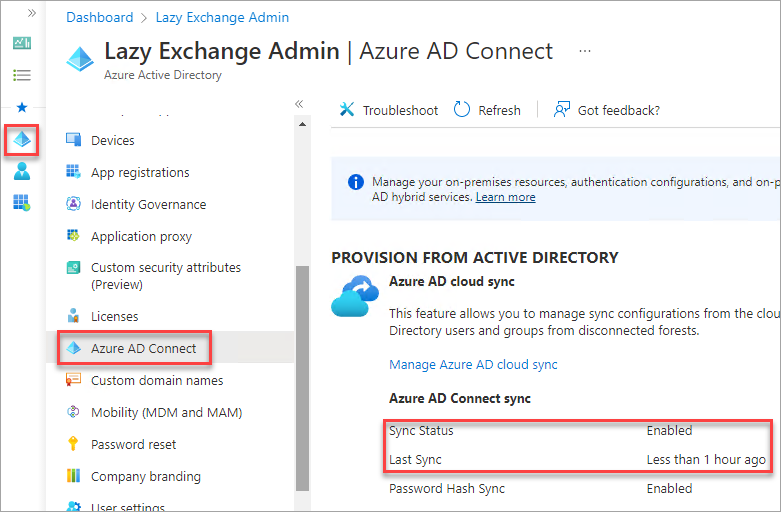
2. Click on Azure Active Directory → Azure AD Connect.
3. Lastly, look for the Azure AD Connect sync section and confirm that the Sync Status is Enabled and the Last Sync was Less than 1 hour ago.
Check the Azure AD Connect Sync Status using MSOnline PowerShell
If you’re more into working on a command-line environment to check the Azure AD Connect sync status, MSOnline PowerShell is up for the task:
1. Open a PowerShell window and import the MSOnline module.
Import-Module MSOnline2. Next, run the below command to get the tenant details, including the last sync time.
# UTC
(Get-MsolCompanyInformation).LastDirSyncTime

# Local Time
(Get-MsolCompanyInformation).LastDirSyncTime.ToLocalTime()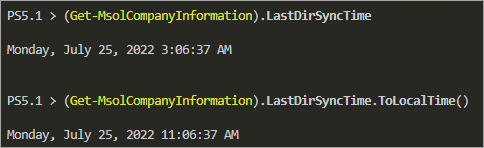
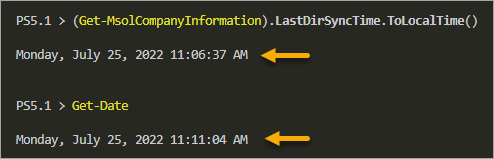
3. Run the below command to determine if the last sync time is within the scheduled cycle (which means recent). Compare the previous sync time with the current time.
Get-DateAs you can see below, the current date and the last sync time are within 45 minutes, which is the delta sync cycle schedule.
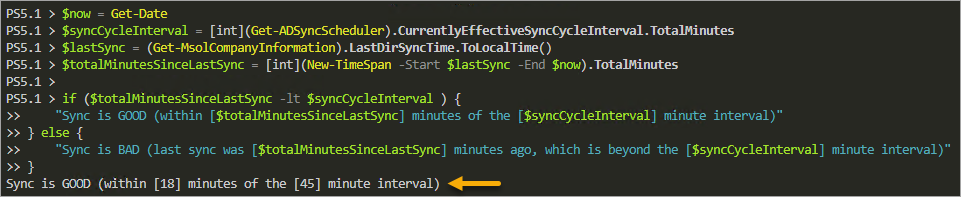
4. Now, run the code below as your starting point if you plan to automate the sync schedule and status monitoring.
This code calculates the elapsed time since the last sync and compares it you the CurrentlyEffectiveSyncCycleInterval value in the scheduler.
$now = Get-Date
$syncCycleInterval = [int](Get-ADSyncScheduler).CurrentlyEffectiveSyncCycleInterval.TotalMinutes
$lastSync = (Get-MsolCompanyInformation).LastDirSyncTime.ToLocalTime()
$totalMinutesSinceLastSync = [int](New-TimeSpan -Start $lastSync -End $now).TotalMinutes

if ($totalMinutesSinceLastSync -lt $syncCycleInterval ) {
    "Sync is GOOD (within [$totalMinutesSinceLastSync] minutes of the [$syncCycleInterval] minute interval)"
} else {
    "Sync is BAD (last sync was [$totalMinutesSinceLastSync] minutes ago, which is beyond the [$syncCycleInterval] minute interval)"
}
Below is the sample result, but you can still improve this script by adding a notification system and scheduling it to run using the Task Scheduler.
Conclusion
Whenever you’re changing AD object properties, you can wait for the changes to reflect in Azure AD, or you trigger a delta sync immediately. Delta sync is helpful in troubleshooting, maintenance, or reconfiguration in Azure AD Connect.
When customizing the synchronization schedule, always consider that a delta sync must happen within seven days after the last sync cycle, whether the previous cycle was a delta sync or full sync.
Thank you for reading, and enjoy learning!


