


If you use GitHub Actions as your build and release pipeline and your team also uses Slack, did you know that you never even have to leave Slack? Create Slack bot to invoke GitHub Actions workflows directly from Slack automatically!
In this tutorial, you’re going to learn how to set up a new Slack chatbot using the bot-building tool called Hubot and automatically kick off a GitHub Actions workflow to deploy code to a server.
Let’s dive in!
Prerequisites
This tutorial will be a hands-on demonstration. If you’d like to follow along, be sure you have the following:
- A Slack Workspace
- A GitHub account and a GitHub personal token
- A Linux server to deploy code to – This tutorial will use Ubuntu 19.
- A local Linux machine – This tutorial will use Ubuntu so that all local commands will be Linux. If you’re running another operating system, the commands may be slightly different.
- SSH credentials to connect to the server you’ll be deploying code to.
- A code editor of your choice that understands YAML like Visual Studio Code.
Creating a Project and GitHub Actions Workflow
Before you can quickly invoke GitHub Actions workflows from Slack, you must first create the workflow.
To create the workflow, let’s create a project folder to hold all of the files you’ll be working with.
1. Open your favorite terminal application.
2. Now run the series of commands below to create the project folder named Hubot and navigate into it.
mkdir ~/Hubot # Create a directory named Hubot
cd ~/Hubot    # Change directory to Hubot
3. Next, run npm init to create a Node.JS package.json file. Running npm init creates a standard Node.JS project which includes the package.json file that contains various information about the project and any dependent NPM packages.
npm init # Initializes package.json file4. Now, create a workflows directory and the deploy.yml workflow file. The workflow file is a series of steps defined in a sequence that GitHub Actions will follow.
mkdir .github/workflows && touch deploy.yml5. Next, define each of the GitHub secrets your workflow will read. The workflow you’re about to create will reference these secrets. Since you will need your server address, username, password, and port of your server to SSH, let’s create GitHub secrets.
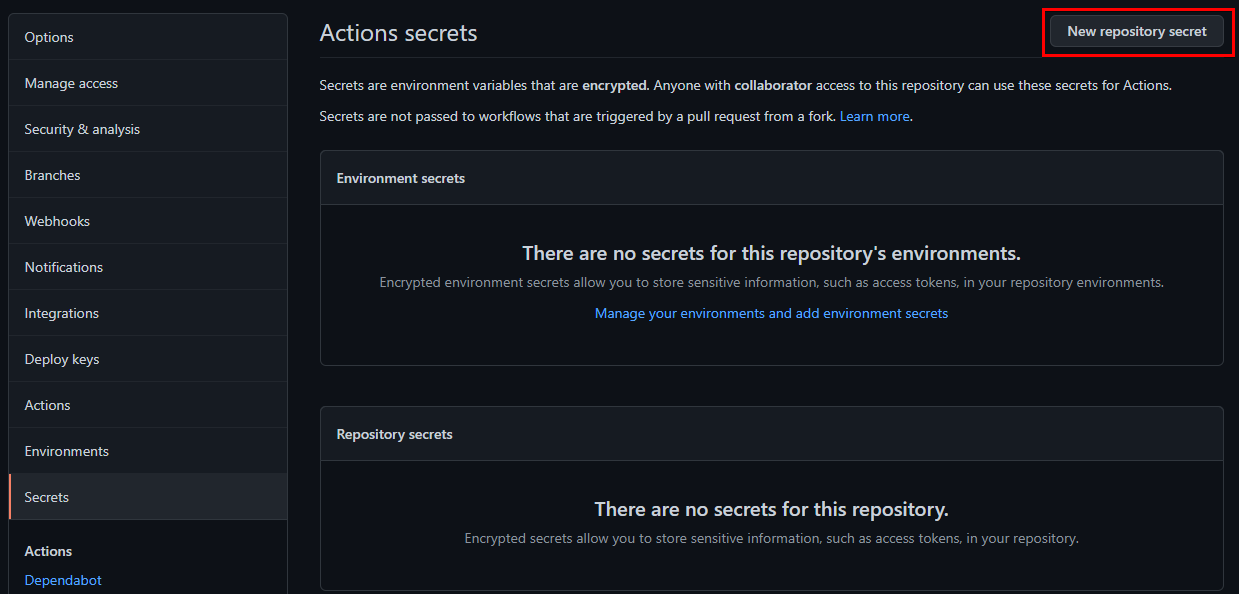
Visit this URL https://github.com/yourusername/yourrepository/settings/secrets/actions where you’ll add your GitHub secrets. Replace yourusername with your GitHub username and yourrepository with your GitHub repository.
Click on the New repository secret button, as shown below to fill up information about the secret you’re adding.
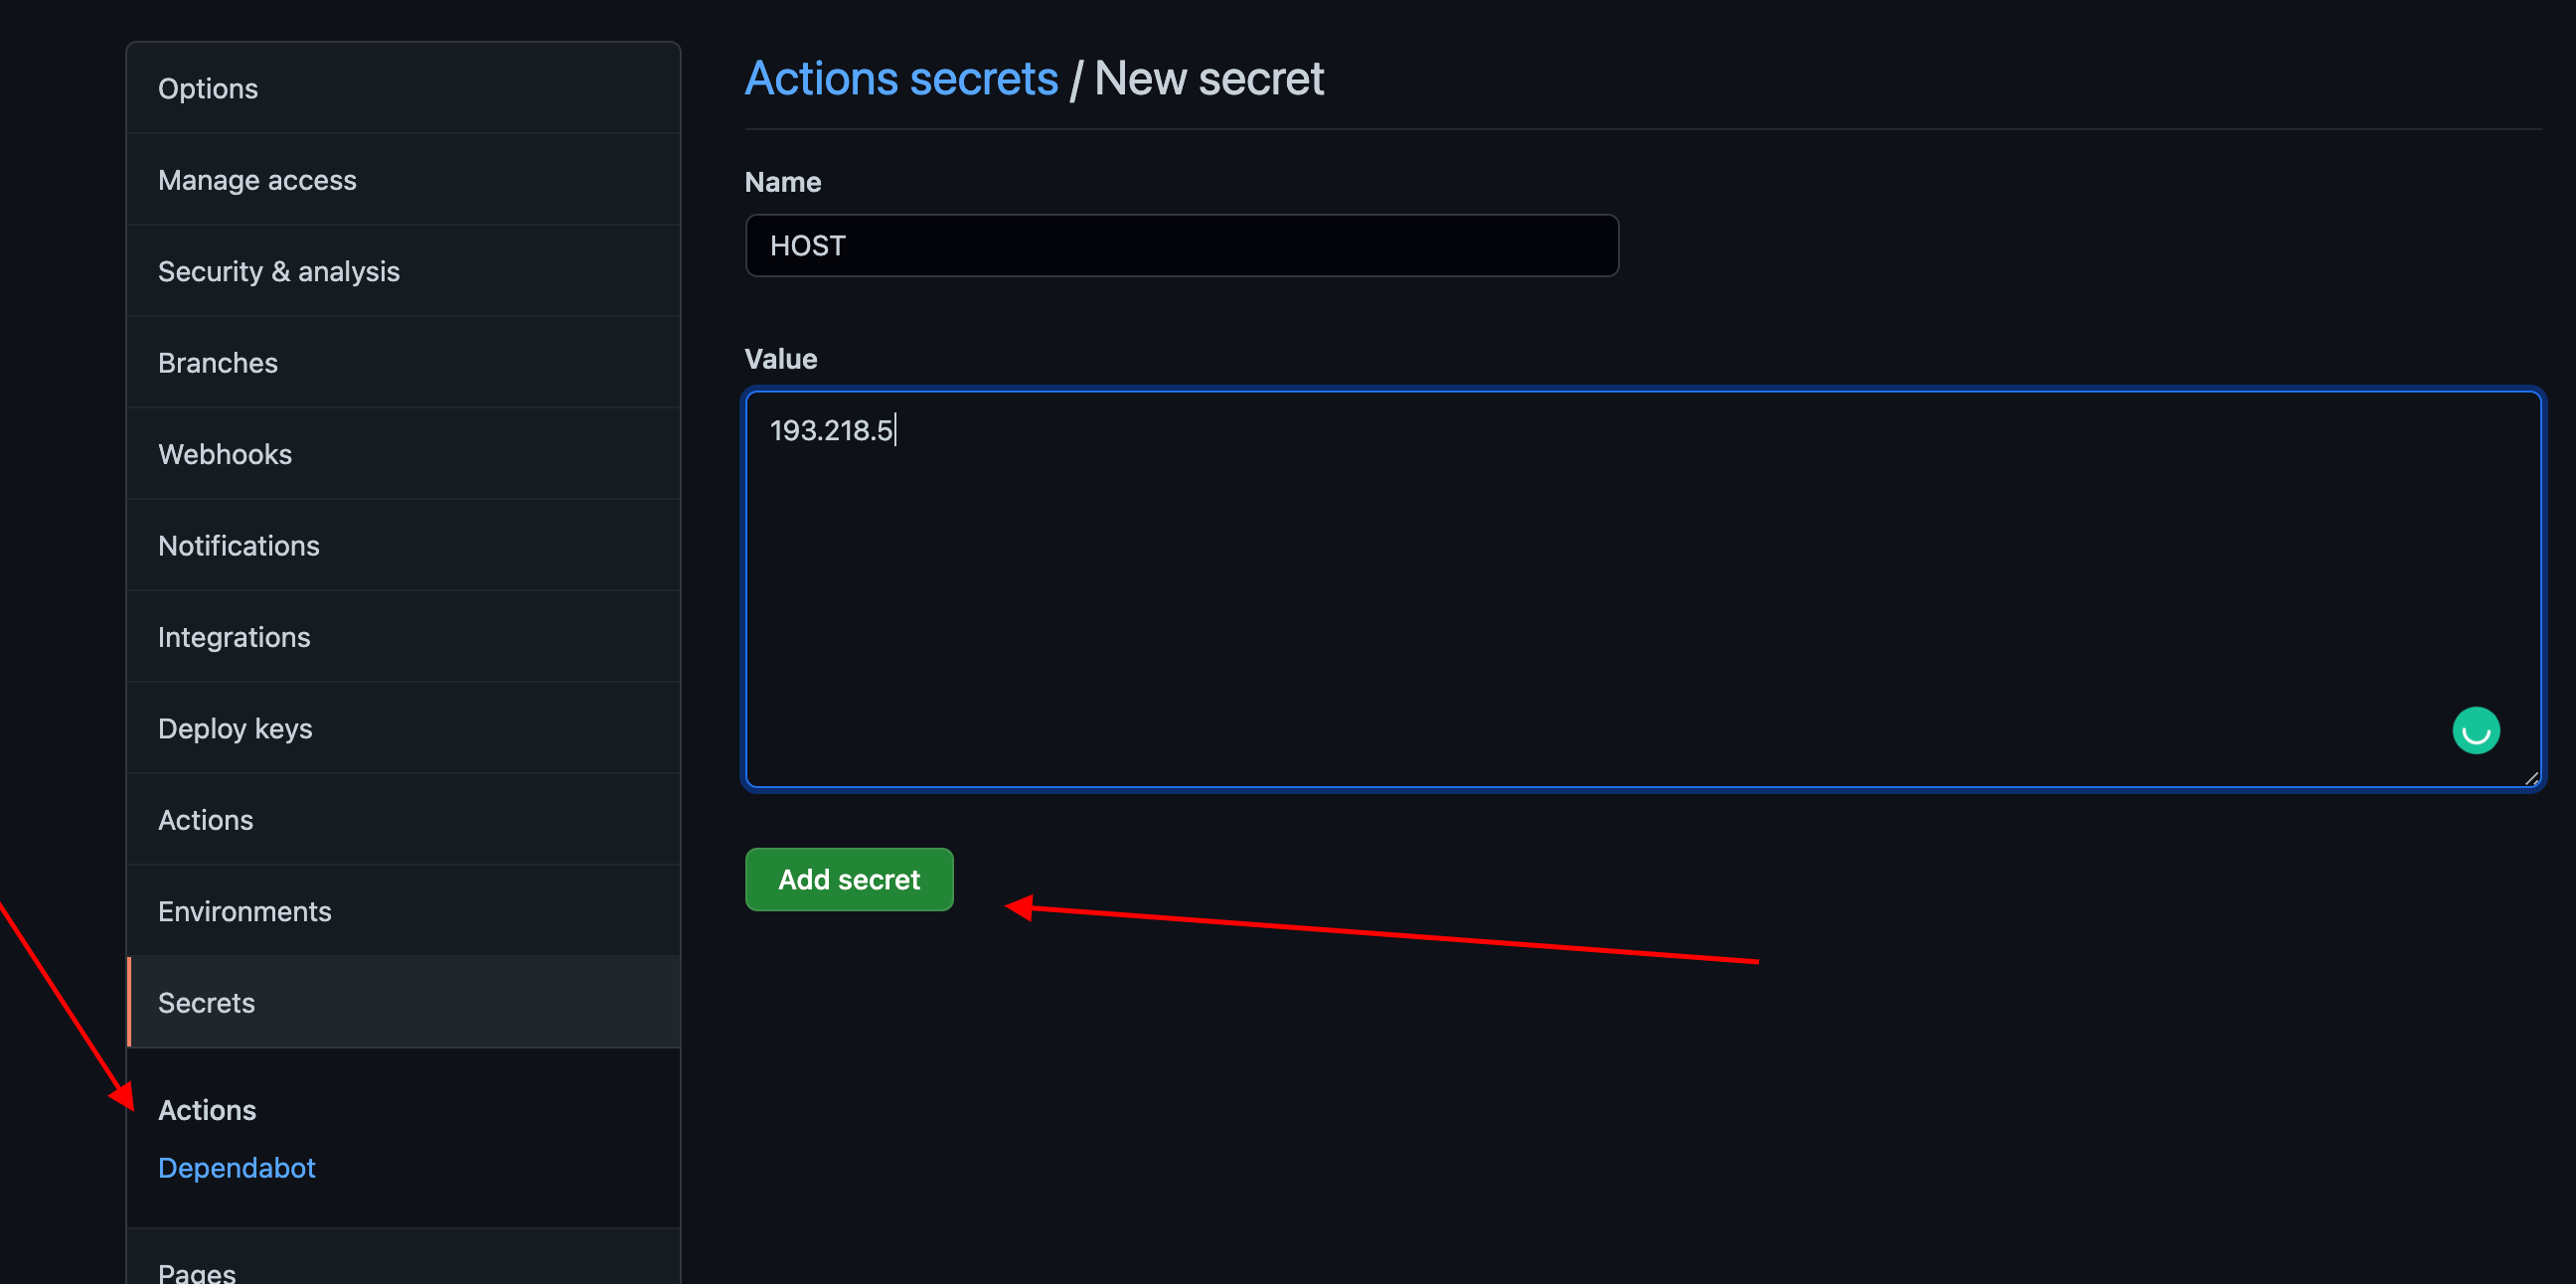
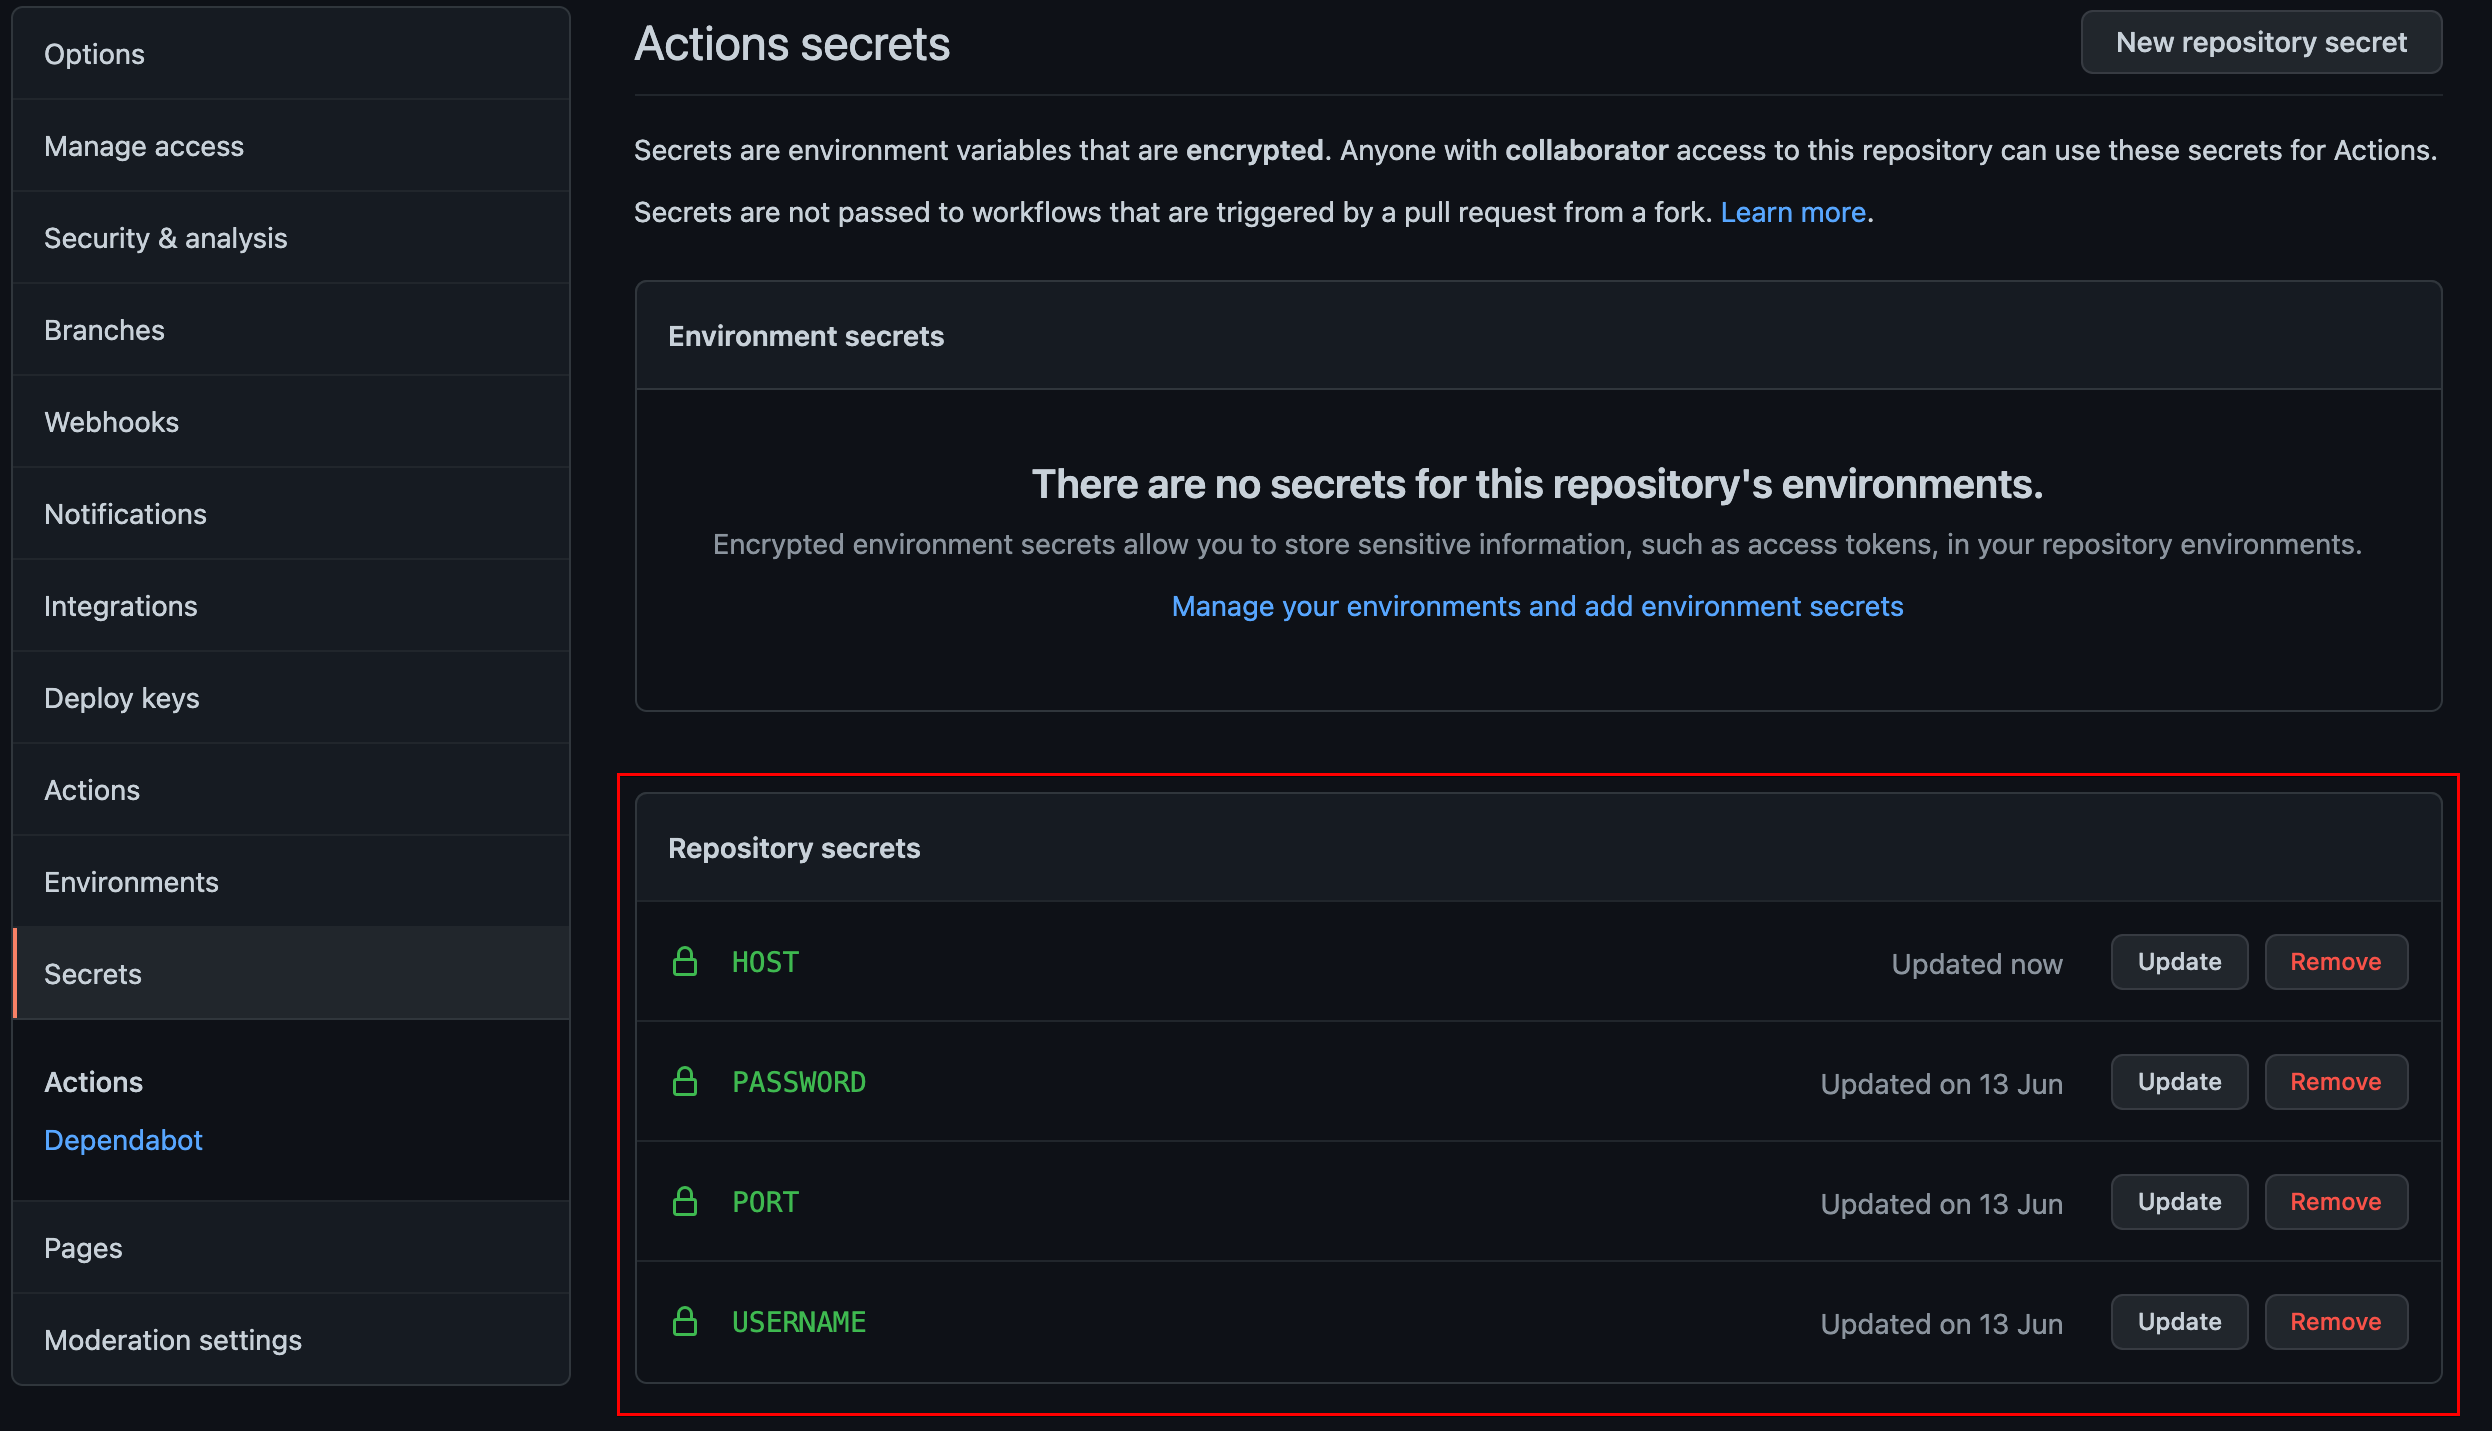
6. Now fill up the secret’s Name and Value field, then click on Add secret to save it. The page will redirect to the GitHub secrets page where you’ll see all your secrets. To add more secrets, click on the New repository secret button as you did previously.
Make sure you save secrets for given variables with exact same name as you will be referencing the same variables, which are HOST, USERNAME, PASSWORD, and PORT.
7. Finally, open the ~/Hubot/.github/workflows/deploy.yml workflow file in your code editor, and copy/paste the following code. The code below is the workflow that will run whenever you trigger the workflow via Slack later.
When you invoke the workflow, a couple of actions will take place:
- GitHub Actions will parse the workflow file below to SSH into the target
hostdefined in theHOSTsecret with theUSERNAMEandPASSWORDdefined as secrets. - The workflow will then download the contents of the GitHub repo for a specific branch (
$branchName) by runninggit pull origin$branchName. Be sure the branch name contains the code you’d like to deploy. - You will be using a Workflow Package from Github Marketplace called ssh-remote-commands. This package has a nice wrapper to workaround where you only need to provide host, username, password, port, and command to run on production.
Make sure your server has git installed with the necessary login credentials to pull the code from the GitHub repository
# Name that will be referenced do much more with it programmatically
name: deploy
on:
  # The event respository_dispatch means on every API trigger,
  # this whole file gets executed
  repository_dispatch:
    types: [deploy-service]
# There can have multiple jobs, but currently,
# this tutorial will only be working on one
jobs:
  deploy:
    name: Deploy
    # The name of the base image where all whole codes in YAML get executed
    runs-on: ubuntu-latest
    steps:
    - name: executing remote ssh commands using password
      # appleboy/ssh-action@master it is an open-sourced package
      # that logs into a server via ssh and executes the script
      uses: appleboy/ssh-action@master
      # These are generally the variable that the package needs
      # to log into the server and execute the script
      with:
       # The secrets are the variables from
       # https://docs.github.com/en/actions/security-guides/encrypted-secrets

       # Your host of the server stored on github secrets with same name HOST
        host: ${{ secrets.HOST }}
        # Your sever's username to login
        # which is stored on github secrets with name USERNAME
        username: ${{ secrets.USERNAME }}
        # Your server's password to login
        # which is stored on github secrets with name PASSWORD
        password: ${{ secrets.PASSWORD }}
        # Your server's port to login
        # which is stored on github secrets with name PORT
        port: ${{ secrets.PORT }}
        # deploy-app.sh can be anything like you can pull code from the GitHub
        # and restart your webserver or queues anything
        # Make sure you have cloned repo on your server
        # You can run many script as you like
        script: git pull origin {{ github.event.client_payload.branch
Executing the Workflow Manually
You’ve now created the GitHub Actions workflow to invoke via Slack. But at this point, your code is on your local machine only. To trigger the workflow, you will need to push code to GitHub.
Running the series of commands below tells git where should the code be pushed and pulled from, in this example, from your remote GitHub repository. In the git remote add origin command below, replace yourusername and yourrepository with your GitHub username and repository
# Open github.com and create a repository
git init # Initializes git
git remote add origin https://github.com/yourusername/yourrepository.git
git add . #adds newly created files for git to track
git commit -m "Created GitHub workflow file"
git push -u origin master
Let’s first test if your code works. Invoke your code manually using the popular curl utility.
Run the command below to make a post request to your GitHub Repository https://github.com/username/repository/dispatches URL to tell GitHub to trigger a Workflow file deploy.yml that you created earlier. Replace username with your actual GitHub username and repository with your GitHub repository.
Replace $github_personal_token in the code below with your personal token.
# Makes a post request at https://github.com/username/repository/dispatches url
curl-X POST  https://github.com/username/repository/dispatches \
# Adds header for accepting content type
-H 'Accept: application/vnd.github.everest-preview+json' \
# Adds header for authorization
-H "Authorization: token $github_personal_token" \
# Adds json content on a body of post request so you can send multiple parameters
# from this data section and you can perform various action based on arguments
--data '{"event_type": "deploy-service", "client_payload": {"environment": "'"$1"'", "ref": "'"$2"'"}}' #You can pass the name of environment & ref as a branch name so that you know which branch to deploy on which server
Create Slack Bot with Hubot
Since you were able to trigger GitHub Action Workflow manually, that’s a good start. Now let’s try to automate the same manual steps via Slack Bot. You’ll create a Slack Bot, which listens to your command and triggers the GitHub Action with arguments.
You have two options to create a Slack Bot, either from scratch or a pre-built hubot package for slack workspaces. In this tutorial, you will use a pre-built Bot package called Hubot. Hubot is an open-sourced automation tool that integrates with chat services like Slack, Discord, Gitter, TeamSpeak, etc.
Creating a custom bot without using an app like Hubot takes a lot of time. Why? Because you’ll handle all the setup processes, listening to webhooks, and hosting the bot. So in this tutorial, you’ll use the Hubot Slack app to simplify all those processes.
Installing Hubot with Npm
Since you’re using Hubot to create a Slack Bot, let’s first download and install Hubot on your local machine. Hubot will be the connector that links Slack and GitHub actions.
1. In your terminal, navigate (cd) to your project directory (~/Hubot).
cd ~/Hubot2. Install the yo and generator-hubot package globally (-g) on your local machine with the npm install command below. The yo package helps you install new projects by generating projects in any language (Web, Java, Python, C#, etc.). The generator-hubot package uses the yo package to install all dependencies along with initial setups.
Once installed, you can run the yo command from anywhere as it was installed globally.
npm install -g yo generator-hubot3. Now, create a basic Hubot boilerplate with the following command. A boilerplate is a section of code included in many places. Without a boilerplate, you always need to write code from scratch.
The command below creates a basic Hubot boilerplate on your project directory. The Hubot boilerplate links Slack (--adapter=slack) so the Bot can listen and respond to the messages inside the slack channel. yo hubot --adapter=slack
yo hubot --adapter=slackAdding Hubot to Your Slack Workspace
Now that Hubot is installed on your local machine, you need to configure Hubot to communicate with Slack.
Let’s install Hubot in your Slack Workspace.
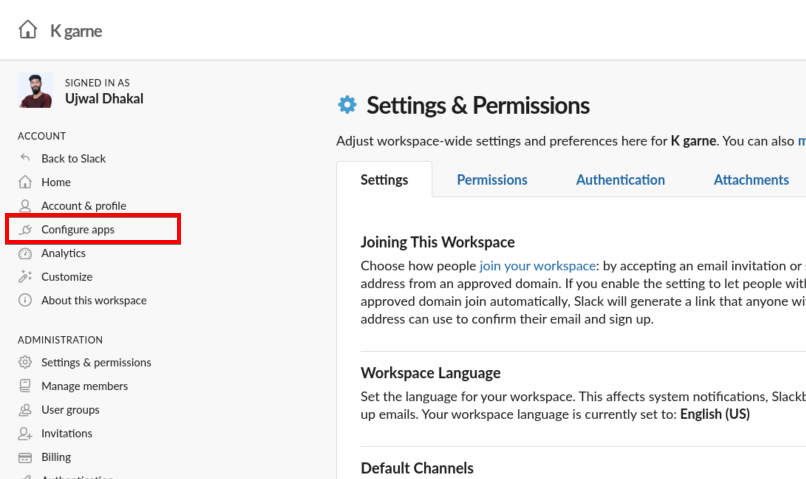
1. Open your web browser and navigate to your Slack admin settings with the URL, like https://workspacename.slack.com/admin/settings. Replace workspacename with your actual Slack Workspace name.
Click the Configure apps on the left panel, as shown below, so that you can search for Hubot in the marketplace. Slack has a marketplace where you can find pre-built applications.
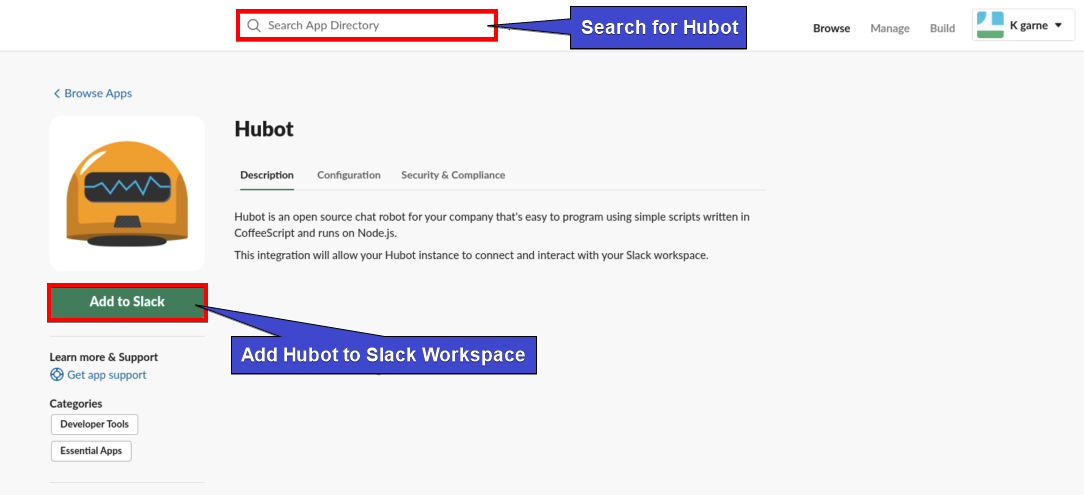
2. Click on the search bar, then type in hubot to search for Hubot in the marketplace and select Hubot.
Now, click on the Add to Slack button, as you see below, to add Hubot to your Slack Workspace.
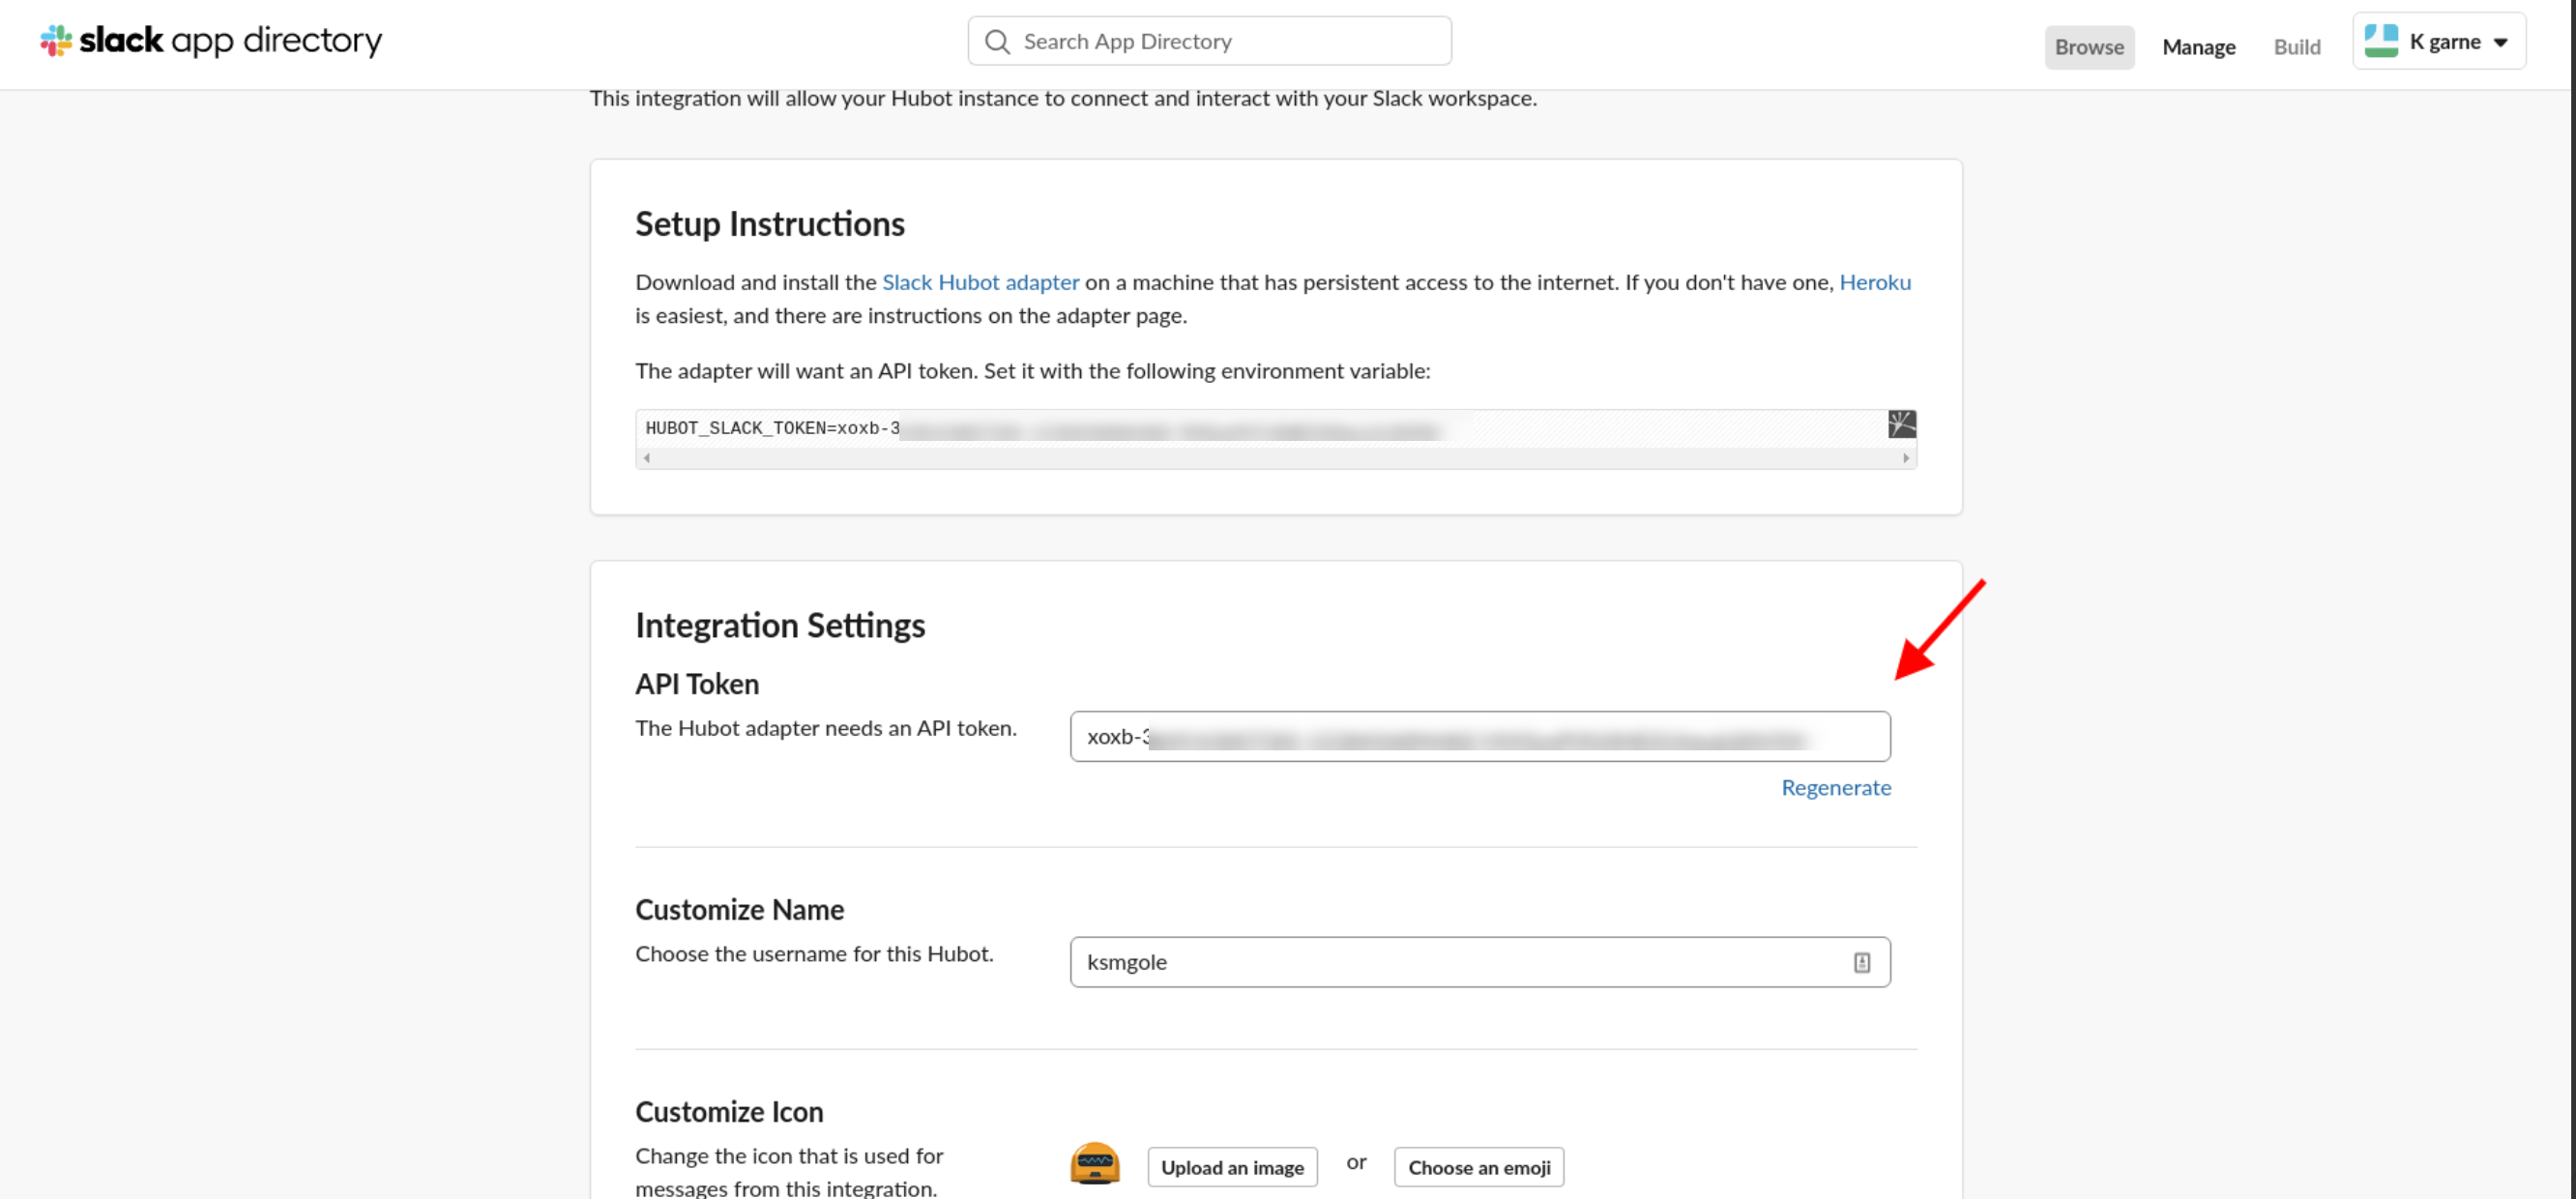
3. Finally, fill up some general information about your Bot, like the name (deployerhubot) and icon. Take note of the API Token as you’ll use it in Hubot Deployer later to activate the Bot from your Hubot project that you have created earlier.
Testing GitHub Actions Workflow’s Integration with Slack
You now have Hubot installed on your Slack Workspace, so let’s test the bot by listening and sending messages to the channel. But first, you must activate the Bot.
1. Run the command below inside the project’s root directory to activate the Bot for Slack (--adapter slack) from your Hubot repo (./bin/hubot). Be sure to replace the $token with the API token you took note of earlier
HUBOT_SLACK_TOKEN=$token ./bin/hubot --adapter slack2. Run the below command to invite (/invite) the Bot (botusername) to your Slack channel. Replace botusername with the name of the Bot you registered in step three of the “Adding Hubot to Your Slack Workspace” section.
/invite deployerhubotNow, mention a Bot with a text in Slack, like @deployerhubot ping, to test if the integration is working. If the Bot responds PONG, as shown below, then you’re all set.

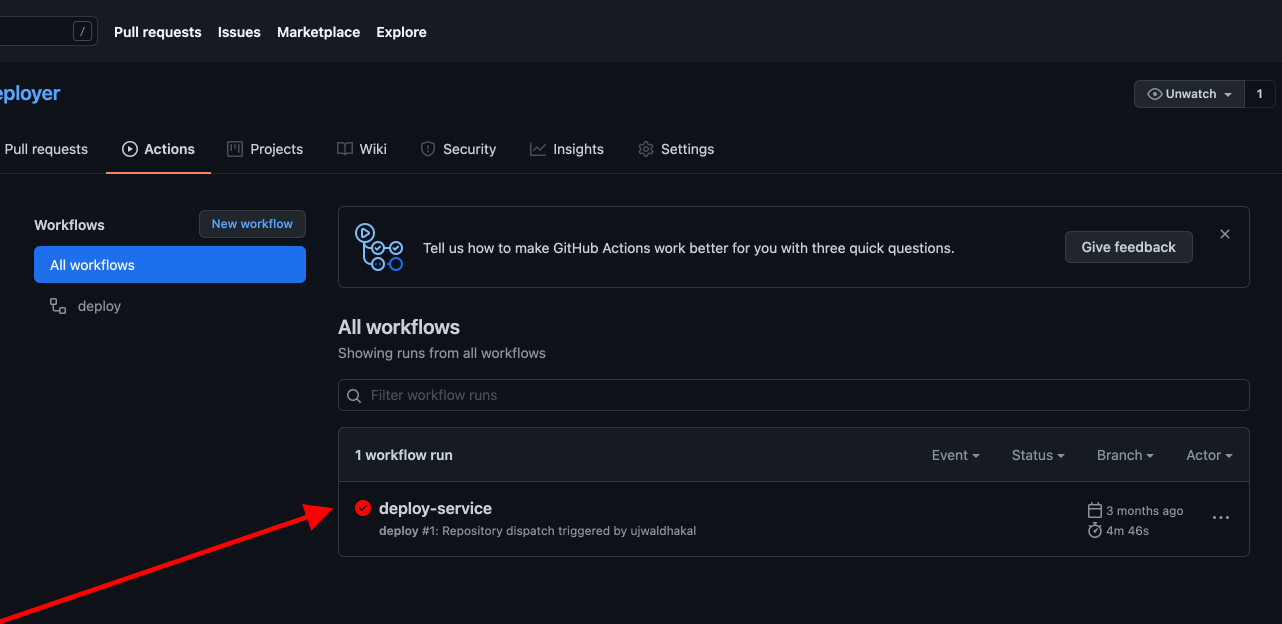
If the Bot did not respond, navigate to your GitHub repository in your web browser, and click on the Actions tab. You can tell which workflow failed as it has a round red check badge on it. Click on the failed workflow to see what caused the failure and fix it.
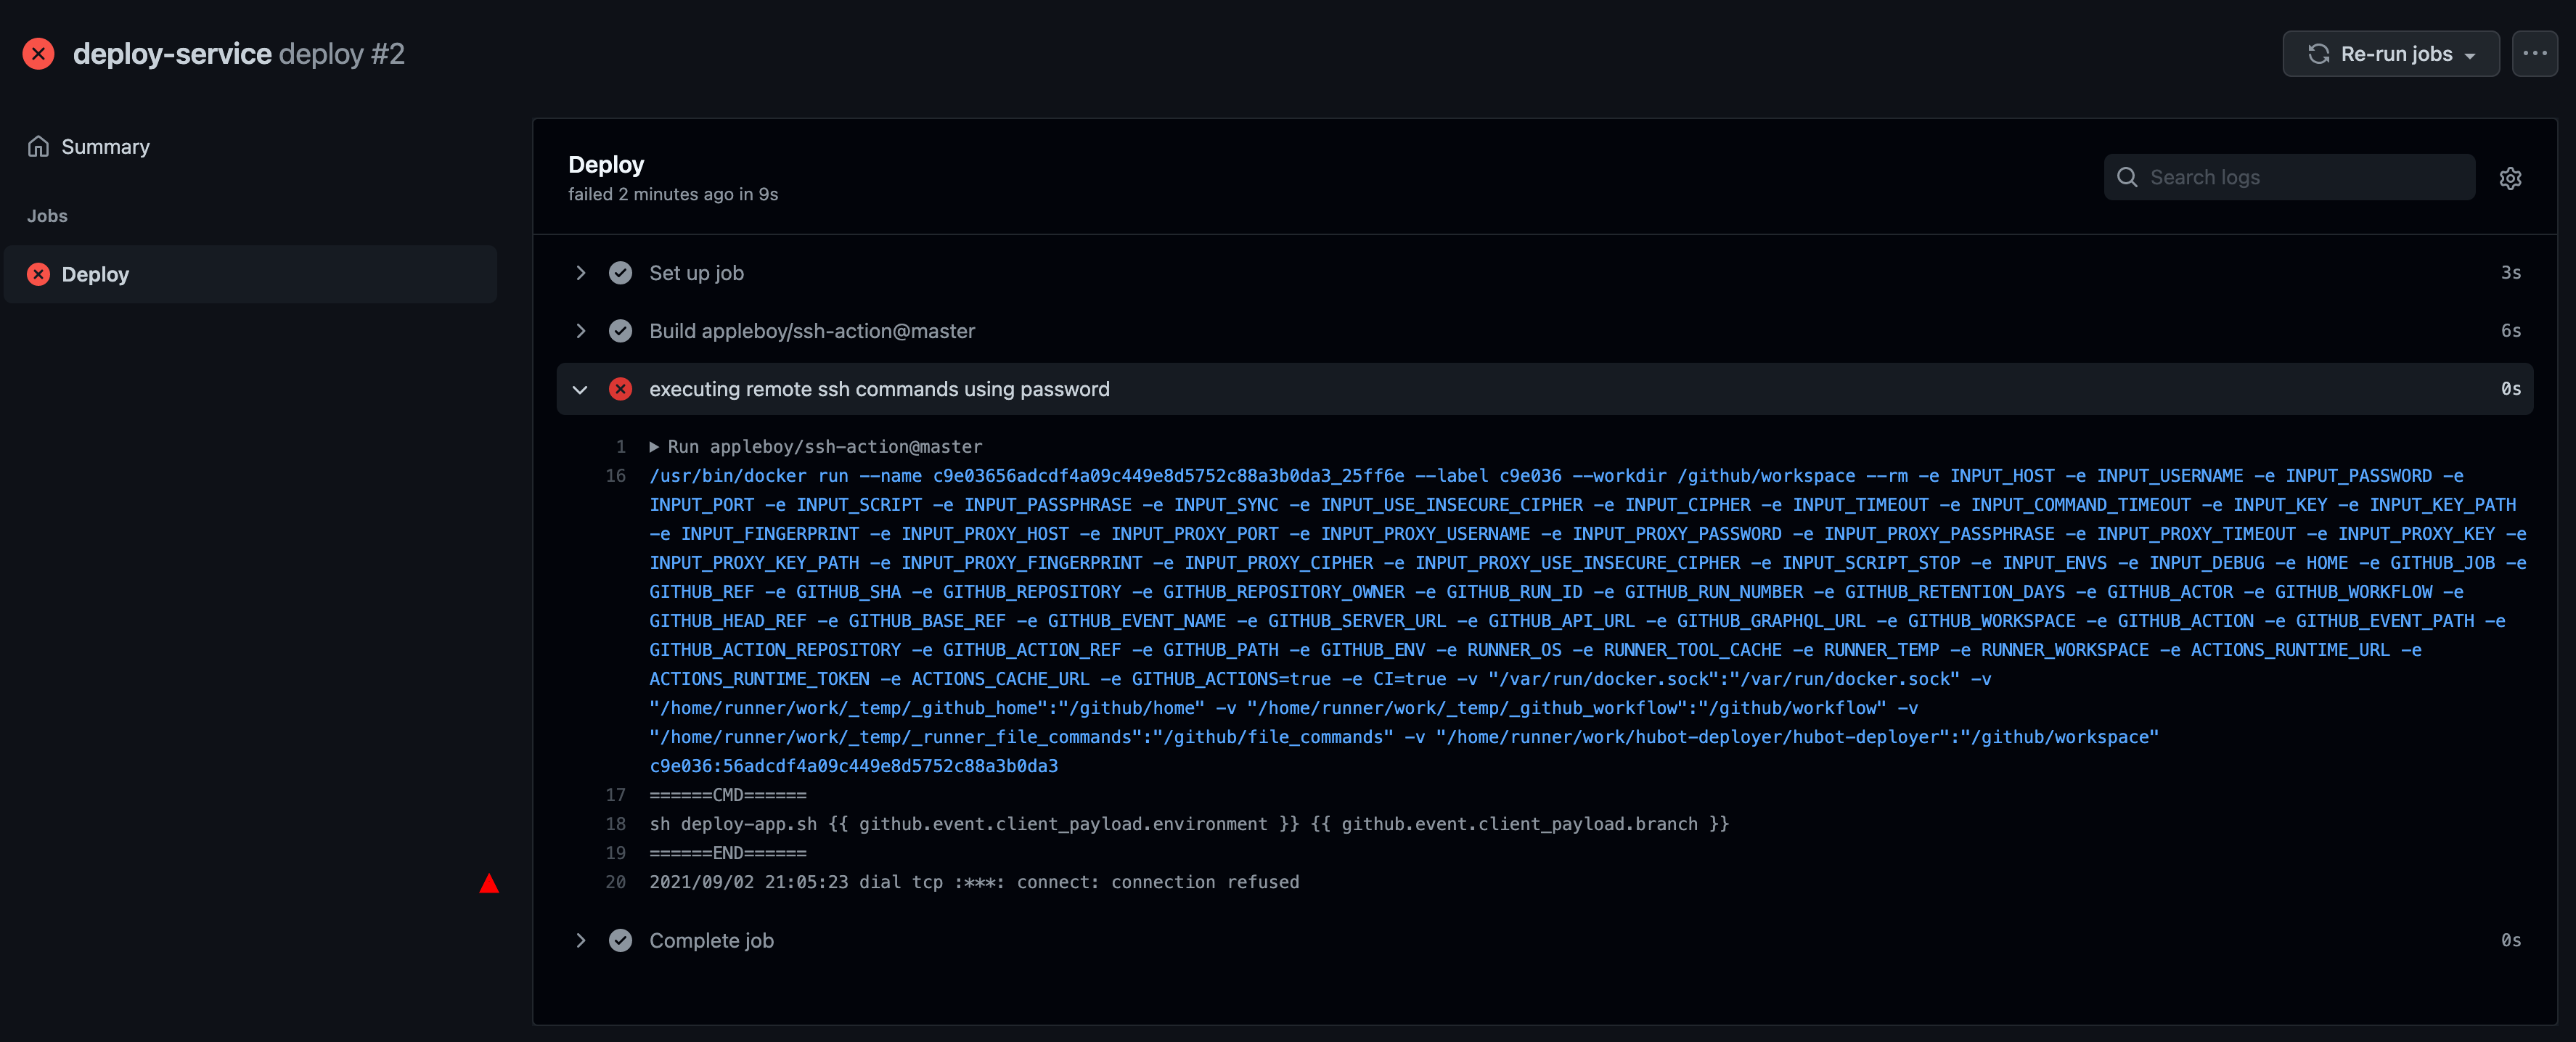
Below, you can see the failure is on executing remote ssh commands using password. After fixing the workflow, go back to step 3 and see if the Bot responds PONG.
Kicking off a GitHub Actions Workflow from Slack
Now that you’ve activated your Slack Bot, it’s time to kick off GitHub Actions workflow from Slack!
You need the flexibility to deploy the given branch to a given server, like pulling the codes from the given branch. you’ll teach the Bot to respond automatically when someone types ***@*bot deploy API feature-x to production on a Slack Channel. You can validate the environment name wherein later people can only deploy certain environments and branches.
To automate the Bot’s responses:
1. Create a directory named ~/Hubot/scripts. The ~/Hubot/scripts directory is where you’ll save a script that triggers your GitHub workflow.
2. In your code editor, create a file named bot.js inside the ~/Hubot/scripts directory. Now copy the code below and paste it inside the bot.js file.
The code below allows the Bot to listen to the chat messages on Slack Channel, then triggers the workflow to send a response to Slack Channel.
const validServices = ['api','app'];
const validEnvironments = ['production'];
robot.hear (`@${process.env.BOT_ID}`,async (bot) => {
// Bot is only interested in listening message
// like @deploy api featurex to production
// Setting up reusable variable
const payload = bot.message.text.split(" ")
const service = payload[2];
const branch = payload[3];
const environment = payload[5];
const username = bot.message.user.name;
//Inform user that we processing
bot.send(`Roger that! Please wait.`);
// Validate if the command that has been used is valid or not
// because user can use invalid commands too
if(!validateCommand(bot,username,service,branch,environment)) {
return;
}
// If command seems valid, then trigger a workflow
await triggerWorkflow(bot,username,service,environment,branch)
// Inform user that workflow has been triggered successfully
bot.send(`Github Action has been triggered successfully`);
})
const validateCommand = (bot,username,service,branch,environment) => {
// Limit the services as users can use services that are not listed
// which will try to trigger workflow and gets error
if(!validServices.includes(service)) {
bot.send(`${service} is not availble, Only ${validServices.join(', ')} are available`);
return false;
}
// Limit the environment as users can use invalid list of environment too
if(!validEnvironments.includes(environment)) {
bot.send(`${environment} is not availble. Only ${validEnvironments.join(', ')} are available`);
return false;
}
return true;
}
const triggerWorkflow = (bot,username,service,environment,branch) => {
try {
// This is the same manual workflow triggering code converted
// from curl to actual javascript post request
const data = await axios.post(`https://api.github.com/repos/yourusername/yourreponame/dispatches`,{
'event_type': 'deploy-service',
'client_payload': {'environment': environment, 'ref': branch}
},{headers:{
Authorization: `token ${token}`,
}})
}
catch(e) {
bot.send(`Sorry @${username} could not trigger github action. Please check my logs ${e.message}`);
}
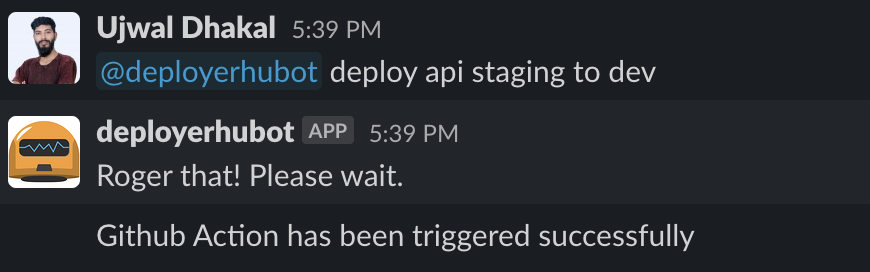
}3. Finally, send the @botusername deploy api staging to dev message in slack, and you’ll see a similar response, as shown below.
Workflow files can be triggered on various GitHub Events, like pushing code to a certain branch, creating tags, creating pull requests, requesting some URLs, and many more.
Conclusion
Throughout this tutorial, you have learned about GitHub Workflow, from manually triggering Slack responses with codes to building a chatbot. You’ve also learned that having a chatbot in Slack allows you to automate tasks by invoking GitHub actions workflow.
Will you take this newfound knowledge up a notch, perhaps adding a Reminder Bot or making interactive messages?


