


Setting up SSL for any website is a challenge. Site visitors, browsers, and search engines reward a properly Secure Sockets Layer (SSL) secured website. Previously, this process involved purchasing, installing, and configuring an SSL certificate. But with Cloudflare SSL, you can complete the process of configuring SSL with only a few clicks!
In this article, you will learn how to configure your site with SSL encryption via Cloudflare. So work your way up to end-to-end encrypted SSL connections!
Prerequisites
To follow along with this tutorial, there are a few prerequisites required below:
- A Cloudflare account with an existing website and domain pointed to the Cloudflare nameservers.
- An Ubuntu Linux server with NGINX installed and configured. This tutorial demonstrates using Linux and NGINX, but the same general process works for IIS or Apache.
Setting up Cloudflare Universal SSL: Only the Beginning
There are several ways you can configure an SSL using Cloudflare. Often, the quickest method is to go for Universal SSL. Why? With Universal SSL, instead of finding and purchasing an SSL certificate, Cloudflare provisions a certificate, then all the traffic sent through Cloudflare will use that certificate.
After enabling Universal SSL, Cloudflare presents a valid SSL certificate to both visitors and search engines. Cloudflare also does not require configuring the server or website to use that certificate—slick!
1. Launch your web browser and log in to the Cloudflare dashboard.
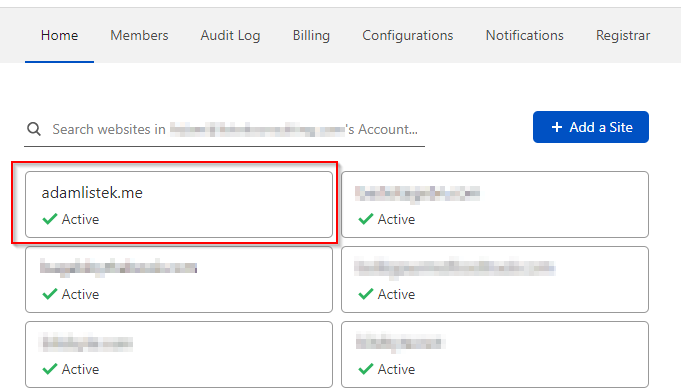
2. Navigate to your site from the account domain list, as shown below.
3. Now, click on SSL/TLS to view your site’s encryption options.
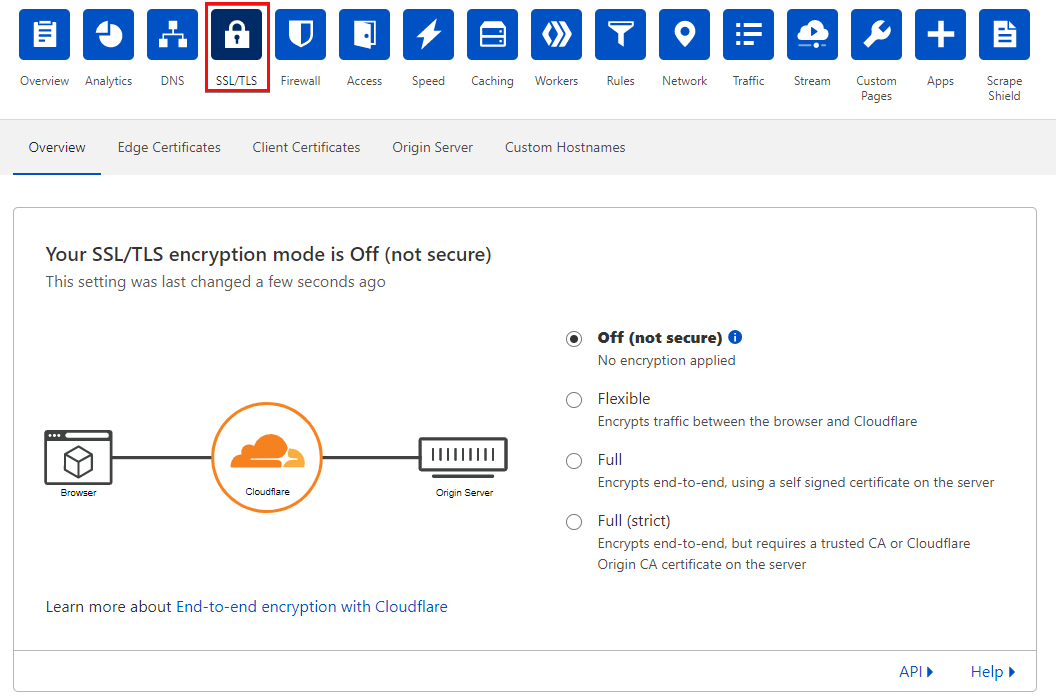
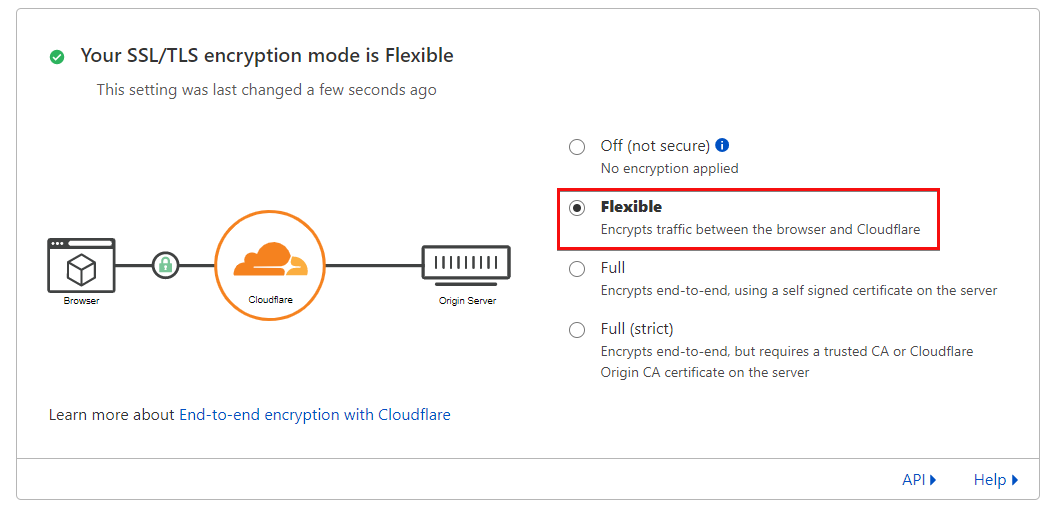
4. Choose the Flexible option to enable Universal SSL. Once selected, the change takes effect immediately. Your site now is encrypted between the browser and Cloudflare!
Configuring Full End-to-End SSL Encryption
Although Universal SSL is a great option to start securing sites, it leaves the traffic between the server and Cloudflare unsecured. Thankfully, there are two encryption modes for encrypting traffic from Cloudflare to the server, Full and Full (strict) encryption each with mainly different certification installation requirements.
- Full – Requires a certificate on the server, but this may be a self-signed certificate.
- Full (strict) – The installed server-side certificate must be a valid certificate.
Let’s go over the difference between these encryptions and how to set them up.
Setting up Full SSL/TLS Encryption with a Self-Signed Certificate
Unlike Universal SSL, Full SSL/TLS encryption requires your webserver to properly serve an SSL certificate to encrypt the traffic from the server to Cloudflare. There are many ways to accomplish this, but this tutorial demonstrates steps in a Linux server with NGINX.
Generating a Self-Signed Certificate
To encrypt the connection between Cloudflare and your origin server, you need an SSL certificate. Since Full SSL/TLS encryption mode does not require the certificate to be fully trusted, you can use a self-signed certificate to get running quickly.
1. Secure Shell (SSH) into your Linux webserver.
2. Change (cd) to the standard Ubuntu SSL directory (/etc/ssl) by running the command below. cd /etc/ssl
cd /etc/ssl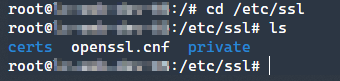
/etc/ssl directory3. Now, generate both the public and private keys for your site with the openssl command. To do so, run the openssl command below.
This command accomplishes a few things:
- Requests (
req) an X.509 certificate provided by the-x509parameter. - When referenced by NGINX, allows NGINX to read the certificate on startup using the
-nodesparameter. - Specifies the number of
days, the certificate is valid. - Creates a new public and private key with
-newkeywith via 2048-bit RSA encryption (rsa:2048). - Saves the private key to
/etc/ssl/private/nginx-selfsigned.keywith the-keyoutparameter. - Saves the public key to
/etc/ssl/certs/nginx-selfsigned.crtusing the-outparameter.
sudo openssl req -x509 -nodes -days 365 -newkey rsa:2048 -keyout /etc/ssl/private/nginx-selfsigned.key -out /etc/ssl/certs/nginx-selfsigned.crtIf
opensslreturns a benign error ofCan't load /root/.rnd into RNG, you’ll need to comment out the#RANDFILE = $ENV::HOME/.rndline in/etc/ssl/openssl.cnf. All modern versions ofopensslfall back to using the system/dev/urandomdevice for random entropy data and do not require a specific file for seeding.
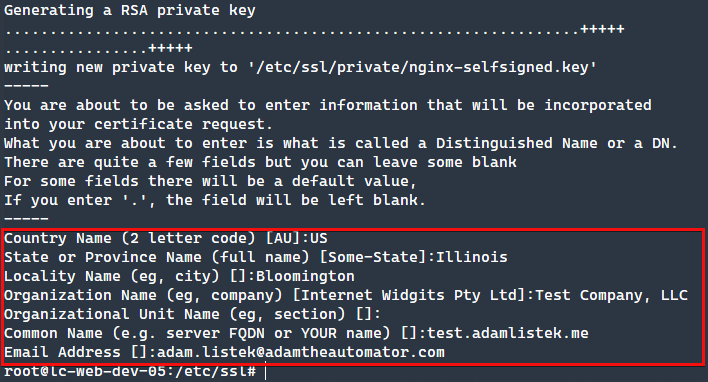
4. After successfully running the command, openssl will prompt you for some information. Below you’ll find all values provided for this tutorial.
- Country Name:
US - State or Province Name:
Illinois - Locality Name:
Bloomington - Organizational Name:
Test Company, LLC - Organizational Unit Name: <blank>
- Common Name:
test.adamlistek.me - Email Address:
[email protected]
5. Lastly, verify that the certificate exists using the test command. If the test command returns (echo $?) 0, then the file exists as expected. You can see in the following screenshot that each command returned a 0 value.
test -f /etc/ssl/private/nginx-selfsigned.key; echo $?
 test -f /etc/ssl/certs/nginx-selfsigned.crt; echo $?
Configuring NGINX
Now that the certificate has been generated and stored in the /etc/ssl/certs and /etc/ssl/private key locations, NGINX must be configured to apply the certificate and serve the site content.
NGINX site configurations are defined in server blocks that are typically contained in virtual host files. In the example below, the basic site configuration is stored in the test.adamlistek.me.conf file and included in the main nginx.conf file.
1. First, create a new virtual host file with the name of your choice, but for this example, name it test.adamlistek.me.conf under the /etc/nginx/vhosts.d directory. Then copy the content below to the virtual host file and save it.
Replace the
test.adamlistek.medomain name with your own, as this is just for demonstration purposes. And if the/etc/nginx/vhosts.dlocation does not exist, create the directory by runningmkdir /etc/nginx/vhosts.d.
server {
   # Listen on port 80 for IPv4 and IPv6
   listen 80;
   listen [::]:80;
 server_name test.adamlistek.me;
 # Perform a 301 redirect with any parameters to the SSL server block below
   return 301 https://test.adamlistek.me$request_uri;
 }
 server {
   # Listen on port 443 for IPv4 and IPv6 with HTTP2 enabled (requires SSL)
   listen 443 ssl http2;
   listen [::]:443 ssl http2;
 server_name test.adamlistek.me;
 # The location of the public and private certificate
   ssl_certificate /etc/ssl/certs/nginx-selfsigned.crt;
   ssl_certificate_key /etc/ssl/private/nginx-selfsigned.key;
 # The location of the web files to load, this is the default NGINX location
   root /usr/share/nginx/html;
 # The default file to serve on a root domain request
   index index.html;
 }
2. Verify that your primary NGINX configuration file, /etc/nginx/nginx.conf contains the necessary include line within the http block, located at the end of the block.
# Server configurations go here
 …
 http {
     # Additional configurations go here
     …
     # Include Virtual Hosts
     include /etc/nginx/vhosts.d/*.conf;
 }
3. Restart NGINX with the following command if you’re on systemd, which is a modern system and service manager for Linux.
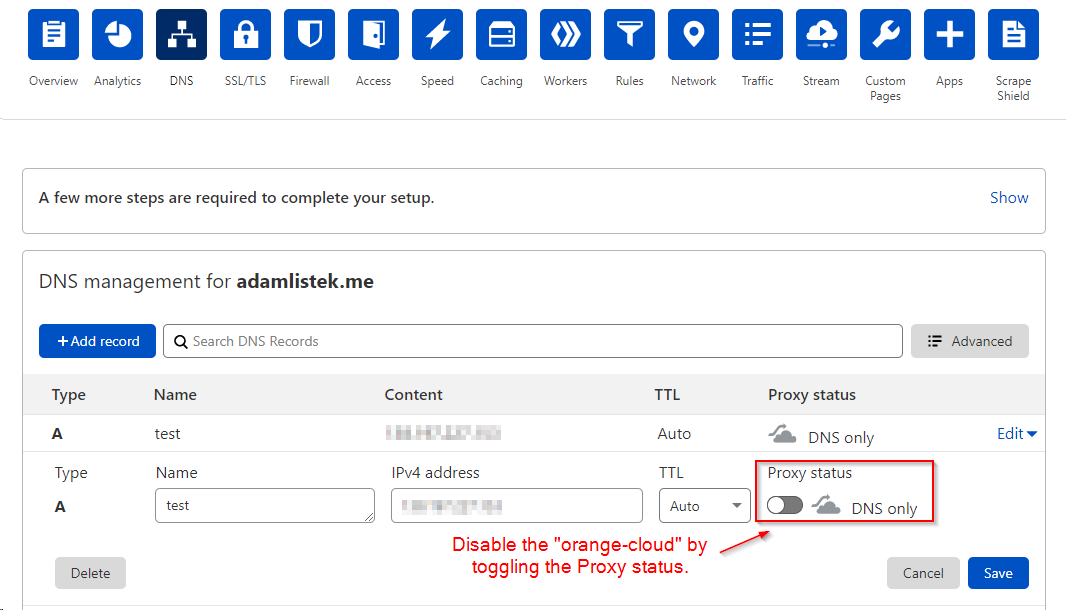
service nginx restart4. Back to Cloudflare, verify that the self-signed certificate is working. To do that, disable the “orange-cloud” for the DNS record under Proxy status, as shown below. Disabling the “orange-cloud” option bypasses Cloudflare and serves requests directly from the webserver.
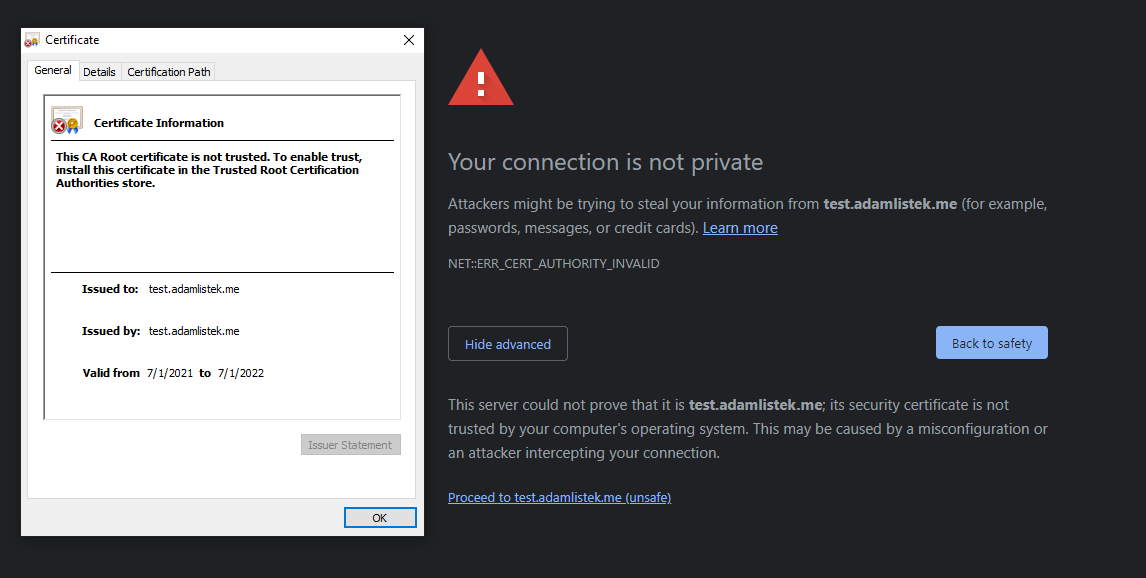
5. Ensure that the site is returning the newly created self-signed certificate by navigating to the website in your web browser. Doing so will result in a warning page, shown below.
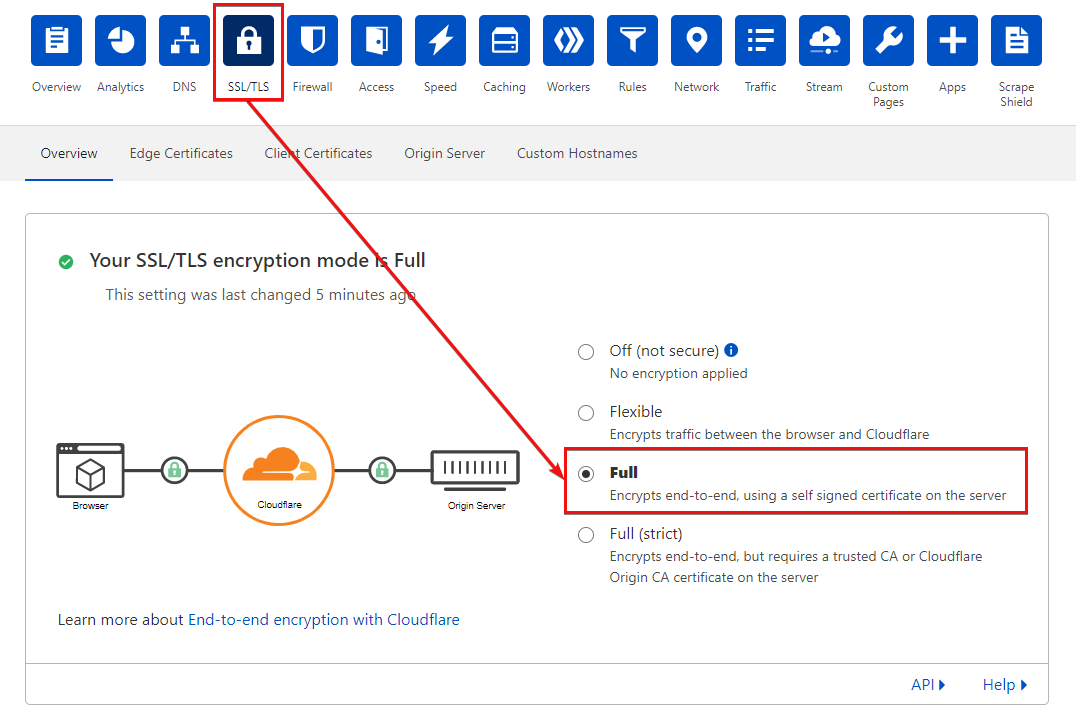
6. Finally, enable Full TLS/SSL encryption on Cloudflare. To do that, re-enable the “orange-cloud” Cloudflare Proxy Status on the DNS record that you previously disabled. Then navigate to the SSL/TLS tab and click the Full radio button shown below.
Generating Origin Certificates for Full (strict) SSL/TLS Encryption
The Full encryption mode does not guarantee that the certificate presented by the web server has an actual valid certificate chain. So instead, go with non-strict encryption, and Cloudflare will accept any certificate presented by the server.
Cloudflare offers the ability to generate a free TLS certificate to secure your origin server connection. But there are two downsides to using a Cloudflare-provided origin certificate. One is that you need to generate and install the certificate manually. The second is the certificate appears like a self-signed certificate that any browser wouldn’t trust other than Cloudflare.
It’s possible to automate certificate generation using the Origin CA Create Certificate API endpoint, but that is beyond the scope of this tutorial.
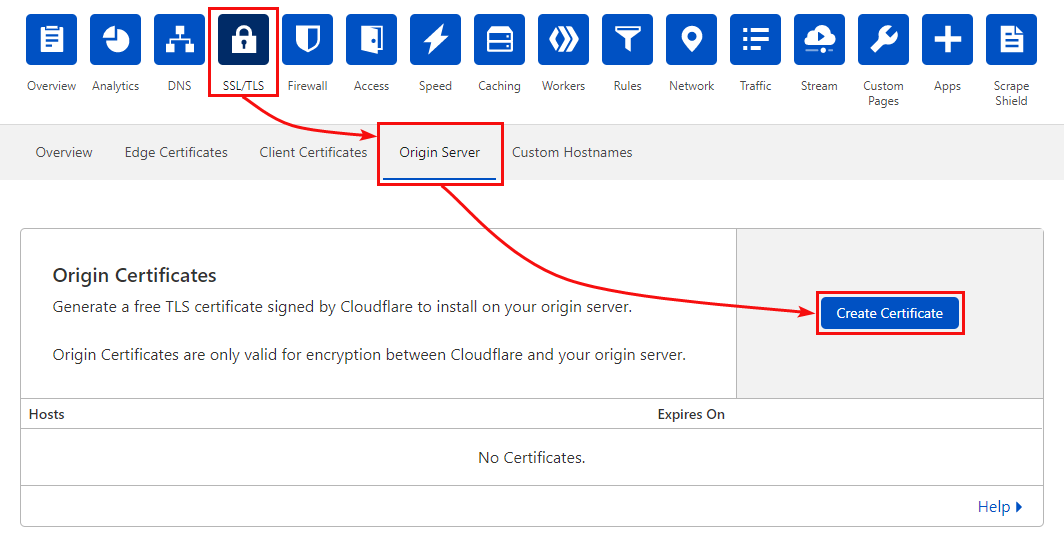
1. Navigate to the Origin Server by going to the SSL/TLS tab —> Original Server, as you see below, and click the Create Certificate button.
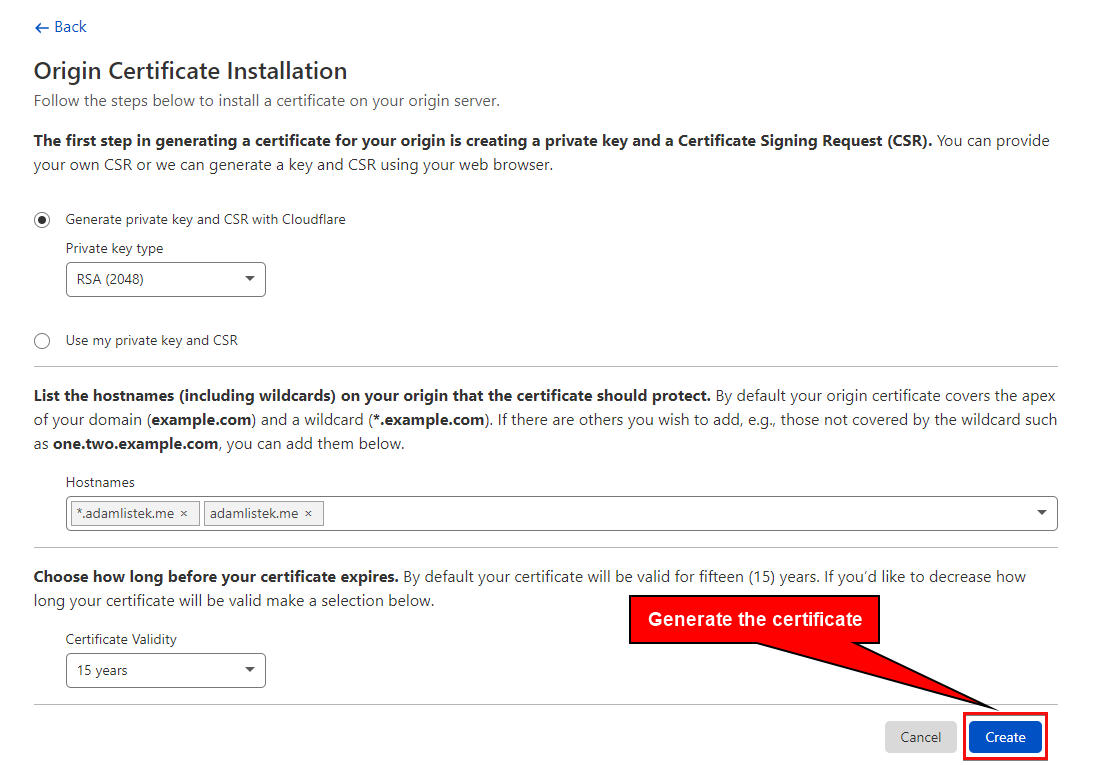
2. As you can see below, the default options are already set to generate a wildcard certificate for the domain with 15 years of validity—sweet! So leave the default options and generate the certificate by clicking on the Create button at the lower-right corner of the page.
A wildcard certificate, shown as
*.domain.com, means that any subdomain will also be covered by this certificate including www.
3. Add the newly created certificate to your Linux system by saving the private and public keys first with the GNU nano text editor. Since there are two keys to save, you’ll need to save the key files one at a time.
Make sure to save the Private Key as it’s only available by the time you generated an Original Certificate. If you accidentally lose this key, revoke the certificate and re-issue a new certificate.
Open a terminal, then create and open the public key file (nginx-test.adamlistek.me.crt) in nano by running the first command below.
Next, go back to Cloudflare and copy the Origin Certificate key (public key) by clicking on the Click to copy option, as shown below. Then paste (Ctrl+U) the public key you copied to the public key file opened in nano. Save the changes (Ctrl+O) and exit (Ctrl+X) from nano.
After saving the public key file, repeat the same process from creating the key file, copying the key from Cloudfare, and saving it on the key file. But this time you’re creating the private key file (nginx-test.adamlistek.me.key).
# The public key, under the Origin Certificiate section
 nano /etc/ssl/certs/nginx-test.adamlistek.me.crt
# The private key, under the section of the same name
 nano /etc/ssl/private/nginx-test.adamlistek.me.key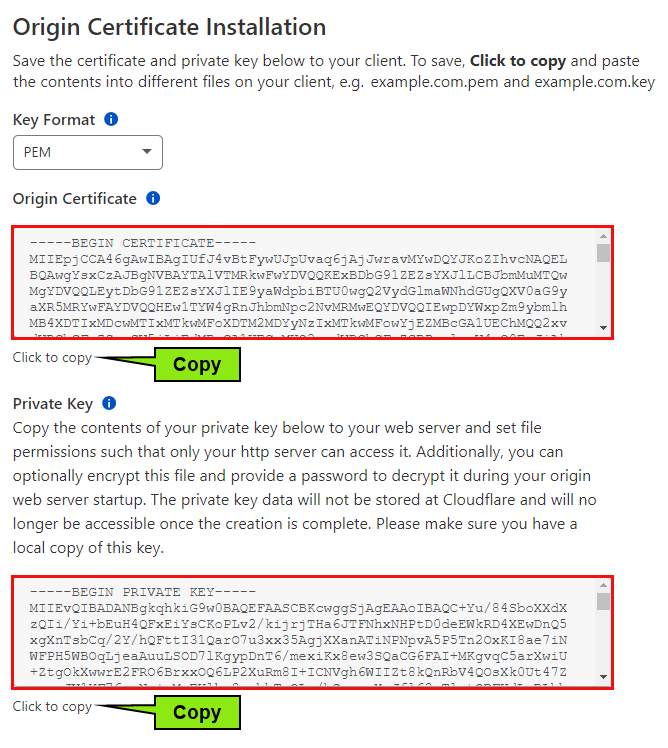
4. Now you’ve created the public and private keys, point NGINX to the location of the certificates. Do so by modifying the test.adamlistek.me.conf configuration file with the below lines, modified to support your domain.
 ssl_certificate /etc/ssl/certs/nginx-test.adamlistek.me.crt;
 ssl_certificate_key /etc/ssl/private/nginx-test.adamlistek.me.key;
5. To apply the new certificates, restart NGINX with the following command.
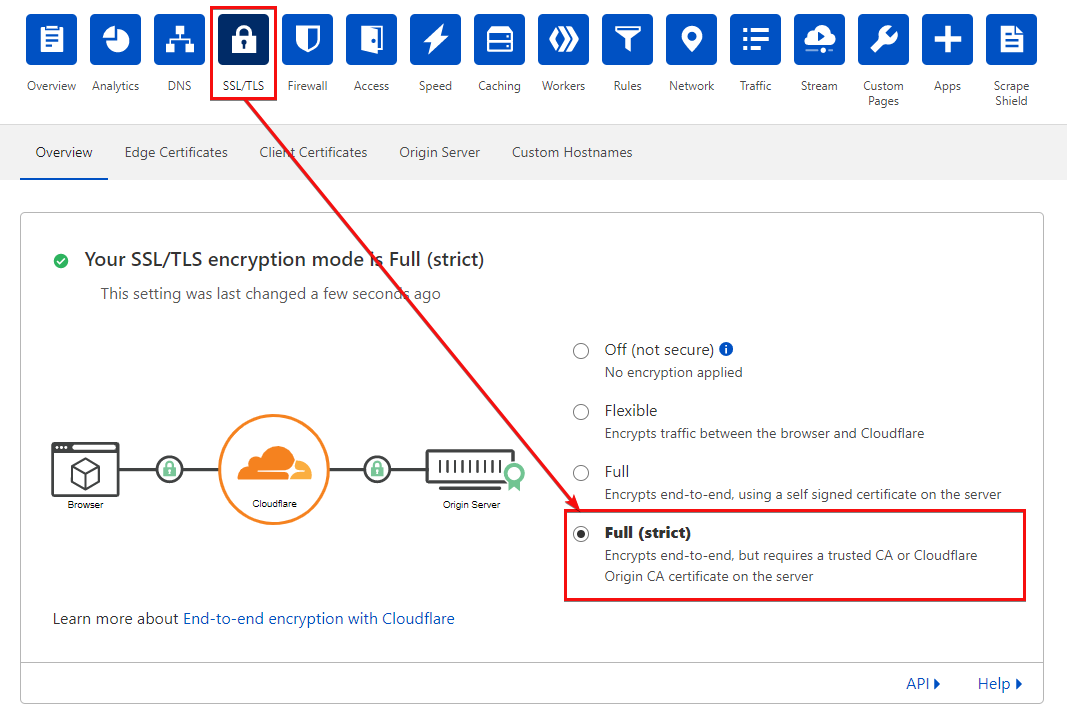
service nginx restart6. Now back to the SSL/TLS tab in Cloudflare, update the SSL/TLS encryption mode by clicking on Full (strict), as you see below.

Enabling Full (strict) SSL/TLS Encryption with LetsEncrypt
The biggest downside with using a Cloudflare origin certificate is that it’s only Cloudflare-trusted. Suppose you need a fully browser-trusted certificate, either as a fallback or for further control. In that case, LetsEncrypt offers the ability to generate a proper certificate.
Although you can use any valid certificate, LetsEncrypt is a common choice to generate a valid certificate. There are multiple LetsEncrypt clients available, but this tutorial demonstrates the acme.sh client.
Since you’re already on Cloudflare, one of the best methods for DNS provisioning with LetsEncrypt is via the DNS option.
1. First, open your terminal and install acme.sh via the curl command.
curl https://get.acme.sh | sh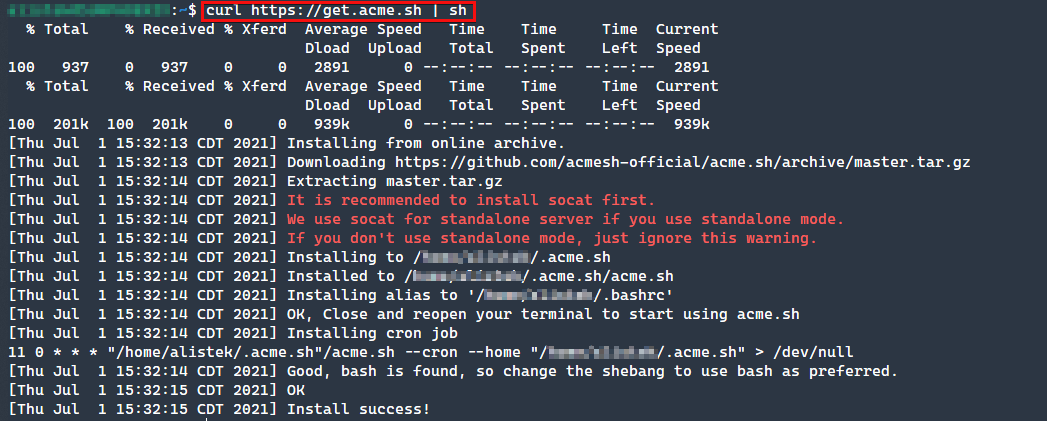
2. Next is to create or modify the account.conf file located in the installation directory to add the saved Cloudflare API keys. These keys can be found in the Profile —> API tokens section of the Cloudflare dashboard.
Although you can create a specific permission-limited token, for the purposes of this tutorial, apply the Global API Key instead, as shown below.
SAVED_CF_Key='cloudflareglobalapikey'
 SAVED_CF_Email='[email protected]'
3. Generate the certificate via the following command. Notice the command below tells acme.sh client to use Cloudflare (dns_cf) to verify (--dns) ownership of the certificate. Then sets the waiting time (--dnsslep) to 20 seconds before issuing (--issue) the certificate to (-d) the domain (test.adamlistek.me).
When the command completes, below, you’ll see the paths where you can locate your certificate, certificate key, intermediate CA certificate, and full chain certificates.
acme.sh --issue --dns dns_cf --dnssleep 20 -d test.adamlistek.me
4. Like before, modify the NGINX site configuration to change the location of the ssl_certificate and ssl_certificate_key. Make sure to replace /home/user with the location of where your acme.sh installation is.
ssl_certificate /home/user/.acme.sh/test.adamlistek.me/test.adamlistek.me.csr;
 ssl_certificate_key /home/user/.acme.sh/test.adamlistek.me/test.adamlistek.me.key;
5. Apply the new configuration by restarting NGINX with the following command.
service nginx restart6. Finally, update your Cloudflare SSL/TLS encryption mode by going to SSL/TLS tab, then click on Full (strict).
Conclusion
Throughout this tutorial, you’ve learned how to secure your site with the various Cloudflare provided SSL/TLS options. Adding LetsEncrypt to your Cloudflare SSL configuration adds a flexible and user-managed origin certificate option as well!
With the knowledge of various options to secure the connection to the site visitor, will you work way up to a fully secure connection to your server with Cloudflare SSL?


