


Windows updates are a critical component of both Windows client and server operating systems. They keep Windows secure and are supposed to be automatic. But when you find yourself needing to clear a Windows Update cache or deal with a “Windows Update Client failed to detect with error“, that automatic nature soon changes.
In this article, you’re going to learn to troubleshoot Windows Updates at the client level. You’ll learn how Windows Updates work (at a high level), how to perform basic troubleshooting using logs and how to fix common Windows Update issues.
Prerequisites
To ensure all of steps this tutorial covers will apply to you, please be sure you have the following:
- A Windows 7+ or Windows Server 2012+ machine – The demo environment used in this tutorial was running Windows 10 Build 1909 but Windows 7 (and possibly earlier versions) will work as well.
- Logged into Windows as an administrative user. You’ll need to run some commands as administrator.
The Windows Update Agent (WUA)
The primary culprit when it comes to problems with Windows Update is the Windows Update agent. The agent is in charge of coordinating detecting, downloading, and installing updates. The agent is what coordinates the Windows Update service (wuauserv) and is a DLL library located in C:\Windows\System32 called wuaueng.dll.
Sometimes, on Windows 8.1/Windows Server 2012 and earlier operating systems, it was necessary to update the agent to a later version. Although updating the agent is far less common and necessary, if you’re running an older operating system, you should ensure it’s running the latest agent version.
To check for the agent version installed on your computer:
- Open up Windows File Explorer.
- Navigate to the C:\Windows\System32 folder.
- Find the wuaueng.dll file, right-click on it and go to Properties.
- In the Properties windows, click on the Details tab as shown below. The WUA version will be the File version.
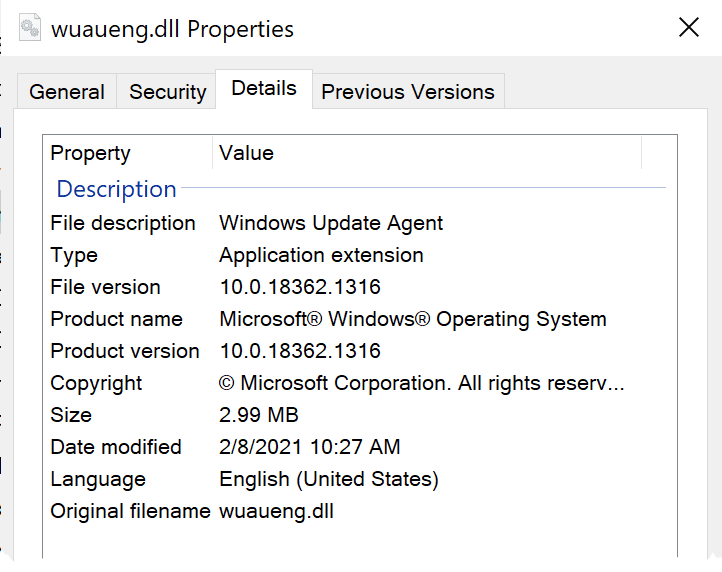
Typically, with Windows 10 and later versions, the WUA will always be at the latest version already. To be sure though, be sure to check the Microsoft documentation.
How to Fix Windows Update Issues
Rather than give you more background on Windows Updates, let’s get down to brass tacks. Let’s cover how you can clear the Windows update cache and potentially fix many of those annoying “Windows Update Client failed to detect with error” error message you’re getting.
Reproduce the Issue and Inspect the Windows Update Log
To troubleshoot any issue on a computer, you must be able to reproduce it. Chasing down a problem that only randomly pops up can be one of the most annoying tasks ever.
Before changing anything on the computer, you should first invoke a full update process. This update process will detect available updates and, depending on if you have automatic downloads and installation set, will also download and install updates.
To kick off the update process on Windows 10:
- Click on the Start Menu and type in powershell.
- Right-click on Windows PowerShell and click Run as Administrator.
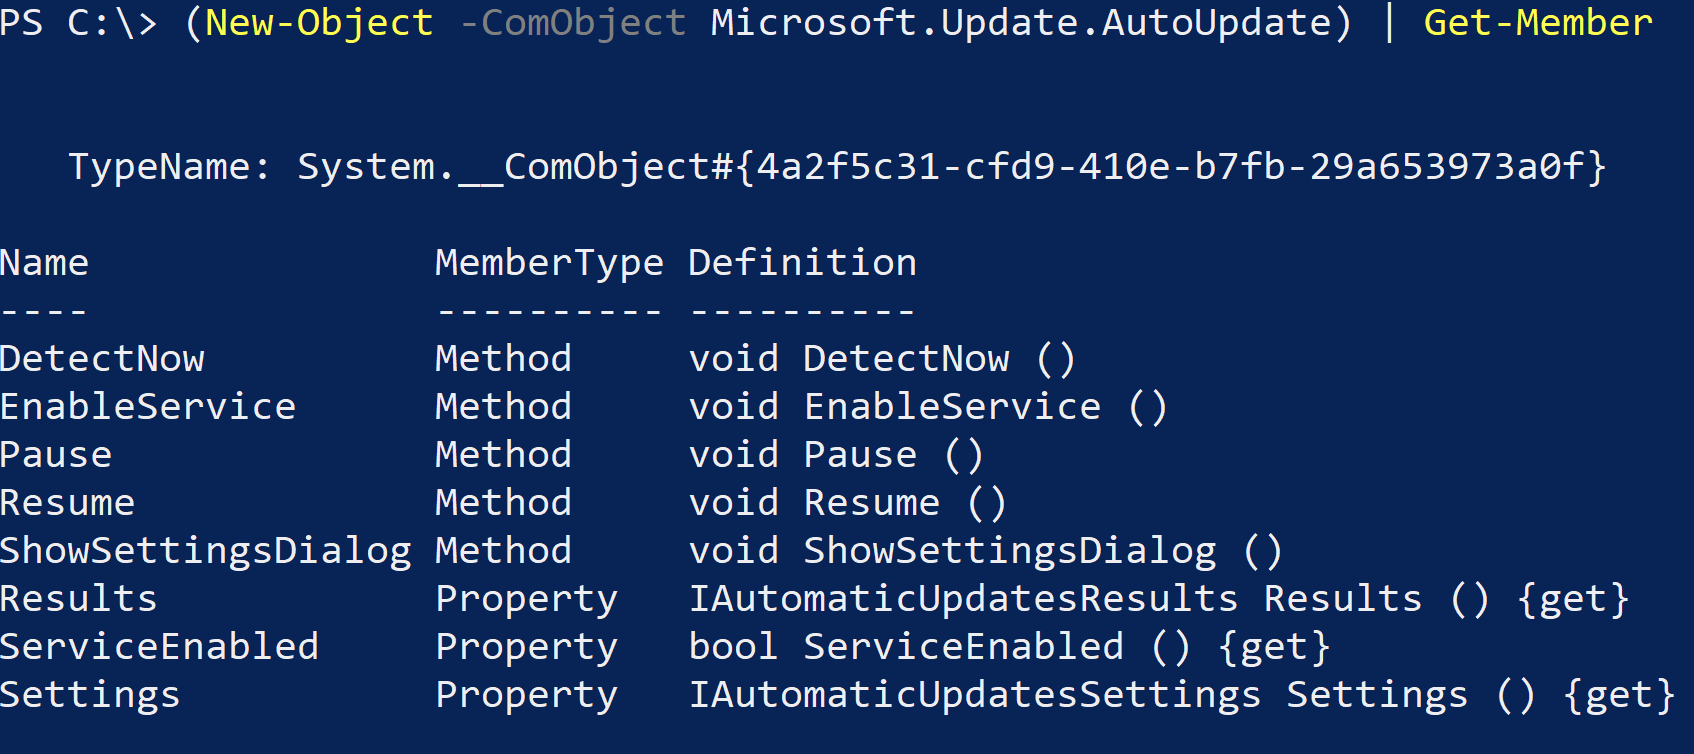
- In your PowerShell console, create a new AutoUpdate COM object and invoke the
DetectNow()method. PowerShell gives you programmatic access to the AutoUpdate COM object to invoke the method that kicks off the Windows Update agent.
(New-Object -ComObject Microsoft.Update.AutoUpdate).DetectNow()4. You can see that the AutoUpdate COM object has other methods on it too that may come in handy down the road.
If you’re running Windows 8.1/Server 2012 or older, you may also use the Windows Update client (C:\Windows\System32\wuauclt.exe) with the
/detectnowswitch. As of Windows 10 though, PowerShell has replaced this switch.
When you run the above PowerShell command, you should get no output. How do you know it did anything? Check the Windows Update log.
5. While still in PowerShell run the Get-WindowsUpdateLog command. This command collects all Windows Update events and creates a WindowsUpdate.log text file in the current directory.
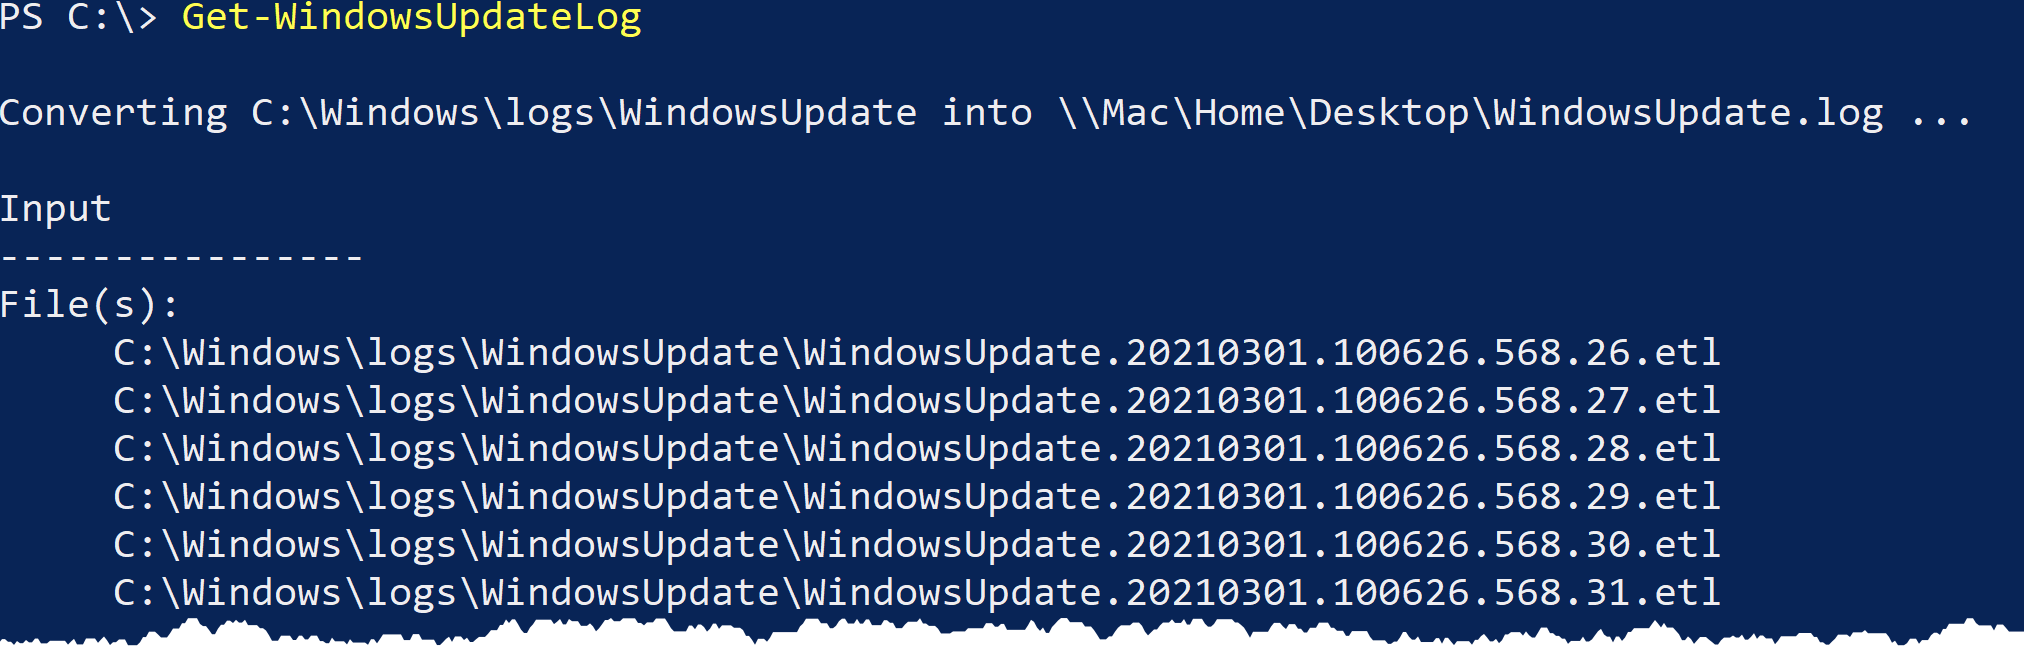
Windows 10 uses event tracing for Windows (ETW) to generate diagnostic logs. You can no longer read the C:\Windows\System32\WindowsUpdate.log log file directly.
6. Inspect the WindowsUpdate.log file and you should see a few lines similar to below. These lines indicate when the WUA initiates. From here, scroll down and notice if you can see any problems.

Confirm Critical Services are Started
Window Updates depends on four Windows services to function correctly:
- Background Intelligent Transfer Service (BITS)
- Windows Update service
- Cryptographic Services
- Windows Installer
If any of the above services are stopped (excluding Windows Installer), updates will fail to work.
To check on important services, use the Windows Services Manager option or use PowerShell. Since you probably already have PowerShell open, let’s go that route.
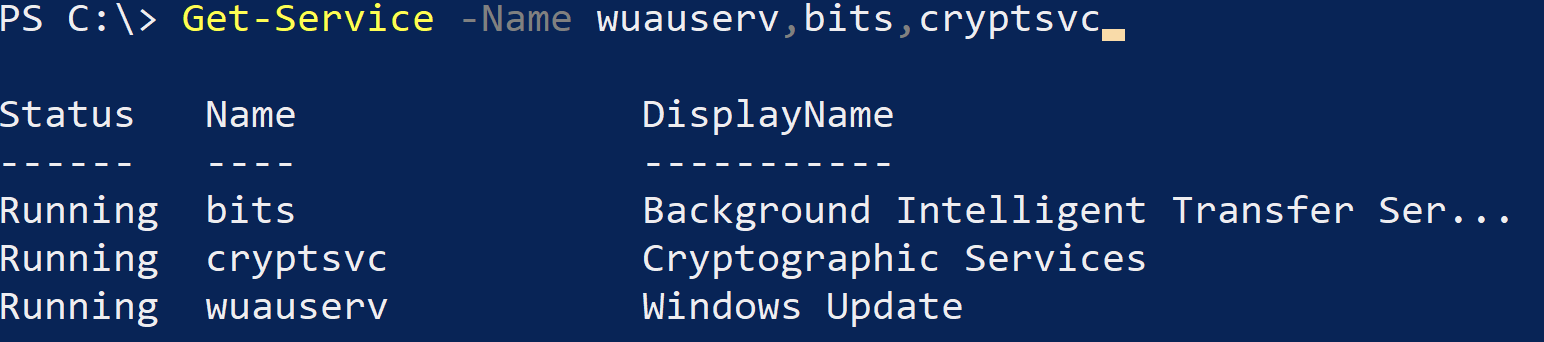
To check on the status of each service use the Get-Service PowerShell command as shown below.
Get-Service -Name wuauserv,bits,cryptsvcNotice below that both services have a Status of Running. If you don’t see this, you’ll need to start them.
To start the services, hit the Up arrow on your keyboard to bring up the last command and then add the Start-Service command to the end like below.
Get-Service -Name wuauserv,bits,cryptsvc | Start-ServiceClearing the Windows Update Cache
If the services are running and you’re still having trouble with Automatic Updates, it’s time to clear the Windows Update cache. When Windows downloads and install updates, it downloads metadata and sometimes caches the binaries for each update.
Depending on what you define as the “cache”, there are different levels of intrusiveness you can apply to this approach. You should start from the least intrusive and test again. If you’re still seeing a problem, proceed to the next troubleshooting step.
Removing the Qmgr DAT Files
One of the most least intrusive ways of clearing the Windows Update cache is to remove all qmgr files from %ALLUSERSPROFILE%\Application Data\Microsoft\Network\Downloader folder. But first, you must stop all of the applicable services mentioned above.
Get-Service -Name wuauserv,bits,cryptsvc | Stop-ServiceOnce you’ve stopped all of the services, run the following:
Remove-Item -Path "$env:ALLUSERSPROFILE\Application Data\Microsoft\Network\Downloader\qmgr*.dat"While attempting to remove qmgr files, you may receive an error stating “The process cannot access the file because it is being used by another process”. If so, restart your computer and try again. If the error continues, reboot Windows in safe mode and try again.
PowerShell should should remove all caches updates. Once it’s done, start up the services again and cross your fingers!
Get-Service -Name wuauserv,bits,cryptsvc | Start-ServiceGoing Nuclear: Resetting the Windows Update Cache
If the above step didn’t help, it’s time to go nuclear. It’s time to completely reset the entire Windows Update caching system back to default settings.
The “Window Update cache” is not really one component; it’s a combination of components. In the above sections, you were just manipulating the services and file system. Windows Update also has settings in the registry and registers many different DLL files.
Let’s now step through a PowerShell script you can use to reset the Windows Update cache which will make any necessary registry modifications, remove any cached updates and also handle some common issues with Windows Server Update Services (WSUS).
To run the below script:
- Click on your start menu and type ise.
- Right-click on PowerShell ISE and click Run as Administrator.
- Click on View and then click on Show Script Pane. This action should bring up a place where you can write a script in.
- Copy the below script into the script pane.
Write-Host 'Stopping all necessary services…'
Get-Service -Name wuauserv,bits,cryptsvc,msiserver | Stop-Service

Write-Host 'Removing all qmgr.dat files…'
Remove-Item -Path "$env:ALLUSERSPROFILE\Application Data\Microsoft\Network\Downloader\qmgr*.dat"

Write-Host 'Backing up Windows Update cache folders…'
Rename-Item -Path "$env:SYSTEMROOT\SoftwareDistribution\DataStore" -NewName 'DataStore.bak'
Rename-Item -Path "$env:SYSTEMROOT\SoftwareDistribution\Download" -NewName 'Download.bak'
Rename-Item -Path "$env:SYSTEMROOT\System32\catroot2" -NewName 'catroot2.bak'

Write-Host 'Resetting BITS and Windows Update services security descriptors…'
$null = Start-Process -FilePath 'sc.exe' -ArgumentList 'sdset bits D:(A;;CCLCSWRPWPDTLOCRRC;;;SY)(A;;CCDCLCSWRPWPDTLOCRSDRCWDWO;;;BA)(A;;CCLCSWLOCRRC;;;AU)(A;;CCLCSWRPWPDTLOCRRC;;;PU)'
$null = Start-Process -FilePath 'sc.exe' -ArgumentList 'sdset wuauserv D:(A;;CCLCSWRPWPDTLOCRRC;;;SY)(A;;CCDCLCSWRPWPDTLOCRSDRCWDWO;;;BA)(A;;CCLCSWLOCRRC;;;AU)(A;;CCLCSWRPWPDTLOCRRC;;;PU)'

Write-Host 'Re-registering all requisite DLLs…'
$dlls = @(
     'atl.dll'
     'urlmon.dll'
     'mshtml.dll'
     'shdocvw.dll'
     'browseui.dll'
     'jscript.dll'
     'vbscript.dll'
     'scrrun.dll'
     'msxml.dll'
     'msxml3.dll'
     'msxml6.dll'
     'actxprxy.dll'
     'softpub.dll'
     'wintrust.dll'
     'dssenh.dll'
     'rsaenh.dll'
     'gpkcsp.dll'
     'sccbase.dll'
     'slbcsp.dll'
     'cryptdlg.dll'
     'oleaut32.dll'
     'ole32.dll'
     'shell32.dll'
     'initpki.dll'
     'wuapi.dll'
     'wuaueng.dll'
     'wuaueng1.dll'
     'wucltui.dll'
     'wups.dll'
     'wups2.dll'
     'wuweb.dll'
     'qmgr.dll'
     'qmgrprxy.dll'
     'wucltux.dll'
     'muweb.dll'
     'wuwebv.dll'
)
foreach ($dll in $dlls) {
    regsvr32.exe "$env:SYSTEMROOT\System32\$dll" /s
}

Write-Host 'Removing WSUS registry values…'
@('AccountDomainSid','PingID','SusClientId','SusClientIDValidation') | ForEach-Object {
     Remove-ItemProperty -Path "HKLM:\SOFTWARE\Microsoft\Windows\CurrentVersion\WindowsUpdate" -Name $_ -ErrorAction Ignore
}

## Resets computer group membership
Write-Host 'Resetting WSUS client cookie..,'
$null = wuauclt.exe /resetauthorization

Write-Host 'Starting all necessary services…'
Get-Service -Name wuauserv,bits,cryptsvc | Start-Service

Write-Host 'Initiating update cycle…'
(New-Object -ComObject Microsoft.Update.AutoUpdate).DetectNow()
Write-Host 'Windows Update reset complete.'
5. Click on File —> Save and save the script somewhere on your computer. This tutorial will assume it’s in C:\FixWindowsUpdates.ps1.
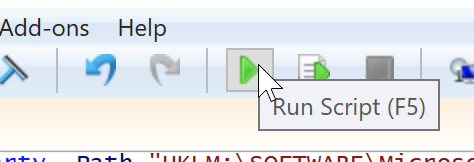
6. Click on the green triangle in the PowerShell ISE to run the script.
If you’re more of a fan of a GUI, you can also find a tool that performs similar steps. But, I can’t confirm it covers the exact same steps given in the PowerShell script from above.
Conclusion
To get necessary updates to download and install automatically in the background on a Windows machine is an orchestration of many tasks. Although, you may run into dozens of different error messages, the tips and scripts you’ve learned in this guide should help you remediate just about all of them.


