


Have you downloaded a file only to discover that the file has been corrupted or changed? The best way to confirm a file’s integrity is to verify the file’s checksum or hash. Lucky for you, there are several ways to verify a file’s checksum in Windows.
Keep reading because you’ll learn several ways to compute a file’s checksum in Windows for free! Learn using built-in Windows tools and third-party utilities to generate a file’s checksum value.
In this article, you will learn how to create a checksum in Windows using five different tools. By the end, you should definitely know how to create hashes in Windows!
Prerequisites
Since this is a how-to article, you will follow the learning-by-doing approach. Some tools used in this article are built-in or provided by Microsoft; some are also from third-party sources. To follow along, make sure you have at least a computer running Windows 10 or at a minimum Windows Server 2012.
Prerequisites for each method of generating checksums will be provided as needed.
The File Checksum Integrity Verifier (FCIV)
The File Checksum Integrity Verifier (FCIV) Microsoft tool was originally introduced in Windows Server 2012 R2 and is available for all future versions.
Suppose that you’ve installed the FCIV tool in C:\Tools\fciv.exe. Run the command below in a command prompt or PowerShell prompt to generate the MD5 checksum of the file VSCodeUserSetup-x64-1.52.1.exe. If your file is located elsewhere, modify the location appropriately.
C:\Tools\fciv.exe C:\downloads\VSCodeUserSetup-x64-1.52.1.exe
After running the FCIV command, you will see a similar result as shown in the screenshot below. As you can see, the fciv.exe command generated the MD5 hash, by default, for the given file.

fciv.exe.FCIV can only generate MD5 or SHA-1 file hashes.
Now that you have computed an MD5 checksum, why not generate the file’s SHA-1 checksum as well? To create the SHA-1 checksum of the same file used in the above example, add the sha1 option to the end of the existing command. As shown in the screenshot below, the SHA-1 hash is generated for the same file as before.
C:\Tools\fciv.exe C:\downloads\VSCodeUserSetup-x64-1.52.1.exe -sha1

fciv.exe.Good job! You’ve created both an MD5 and SHA-1 checksum value. Why not generate both the MD5 and SHA-1 hash values at the same time? Instead of using the sha1 option, use both.
C:\Tools\fciv.exe C:\downloads\VSCodeUserSetup-x64-1.52.1.exe -both
The resulting hash values are labeled as MD5 and SHA-1. Using the both parameter saves time when you need to generate both MD5 and SHA-1 hash values.

fciv.exe.While FCIV is a handy tool for computing file hashes, FCIV is older, and the hashing algorithms are limited to MD5 and SHA-1. Microsoft officially declared that FCIV is an unsupported command-line tool . Despite this, in the absence of other tools, FCIV can still serve as a great alternative.
At this point, you’ve created MD5 and SHA-1 hash values using the fciv.exe tool. What do you think so far? I know you’re ready to learn the next tool.
Using Certutil
Certutil is another excellent tool to generate a file’s checksum in Windows. The exact program name is certutil.exe, which is available out-of-the-box.
The primary purpose of certutil.exe is for certificates. But, certutil.exe has a feature for creating file checksum’s in Windows using the following hash algorithms:
- MD2
- MD4
- MD5
- SHA1
- SHA256
- SHA384
- SHA512
Let’s see how it works.
Fire up PowerShell or a command prompt to start computing file checksums, using the syntax shown below.
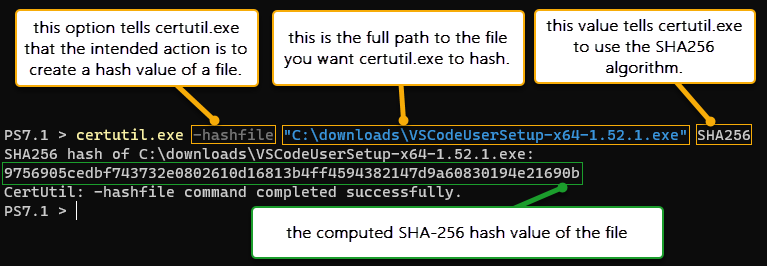
certutil.exe -hashfile [Path to File] [Hash Algorithm]
In the example below, certutil.exe generates the SHA-256 hash of the file C:\downloads\VSCodeUserSetup-x64-1.52.1.exe, as demonstrated in the resulting screenshot.
certutil.exe -hashfile "C:\downloads\VSCodeUserSetup-x64-1.52.1.exe" SHA256
certutil.exe to create a file checksum.You now know how to use certutil.exe to create a file checksum. To practice, try generating the file’s hash value using all of the other available algorithms. Read on to learn how to use Get-FileHash and PowerShell to generate a file hash!
Did you know that hashing algorithms, such as SHA-256, are also used when creating SSL certificates?
Using the PowerShell Get-FileHash Cmdlet
You’ve been reading about and using command-line tools to create file checksums in Windows since the start of this article. One more command-line tool that you will learn how to use is the Get-FileHashPowerShell cmdlet.
Before using Get-FileHash, refer to the syntax below to familiarise yourself with the available parameters. Use the Path parameter to specify a target file, and the Algorithm parameter to indicate which hash algorithm to use.
Get-FileHash -Path [path to file] -Algorithm [Hash Algorithm]
The available hash algorithms for Get-FileHash are listed below. You’ll notice that the choices of hash algorithms are different than what FCIV and CertUtil offer. Additionally, older and more vulnerable algorithms are no longer included, such as the MD1 and MD4 algorithms.
- SHA1
- SHA256
- SHA384
- SHA512
- MACTripleDES
- MD5
- RIPEMD160
The command below computes the hash value of the file VSCodeUserSetup-x64-1.52.1.exe using the SHA-256 algorithm. Copy and run the code below in PowerShell to test, making sure to change the file path as needed.
Get-FileHash -Path C:\downloads\VSCodeUserSetup-x64-1.52.1.exe -Algorithm sha256
As you can see in the screenshot below, the Get-FileHash command computed the file’s SHA-256 hash as specified with the -Algorithm sha256 parameter.

Get-FileHash to compute the SHA-256 checksum of a file.If you want to compute the file’s checksum using different algorithms, you only need to change the Algorithm parameter value. Do you think you can now create the SHA-512 checksum of a file using Get-FileHash? I bet you can!
Generating Hashes For Multiple Files Simultaneously
With Get-FileHash, it is possible to generate the checksum of multiple files at the same time. The example code below stores the list of file paths within the $files variable. Next, the Get-FileHash consumes the $files variable to calculate the SHA-256 checksum for each file, as shown in the screenshot below.
$files = @(
    'C:\downloads\PowerShell-7.1.0-win-x64.msi',
    'C:\downloads\VSCodeUserSetup-x64-1.52.1.exe'
)
Get-FileHash -Path $files -Algorithm sha256
Get-FileHash to compute the hash values for each file stored in the $files array.What if you need to generate a hash for a folder full of files? Instead of manually crafting the $files array, use the Get-ChildItem cmdlet to retrieve the list of files in a given folder.
In the command below, the Get-ChildItem cmdlet retrieves the list of files inside the c:\downloads folder. The result is then passed via the PowerShell pipeline to the Get-FileHash cmdlet, which in turn computes each file’s SHA-256 hash value.
(Get-ChildItem C:\downloads).Fullname | Get-FileHash -Algorithm sha256
Depending on the file sizes, the time it takes to generate a checksum may vary. In this example, the command took approximately twenty seconds to compute the checksum of an 8GB ISO file. The result should look similar to the screenshot below.

Get-ChildItem and Get-FileHash to compute the hash values for each file in a folder.Using Third-Party Tools to Create File Checksums in Windows
If for some reason, you find that the built-in tools to generate file checksums in Windows are not enough, there are third-party tools available. Not all third-party tools are free, but a few free and popular utilities are shown below.
7-Zip
Are you tired of using the command-line and are looking for a graphical tool to create file checksum in Windows? 7-zip is a popular and free file compression tool that is capable of generating a file’s hash value.
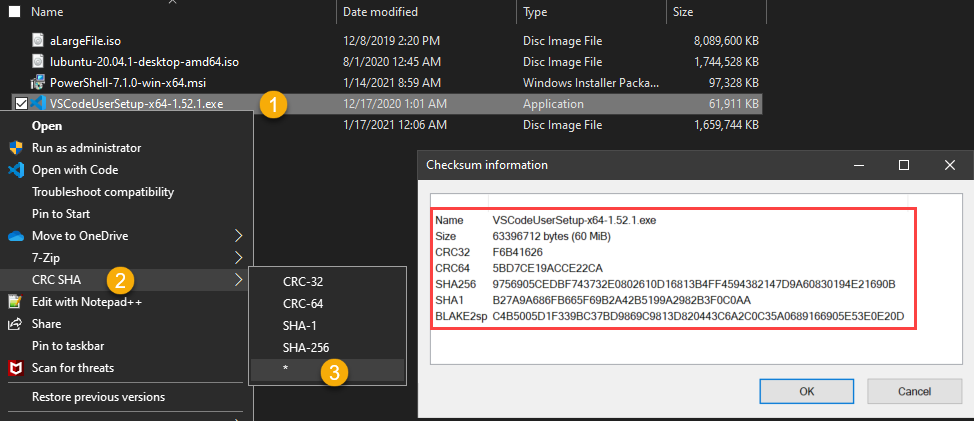
Installing 7-zip on your computer automatically adds a context menu option to generate the checksum of a file. To get the hash value of a file, follow these steps:
- Right-click on the file to generate the checksum.
- Select the CRC SHA menu option to list the available hash algorithms.
- Finally, click on the hash algorithm you wish to use.
In the example below, the asterisk (*) option displays the file’s hash value using all available algorithms. How’s that for easy?
Next, learn how to use the HashMyFiles tool to generate multiple file’s checksum’s as an alternative to 7-Zip!
HashMyFiles
Forget about command-line and right-click. HashMyFiles can create the checksum or hash values of a single file, multiple files, or entire directories using drag and drop.
Launch the HashMyFiles program and drag the files or folders to generate a hash for into the HashMyFiles main window. As shown below, the main window displays the files and associated hashes in a table format, with additional information available in the properties window.
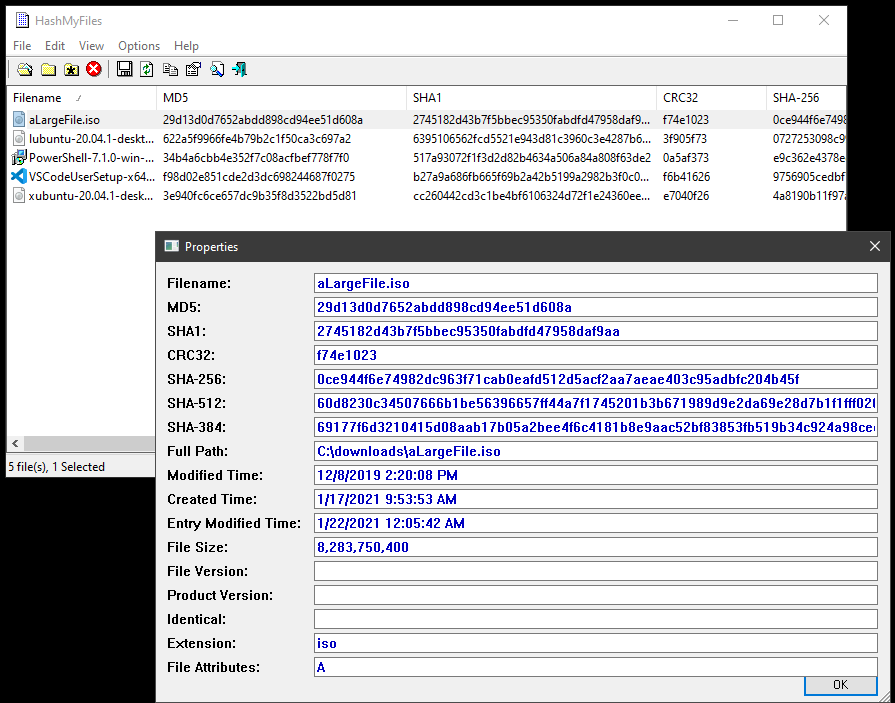
What’s more, HashMyFiles can export the hash or checksum values to an HTML report or a tab-delimited file. This export feature is useful when you want to keep a record of the file checksum values.
Next Steps
In this article, you’ve learned that there are several ways to create a file checksum in Windows. Microsoft has built-in command-line tools such as certutil.exe and Get-FileHash.
There are third-party tools as well that are free and relatively easy to use. Whatever your choice of tool to generate file hash values, the concept and result is the same for every hash algorithm.
What’s next for you? Maybe put your scripting skills to the test and create a checksum inventory of crucial files using any of the tools you learned about in this article.


