

The Secure Shell (SSH) protocol and the OpenSSH project have been around for decades on Linux. But OpenSSH on Windows hasn’t been embraced in the Windows world until recently. As such, a Windows Server doesn’t typically come pre-built and ready to go and requires some setup.
Not a reader? Watch this related video tutorial!In this tutorial, you’re going to learn how to SSH into your Windows Server just as easily as Linux. You’ll learn how to get OpenSSH installed (or updated) on Windows, add appropriate firewall rules, and configure public key, password, and certificate-based authentication.
Prerequisites
To effectively follow the examples and demos in this article, you’ll need to meet these requirements below.
- A Windows Server machine – This article will use Windows Server 2019 Datacenter. The server this tutorial will use will have a user account called june and will connect to the server at the IP address of 40.117.77.227 with a hostname of ataWindows.
- A local computer with PowerShell 7.1 installed. PowerShell 7.1 is available in Windows, Linux, and macOS. The examples in this article use PowerShell 7.1 in Windows 10.
Downloading OpenSSH
Unlike Linux servers, Windows servers do not have an out-of-the-box SSH server running. But Microsoft has released an open-source port of OpenSSH for Windows. With this release, you can now set up an SSH server on a Windows machine.
To get started, you’ll first need to download OpenSSH. To do so, follow the steps below:
- Connect to the desktop on a Windows Server using Remote Desktop (RDP) or your preferred desktop manager client.
2. On your Windows Server desktop, open an elevated Windows PowerShell console.
3. Next, copy the code below, paste it in the PowerShell window, and press Enter. This script will download the latest OpenSSH release, which as of this writing, is v8.1.0.0p1-Beta to the current working directory.
If you like to save the PowerShell code to download OpenSSH, you can also open a code editor like Windows PowerShell ISE or Visual Studio Code and save it in there.
## Set network connection protocol to TLS 1.2
## Define the OpenSSH latest release url
 $url = 'https://github.com/PowerShell/Win32-OpenSSH/releases/latest/'
## Create a web request to retrieve the latest release download link
 $request = [System.Net.WebRequest]::Create($url)
 $request.AllowAutoRedirect=$false
 $response=$request.GetResponse()
 $source = $([String]$response.GetResponseHeader("Location")).Replace('tag','download') + '/OpenSSH-Win64.zip'
## Download the latest OpenSSH for Windows package to the current working directory
 $webClient = [System.Net.WebClient]::new()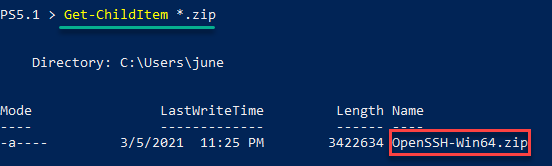
$webClient.DownloadFile($source, (Get-Location).Path + '\OpenSSH-Win64.zip')4. The OpenSSH-Win64.zip file should now be in your current working directory. Verify this by running the command below.
Get-ChildItem *.zipAs you can see below, the OpenSSH-Win64.zip file exists in the directory.
Installing OpenSSH
After you’ve downloaded OpenSSH-Win64.zip, the next step is to install OpenSSH on the server. There’s no installation wizard in case you’re expecting it.
- While still in the same PowerShell session, copy the code below and run it in PowerShell. This code extracts the OpenSSH-Win64.zip file contents to C:\Program Files\OpenSSH.
# Extract the ZIP to a temporary location
Expand-Archive -Path .\OpenSSH-Win64.zip -DestinationPath ($env:temp) -Force
# Move the extracted ZIP contents from the temporary location to C:\Program Files\OpenSSH\
Move-Item "$($env:temp)\OpenSSH-Win64" -Destination "C:\Program Files\OpenSSH\" -Force
# Unblock the files in C:\Program Files\OpenSSH\
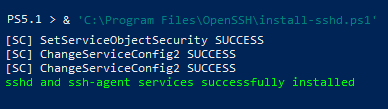
Get-ChildItem -Path "C:\Program Files\OpenSSH\" | Unblock-File2. After extracting the ZIP file, run the command below in PowerShell to execute the script C:\Program Files\OpenSSH\install-sshd.ps1. This script installs the OpenSSH SSH Server service (sshd) and OpenSSH Authentication Agent service (sshd-agent).
& 'C:\Program Files\OpenSSH\install-sshd.ps1'You can see the expected result below.
To ensure that the SSH server starts automatically, run the command below in PowerShell.
## changes the sshd service's startup type from manual to automatic.
 Set-Service sshd -StartupType Automatic
## starts the sshd service.
 Start-Service sshd
Adding a Windows Firewall Rule to Allow SSH Traffic
This procedure is applicable only if your Windows Server is using the Windows Firewall. For servers using third-party firewalls, refer to your firewall documentation on how to allow port 22.
Installing OpenSSH does not automatically create a firewall exception rule to allow SSH traffic. Therefore, your next task is to create the firewall rule manually.
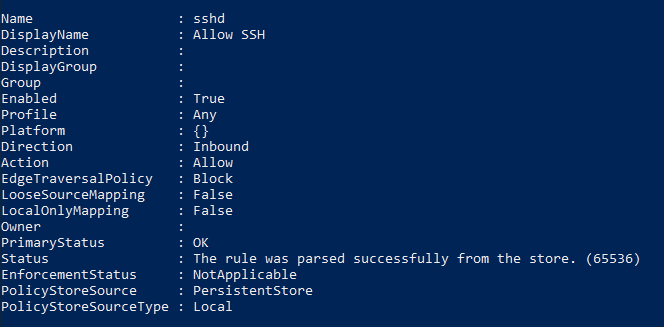
One of the easiest ways to create a new Windows Firewall rule is with PowerShell and the New-NetFirewallRule cmdlet. The command below creates a firewall rule called Allow SSH that allows all inbound TCP traffic destined to port 22.
Copy the command below and run it in PowerShell.
New-NetFirewallRule -Name sshd -DisplayName 'Allow SSH' -Enabled True -Direction Inbound -Protocol TCP -Action Allow -LocalPort 22The below screenshot shows the expected output in PowerShell after creating the firewall rule.
Connecting with SSH using Password Authentication
At this point, you’ve installed OpenSSH on Windows and performed the initial server configuration. The next step is to test whether connecting via SSH actually works.
To test your newly configured SSH server, let’s now run the ssh command on your local computer.
The same steps in this section also apply when connecting to a Linux SSH server.
1. From your local computer this time, open PowerShell.
2. Next, run the command below to start the SSH login process. Make sure to change the username and the remote host of your Windows Server.
3. Since you’re connecting for the first time to the server, you will see a prompt saying that the authenticity of the host can’t be established. The message means that your computer does not recognize the remote host yet. Type yes and press Enter to continue.
4. When prompted for the password, type in your account password and press enter.

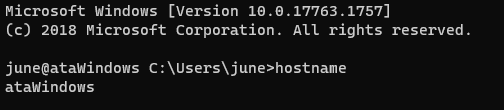
5. After logging in, as you can see in the screenshot below, you’ll arrive at the remote host’s command prompt. Suppose you want to confirm that you’ve entered the session on the remote host. To do so, type hostname, and press Enter. The command should return the remote computer name.
Changing the Default Shell for OpenSSH to PowerShell
When you first logged in to your Windows SSH server, you’ll notice that the default shell or command interpreter is CMD. Having CMD as the default SSH shell is fine, but if you prefer to use PowerShell as the default shell instead, follow these steps.
To change the default OpenSSH shell from CMD to PowerShell:
First, open an elevated PowerShell window on your Windows Server, if you don’t have one open already.
Next, create a new registry string value called DefaultShell in the registry key HKLM:\SOFTWARE\OpenSSH. Set the DefaultShell string data to the Windows PowerShell path C:\Windows\System32\WindowsPowerShell\v1.0\powershell.exe.
New-ItemProperty -Path "HKLM:\SOFTWARE\OpenSSH" -Name DefaultShell -Value "C:\Windows\System32\WindowsPowerShell\v1.0\powershell.exe" -PropertyType String -ForceThe screenshot below shows the expected result of the command.

Configuring Public Key Authentication
In the previous sections, you connected with a username and password. this works but a more secure way to authenticate with an SSH server is by using a key pair.
In a nutshell, a key pair consists of two keys called the public key and private key, which constitute a set of security credentials to prove your identity.
The public key is stored on the server, while the private key stays on the local computer. You must treat a private key like your password. If the private key is compromised, anyone can use it to gain access to your SSH server.
Preparing the administrators_authorized_keys File
Public keys have to be on the server. But where? For OpenSSH on Windows, the SSH server reads the public keys from the C:\ProgramData\ssh\administrators_authorized_keys file. But this file does not exist by default. You must create one first.
Follow these steps below to create the administrators_authorized_keys file and set its proper access control list (ACL).
On the Windows Server:
1. Open an elevated Windows PowerShell console if not already.
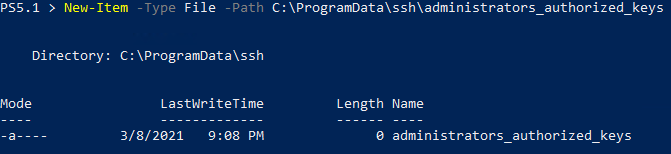
2. Copy the command below and run it in PowerShell. This command creates the administrators_authorized_keys file using the New-Item cmdlet.
New-Item -Type File -Path C:\ProgramData\ssh\administrators_authorized_keysYou should see a result similar to the screenshot below.
3. Next, get the ACL currently assigned to the ssh_host_dsa_key file and copy that ACL to the administrators_authorized_keys file. To do so, run the command below.
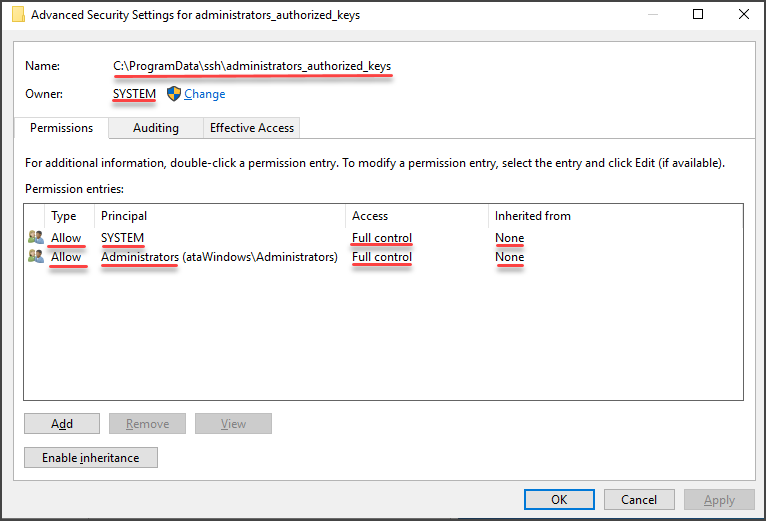
get-acl C:\ProgramData\ssh\ssh_host_dsa_key | set-acl C:\ProgramData\ssh\administrators_authorized_keysThe OpenSSH service requires that only the Administrators group and the SYSTEM account have access to the administrators_authorized_keys file. And copying the ACL of ssh_host_dsa_key to administrators_authorized_keys makes sense because the ACL is already set.
4. Now open up Windows Explorer.
5. Navigate to the C:\ProgramData\ssh\ folder.
6. Right-click on the administrators_authorized_keys file and click Properties.
7. On the properties page, click on the Security Tab and click Advanced.
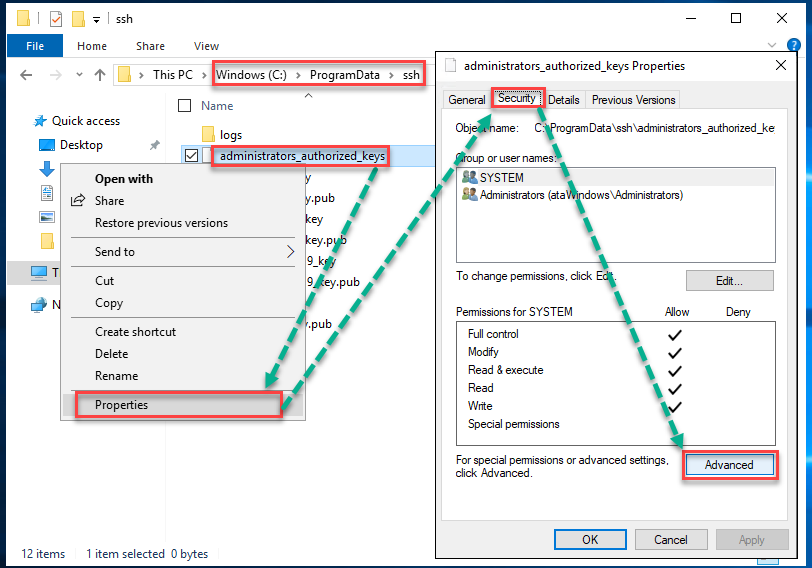
8. Then, confirm if the permissions are as shown like in the image below.
Generating a New SSH Key Pair
To generate a new SSH key pair, use the ssh-keygen command, which is part of the OpenSSH client tools built-in to Windows 10 (and above) and most Linux operating systems.
The example shown in this section works on both Windows and Linux computers.
On your local computer, in a PowerShell console:
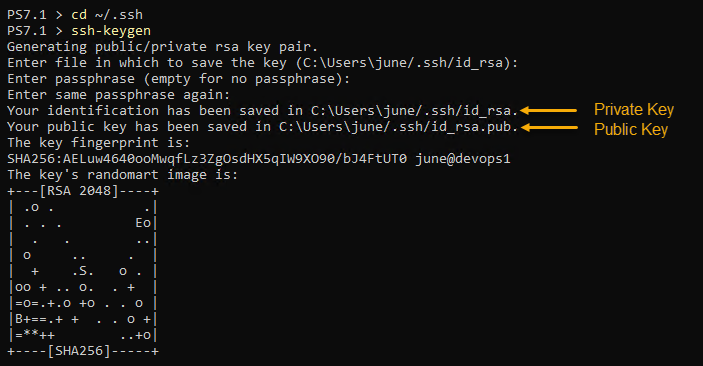
1. Navigate to your home folder’s .ssh directory by running the command below.
cd ~/.ssh2. Next, type in the command ssh-keygen and press Enter. When asked to enter a file location to save the key you’re generating, keep the default location and press Enter. Doing so allows your SSH client to find your SSH keys when authenticating automatically.
In Windows, the default key file is C:\Users\<username>\.ssh\id_rsa.
3. At the next prompt, leave the passphrase blank. At this point, you do not have to use a passphrase for testing.
Adding a passphrase to your private key significantly increases its security. A passphrase acts as a second-factor authentication (2FA) to your private key.
You’ll notice that the command created two files; id_rsa (private key) and id_rsa.pub (public key).
Deploying the Public Key to the Windows SSH Server
Now that you’ve generated your private-public key pair, your next step is to copy the public key to the C:\ProgramData\ssh\administrators_authorized_keys file on the SSH server.
On your local computer, in a PowerShell console:
1. Copy the code below and run it in PowerShell. Make sure to change the username and IP address first. You can refer to the comment above each command to know what each command does.
# Read the public key
 $public_key = Get-Content ~/.ssh/id_rsa.pub
# Append the public key to the administrators_authorized_keys on the server using ssh.
ssh [email protected] "'$($public_key)' | Out-File C:\ProgramData\ssh\administrators_authorized_keys -Encoding UTF8 -Append"2. Enter your password when prompted, and ssh will proceed to copy the public key. You will see a similar result, as shown below.

Connecting with SSH using Public Key Authentication
Now that you’ve copied your public key to your SSH server, you no longer need to use a password to authenticate. As you can see below, ssh did not prompt for a password.

Configuring Certificate Authentication
Like public key authentication, certificate authentication is passwordless or passphrase-protected. To enable certificate login, follow the same procedure of generating a key pair sans deploying the public key to the SSH server.
You do not need to map the public key to the authorized_keys or administrators_authorized_keys files on the SSH server. Instead, the public key is signed using a certificate authority (CA) key.
Creating the Certificate Authority (CA) Key
Generating the CA keys for signing is similar to generating a user key pair that you did earlier in this article. Only this time, you’ll need to specify a filename for the new CA keys. To do so, on your Windows Server in a PowerShell console:
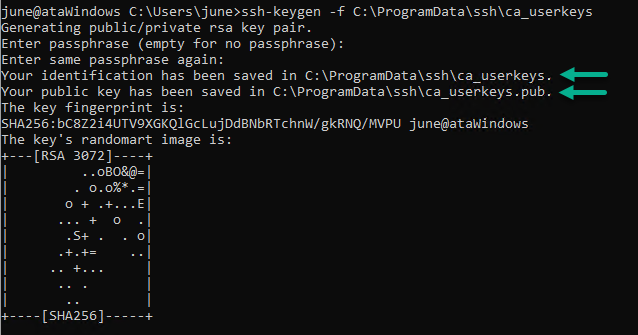
Execute the ssh-keygen command as shown below. This command creates the CA key in C:\ProgramData\ssh\ca_userkeys, but feel free to use a different file name. Using a different filename will not affect the CA key functionality.
When asked for a passphrase, leave the passphrase empty and press Enter.
ssh-keygen -f C:\ProgramData\ssh\ca_userkeysYou can see below that the command created two files. ca_userkeys, which is the private key, and ca_userkeys.pub, which is the public key.
Now that you’ve generated the CA keys, tell the SSH server to trust the CA and where to find the CA key. To do this, add a new line TrustedUserCAKeys path/to/ca_userkeys.pub to the C:\ProgramData\ssh\sshd_config file on the server.
Run the commands below to append the configuration item in the file sshd_config.
# If the SSH server is Windows
 echo TrustedUserCAKeys C:\ProgramData\ssh\ca_userkeys.pub>> C:\ProgramData\ssh\sshd_config
Signing the User’s Public Key
At this point, you’ve generated the CA keys and configured the SSH server to trust the CA public key file. What’s left now is to sign your user public key.
On your local computer, in a PowerShell console:
1. Copy the id_rsa.pub file to your home drive on the SSH server using the SCP command. Make sure to change the username and IP address to the correct values.
scp ((Resolve-Path ~/.ssh/id_rsa.pub).Path) [email protected]:id_rsa.pub2. Log in to your Windows Server using ssh. Once logged in, run ssh-keygen to sign the user’s public key. You’ll notice that the command below used several parameters. Let’s break them down.
-s C:\ProgramData\ssh\ca_userkeys– specify the CA key’s location for signing the public key. In this example, the CA key is the one you generated.-I id_username– specify the ID you want to assign to the signed user public key. Change theid_usernamevalue to any name you want.-V +4w– this parameter specifies the validity period for the signed key. In this example,+4wmeans that the signed user key will be valid for four weeks. You can change this value to your preferred validity period.-n username– this is the username of whom will own the signed public key.<path to id_rsa.pub>– this is the user public key’s location to sign (Windows).
ssh-keygen -s C:\ProgramData\ssh\ca_userkeys -I id_username -V +4w -n username ~/id_rsa.pubAfter you run the command in your SSH session, you should get a similar output, as shown below. As you can see, the command generated a new file called id_rsa-cert.pub, which is the signed user certificate.

3. Now, navigate back to your local computer PowerShell session and copy the id_rsa-cert.pub file from the server to your local computer. Change the username and IP address to the correct values first before running the command.
scp [email protected]:id_rsa-cert.pub ((Resolve-Path ~/.ssh/).Path)After the copy completes, you’ll find the signed user certificate in your home folder, as shown below.

Connecting with SSH using Certificate Authentication
You’ve configured certificate authentication, and now you have your user certificate. You should now test if you can connect the SSH server with certificate authentication.
The command to connect to SSH with a certificate is the same as using a password or public key. But, if you enabled public key authentication previously, disable it first. Otherwise, ssh will keep using your key pair instead of your certificate.
To disable your key-pair, remove your public key from the administrators_authorized_keys file. To do so, follow these steps.
Note that the succeeding commands will empty the whole administrators_authorized_keys file, effectively removing all mapped public keys. If you don’t want to clear all mapped public keys, use a text editor to remove selected public keys from each file manually.
While SSHed into the Windows Server:
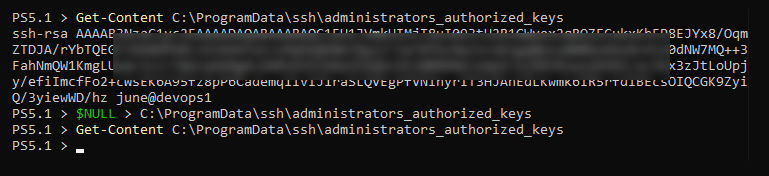
1. Run the below code in PowerShell to empty the administrators_authorized_keys file.
# Clear the administrators_authorized_keys file
 $NULL > C:\ProgramData\ssh\administrators_authorized_keys
# Confirm that the administrators_authorized_keys is empty
 Get-Content C:\ProgramData\ssh\administrators_authorized_keys
2. At this point, the authorized_keys and administrators_authorized_keys files are empty, as you can see in the screenshot below.
3. Type exit and press Enter to disconnect from your SSH session. You’ll be back to your PowerShell session.
4. After removing the public keys, your next ssh login attempt will use certificate authentication. The login experience will be the same as public key authentication.

Conclusion
You’ve now set up an OpenSSH Windows Server from scratch all the way to exploring and setting up various authentication means. You can now connect to your Windows Servers exactly how you would with Linux!


