

The SCP (Secure Copy) command is a non-interactive command for securely copying files and directories between two systems. SCP uses the SSH protocol for encryption and authentication, making it a secure way to transfer files between remote servers.
Not a reader? Watch this related video tutorial!If you’re looking for an awesome guide to using the SCP command, look no further. This tutorial will show you SCP command usage examples, which could help you become a confident SCP user.
Ready? Read on to take your file transfers to the next level!
Prerequisites
This tutorial will be a hands-on demonstration. If you’d like to follow along, be sure you have the following requirements.
- You’ll need two Linux computers to act as the copy source and the copy destination on the same or different networks. This tutorial will be using Ubuntu 20.04 computers, as listed in the table below.
| Computer Name | Designation |
| ubuntu1 | Source host |
| ubuntu2 | Destination host |
- If there’s a firewall on each or between the two computers, make sure that port 22 is open.
- This tutorial assumes that you have already opened an SSH session and logged on to both computers.
Copying a File using the SCP Command
There can be many reasons you’d want to copy files from one system to another. Perhaps for backup purposes, replicate configuration files, or simply want to have a copy of the files. Whatever the reason, the SCP command has your back.
The basic syntax for the SCP command is as follows.
scp [Option] [user1@]SRC_HOST:]your_file1 [user2@]DEST_HOST:]you_file2
Where:
Option– specifies any options to use, such as cipher or limit. You’ll be using some common options in this tutorial.user1– is the username on the source host.SRC_HOST– is the hostname or IP address of the copy source.your_file1– is the path and name of the file that you want to copy.DEST_HOST– is the hostname or IP address of the copy destination.user2– is the username with access to the destination host.your_file2– is the path and name of the file that you want to copy fromyour_file1
Note: You can specify your file paths using a relative or absolute path on the local system. But the file paths on the remote system must use a username with an absolute path.
Now that you understand the basic syntax, you can start with the file copy exercise using the SCP command.
1. To start, create a new file called backup.txt in the home directory on ubuntu1.
# Change into the home directory
cd ~
# Create a text file with content
echo "This is my backup file" > backup.txt
# Display the file content to confirm
cat backup.txt
# Show the SHA1 hash 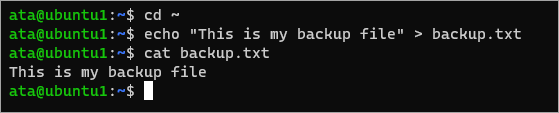
2. Next, create a new directory named backup on ubuntu2. This directory will be the file copy destination path.
# Creat the backup directory
mkdir ~/backup && cd ~/backup
# Display the full path
pwd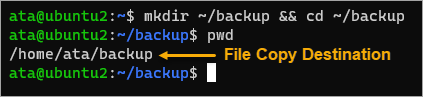
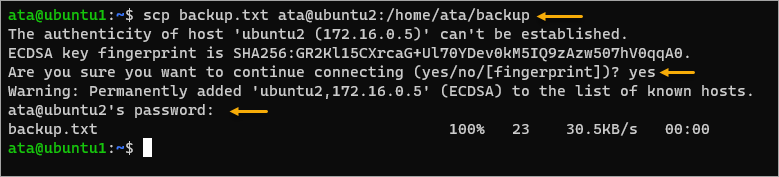
3. Now, run the scp command below on ubuntu1 to copy backup.txt to the backup directory on ubuntu2. Make sure to replace the username and path with yours.
scp backup.txt ata@ubuntu2:/home/ata/backupIf you want to copy the file to a different name, append the new filename to the destination path. Example: scp backup.txt ata@ubuntu2:/home/ata/backup/backup2.txt
4. If now’s the first time you’re connecting to the ubuntu2 host, type yes at the confirmation prompt and press Enter.
5. Next, type the user account password on ubuntu2 and press Enter. Once you enter the correct password, the file copy will proceed.
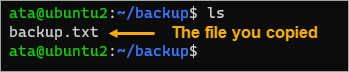
6. After copying the file, switch to your ubuntu2 terminal and run the below command to list the directory contents.
lsConfirm that the file backup.txt exists and you’ve successfully copied the file.
7. Next, display the copied file’s content to confirm that the file is intact on ubuntu2.
cat backup.txt
8. Lastly, to confirm that the files are identical, get the SHA1 checksum of each file on both machines and compare the values. This step is an extra measure to verify the file’s integrity did not change during the transfer.
# on ubuntu1 and ubuntu2
sha1sum backup.txt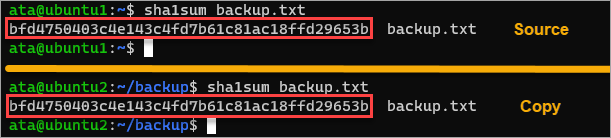
Running Recursive Copy with the SCP Command
In the previous section, you learned to copy individual files from a local system to a remote system using the SCP command. You often need to copy an entire directory with its subdirectories and files in real-life scenarios.
Copying entire directories typically apply to backup scenarios. Suppose your server (ubuntu1) runs a web server whose files are in the /var/www/ directory. Below is the sample folder tree structure.
/var/www
├── html
│   └── index.html
└── your_domain
    └── index.html
You can effortlessly back up the entire folder to a remote destination with the SCP command.
In most cases, backup operations run through automation scripts and scheduled tasks or cron jobs. This example demonstrates how you would back up an entire directory manually.
1. First, create a web-server-backup directory on ubuntu2.
# Create the backup directory on ubuntu2
mkdir ~/web-server-backup
# Display the full backup directory path
realpath ~/web-server-backup
2. Next, switch back to the ubuntu1 terminal and run the SCP command below. The -r switch enables the recursive copy mode, which means that SCP will copy the entire /var/www/ from the top folder down to the last file.
scp -r /var/www/ ata@ubuntu2:/home/ata/web-server-backup
3. Now, run the tree command on both systems to compare the directory structure. On ubuntu1, you’ll display the directory tree for /var/www. On ubuntu2, you’ll display the directory tree for the backup directory, which is /home/ata/web-server-backup in this example.
# on ubuntu1
tree /var/www/

# on ubuntu2
tree /home/ata/web-server-backup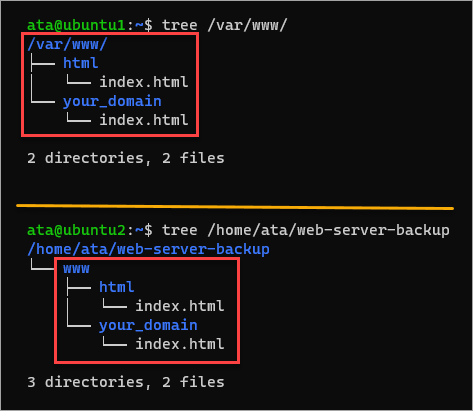
Filtering File Extensions to Copy
Suppose you have a directory on your local system containing mixed file types with different extensions. You’re supposed to copy all files from that folder to a remote computer using the SCP command as part of your job. You already know how to copy entire directories.
But, the condition is that you must only copy all files with the *.txt extension. Don’t panic; you’re still on track, and the solution is not far from what you already did in the previous sections. To filter the files to copy, you’ll be using wildcards.
Common wildcard characters are the asterisk (*), which represents zero, one, or more characters, and the question mark (?), which means a single character.
1. First, create the sample folder and files on ubuntu1 that you will be copying later. Run the command below to create the folder foo and files with *.txt, *.doc, and *.ppt extensions.
# Create a directory named foo
mkdir foo && cd foo
# Create five *.txt files
touch {1..5}.txt
# Create five *.doc files
touch {1..5}.doc
# Create five *.ppt files
touch {1..5}.ppt
# List all the files in the directory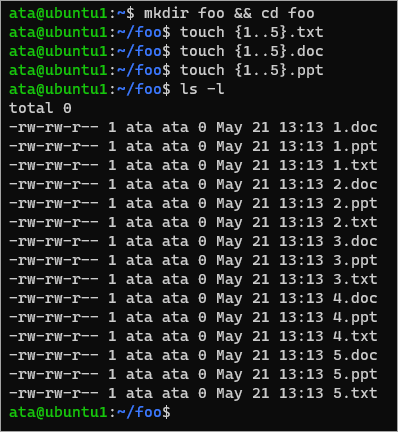
2. Next, switch to your ubuntu2 terminal and create a directory called bar. This directory will be your copy destination path.
# Create the folder
mkdir bar
# Display the new folder's full path
realpath bar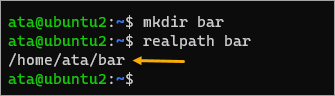
3. Switch back to your ubuntu1 terminal and run the below SCP command. Notice that this time, instead of specifying a specific folder as the source, your source contains a wildcard that matches any files with a txt extension inside the foo folder.
scp *.txt ata@ubuntu2:/home/ata/bar/Type in the account password, and the copy should continue. As you can see below, the SCP command only copied the txt files despite the source folder having other file types.
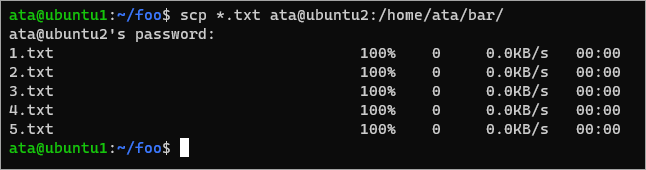
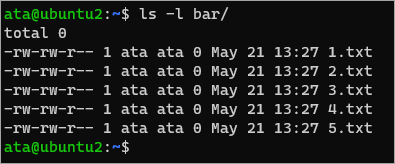
4. Lastly, switch to the ubuntu2 terminal and list the files inside the bar directory.
ls -l bar/
The result should confirm that only *.txt files exist inside the directory.
Enabling Key-Based Authentication
Typing in the destination account password can be tedious and cumbersome. Also, password-based authentication is less secure and not appropriate for automation. What’s the alternative? Enable key-based authentication.
As you know, the SCP command uses SSH under the hood. And SSH gives you the option to authenticate using SSH keys instead of passwords. The steps for setting up SCP with SSH key authentication are as follows.
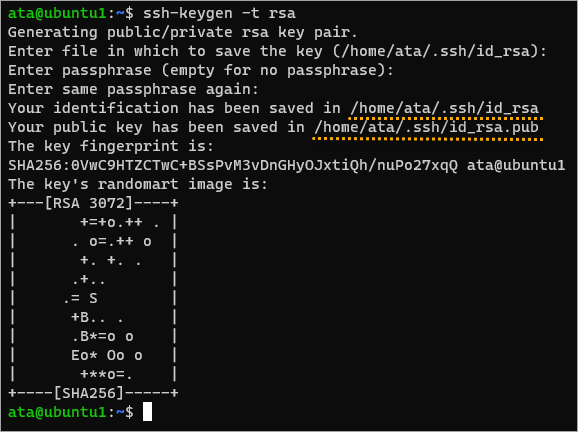
1. On ubuntu1, generate an SSH key pair by running the ssh-keygen command.
ssh-keygen -t rsa2. Press Enter to accept the default path in which to save the key. Finally, press Enter two times not to add a passphrase to the key.
As you can see below, the command created two files. The id_rsa file is your private key, which will stay on the source computer. Conversely, you should copy the id_rsa.pub to the destination host.
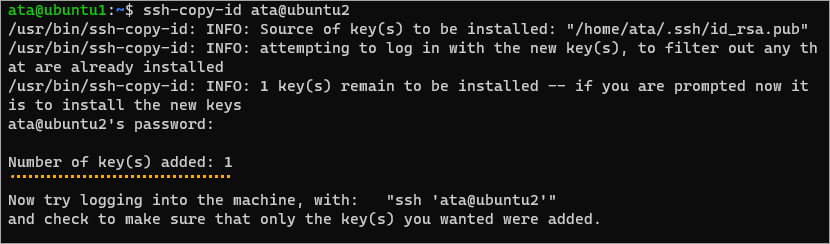
3. Run the below command to copy your public key to the remote host ubuntu2.
ssh-copy-id ata@ubuntu2Enter the destination account password at the prompt to continue copying the public key.
4. Now that you’ve generated the SSH key pair, run the below command to securely copy the backup.txt file from ubuntu1 to ubuntu2. The argument -i ~/.ssh/id_rsa tells the SCP command to authenticate with the SSH key file.
scp -i ~/.ssh/id_rsa backup.txt ata@ubuntu2:backup3.txtThe SCP command no longer prompts for the password, as you can see below.

That’s it! You’ve gotten rid of that pesky password prompt and made your SSH session even more secure.
Conclusion
This article taught you how to use the SCP command to copy files between two Linux systems securely. You also learned how to use SCP with SSH keys for authentication. Now that you’ve learned about the SCP command, try it out the next time you need to copy one to bulk files between computers.


