

So you’re starting a new project, you need to set up a website, and someone made you use IIS (Internet Information Services) on your old and enterprisey Windows Server box. What a drag! How do you even accomplish daily tasks like configuring IIS URL Rewrite rules? Fear not! Today, you’ll figure out how to do just that.
In this tutorial, you’ll use a simple VuePress website project as an example and figure out what kind of rewrite rules the project needs. And despite all of the enterprisiness, the process isn’t too long-winded!
Read on and never let your website lead to a broken link!
Prerequisites
This tutorial will be a pretty hands-on demonstration! If you’d like to follow along, be sure you have the following:
- Any supported Windows operating system (Windows 10 or 11, or Windows Server 2019, 20H2, or 2022)
- Internet Information Services 7 or later
- A website you already host on IIS
Installing the URL Rewrite Module
IIS URL Rewrite module is one of those must-know modules on IIS. This module allows you to quickly build rules to manage incoming and outcoming links on your site.
Kick off this tutorial by installing the URL Rewrite module. You may or may not have it on your system, so you’ll first have to check if the module is already installed on your system.
1. Open your Internet Information Services (IIS) Manager, and select any of your websites under Sites in the Connections panel.
If you don’t see the module in the list, you’ll need to install it first. But if the module is there, like in the screenshot below), you can jump to the “Redirecting URL to use HTTPS to Secure a Website” section!

2. Download the URL Rewrite Module for IIS 7 (and later), and follow the prompts to install the module.
3. Lastly, restart your IIS Manager, and you should now have the module available!
Redirecting URL to use HTTPS to Secure a Website
Putting up your website on the internet comes with a lot of risks. So the first step is to secure your website, and the IIS URL Rewrite module can help. You don’t want to serve your site from plain HTTP but rather require HTTPS, which you can handle with a redirection.
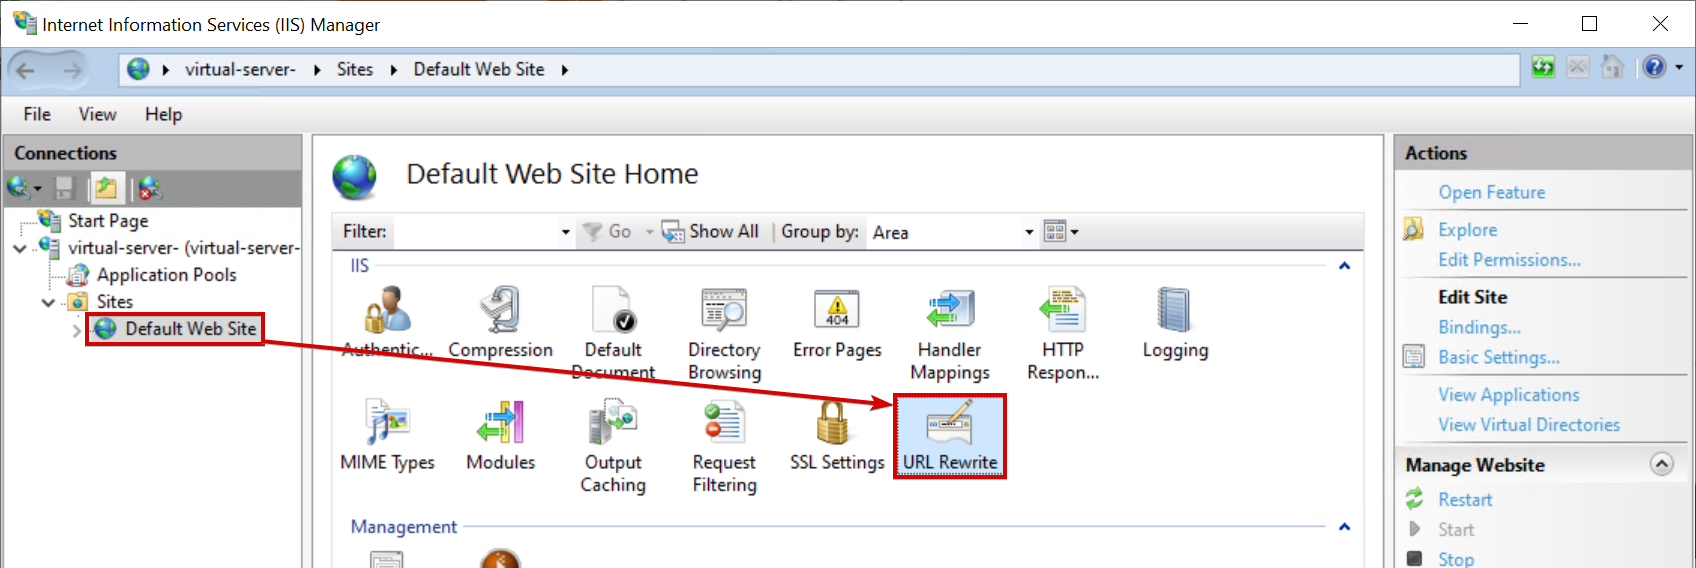
1. First, open your IIS Manager and click on Default Web Site at the left panel. Double-click on the URL Rewrite module, as shown below, to add rewrite rules.
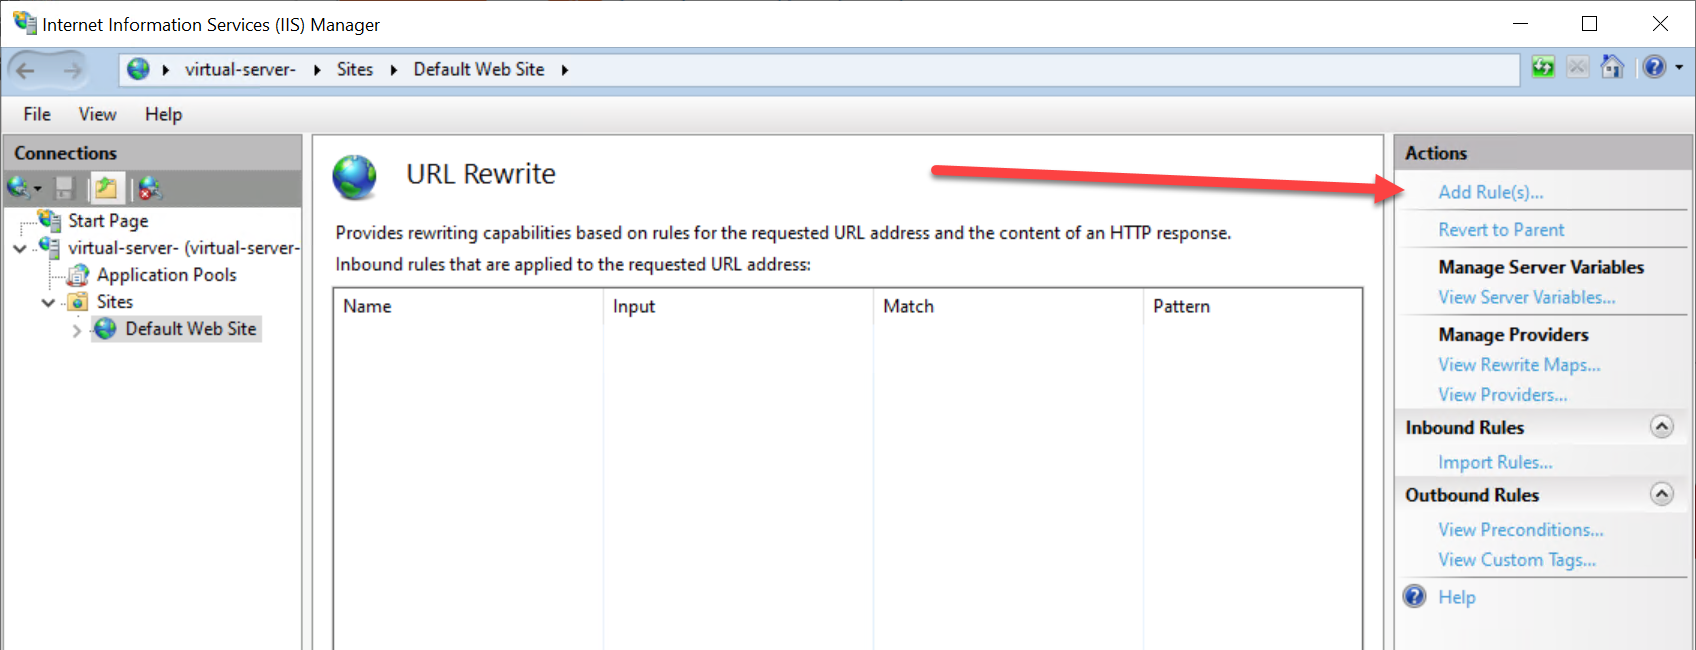
2. Next, click on Add Rule(s) option at the right panel, and a pop-up window appears where you’ll select a rule template. A rule template lets you create one or more rewrite rules depending on your needs.
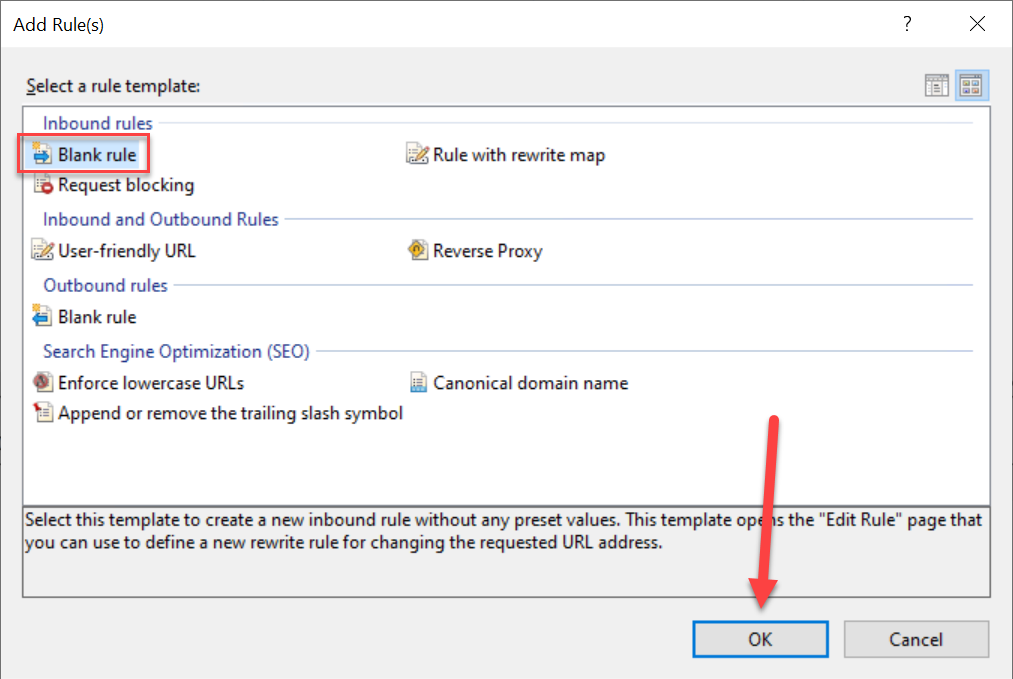
3. Select Blank rule, and click OK as none of the templates match your use-case. Instead, you’ll configure the rule manually.
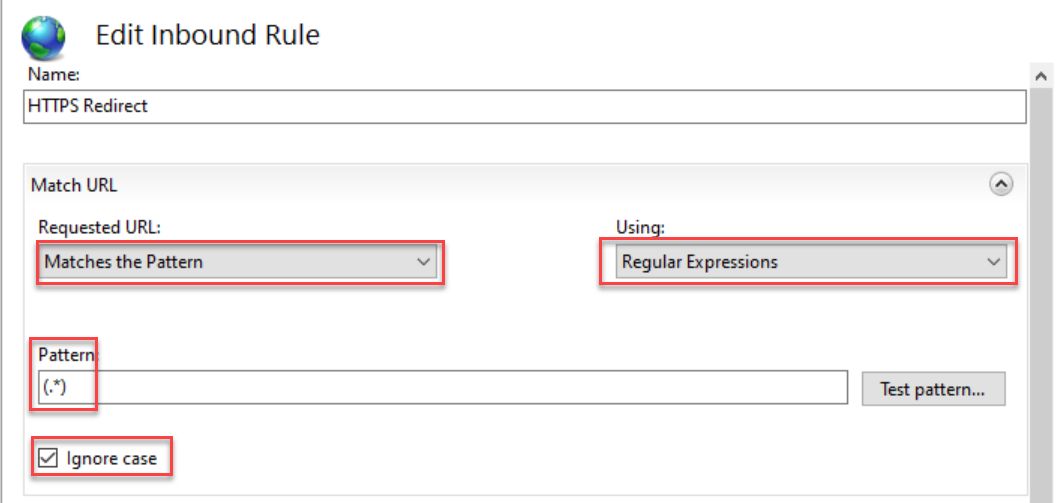
4. Now you’ll create a regular expression pattern match rule that matches all URLs. You’ll match any incoming URLs but only modify those that aren’t using HTTPS.
In the Match URL section:
- Set Requested URL to Matches the Pattern, enabling you to use Regular Expressions to decide which incoming requests to match.
- Set Using to Regular Expressions to set up a rule to match every incoming request.
- Enter (.*) as the Pattern – This Regular Expression matches all URLs to target every single URL for this rule.
- Ignore case is selected by default, but since your Pattern is effectively “match all,” this selection doesn’t matter.
5. Now scroll down a bit, and add the condition to exclude incoming requests using https, as shown below.
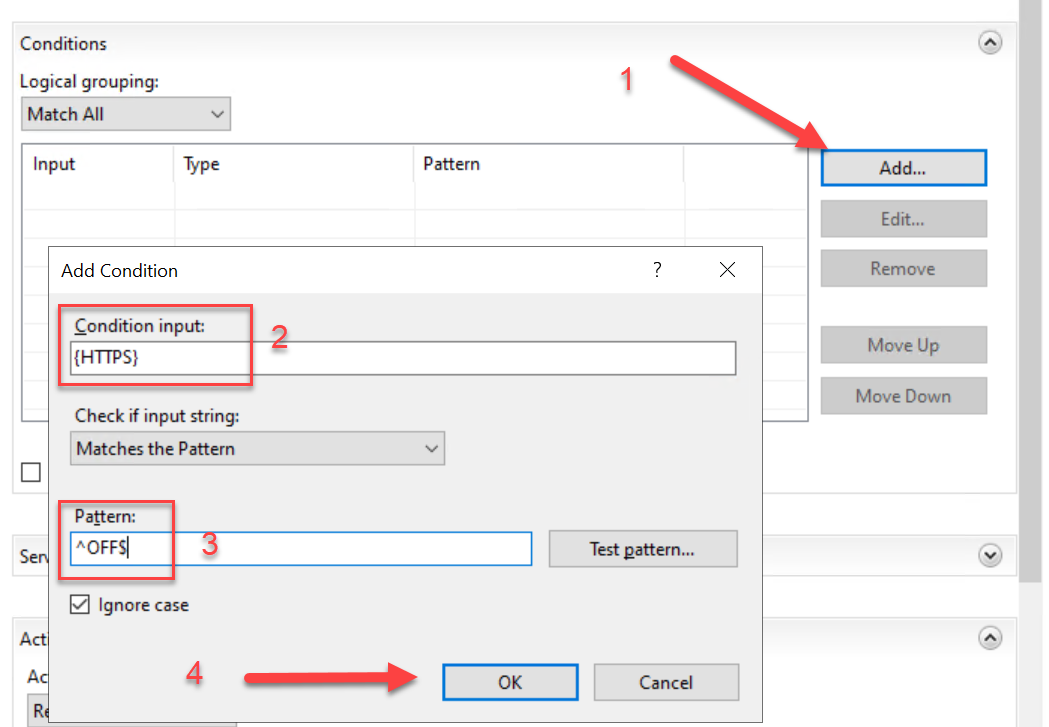
Set the fields as follows under the Conditions section to check for a condition, which will decide if the rule will be applied against the incoming request or not:
- Set the Condition input to {HTTPS}, which will only match requests using HTTPS protocol (as opposed to HTTP).
- Leave the dropdown as Matches to Pattern.
- Set the Pattern to ^OFF$, which causes the rule to be applied against incoming requests that didn’t have HTTPS as the protocol.
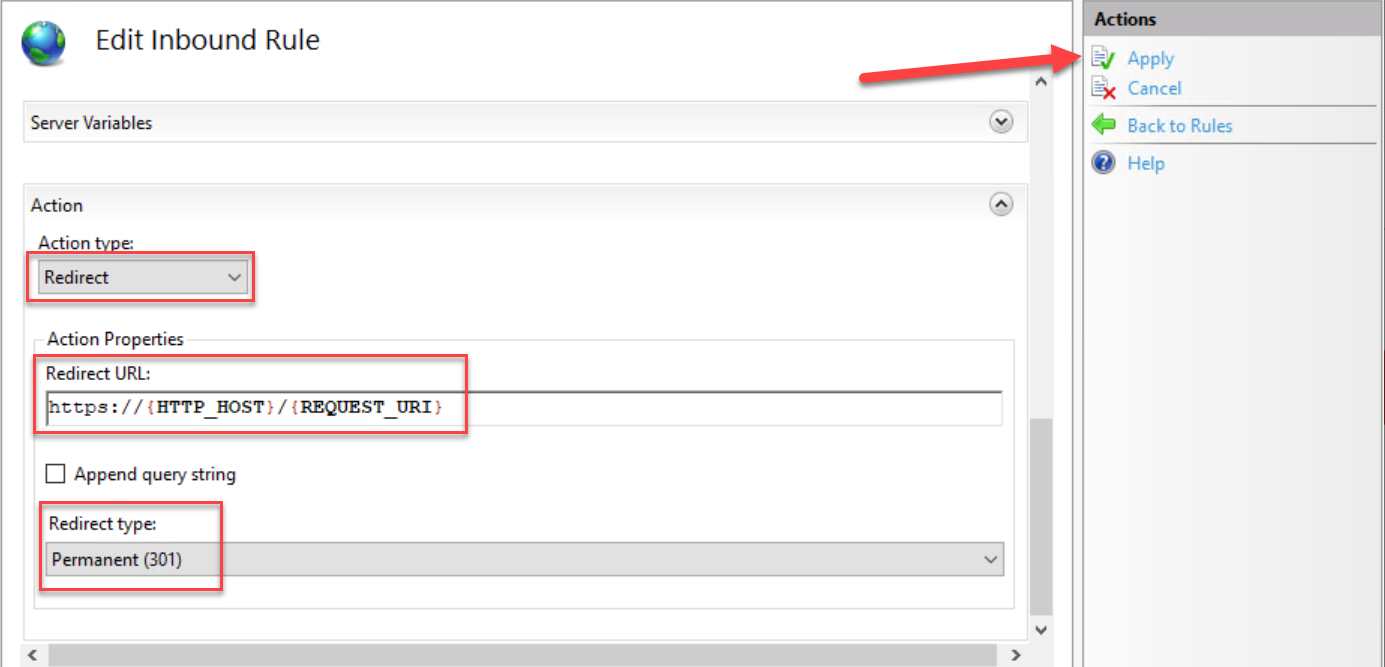
6. After adding a condition, set what actions the rule will take:
- Set the Action type to Redirect, which redirects the user to a new address in the browser (instead of rewriting how the URL looks).
- Set the Redirect URL to https://{HTTP_HOST}/{REQUEST_URI}, which will redirect the user to the same page path (using server variable REQUEST_URI) under the same domain (or “host,” using server variable HTTP_HOST), but using HTTPS as the protocol.
- Set the Redirect type to Permanent (301) since your page has permanently changed its location.
- Click on the Apply button under the Actions panel to apply the redirection rule.
7. Finally, open your favorite web browser and navigate your website to (http://localhost). You’ll see below that your website redirects to https://localhost for secure access.
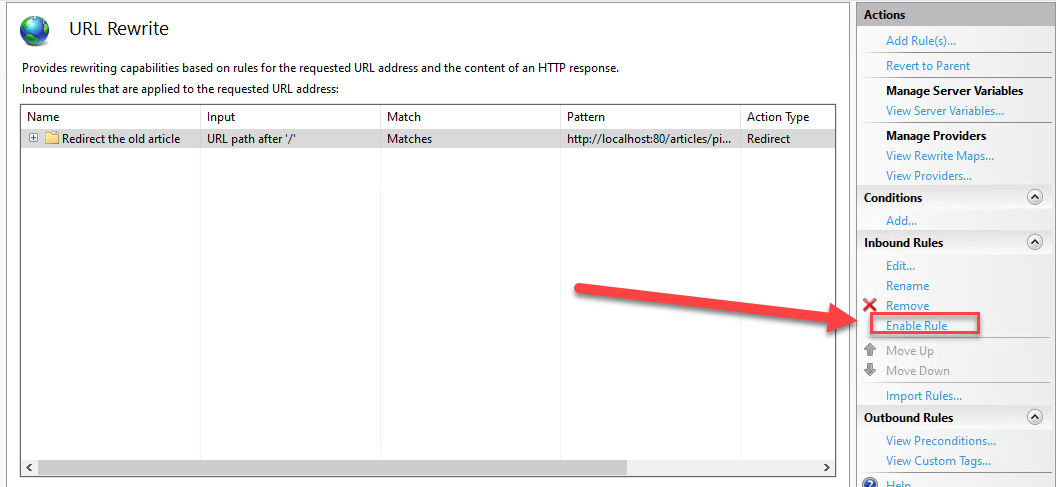
If your browser seems to be ignoring the rewrite rule, double-check your Pattern – most of the time, the issues are typos or extra whitespaces. Also, verify your rule is enabled by selecting it and clicking on the Enable Rule option, as shown below.
Modifying URL Rewrite Rules Using the web.config file
Perhaps you prefer to modify the rewrite rules in a config file. If so, you can modify the rules by editing the web.config file for your website directly. But first, you’ll need to find your web.config file, and the quickest way to do so is through your IIS Manager.
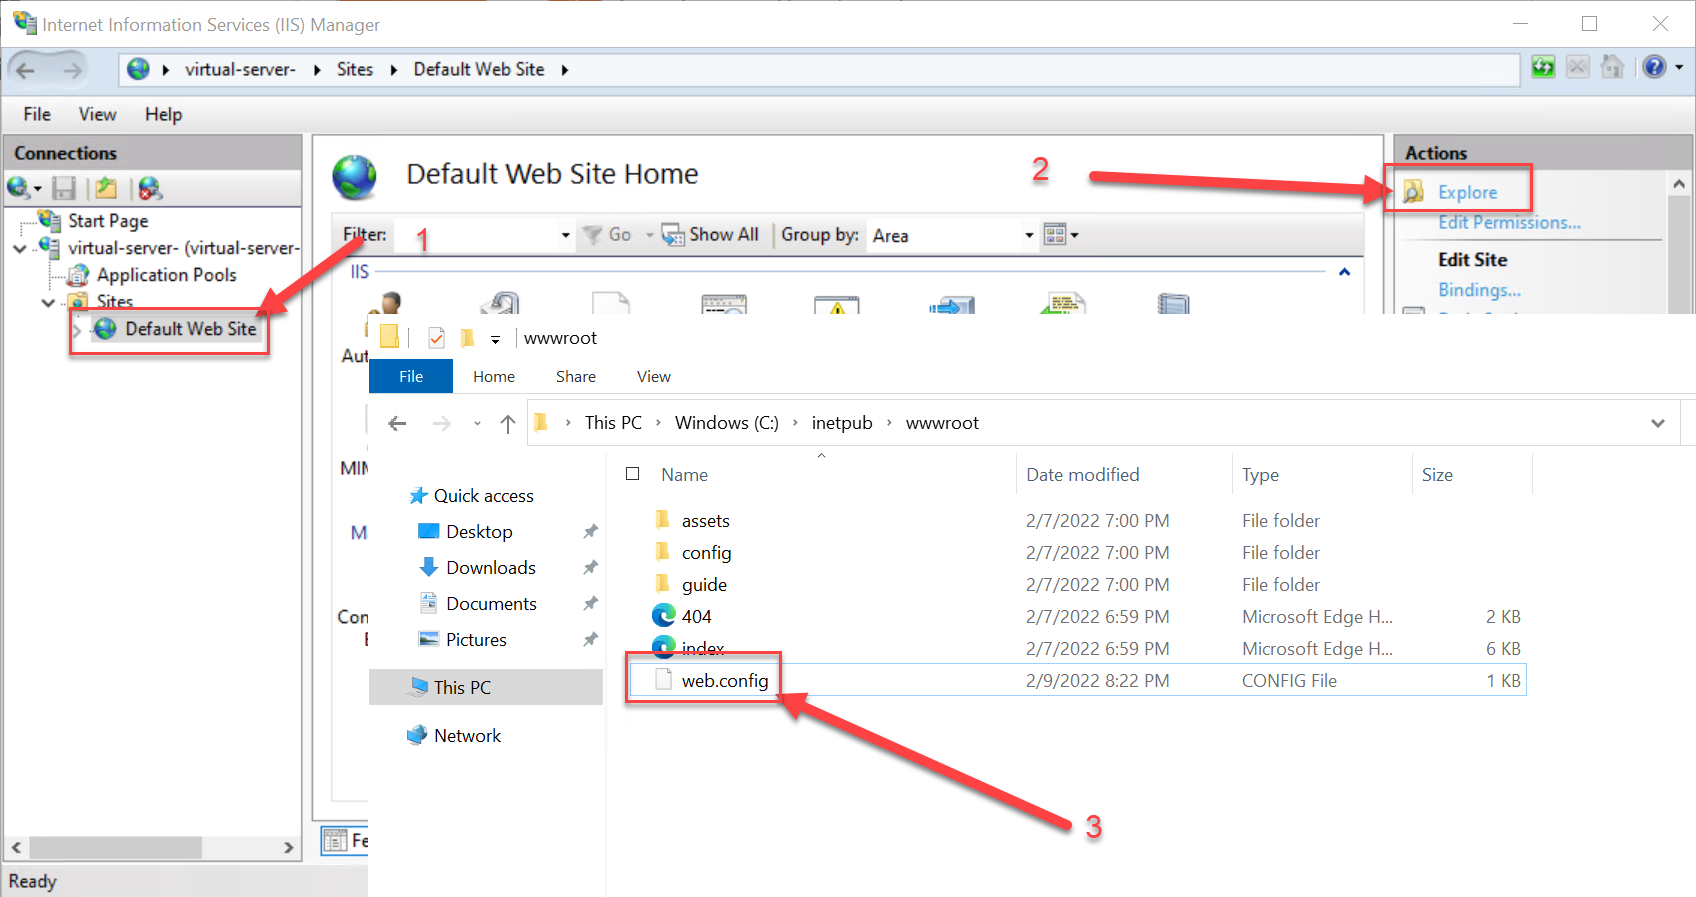
1. On your IIS Manager, click on your website under the Connections panel (left panel) and click on Explore in the Actions panel (right panel). The web.config file’s location opens up in File Explorer, as shown below.
2. Open the web.config file in your preferred text editor. If you haven’t made any changes, it’ll look like the one below
<?xml version="1.0" encoding="UTF-8"?>
<configuration>
</configuration>
3. Modify the rewrite rules to your heart’s content. The modification should go inside <system.webServer>, which you’ll need to create if it doesn’t exist yet.
The end result of modifying the rules will look like the one below.
<?xml version="1.0" encoding="UTF-8"?>
<configuration>
	<!-- This section tells IIS we're configuring a module for the web server functionality or one of its modules -->
	<system.webServer>
		<!-- This section defines configuration for the URL Rewrite module -->
		<rewrite>
	      <rules>
						<!-- This section adds a new rule for our HTTPS REdirect -->
	          <rule name="HTTPS Redirect" stopProcessing="true">
								<!-- Match all URLS... -->
	              <match url="(.*)" />
	              <conditions>
										<!-- ... but only if they are using HTTP instead of HTTPS! -->
	                  <add input="{HTTPS}" pattern="^OFF$" />
	              </conditions>
								<!-- Redirect to a HTTPS version of the page -->
	              <action type="Redirect" url="https://{HTTP_HOST}/{REQUEST_URI}" appendQueryString="false" />
	          </rule>
	      </rules>
	  </rewrite>
	</system.webServer>
</configuration>
4. Lastly, navigate to http://localhost on your browser to make sure the rule works and verify the URL changes to https://localhost.
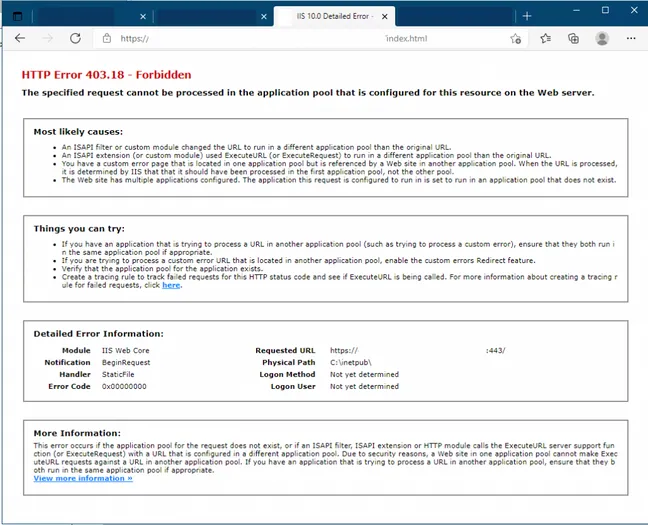
If your website starts throwing 403.18 errors, like in the screenshot below, most likely what’s causing the error is a rule affecting child applications or “virtual directories.” You’ll need to stop the rules from being inherited to fix the error, but this topic is beyond this tutorial.
Modifying URL Rewrite Rules via a PowerShell Script
If you’re more into scripting, PowerShell script lets you accomplish creating rewrite rules. The cmdlets are pretty verbose, and you’ll need to run quite a few of them in a script rather than running them one by one.
1. Create a script file in your preferred text editor or script editor, populate the file with the following code and modify the values as you desire.
At this point, the values in the code below should be familiar to you, as they are the same values you’ve used in the previous section.
# Firstly, the script needs to import the module WebAdministration to get access to the cmdlets required to add and modify the “WebConfigurationProperties” (which will just get injected into the web.config)
Import-Module webAdministration
# Then the script defines your IIS website - in this case, the default site.
$site = "iis:\sites\Default Web Site"

# Then the sript will create the property for our rule
Add-WebConfigurationProperty -pspath $site -filter "system.webserver/rewrite/rules" -name "." -value @{name='HTTPS Redirect'; patternSyntax='ECMAScript'; stopProcessing='True'}
# The script ill set it to match any incoming request
Set-WebConfigurationProperty -pspath $site -filter "system.webserver/rewrite/rules/rule[@name='HTTPS Redirect']/match" -name url -value "(.*)"
# And finally, add the familiar condition to only match HTTP requests (and not HTTPS).
Add-WebConfigurationProperty -pspath $site -filter "system.webserver/rewrite/rules/rule[@name='HTTPS Redirect']/conditions" -name "." -value @{input="{HTTPS}"; pattern='^OFF$'}
# The last 3 commandlets set the values for type, URL and appendQueryString-parameter for the action itself, “Rewrite”, “https://{HTTP_HOST}/{REQUEST_URI}” and “false”, respectively.
Set-WebConfigurationProperty -pspath $site -filter "system.webServer/rewrite/rules/rule[@name='HTTPS Redirect']/action" -name "type" -value "Redirect"
Set-WebConfigurationProperty -pspath $site -filter "system.webServer/rewrite/rules/rule[@name='HTTPS Redirect']/action" -name "url" -value "https://{HTTP_HOST}/{REQUEST_URI}"
Set-WebConfigurationProperty -pspath $site -filter "system.webServer/rewrite/rules/rule[@name='HTTPS Redirect']/action" -name "appendQueryString" -value "false"
2. Run the script to apply the modifications on the web.config file for the rewrite rules.
3. Finally, navigate to http://localhost to test the rules are working.
Perhaps you suddenly got a “500 – Internal Server Error” after modifying the web.config file directly. If so, verify your web.config file’s syntax — it’s easy to mess up. Or try reinstalling the URL Rewrite Module for IIS.
Implementing URL Rewrite Rules to Fix Broken Links
You’ve successfully secured your website with HTTPS, but what if your website leads to a broken link? Imagine you just got an email from your colleague who’s complaining about broken links leading to your website, so you investigate.
And lo and behold, from the logs, you discover many people are encountering 404 errors. The error comes with a link to an old article that doesn’t exist anymore. Digging deeper, you see tons of sites linking to your website with the broken link from referring sites.
Contacting all site developers to update the link is a massive pain! Luckily, the URL Rewrite module can save the day by redirecting the broken URL to the right one.
1. Create a new blank rule as you did in the “Modifying URL Rewrite rules using IIS Manager” (steps one to three)
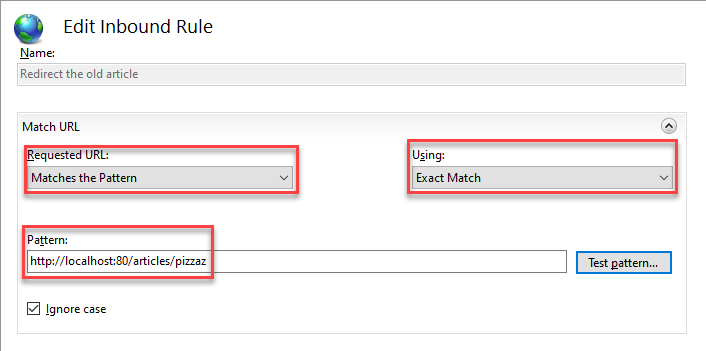
2. Next, configure a new rewrite rule with the following:
- Set the Requested URL to Matches the Pattern, using Exact Match.
- Enter the broken URL as the Pattern.
- Select Redirect as the Action type.
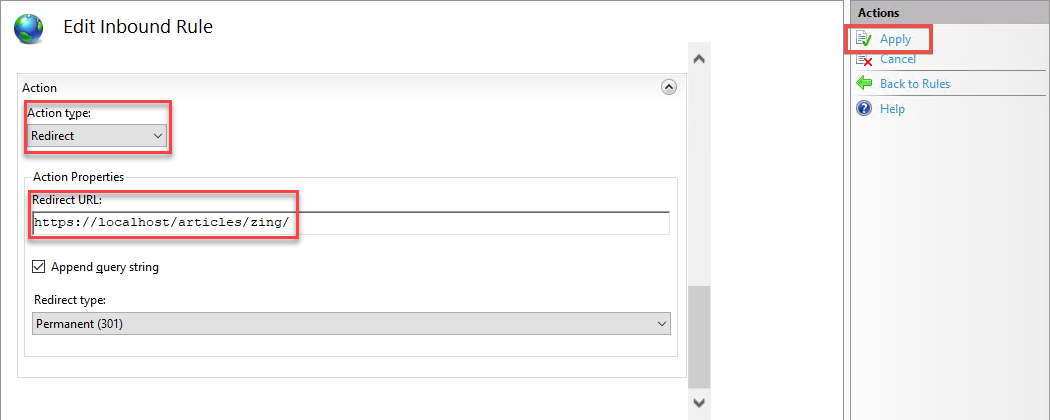
3. Under the Actions section, set the following:
- Insert the new URL as the Redirect URL
- By default, you can let the Append query string option remain selected to conserve any parameters the URL might have had before redirection.
- Leave the Redirection type set to Permanent (301).
- Click Apply to finalize the new rule.
Pay attention to the accurate URL of the broken link. In the example below, in the Pattern field, port 80 is included. Even though the port is omitted from the visible URL, it’s present in the URL that IIS considers for the rules.
4. Lastly, navigate to the broken URL and see if it redirects to the correct URL.
Conclusion
In this tutorial, you’ve learned how to install the IIS URL Rewrite module, create your first URL Rewrite rules and troubleshoot some of the most typical problems that might arise. At this point, you can now keep your website up and accessible with the URL Rewrite module.
Armed with this knowledge, you can take on more complicated tasks — like changing your site’s directory structure or configuring the rules for React Router. URL Rewrite module allows you to redirect your users to a new location and share your content from multiple addresses with the rewrite rules — but that’s a topic for another tutorial!


