

If you’re a Windows system administrator, you might have been forced to work with windows certificates. Working with certificates in Windows is typically one of those extra hats a sysadmin has to take on. Using the Windows certificate manager as a tool, you can do it!
Certificates are notoriously complex and hard to understand but in this article, you’ll get a chance to discover certificates aren’t that scary in Windows!
This article will cover mainly working with certificates in Windows. If you’d like to learn more about how certificates work in general, check out this article’s companion X.509 Certificate Tutorial article.
Understanding Certificate Stores
Within the Windows certificate manager, all certificates exist in logical storage locations referred to as certificate stores. Certificate stores are “buckets” where Windows keeps all certificates that are currently installed and a certificate can be in more than one store.
Unfortunately, certificate stores are not the most intuitive concept with which to work. You will read about how to differentiate these stores and how to work with them below.
Each store is located in the Windows Registry and on the file system. Refer to the below table for details. When working with a certificate in a store, you are interfacing with the logical store; not directly modifying the registry or file system. This simpler manner lets you work with a single object while Windows takes care of how to represent that object on disk.
You’ll sometimes see certificate stores referred to as physical or logical stores. Physical stores reference the actual file system or registry location where the registry key(s) and/or file(s) are stored. Logical stores are dynamic references that reference one or more physical stores. Logical stores are much easier to work with than physical stores for most common use cases.
Windows stores certificates in two different areas – a user and computer context. A certificate is placed in one of these two contexts depending on if the certificate should be used by a single user, multiple users, or the computer itself. For the rest of this article, a certificate in a user and computer context will be informally called user certificates and computer certificates.
User Certificates
If you intend for a certificate to be used by a single user, then a user certificate store inside the Windows certificate manager is ideal. This is the common use case for certificate-based authentication processes such as wired IEEE 802.1x.
User certificates are located within the current user’s profile and are only logically mapped within that user’s context. User certificates are “mapped” and are unique for each user, even on the same systems.
Computer Certificates
If a certificate will be used by all users on a computer or a system process, it should be placed inside of a store in the computer context. For example, if a certificate will be used on a web server to encrypt communication for all clients, placing a certificate in a store in the computer context would be ideal.
You’ll see that a computer’s certificate store is logically mapped for all user contexts. This allows for certificates in a computer certificate store to be used by all users, depending on the permissions configured for the private key.
For more information on private keys, be sure to check out the article X.509 Certificates Tutorial: A Sysadmin Guide.
Computer certificates are located in the Local Machine Registry hives and the Program Data folder. User certificates are located in the Current User Registry hives and the App Data folder. Below you can see a breakdown of where each type of store is located in the registry and file system.
| Context | Registry Path | Explanation |
|---|---|---|
| User | HKCU:\SOFTWARE\Microsoft\SystemCertificates\ | Physical store for user-specific public keys |
| User | HKCU:\SOFTWARE\Policies\Microsoft\SystemCertificates\ | Physical store for user-specific public keys installed by Active Directory (AD) Group Policy Objects (GPOs) |
| Computer | HKLM:\SOFTWARE\Microsoft\SystemCertificates\ | Physical store for machine-wide public keys |
| Computer | HKLM:\SOFTWARE\Microsoft\Cryptography\Services\ | Physical store for keys associated with a specific service |
| Computer | HKLM:\SOFTWARE\Policies\Microsoft\SystemCertificates\ | Physical store for machine-wide public keys installed by GPOs |
| Computer | HKLM:\SOFTWARE\Microsoft\EnterpriseCertificates\ | Physical store for machine-wide public keys installed by the Enterprise PKI Containers within an AD domain |
| Context | File Location | Explanation |
|---|---|---|
| User | $env:APPDATA\Microsoft\SystemCertificates\ | Physical store for user-specific public keys and pointers to private keys |
| User | $env:APPDATA\Microsoft\Crypto\ | Physical store for user-specific private key containers |
| Computer | $env:ProgramData\Microsoft\Crypto\ | Physical store for machine-wide private key containers |
Prerequisites
Throughout the rest of this article, you will find multiple examples showing interactions with Windows certificate stores. To replicate these examples, be sure you meet the following prerequisites:
- Windows Vista, Windows Server 2008, or newer operating system. The examples shown use Windows 10 Enterprise version 1903.
- Familiarity with PowerShell. Although not required, this will be the language used to reference certificates where appropriate. The examples shown have all been created with Windows PowerShell 5.1.
- You will not need any specific certificates installed to follow along, but using a self-signed certificate is beneficial.
Managing Certificates in Windows
In Windows, there are three primary ways to manage certificates:
- The Certificates Microsoft Management Console (MMC) snap-in (certmgr.msc)
- PowerShell
- The
certutilcommand-line tool
In this article, you’ll learn how to manage certificates via the Certificates MMC snap-in and PowerShell. If you’d like to learn more about how to use certutil, check out the Microsoft Docs.
PowerShell vs. the Windows Security Certificate Manager
Since certificates can be managed a few different ways in Windows, which one do you choose? Should you go the GUI (MMC) route or command-line with PowerShell?
Note: This article is relevant both for the Windows 7 Certificate Manager and Windows 10 Certificate Manager MMC snap-ins.
First, consider the lifecycle of a certificate. If you only intend to install or remove a single certificate once, consider using the MMC. But if you’re managing multiple certificates or find yourself performing the same task over and over again, the command-line route may be the way to go. Even if you don’t know how to write PowerShell scripts, it’d be worth learning if you have many different certificates to manage.
Let’s first take a look at how to discover the certificates installed on Windows using both the Certificate Manager and PowerShell.
Using the Windows Certificate Manager (certmgr.msc)
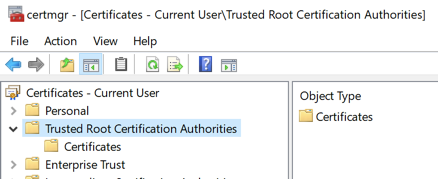
To view certificates with the MMC, open up the Certificate Manager open your Start menu and type certmgr.msc. This will bring up the Windows Certificates MMC. This initial view will provide an overview of all the logical stores displayed in the left window.
You can see in the screenshot below the Trusted Root Certification Authorities logical store is selected.
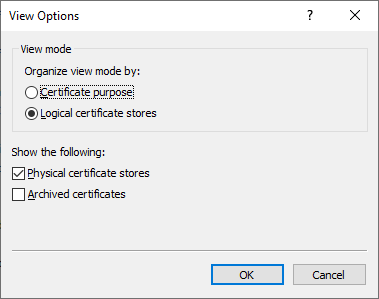
Viewing Physical Stores
By default, the Windows certificate manager will not show the actual physical stores. To show the stores, click on View and then on Options. You will then see options to choose to show physical certificate stores. Enabling this option makes identifying the specific paths within Windows easier.
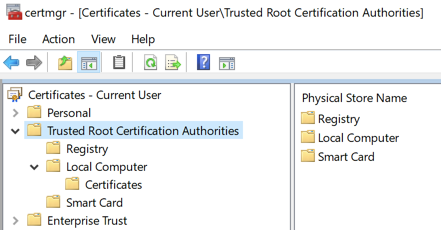
You can now see additional containers are shown under the example Trusted Root Certification Authorities logical store shown previously. The certificates are still grouped relative to their logical stores, but you can now see the physical store, “Registry”.
Inspecting Attributes in the Windows Certificate Manager
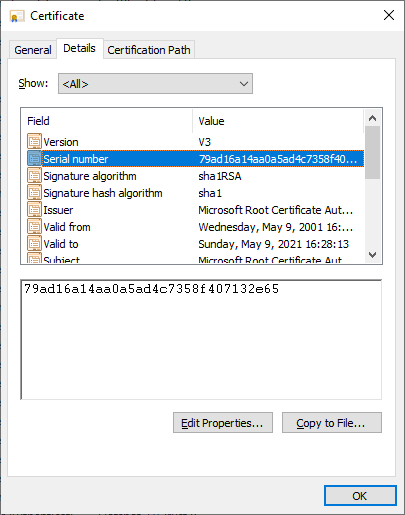
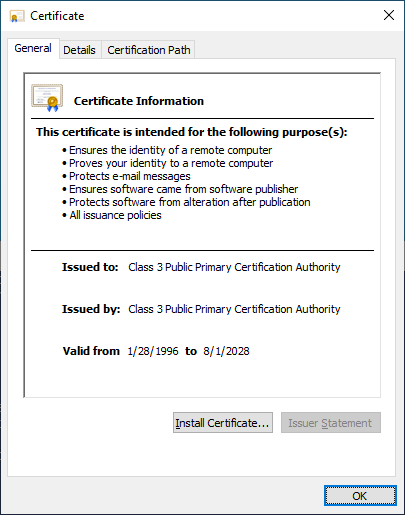
There are many attributes of a certificate you can see when viewing them with the MMC. For example, you will likely want to select specific certificates.
The easiest way for you to accomplish this is by referencing the certificate’s Serial Number or Thumbprint extension value. If the certificate was signed by a certificate authority (CA), it will have a serial number when issued. The Thumbprint is calculated every time the certificate is viewed.
You can see some of the attributes for a certificate by opening it up in the MMC as you can see below.
One important feature to point out is embedded private keys. Certificates in Windows can also have a corresponding private key. These private keys are stored in corresponding physical stores as encrypted files.
To quickly distinguish a certificate with and without a corresponding private key, look at the certificate icon. In the Windows certificate manager, if the icon simply looks like a piece of paper with a ribbon, there is no corresponding private key. If a certificate does have a private key, you will see a key in the MMC icon, and you will see a key at the bottom of the General tab when you open the certificate.
Using PowerShell
As with the MMC, you can view and manage certificates with PowerShell as well. Let’s first inspect certificates in their physical stores (the registry and file system).
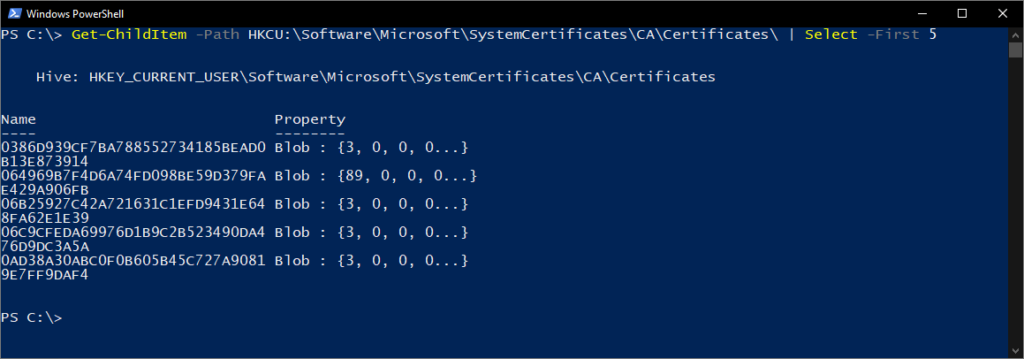
By Physical Store
Using the Get-ChildItem PowerShell cmdlet, you can enumerate all of the keys and values inside of the parent HKCU:\Software\Microsoft\SystemCertificates\CA\Certificates\ registry key path.
The below command will enumerate all of the currently-logged-in user’s certificates in the Intermediate Certification Authorities logical store.
Get-ChildItem -Path HKCU:\Software\Microsoft\SystemCertificates\CA\Certificates\Each entry in the Registry hive you see will correspond to the Thumbprint of the certificate for a trusted CA and it’s certificate in the corresponding property. You can see an example output of this below.
Another common store is, the Personal store. Your certificates for this store are located on the file system rather than the Registry. In the following commands we will show these different physical paths and their purposes.
Each file in the directory, returned by the command below, corresponds to a certificate installed in the Personal current user store.
Get-ChildItem -Path $env:APPDATA\Microsoft\SystemCertificates\My\Certificates\Each file returned in the below command is a reference to the object for a private key created by the Key Storage Provider (KSP). The file name corresponds to the Subject Key Identifier of the certificate. Each private key you install will have a corresponding file added.
Get-ChildItem -Path $env:APPDATA\Microsoft\SystemCertificates\My\Keys\Each file in the directory returned by the below command is the unique container for the encrypted private key created by the KSP. There is no direct relationship between the file name and the certificate, but the file is the target of the pointer in the earlier command.
Get-ChildItem -Path $env:APPDATA\Microsoft\Crypto\KeysBy Logical Store
Since working with certificates in their physical paths is uncommon, you will be working with the logical stores for the rest of the examples.
PowerShell can access Windows logical stores using the Cert: PSDrive. The Cert: PSDrive maps certificates to the physical stores much like the MMC does.
Unfortunately, the MMC and the Cert PSDrive do not label the logical stores the same. Below you can see a comparison table of the common stores and their names both in the MMC and the Cert PSDrive.
| Cert: | Certificates MMC |
|---|---|
| My | Personal |
| Remote Desktop | Remote Desktop |
| Root | Trusted Root Certification Authorities |
| CA | Intermediate Certification Authorities |
| AuthRoot | Third-Party Root Certification Authorities |
| TrustedPublisher | Trusted Publishers |
| Trust | Enterprise Trust |
| UserDS | Active Directory User Object |
Selecting Certificates
When you are working with certificates you will need a way to filter and select certificates to perform specific operations against. Most of the time you will filter and select certificates based on the value of a specific extension.
For the following examples you need to start by listing all installed certificates in the root CA store.
Get-ChildItem -Path Cert:\CurrentUser\Root\The returned objects will be certificate objects you can use in the following examples.
Common extensions are already available as properties of the certificate objects. In the below example you are using Get-Member to list all the properties of the returned objects.
Get-ChildItem -Path Cert:\CurrentUser\Root\ | Get-Member -MemberType Properties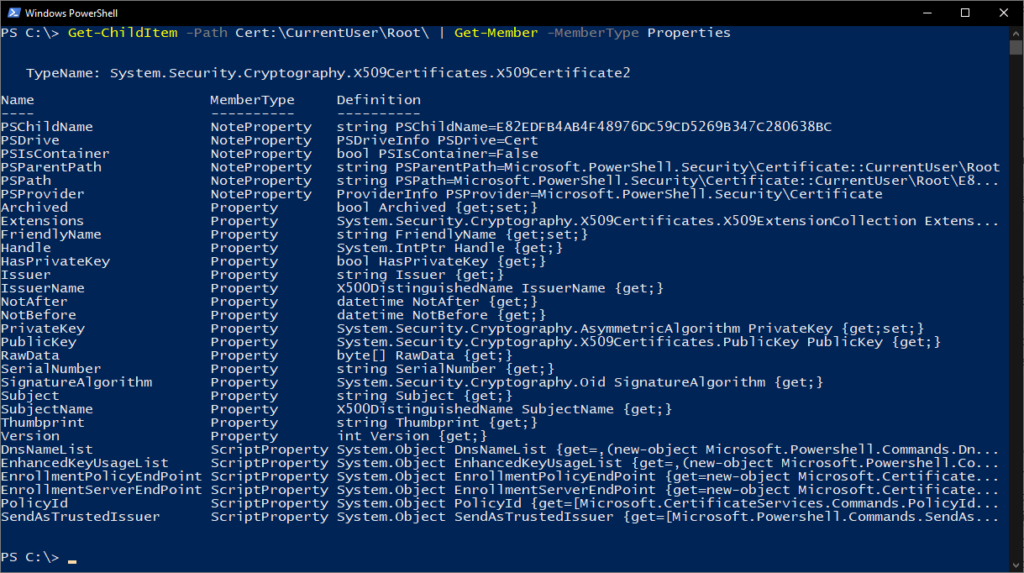
As you can see in Figure 9, some of these extensions, like Issuer, are helpful for finding the certificate you are looking for. Extensions supply information about the certificate, such as who it is issued to, what it can be used for, and any restrictions on it.
In more complex use cases you will want to find certificates by other extensions, like the certificate template used. The difficulty is the values for these extensions return as an array of integers. These integers correspond to ASN.1 encoded content.
The existing ScriptProperties available on the object show examples for interfacing with these. In the below command you will pull the Key Usages manually to see this relationship.
((Get-ChildItem -Path Cert:\CurrentUser\Root\ | select -First 1).Extensions | Where-Object {$_.Oid.FriendlyName -eq "Key Usage"}).format($true)The new piece we introduce in the above command is the format method, which performs the ASN.1 decoding. You pass it a boolean value (e.g. $true) above to identify whether we want the returned object to be single-line or multi-line.
You will use the Thumbprint value from the certificate in Figure 7 in the below command. The Thumbprint value is set as a PowerShell variable and used to select the specific certificate in the below commands.
$thumb = "cdd4eeae6000ac7f40c3802c171e30148030c072"
Get-ChildItem -Path Cert:\CurrentUser\Root\ | Where-Object {$_.Thumbprint -eq $thumb}
Creating Self-Signed Certificates with PowerShell
PowerShell can create self-signed certificates using the New-SelfSignedCertificate cmdlet. Self-signed certificates are useful for testing as they allow you to generate a public and private key pair without the use of a CA.
Let’s now create a self-signed certificate in the Current User and the Local Machine stores to use in examples for the next steps.
In the example below, PowerShell is generating a public and private key pair, a self-signed certificate, and installing them all into the appropriate certificate stores.
PS51> New-SelfSignedCertificate -Subject 'User-Test' -CertStoreLocation 'Cert:\CurrentUser\My'
PS51> New-SelfSignedCertificate -Subject 'Computer-Test' -CertStoreLocation 'Cert:\LocalMachine\My'
Using self-signed certificates for production services is not encouraged as all the trust-based mechanisms do not exist.
Importing/Exporting Certificates
Public key cryptography is fundamentally based on the public key being widely accessible. Given this tenement you need standard ways to effectively share certificates. Equally as important is security of your private keys. Storing private keys in inaccessible media, or with disaster recovery materials is a common practice for certain private keys.
Both of these require ways to store these cryptographic objects in standard formats. Exporting provides the functions to perform storing of these objects and ensure they use widely accepted standard file formats. Importing allows you to bring the cryptographic objects into Windows operating systems.
Using the Windows Certificate Manager (certmgr.msc)
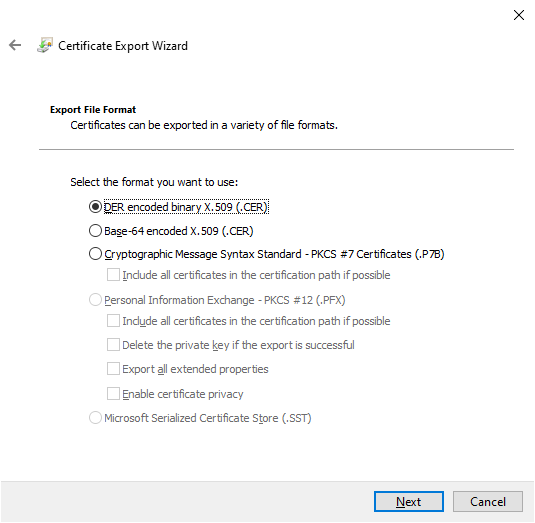
Exporting certificates from the MMC is relatively straight forward. To export a certificate without a private key, click on the certificate in the MMC, click on the All Tasks menu and then on Export.
During the export, you will be asked for a file format as shown below. The most common options are DER or Base-64 encoded.
Exporting Private Keys
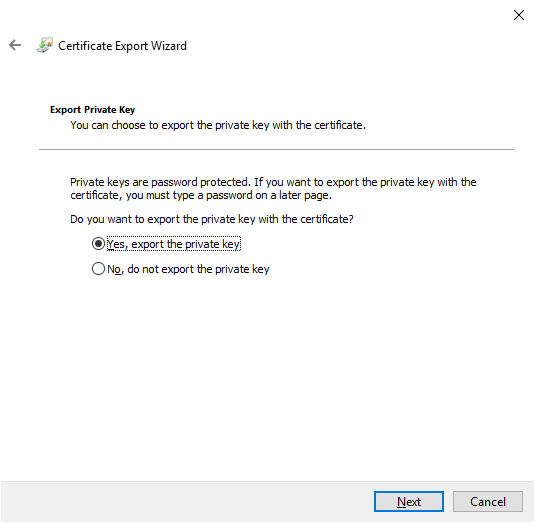
To export a certificate with an associated private key, you’ll have to meet two criteria; the logged-in account must have permission to the private key (for computer certificates only) and the private key needs to be marked as exportable.
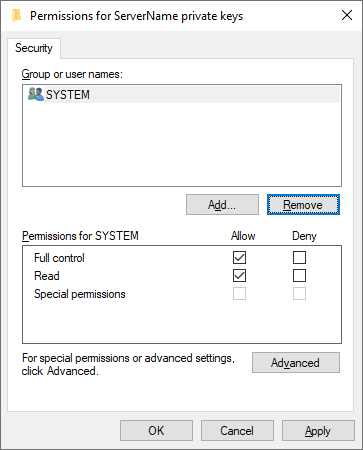
To verify the permissions for a local computer’s private keys, you can select a certificate with a private key, choose All Tasks, and Manage Private Keys from within the Certificates MMC. The dialog box that opens shows the access control entries for the private keys.
When those two or three prerequisites are met you can select a certificate, click on All Tasks and then on Export just like you would with a certificate with only a public key. When exported, you should now have option to select Yes, export the private key as shown below.
When you export a private key in Windows you can only save the file as a PFX. These file types and encoding formats are detailed at length in this post.
For the remaining settings shown in the export wizard, you can use the defaults. The below table is a quick rundown of each.
| Setting | Description |
|---|---|
| Including all certificates in the certification path if possible | Helps with portability of certificate issuers, and includes all pertinent public keys in the PFX |
| Delete the private key if the export is successful | Removes the private key from the file and has few common use cases, but one example is to test access to private keys |
| Export all extended properties | Will include any extensions within the current certificate, these relate to the certificates [specific settings]( |
| Enable certificate privacy | Normally only the private key will be encrypted in the exported PFX file, this setting encrypts the entire contents of the PFX file |
| Group or user names | You can use a group or user security principal from Active Directory for encrypting the contents of the PFX file, but a password is the most portable option across legacy systems or computers not joined to the same domain |
Importing Certificates
The import function is the same for all supported certificate file types. The only difference is if the file includes a private key you can “Mark this key as exportable”, which you will read more on below. Windows will leverage the Certificate Import Wizard.
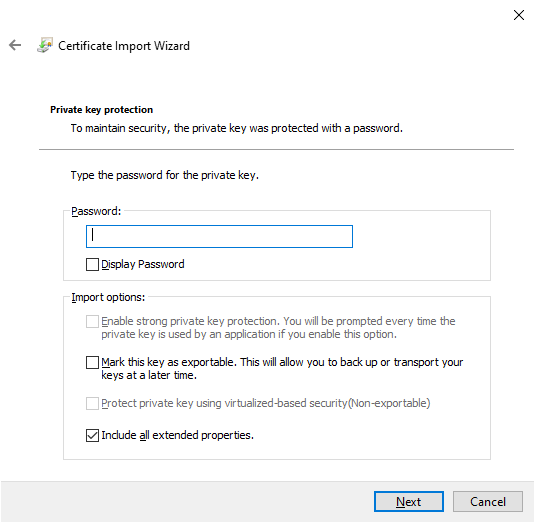
When you use the Certificate Import Wizard for a PFX you will need to supply the password used to encrypt the private key. Here is another recap of the import options.
| Setting | Description |
|---|---|
| Enable strong private key protection | Requires a password for each access of a private key, be cautious of newer functions as they will not be supported in all software |
| Mark this key as exportable | You should try to avoid using this setting on any end system, private keys should be treated similarly to storing passwords |
| Protect private key using [virtualization-based security] | The setting provides more security functionality for protecting private keys from advanced malware attacks |
| Include all extended properties | Relates to the same Windows-specific settings discussed as with exporting |
PowerShell code signing certificates are a good use case for strong private key protection.
Automatic placement of certificates can be something of which to be cautious. You will likely have the best results manually selecting the certificate store.
Using PowerShell
Now, with PowerShell export one of the self-signed certificates you created earlier. In the example the Current User is used, but you can use either.
Below, you are selecting a certificate in the Current User Personal logical store that was self-signed, meaning where the issuer matches the subject.
$certificate = Get-Item (Get-ChildItem -Path Cert:\CurrentUser\My\ | Where-Object {$_.Subject -eq $_.Issuer}).PSPathNow that you selected a certificate, you can use the Export-Certificate command to save a DER encoded file using the command below.
Export-Certificate -FilePath $env:USERPROFILE\Desktop\certificate.cer -Cert $certificateNow lets look at exporting the private key as well. Below you are verifying that the certificate you selected has a private key, if this does not return true, then the Get-Item command likely selected the wrong certificate.
$certificate.HasPrivateKeyBelow you will set a password to use for encrypting the private key. Then export the selected certificate into a PFX file and use the password you entered earlier to encrypt the file.
$pfxPassword = "ComplexPassword!" | ConvertTo-SecureString -AsPlainText -Force
Export-PfxCertificate -FilePath $env:USERPROFILE\Desktop\certificate.pfx -Password $pfxPassword -Cert $certificate
Similarly to exporting, there are two commands. One command for importing certificates and one for importing PFX files.
Below the Import-Certificate command imports the DER encoded file that you exported earlier to the Current User’s Personal store.
Import-Certificate -FilePath $env:USERPROFILE\Desktop\certificate.cer -CertStoreLocation Cert:\CurrentUser\MyLet’s say you want to install that certificate’s private key too.
$pfxPassword = "ComplexPassword!" | ConvertTo-SecureString -AsPlainText -Force
Import-PfxCertificate -Exportable -Password $pfxPassword -CertStoreLocation Cert:\CurrentUser\My -FilePath $env:USERPROFILE\Desktop\certificate.pfx
Keep in mind that the password needs to be a Secure String. As well, if you are importing to the Local Machine store (e.g. Cert:\LocalMachine\) you will need to run the command from an elevated Administrator prompt.
In the above example, you also use the Exportable parameter with the command, marking the private key as exportable in the future. The default is to not be exportable. Exportable private keys are another security consideration, and deserves further focus on how you secure them.
There are also many other things to do with certificates in Windows so you should explore more.
Removing Certificates with PowerShell
When removing certificates you need to keep in mind there is no Recycle Bin. Once you delete a certificate, it’s gone. This means it is critical to confirm you are deleting the correct certificate by validating a unique identifier, like the Serial Number or Thumbprint extension value.
Similarly to above, in the below command we select a self-signed certificate from the Current User’s Personal store.
$certificate = Get-Item (Get-ChildItem -Path Cert:\CurrentUser\My\ | Where-Object {$_.Subject -eq $_.Issuer}).PSPathBelow you can see the Thumbprint, Serial Number, and Subject properties for the selected certificate to ensure it is the certificate you intend to select.
$certificate.Thumbprint
$certificate.SerialNumber
$certificate.Subject
Verify you have selected the correct certificate you intend to delete.
The below command removes all selected certificate objects, please use with caution. By passing the $certificate object through the pipeline to the Remove-Item cmdlet in the below command, you will delete all certificate content without any validation prompts.
$certificate | Remove-ItemSummary
Throughout this article you have worked with certificates in Windows, learning how to access them and some tools to use when working with them. There is much more to explore on the topic, including how to associate installed certificates with specific services, or even how to implement a private Public Key Infrastructure (PKI) by deploying your own Certificate Authorities (CA).


