
Infrastructure as code (IaC) is an important component in a DevOps world. By treating infrastructure like code, DevOps engineers can do a lot more with less management. With IaC being so important, Terraform and DevOps go hand in hand. This is why Terraform in Devops is so popular.
But why is Terraform so popular when other tools like Ansible, Azure Resource Manager Templates, Chef, Puppet, and others exist? In this article, you will find out. You’ll learn the reasons behind the popularity of the Terraform and even go through a simple demo to see it in action!
If you’re ready, let’s get started!
Why do Terraform in DevOps go hand in hand?
Terraform in DevOps arena is proven to be a valuable tool for many different purposes, with each purpose sitting squarely on any DevOps pros’ shoulders.
- Can manage a multi-cloud environment – Terraform doesn’t discriminate when it comes to the cloud. Terraform natively supports cloud service providers like Amazon Web Services (AWS), Google Cloud Platform (GCP), Microsoft’s Azure, and more. Using Terraform, you can create a single configuration file to manage one or five different cloud environments. You could host an Azure SQL database, EC2 instances in AWS, and storage in GCP: Terraform doesn’t care.
- A declarative approach to configuration – Unlike common scripts that use an imperative approach (defining a sequence of tasks), Terraform uses a declarative approach. Terraform declares the desired state of an infrastructure resource and keeps it that way. With its declarative approach, the order in which resources are defined isn’t important. It’s smart enough to know many resource dependencies on its own.
- State-based lifecycle management – Terraform keeps a record of every resource it provisions. Terraform tracks state across one or 100 iterations by using the previous state and ensures resources are always in the expected state. Regardless of how the infrastructure is configured today, Terraform will ensure the state is as you define it. Whether you’re creating, updating, or removing a resource, Terraform will carry out your orders with minimal finagling.
- Idempotency – Regardless of the state of the infrastructure, Terraform will ensure the state you’ve defined for it is applied. Terraform is idempotent, meaning you can run it as many times as you’d like, and if no updates are needed, it will simply ignore any needed changes.
- Easy to understand language – Terraform mainly uses a language called Hashicorp Configuration Language (HCL). Unlike other IaC tools, HCL is less verbose and easier to understand.
Demo: How Terraform Does Infrastructure Provisioning
Enough talk. Let’s walk through a simple scenario of using Terraform to provision some cloud infrastructure. In this demo, you’ll get a glimpse into the basics of Terraform and the process of provisioning infrastructure with it.
Prerequisites
If you’d like to follow along with this demo, be sure you have the following:
- A code editor – Visual Studio (VS) Code is a great choice.
- An Azure account with rights to
- Docker – This demo will use Docker v20.10.2.
- Azure CLI – This demo will use v2.24.
- Terraform – This version will use v1.0.0.
- Authenticated to Azure with the Azure CLI
Creating a Docker Container in Azure
This demo will showcase using Terraform to create a Docker container in Azure. In this demo, you’ll use Terraform to create an Azure resource group called tfresname in the Azure region southafricanorth. Once created, you’ll then deploy create a Docker container called terraform-node-app.
Creating the Terraform Configuration FIle
1. Create a directory on your computer to store the Terraform configuration files. This demo will use ~/terraform-node-app.
2. Open your favorite code editor and create and save a text file called main.tf. This text file will be the Terraform configuration file you’ll define all resources in.
3. In the configuration file, define the azurerm provider, as shown below. You must define this provider so that Terraform can download the appropriate tools to work with Azure when you initialize it.
This demo is using v2.5.0 of the azurerm provider. Refer to the Terraform changelog for the latest version.
You’ll also see an empty features block. The features block is where you can change the behavior of the provider, if necessary.
provider "azurerm" {
     version = "2.5.0"
     features {}
4. Next, add a azurerm_resource_group resource block to create an Azure resource group. The resource block below defines a user-configurable resource block called tf_resource and creates an Azure resource group called tfresname in the southafricanorth Azure region.
resource "azurerm_resource_group" "tf_resource" {
     name = "tfresname"
     location = "southafricanorth"
 }
5. Now, add a azurerm_container_group resource block containing a container you’d like to create. The below snippet creates an Azure container group to host the Docker image and container and defines a container called terraform-node-app using the Docker image deborahemeni/terraform-node-app.
resource "azurerm_container_group" "tf_container" {
     name     = "terraform_node_app"
     location = azurerm_resource_group.tf_resource.location
     resource_group_name = azurerm_resource_group.tf_test.name
 ip_address_type = "public" dns_name_label = "app_dns" os_type = "Linux" container {     name   = "terraform-node-app"     image  = "deborahemeni/terraform-node-app"     cpu    = "0.5"     memory = "1.5"     ports {         port     = 443         protocol = "TCP"     } }
 }
Running Terraform
Now that you’ve created the configuration file, Terraform needs to provision the resources; it’s time to run Terraform.
1. Open a command line and navigate to the ~/terraform_node_app directory.
2. Since this will be the first time you’ve tried to provision these resources, initialize Terraform. Initializing Terraform will tell it to download all of the necessary provider plugins as defined in the configuration file and perform other various checks.
terraform init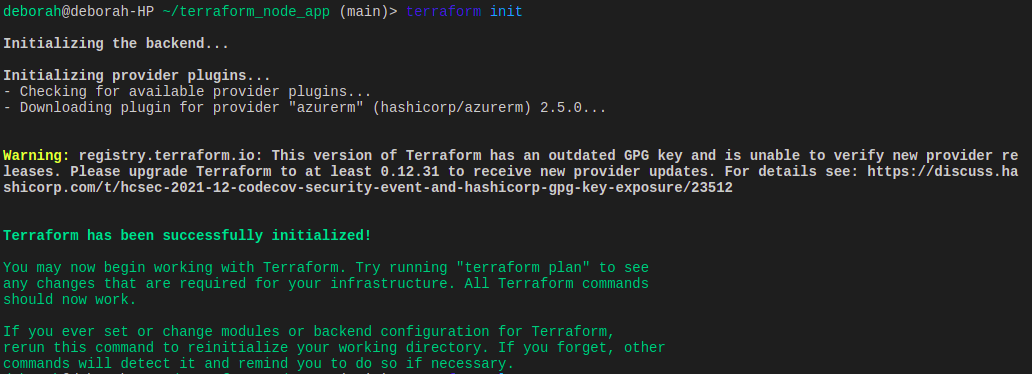
3. Next, preview the changes that Terraform should make were you to run it for real. This command reads the configuration file, runs through all of the logic and ensures the syntax is correct, and provides you with a summary of what would happen if run. terraform plan
terraform plan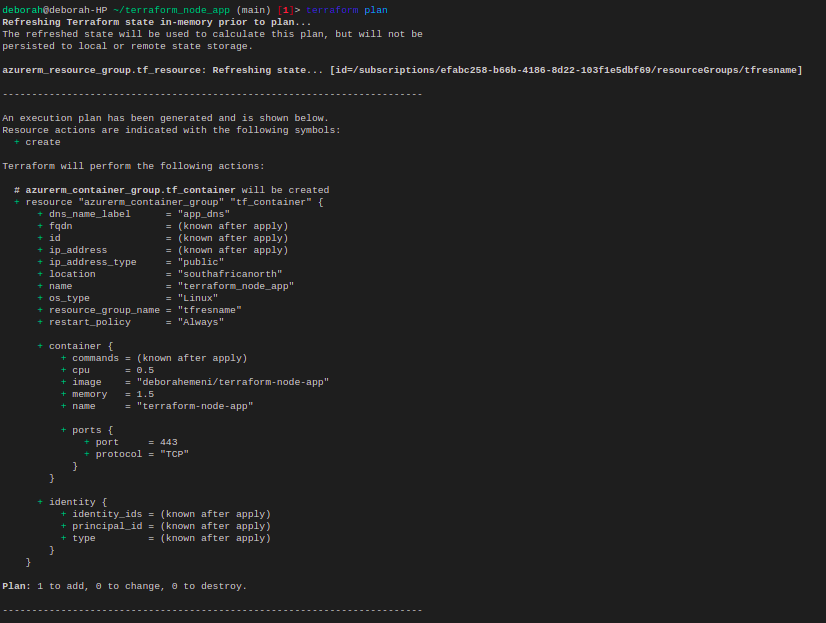
Finally, tell Terraform to apply the configuration. Terraform will then read the configuration file and carry out each instruction defined as blocks to build the Azure infrastructure.
By default, Terraform will confirm with you before it creates any resources. But, you can skip this prompt by using the
auto-approveparameter.
terraform apply
Terraform Challenges
Despite the popularity of Terraform in DevOps, you should know some of the challenges that many find with this tool.
1. No rollback – Upon the second or later execution, when Terraform encounters an error and has already created some resources, you cannot roll back to a previous state.
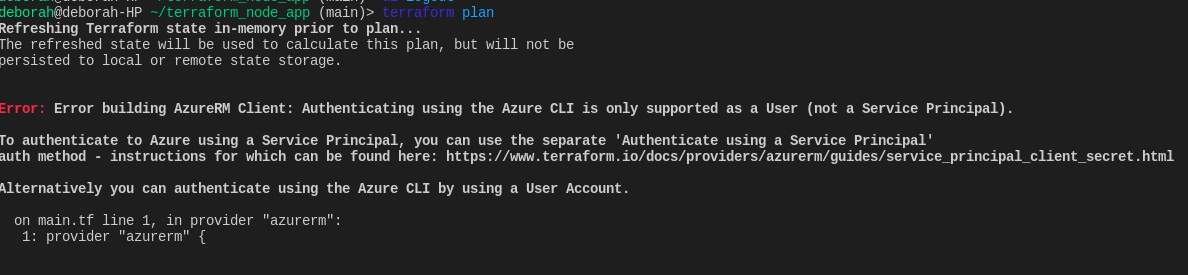
2. Error Handling – Sometimes, Terraform returns some obscure errors making it difficult for beginners to understand what’s wrong.
3. Only a command-line tool – Although some people consider only having a CLI a benefit, others would rather work in a graphical interface. If you don’t have much skill on the command line, Terraform may be a struggle at first.
Conclusion
You should now have a good understanding of how Terraform in DevOps work together. Terraform, as a tool, is a great addition to any DevOps pros toolbelt. With its idempotent, declarative nature, Terraform makes a great infrastructure automation tool!
But don’t be swayed by this article. Now, go find out for yourself! See if you agree with the benefits and challenges and begin working on your own Terraform project! What infrastructure will you automate with Terraform?


