
PowerShell Remoting (PSRemoting) is one of the most-used features in all of PowerShell. Why? Because it’s so darn useful! Using a single command, you can seamlessly connect to one or thousands of remote computers and execute commands.
In this Ultimate Guide, you will go deep into PSRemoting. You’ll learn what it is, how it works, and all of the various technologies that make PSRemoting work. This guide will not cover how to use PSRemoting. You’ll see plenty of references to many of our how-to guides throughout.
How PSRemoting Works
In a nutshell, PSRemoting allows you to run commands on remote computers just as if you were sitting in front of them. PSRemoting provides a set of features that connects and authenticates a user user, runs remote commands and returns any output from that command to the local computer.
Think of PSRemoting like telnet or SSH or even psexec. It’s just a way to run commands on computers within PowerShell.
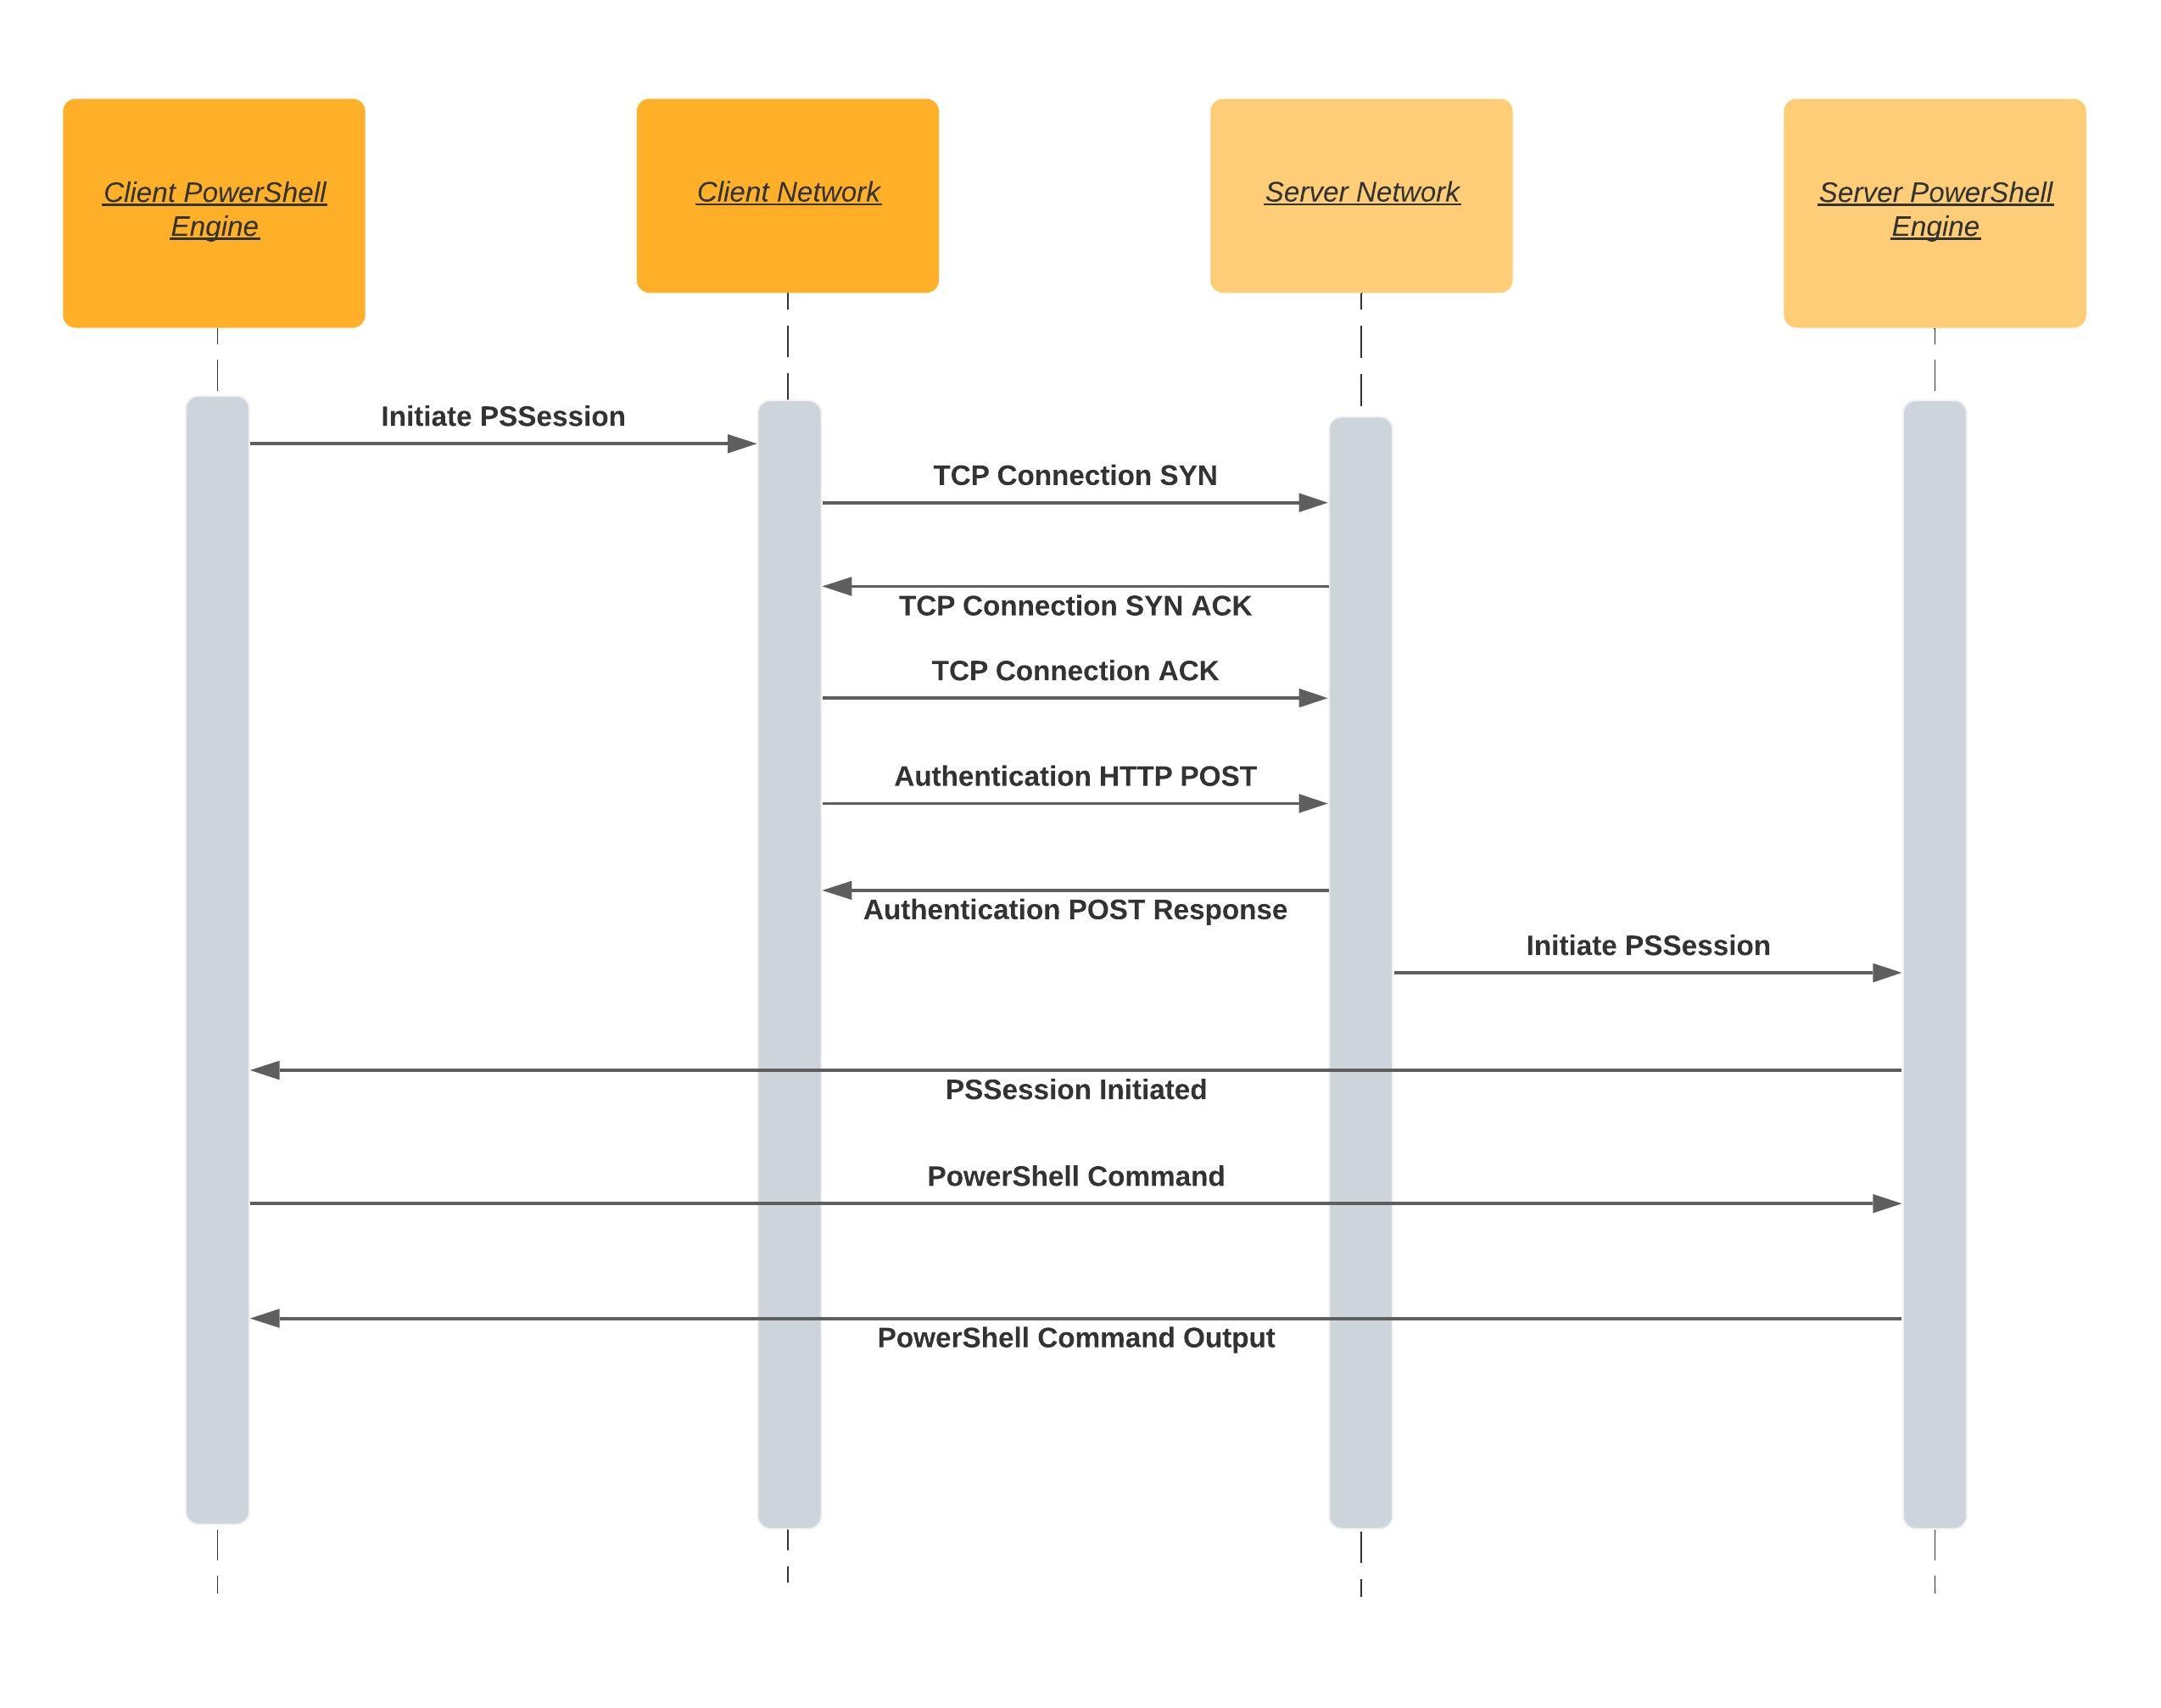
PSRemoting heavily relies on a concept called a session. A session is a term used to describe a remote shell that runs commands inside. The process to create one of these sessions goes through many steps in the background.
When you initiate a PSRemoting session, the following rough steps carry out:
- The client attempts to connect to the destination server on a WinRM listener (more on WinRm listeners below). A WinRM listener is a tiny web service that runs on the destination server. WinRM is Microsoft’s implementation of a standard called WSMan. WSMan is an open standard created with many other large tech companies at the time like Dell, Intel, and Sun Microsystems.
- When the client connects to the listener over the HTTP or HTTPS protocol, the authentication process begins. All details of each method of authentication will be covered later, but for now, just know that the client needs to pass credentials to the server in some manner.
- After the client connects and authenticates to the server, PSRemoting creates a session.
- Once the PSRemoting creates the session, it then is open for business. At this point, the client can begin sending information to the server with the server returning any necessary output known as serialization. This communication is typically encrypted.
WinRM Listeners: Available for Connection
A client needs somewhere to connect to when coming in from over the network. The client needs to “talk” to something that’s “listening” on the other side; that “listening” is the role of the WinRM listener.
You can discover all of the WinRm listeners running on any Windows computer by using the winrm command below.
winrm e winrm/config/listener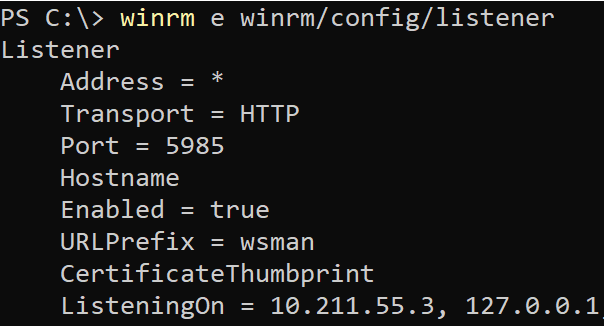
WinRm listeners have a few important components. They have:
- A listening address – The listening address is the IP address that they bind to. This is the IP address that a client connects to.
- The type of transport – Every WinRM listener needs a way to communicate with the client; they do this via a transport using either HTTP or HTTPS.
- An optional certificate thumbprint – When a WinRM listener uses HTTPS for the transport, it must know what private key to authenticate the client against; this key is found using a certificate thumbprint.
Use an HTTPS listener when possible. Setting up HTTPS transport increases security by ensuring server validity and encrypting both the authentication and transport traffic. When issuing a certificate, use a trusted certificate from a certification authority, when possible rather than a self-signed certificate.
Trusted Hosts: Validating a Server
How PSRemoting Authentication over WinRM Works
As stated above, one of the first steps that PSRemoting goes through is authentication. Authentication is one of the most complicated yet most essential parts of PSRemoting.
When PSRemoting was first introduced, it only had one authentication mechanism, Windows Remote Management (WinRM) but nowadays, you can also authenticate using SSH which you’ll see later.
WinRM supports two distinct types of authentication; a username and password or a certificate with various types of authentication for a username/password combination.
Basic Authentication
Starting at the easiest, yet most insecure type of authentication is Basic authentication. This type of authentication is a standard built into the HTTP protocol. Basic authentication sends a base64 encoded copy of the username and password in the HTTP header from the client to the listener.
Because Basic authentication only encodes the username and password and does not encrypt it, it’s trivial to intercept the credentials over the network.
Do not use Basic authentication unless you absolutely have to. There are many other more secure methods WinRM can authenticate!
Kerberos Authentication
Are both your client and server in an Active Directory environment? If so, you’re using already using Kerberos authentication across many of your network services.
When the WinRM client attempts to connect to a WinRM listener over Kerberos:
- The server first attempts to retrieve a session key or ticket-granting-ticket for the client from a domain controller.
- The domain controller looks up the client and the server and if both are valid and trusted, it issues the token.
- The server then validates the client’s connection using the trusted token rather than the username and password.
During Kerberos authentication, the domain controller validates both the client and server during the ticket retrieval steps stopping someone malicious from impersonating the server.
Kerberos is a mature and secure authentication method and is the default authentication type when a client and server are both members of an Active Directory domain. But, it does require both client and server to be joined to the same Active Directory forest or with a trust set up between forests.
Negotiate Authentication
WinRm can also attempt to use Kerberos and if not available fall back and attempt to use an authentication protocol called NT Lan Manager (NTLM).
When using NTLM:
- The server sends the client a string.
- The client then encrypts the string with a hash of the user’s password.
- The encrypted string is then sent back to the server that sends the username, original string, and encrypted string to a domain controller.
- The domain controller then looks up the password hash for that user and repeats the same encryption process on the string to ensure it matches.
NTLM is good for validating the client, but unlike Kerberos, it does not validate the server. This opens up multiple attacks where the server could be impersonated by an attacker.
You can improve NTLM security by also validating the server with a server authentication certificate and assigning it to an HTTPS WinRM listener. In this setup, the client is authenticated with NTLM against the domain controller, and the server is authenticated with a trusted certificate. Although this setup provides both client and server authentication, the NLTM protocol uses an older encryption cipher with an outdated key size.
For these reasons, NLTM is only usable if you add the server to the trusted host list or use an HTTPS listener.
Digest Authentication
One of the most uncommon authentication methods to use in WinRM is Digest authentication. NTLM and Digest are similar authentication methods. Like NTLM, Digest generates a unique string that is encrypted with the hash of the user’s password. The password then doesn’t need to be sent to the server.
Digest uses the MD5 hashing algorithm to encrypt the password. Due to this choice of algorithm, Digest is generally seen as obsolete and should not be used. MD5 has various known vulnerabilities that make it unsuitable for cryptographic use.
Credential Security Support Provider (CredSSP)
Although we could go into the ins and outs of CredSSP, it’s not necessary. Why? Because when it comes to PSRemoting and WinRM, CredSSP is implemented for typically one reason, the “second hop problem” which you’ll learn about below.
When configured for CredSSP authentication, the WinRM client and server both use Negotiate authentication to authenticate both the user and client. But once completed, the user’s password is sent to the server.
Because the password is sent after the authentication process has been completed, it is now encrypted. CredSSP also encrypts the password with the TLS session keys so that the encrypted string will be unique between sessions.
CredSSP is helpful because after authentication, the server can then connect to anything else on your behalf. However, when this happens, you are fully trusting the server you connected to with the user password.
Certificate-Based Authentication
Arguably the most secure method of authentication to use with PSRemoting is certificate-based authentication. In this method of authentication, a typical key exchange happens with a private and public key on the client and a server validating the certificate.
WinRM authenticates the user by mapping a user on the server within WinRm. The only thing that is passed during the authentication process is the public key so it is a very secure way to authenticate
Although the most secure, certificate-based authentication is not too common. Why? Simply because of the leg work necessary to set it up. You must:
- Build a certificate authority
- Create a user authentication certificate
- Share the public key
- Use local user account with appropriate permissions (Administrators group probably)
- Set up an HTTPS listener
- …and other steps.
You cannot use a domain user to authenticate with certificates even if the client and server are both a part of Active Directory.
Windows OS Authentication Defaults
Now that you’ve seen there are many different authentication options available, how do you know which are available out-of-the-box? Below you’ll see a table with two columns indicating if the WinRM client, by default, is enabled and if that particular authentication type is enabled by default.
All of the aforementioned authentication types are configurable but using the table below will give you a good idea of what you’ll need to configure yourself.
| Method | Client | Service |
| Basic | Enabled | Disabled |
| Kerberos | Enabled | Enabled |
| Negotiate | Enabled | Enabled |
| CredSSP | Disabled | Disabled |
| Digest | Enabled | Disabled |
| Certificate | Enabled | Disabled |
The Second Hop or Double-Hop Problem
One of the biggest issues with PSRemoting is known as the “second hop problem” or a “double-hop”. This situation occurs when you connect to a remote system over PSRemoting and you then need to connect to another remote computer.
This situation is problematic because when the WinRm client authenticates to the first remote computer, the server only validates the identity of the originating client without sending the password to the server. When you attempt to connect to the second computer from the server of the first connection, the final server does not have any way to validate the user’s identity.
You can solve the double-hop problem a few different ways either through using CredSSP or Kerberos Delegation.
Using CredSSP
The most common way to get around the double-hop problem is by using CredSSP. CredSSP authentication gets around this situation by storing a user credential on the first remote server which the server turned client can then pass to the second remote server.
There’s one catch to using CredSSP though. The user credential stored on the first remote server can be stored in plain-text thus introducing an obvious security concern. In newer operating systems a hash of the password and the Kerberos Ticket Granting Ticket (TGT). These can be used together to authenticate as the user anywhere on the network just like a plain-text password, but it does lower the risk a little.
With Negotiate, the client and server pass information back and forth to validate who they say they are, but the user’s password is never accessible. Due to this security feature, there is no way that the 1st server can authenticate you when you connect to the 2nd server.
Using Kerberos Delegation
Kerberos, as mentioned earlier, is a common way to set up PSRemoting. Being part of the ubiquitous Active Directory and already set up, by default, it’s extremely common. Although on its own, Kerberos is a fine way to authenticate WinRM, it doesn’t get around the double-hop problem.
To get around the double-hop scenario, you can use a second type of authentication known as Kerberos Delegation. Although there are many varieties of Kerberos Delegation, the only variety capable of (and secure enough) to pose as an alternative to CredSSP is called Kerberos Constrained Delegation more specifically resource-based Kerberos Constrained Delegation.
Resource-based Kerberos Constrained Delegation is a form of delegating Kerberos authentication tokens based on domain resources, like computers, in this case, that is constrained to a specific list of Kerberos (Active Directory) objects.
To configure this Kerberos delegation you need to edit the ADComputer object of the third computer in the chain. For example, if you were going to remote from ClientA to ServerB to ServerC, you have to edit the ADComputer object for ServerC, but you also need to know what ServerB will be. For this example run the below command in PowerShell:
Using resource-based Kerberos Delegation works for remote connections like …. or … but it will not work with PSRemoting. You will not be able to connect to a third computer when connected to a computer over WinRM using PSRemoting.
Setting up resource-based Kerberos Constrained Delegation is a one-line PowerShell command using the Set-ADComputer cmdlet. If, for example, you’re connected to ServerB from ClientA over PSRemoting and want to connect to ServerC with …., you can do so by running the below PowerShell command.
Set-ADComputer -Identity ServerC -PrincipalsAllowedToDelegateToAccount ServerBWinRm caches failed connections for 15 minutes. Because of this feature, you may not be able to connect to the third computer even after setting up resource-based Kerberos Constrained Delegation. To remediate, either wait or run the command
klist purge -LI 0x3e7on the third computer to purge the failed Kerberos tokens.
How PSRemoting Authentication over SSH Works
Although WinRm authentication is the most common method of authentication for PSRemoting, as of PowerShell v6, you have another way; SSH. Using SSH as an authentication method allows you to use PSRemoting with Linux.
SSH, unlike WinRm, requires some additional configuration on both the client and the server such as setting up an SSH client on the Windows client and …
Using SSH to handle the authentication means you are limited to the types of authentication that SSH supports. This narrows the list down with the main two being password-based and public-key-based.
There are other types of authentication supported by SSH, but they are usually deemed less secure than the password and public-key based options so we will just focus on these two.
Password Authentication
The easiest way to set up SSH authentication with PSRemoting is with password-based authentication. Password-bassed authentication allows you to provide a password to validate yourself.
In the SSH authentication process, the password is exchanged after the SSH connection is made and the password is encrypted in transmission. Unlike some authentication methods used by WinRM, like Kerberos, this authentication method does send the whole password to the server.
You can sorta compare SSH password authentication to the WinRM authentication method Basic using an HTTPS listener. The password itself is not protected in any meaningful way, but the entire connection, including the password, is encrypted based and the server is validated based on a certificate.
Certificated-Based Authentication
While password-based authentication is easy to set up and straightforward to use, it has two issues.
- First is there is no way to authenticate in an unattended format securely.
- Password authentication still sends a password across the network. While the password is encrypted within the SSH connection, the server receives the whole password. If the server is in some way compromised, it could become a security issue.
Certificate-based authentication, on the other hand, does not send any sensitive data across the network like the password. Instead, the server has a copy of a public key, the client has a copy of the private key and the negotiations happens on the server.
A rough workflow goes as follows:
- When the client attempts to authenticate, it sends the ID or thumbprint of the public key to the server.
- If the server has the public key listed as authorized, it responds with a string encrypted with the public key.
- The client then decrypts the string with the private key.
- The private key is then hashed with a session ID.
- The session ID is sent back to the server, which then compares it against the hash is generated using the original string and session ID.
- If the session ID hash from the client and the session ID on the server match, the client authenticates and is allowed to connect.
Anything encrypted with the public key can only be decrypted with an associated private key. Anything encrypted with the private key can only be decrypted with the public key. The session ID is also thrown in to provide what is called Perfect Forward Secrecy (PFS).
PFS provides security if the private key is compromised, the attacker would not be able to decrypt all of the messages that had gone back and forth. A unique session ID means that the shared secret used to encrypt communication is different for every session.
Certificate-based authentication with SSH, like WinRm, does require additional effort to set up such as generating the private/public key paid and authorizing the public key on the remote server.
User Rights Required to Connect
By default, two local groups of users can connect to a server remotely using PSRemoting; Administrators and Remote Management Users.
While you can just add user accounts to the local Administrators group on a remote server, you should always provide the least amount of access. If a user simply needs to connect with PSRemoting to a remote computer, can add the user account to the Remote Management Users group; not Administrators.
To further control PSRemoting access, you can also use a feature called Just Enough Administration (JEA). JEA allows non-administrator users to only run specific commands as administrators in PowerShell’s constrained language mode.
Implicit vs. “Explicit” Remoting
If you’ve used PSRemoting before, you’re probably familiar with commands like Invoke-Command, New-PSSession, Enter-PSSession, etc. When you run these commands, it’s clear you’re connecting to a remote computer somehow. You’re explicitly using PSRemoting.
When you run PSRemoting-specific commands, you’re explicitly running those commands but did you know there’s another way? Instead of invoking Invoke-Command and other cmdlets directly, you can leverage PSRemoting by using implicit PSRemoting.
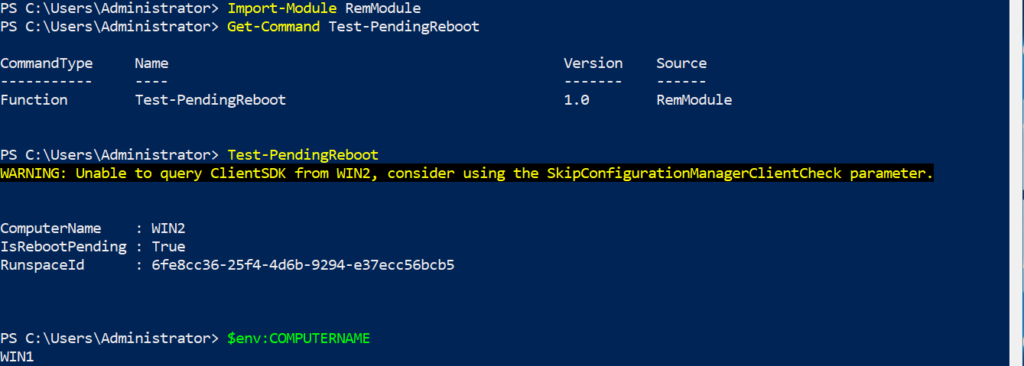
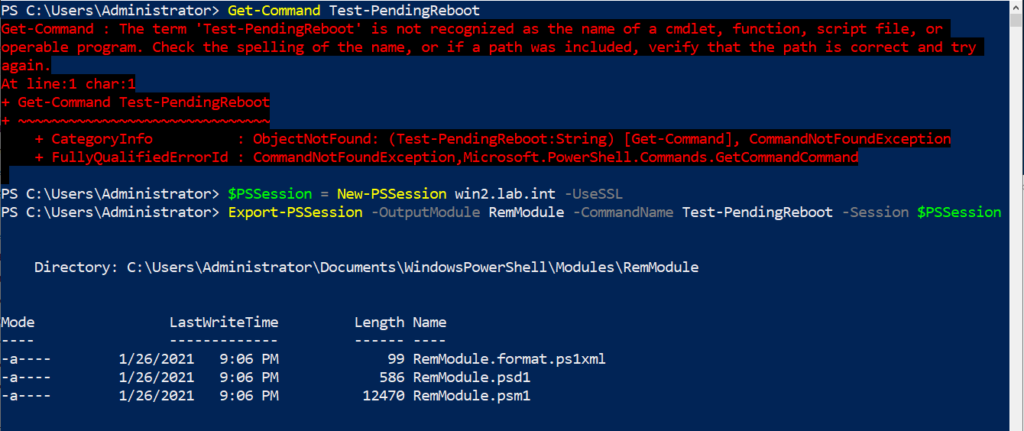
Implicit PSRemoting may looks like you are running the commands locally within your PowerShell session, but they are actually running on a remote machine. A good example of this is using a module that is not installed on your system. Instead of installing it locally you can export commands from a PSSession which will allow you to run them as if they were installed locally.
In the below screenshot you can see the that I do not have the Test-PendingReboot command. Then I connected to a remote machine and export that command.
Next if that module is imported, I can then execute the Test-PendingReboot command. This is shown below, but you will notice that it shows that the computer name in the output is not the name of the device that PowerShell is running from, but the device that the command was imported from.