Thank you for reading this post on how to administer IIS with PowerShell!
This page was created using the newer IISAdministration PowerShell module.
Keep calm and learn PowerShell.
``` ### Creating an IIS Website It’s now time to make the webpage just created available for the world to see. To do that, you’ll need to create a _[virtual directory](https://docs.microsoft.com/en-us/iis/configuration/system.applicationhost/sites/site/application/virtualdirectory)._ The virtual directory contains all of the assets and resources used for the page being served. > _By default, IIS creates a virtual directory under C:\\inetpub\\wwwroot. The directory contains all of the default webpage assets and resources for IIS. You could use the default C:\\inetpub\\wwwroot directory to store your files as well, but for these examples, it will not be used to keep the paths as short as possible. That’s why you are using C:\\MyWebsite instead._ To create a new virtual directory (site), use the [`New-IISSite` cmdlet](https://docs.microsoft.com/en-us/powershell/module/iisadministration/new-iissite). This cmdlet allows you to create the IIS website. For this article, create a website called _Mywebsite_ pointed to the _C:\\MyWebsite_ directory that’s listening on port 8088. In the code snippet below, you can see how to do this using the `New-IISSite` cmdlet. The only piece that might be confusing is the `BindingInformation` parameter. This parameter allows only [binding syntax](https://docs.microsoft.com/en-us/iis/configuration/system.applicationhost/sites/sitedefaults/bindings/binding). In this snippet, `New-IISSite` will create a website that is bound to an IP address (`*` is the same as 127.0.0.1), the TCP port to listen on followed by any HTTP headers. _Binding syntax can be explained as protocol, followed by source:Port:destination . In this example, you’ve configured IIS to listen for HTTP requests from ANY (_) IP address on port 8088 and the destination is the localhost.\* ```powershell PS> New-IISSite -Name 'MyWebsite' -PhysicalPath 'C:\MyWebsite\' -BindingInformation "*:8088:" ``` Once the site has been created, you can run `Get-IISSite` to inspect what it looks like as shown below.  Creating a New Website in IIS By default, the website configuration is started and your web host begins serving those HTTP requests. Open your browser of choice and navigate to the local machine pointing to port 8088. You should now see the webpage you created earlier displayed. 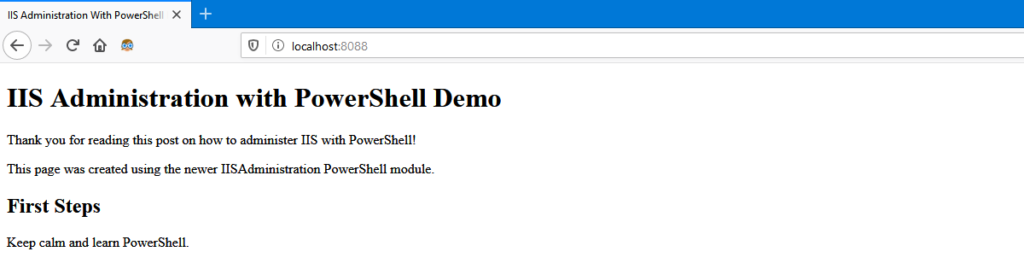 MyWebSite IIS site in a web browser Congratulations! You’ve just set up your first website on IIS using PowerShell! Now that you have a website up and running, it’s time to learn how to manage your website and the IIS server hosting it. ## Managing the IIS Website Once a website is up running, you will undoubtedly need to perform common actions like stopping and starting the site. For example, if the site needs updates made to it, you’ll sometimes have to restart the site. To manage the site in PowerShell, you have two cmdlets to work with – [`Start-IISSite`](https://docs.microsoft.com/en-us/powershell/module/iisadministration/start-iissite) and [`Stop-IISSite`](https://docs.microsoft.com/en-us/powershell/module/iisadministration/stop-iissite). These two cmdlets work similarly to how the `Stop-Service` and `Start-Service` cmdlets operate. Stopping a website is similar to stopping a Windows service. You are preventing or allowing access to the site accessible by a protocol being served on a unique port by IIS. However, you are not stopping the _IIS host_. Sites can be stopped and started on an _individual_ basis. ### Stopping a Single Site To stop an IIS website, you will use the `Stop-IISSite` cmdlet. By default, the site that you created earlier should be in a `Started` state. If you stop the site and thus prevent access to _MyWebsite_, run `Stop-IISSite` providing the name as shown below. This code stops the _MyWebsite_ site from being served by IIS. After stopping the site, you will no longer be able to access it. ```powershell PS> Stop-IISSite -Name "MyWebsite" ``` An example of inspecting the website’s state as `Started`, stopping and inspecting the state again is shown below. In this example, you are: 1. Getting the status of the _MyWebsite_ site using `Get-IISSite`. 2. Execute the `Stop-IISSite` cmdlet against the _MyWebsite_ site. This cmdlet shuts down access to the website. Since this action is making operational changes you will be prompted for confirmation. 3. Running `Get-IISSite` again to verify that _MyWebsite_ site is stopped by noticing the `Stopped` state. 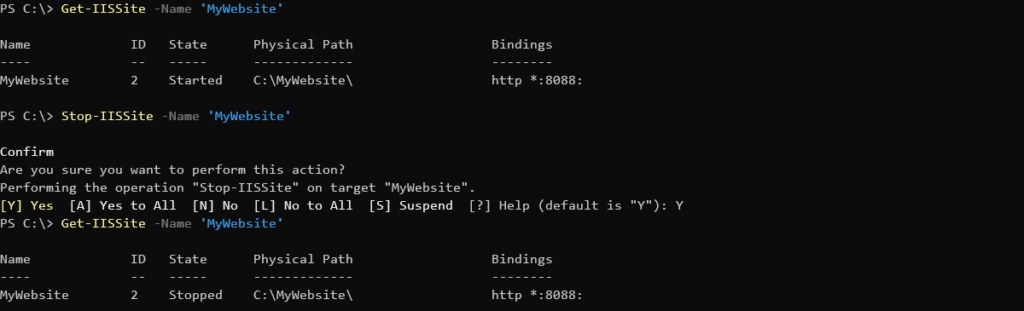 Getting, stopping, and confirming MyWebsite state ### Stopping All Sites Above you stopped a single site but you can also stop all sites just as easily. By using the pipeline and piping the output of `Get-IISSite` to `Stop-IISSite`, PowerShell will enumerate all sites and stop them all. In the below code example, the optional `Verbose` switch parameter is used to show more information. ```powershell Get-IISSite | Stop-IISSite -Verbose ```  Stopping all IIS sites with PowerShell > _You can also stop all sites in IIS by stopping the W3SVC or World Wide Web Publishing Service. Stopping the Windows service shuts down IIS and prevents all sites being served. If you do this, however, the sites may still show to be in a Started state._ ### Starting a Single Site Let’s say you’ve made some changes to the _MyWebsite_ site and need to start it back up again. It’s time to use the `Start-IISSite` command. To do that, simply specify the name just as you did by using the `Stop-IISSite` cmdlet. ```powershell PS> Start-IISSite -Name 'MyWebsite' ``` When executed, you can then inspect the state again using `Get-IISSite`. When you do, you should then see similar output to the screenshot below. 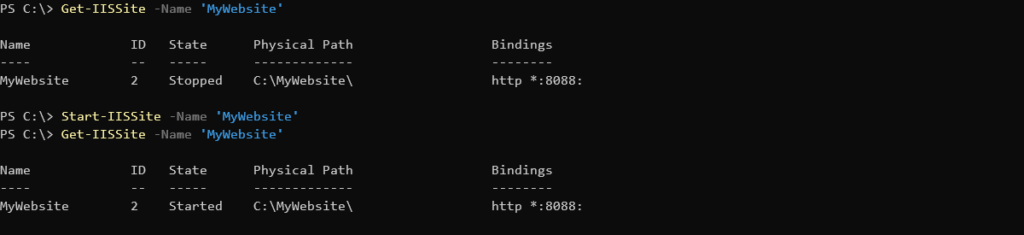 Checking the status of _MyWebsite_ using `Get-IISSite` and starting the site with `Start-IISSite` And now your site should be available again at _[http://localhost:8088](http://localhost:8088)_ if you refresh your browser. ### Starting All Sites Similar to how you stopped all sites from being published, you can use the pipeline to start all websites on your IIS host as well. ```powershell PS> Get-IISSite | Start-IISSite ``` Once again, you are getting all of the IIS sites being served and using the pipeline to start each one. Your output should look similar to the screenshot below.  Using the pipeline to start all sites on host ## Managing Web Bindings It’s now time to start performing some common administrative tasks on the _MyWebsite_ site. Of of the most common task is changing the web bindings. When you created the _MyWebsite_ site, you used the binding syntax of `*:8088:`. This syntax represented listening on the IP address 127.0.0.1, on port 80 with no HTTP headers. Let’s say now you’ve decided that you instead want the site to listen on port 9000 instead. To do this, you’ll need to modify the site bindings. ### Inspecting Existing Bindings Before you can change the site’s bindings, you should first inspect the current configuration. One way to do that is to inspect the `Binding` property returned by `Get-IISSite`. Notice in the next code snippet how to do that. In the snippet, `Get-IISSite` is querying the _MyWebSite_ site, and only returning the `Bindings` property. ```powershell PS> (Get-IISSite -Name 'MyWebsite').Bindings ``` When you inspect just the `Bindings` property, PowerShell will return an object with a few different pieces of information as shown below.  Example 1: Finding binding information If you’d like to only see the binding information, you can specifically reference the `bindingInformation` property as shown below.  Example 2: Finding binding information ### Removing Bindings If you’d like to change what port a site listens on, you must first remove the existing binding tying it to that port. To remove the binding, you first have to stop the site. ```powershell PS> Stop-IISSite -Name 'MyWebsite' ``` Once the site is stopped, you can now remove the existing binding tying the _MyWebsite_ site to port 8088. To do that, you can use the [`Remove-IISSiteBinding` cmdlet](https://docs.microsoft.com/en-us/powershell/module/iisadministration/remove-iissitebinding). To remove the binding for _MyWebsite_ as defined earlier, below you can see an example of using `Remove-IISSiteBinding` to do just that. Below, you are providing the name of the site and specifying the binding syntax discovered earlier. ```powershell PS> Remove-IISSiteBinding -Name 'MyWebsite' -BindingInformation "*:8088:" ``` When you execute the code, you will be prompted to confirm your decision since you are doing something destructive as shown below.  Removing site binding using Verbose parameter > _There’s no limit to how many bindings you can have. You can just as easily have kept the original binding and added TCP port 9000 as a new binding._ Now you can run `Get-IISSite -Name 'MyWebsite'` again. You’ll now see that the binding information has been removed as shown by the blank value under `Bindings`.  Confirming the old bindings were removed Even though the site is published, IIS has no way of knowing how to route traffic to your site. It is important to have at least one binding assigned to your site. To show you the importance, try to navigate to [http://localhost:8088/index.html](http://localhost:8088/index.html) again. If you were using Mozilla Firefox web browser, you may see this message below. 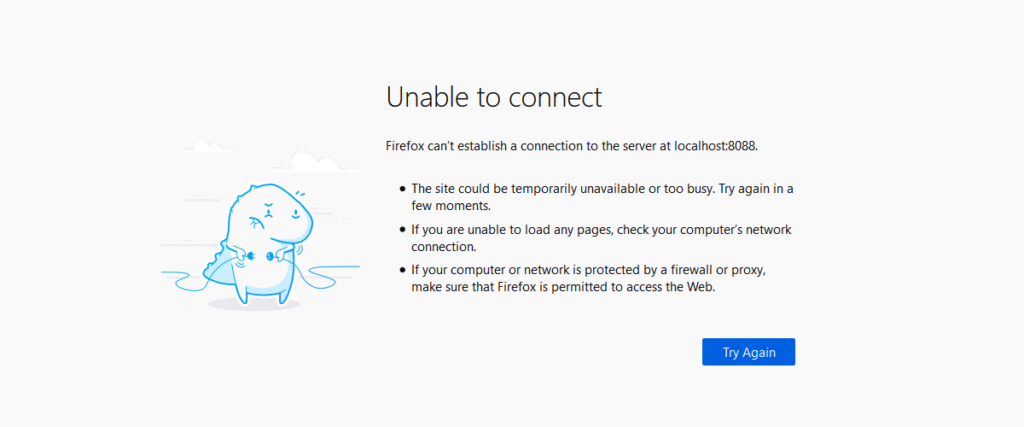 Can’t establish a connection ### Creating New Bindings In the last section, you removed the only site binding _MyWebsite_ had. While this broke the site, it’s only a temporary problem. It’s time to correct this issue by creating a new binding. To create a new binding, use the `New-IISSiteBinding` cmdlet. Since you need to bind port 9000 to the _MyWebsite_ site now, specify the correct binding syntax as shown below. ```powershell PS> New-IISSiteBinding -Name 'MyWebsite' -BindingInformation "*:9000:" ``` Once you’ve created the new binding, start up the site again with `Start-IISSite`. Recall that to create this new binding, IIS required the site to be brought down. When the site starts again, you should now be able to access it on port 9000. To verify this, open your web browser of choice and navigate to [http://localhost:9000](http://localhost:9000). You should now see the webpage is working again under port 9000. 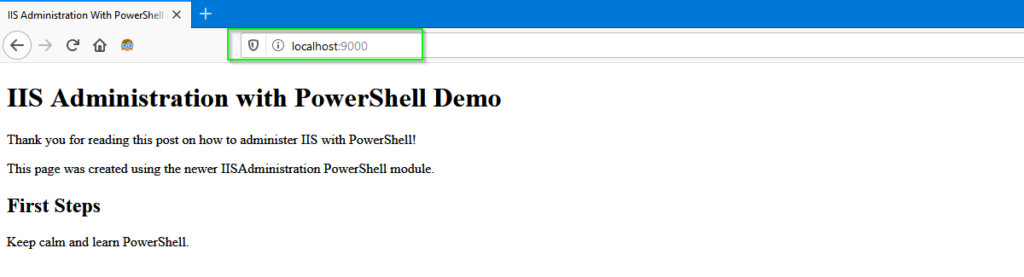 Same page, different TCP port ### Removing a Website This you just went through a tutorial and don’t intend to keep the _MyWebsite_ site around for good, it’s time to clean it up. To remove a site, use the `Remove-IISSite` cmdlet. Removing an IIS site can be a dangerous undertaking especially if you’re removing a site on IIS that’s hosting other production websites. To verify you’re removing the right site, it’s recommend to use the common [`WhatIf`](https://adamtheautomator.com/powershell-whatif/ "WhatIf") PowerShell parameter. This parameter allows you to inspect what _would_ have happen if the command would have actually run. You can see an example of removing the _MyWebsite_ site using the `WhatIf` parameter below. ```powershell Remove-IISSite -Name 'MyWebSite' -WhatIf ```  Being careful with destructive cmdlets by using `-WhatIf` ! If everything looks good, let go of the safety bar and re-run the code, this time without the `-WhatIf` parameter. > _When using the `Remove-IISSite` cmdlet, the site is not deleted. It is removed from the IIS configuration. Files for the website remain intact._ ## Summary In this article, you’ve learned to create a website using the IISAdministration module. You’ve seen how to perform administrative operations necessary to maintain a website. You now know enough of the basics to work with any modern IIS host using PowerShell! ## Further Reading * [**_IISAdministration PowerShell Cmdlets Reference_**](https://docs.microsoft.com/en-us/iis/get-started/whats-new-in-iis-10/iisadministration-powershell-cmdlets) * [**_Stay Up-To-Date on the latest in IIS Technology (iis.net)_**](https://www.iis.net/) * [**_Microsoft IIS Administration API_**](https://docs.microsoft.com/en-us/IIS-Administration/) Share this article [Share on X](https://twitter.com/intent/tweet?url=https%3A%2F%2Fadamtheautomator.com%2Fpowershell-iis%2F&text=PowerShell%20IIS%20Mastery%3A%20Create%20and%20Manage%20Websites)[Share on Facebook](https://www.facebook.com/sharer/sharer.php?u=https%3A%2F%2Fadamtheautomator.com%2Fpowershell-iis%2F)[Share on LinkedIn](https://www.linkedin.com/sharing/share-offsite/?url=https%3A%2F%2Fadamtheautomator.com%2Fpowershell-iis%2F) ## Related Posts  ### [Managing IIS App Pools: A PowerShell Tutorial](/powershell-iis-2/) Learn to create, modify, and remove IIS application pools using PowerShell. Your guide to efficient IIS management.  ### [Mastering IIS Certificate Requests with PowerShell](/iis-certificate-request/) Secure your IIS websites like a pro. Step-by-step guide to IIS certificate requests and binding using PowerShell.  ### [Troubleshoot DNS Issues with PowerShell](/troubleshoot-dns-issues-powershell/) Troubleshoot DNS issues with PowerShell by testing name resolution, DNS client settings, cache entries, and network connectivity in a repeatable workflow. ## Categories * [IT Ops](/category/it-ops/) * [Cloud](/category/cloud/) * [DevOps](/category/devops/) * [Home Ops](/category/home-ops/) * [Information Security](/category/infosec/) * [Software Development](/category/software-development/) ## Site * [Home](/) * [Tutorials](/tutorials/) * [Instructors](/author/) * [Advertising](/advertising/) * [Recommended Resources](/resources/) * [About Adam](/about-adam/) Copyright 2026© ATA Learning | [Privacy Policy](/privacy/)