
Developing software is a finicky job. At the end of the day, the entire job is about writing instructions in a strange language for a picky interpreter that will shut down everything you’ve worked on. Well, it’s time to install Windows Terminal and discover a better way.
Not a reader? Watch this related video tutorial!In this Ultimate Guide, you’re going to learn about one of the best consoles around for developers; the Windows Terminal. You’re going to get a full rundown of nearly all features of Windows Terminal. You will learn how it can help you get things on Windows at the command line.
Windows Terminal enhances the console experience with modern terminal features like tabs, panes, and even background images. You can even have a full Linux shell running alongside Windows PowerShell or cmd.exe without having to switch between console sessions.
This article will be a walkthrough on many Windows Terminal capabilities. It will be a hands-on tutorial throughout so be prepared to get to work!
Prerequisites
The requirements to install and use the Windows Terminal itself are pretty basic. All you need is a Windows 10 machine with build 1903 (May 2019) or later. If you want to follow along with all of the demos in this article, you’ll need a few other tools installed as well:
- The Windows Subsystem for Linux (WSL) feature enabled with a Linux distribution installed (all demos shown are using Ubuntu 20.04)
- Visual Studio Code (VS Code)
- Python with the rich text library installed
- Visual Studio 2019 or later with:
- The Windows 10 1903 SDK installed
- The Desktop Development with C++ Component Installed
- The Universal Windows Platform Development Component Installed
- The C++ (v142) Universal Windows Platform Tools Component Installed
Terminal vs. Console vs. Shell
Because we’ll be covering many terms in this article, it’s important to first get a grasp on some terminology differences so you don’t get confused.
Even though the concepts are similar, it’s important to note that a terminal is not a console is not a shell. Each has its own specific purpose. Scott Hanselman has a great blog post on the definitions of each, but here is how they’ll be used in this article:
- Terminal: The Windows Terminal application.
- Console: Any console host application that is not the Windows Terminal.
- Shell: The program between the terminal and the operating system. (pwsh, cmd, zsh, etc.)
Install Windows Terminal
There are a few different ways to install Windows Terminal, but the easiest by far (and the Microsoft-recommended way) is to install it from the Microsoft Store. There are two different versions you can download; the standard Windows Terminal and the Windows Terminal Preview.
For the purposes of this article, you can use either one. The installation is straightforward so we won’t cover that in this article and will assume you’ve already installed it.
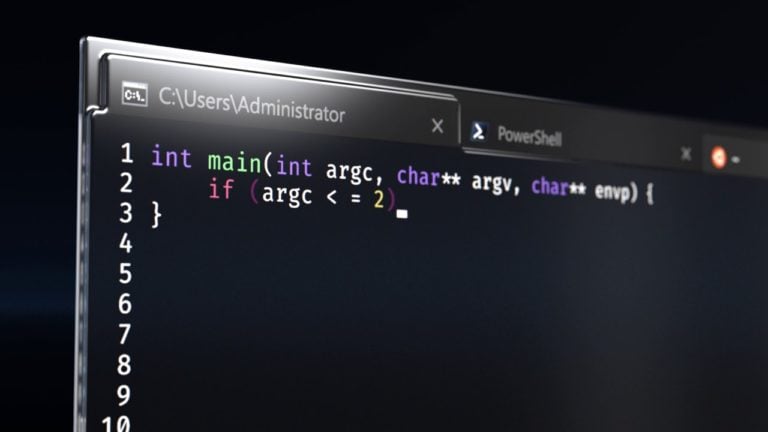
When you open up Windows Terminal for the first time, it doesn’t look or feel impressive. There are a lot of tweaks you’ll have to make to get there, but it all starts with a window like this one below.
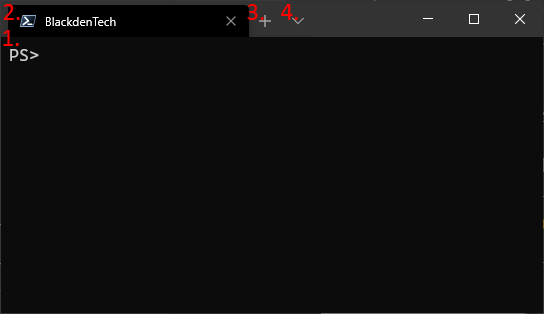
Notice that the Windows Terminal has four primary components:
- Terminal Window – Here is where you will be doing the bulk of your work, and where you can customize the most.
- Tab Name – Windows Terminal supports tabs, which means that you can have different shells
- New Tab – This button will open a new tab of your default profile
- Profiles list – This will list the profiles that are available to open.
Windows Terminal has a minimalist layout, but there’s a lot of functionality hidden away behind it.
Building the Terminal from Source
While this is the Windows Terminal, and it does come from Microsoft, it’s also completely open-source, which means that if you wanted to, you can contribute to it. It’s a C++ program with a very active community.
Even though this is a GA product, at the time of writing there are still a few minor bugs being addressed and features on the road map for future development. Maybe it’ll be you that helps contribute to them!
If you’re a developer and really want to get into the code, you can build the Windows Terminal from PowerShell, follow these steps:
- Run
git submodule update --init --recursiveto update all the git submodules - Run the below PowerShell commands:
Import-Module .\tools\OpenConsole.psm1
Set-MsBuildDevEnvironment
Invoke-OpenConsoleBuild
The settings.json file: Customizing all the things
Eventually, you’ll probably want to make the terminal your own and customize it. One of the best things about Windows Terminal is just how customizable it is. The most common way to customize the Windows Terminal is by editing the settings.json file located in the %LOCALAPPDATA%\Packages\Microsoft.WindowsTerminal_8wekyb3d8bbwe\LocalState\ directory.
You can also access the settings.json file by clicking on the profiles list and selecting Settings.
The settings.json file is where you will perform most of the customizations for Windows Terminal until a graphical option is available.
The Windows Terminal team has promised in an upcoming release that a GUI will be released for managing settings soon!
Other than just having all settings stored in one convenient spot, when settings are stored in a JSON file, you can put your settings in source control or back them up in case you move between different machines.
You can even share the settings with others. If you’d like to take a peek on an example settings.json looks like, check one out here.
The settings.json Schema
If you’re using Visual Studio Code, the terminal includes a JSON schema that will help validate any customization you make inside of settings.json, including auto-fill any new ones.
As soon as your changes are saved (as long as settings.json is still valid) the new changes will be reflected right away in the terminal or an error will be shown without needing to refresh the terminal.
While Visual Studio Code isn’t required to edit JSON, it’s definitely recommended when it comes to customizing the Windows Terminal.
There are currently four different sections of settings.json that control how Windows Terminal looks and feels: Globals, Profiles, Schemes, and Key Bindings. Let’s take a look at each section.
Globals
The globals section is responsible for determining the behavior of the Windows Terminal. Always at the very top of the file, the global section controls things like confirm on close, visual theme, and the default profile. You can see an example in the following code snippet.
// settings.json

{
    "$schema": "<https://aka.ms/terminal-profiles-schema>",

    "defaultProfile": "{d21f5dd0-bdc3-4cf7-9e3c-5d5d721074c9}",

    // You can add more global application settings here.
    // To learn more about global settings, visit <https://aka.ms/terminal-global-settings>

    // If enabled, selections are automatically copied to your clipboard.
    "copyOnSelect": false,

    // If enabled, formatted data is also copied to your clipboard
    "copyFormatting": false,

		...
		...
}
Profiles
A profile is a configuration of the Windows Terminal that has its own shell, theme, and settings. When you open up a Windows Terminal profile, it will open a session with the assigned shell, environment, or WSL distribution. This means you can have different shells open at the same time, or different sessions of the same shell, which can be useful when testing code cross-platform or need to run a background process.
Windows Terminal comes with three profiles by default: Windows PowerShell, cmd.exe, and Azure Cloud Shell. If you have WSL installed, it will also generate a profile for each WSL distribution you have installed. It also includes a defaults section that will apply settings to every profile in settings.json. This is a great place to put Unicode-compatible fonts which will be covered later in this article.
You can see an example of what a profile looks like in the following code snippet.
// settings.json

"profiles":
    {
        "defaults": {},
        "list":
        [
            {
                "guid": "{d2df7eb9-1d7e-4a05-91a6-04ac0ee99970}",
                "name": "Windows PowerShell",
                "commandline": "powershell.exe",
                "hidden": false
            }
				]
		}
Creating a New Profile
Setting up profiles can be useful if you want to add variations on the same shell, or add custom remote profiles to the terminal.
To create a new Windows Terminal profile in settings.json, here are the steps you’ll need to take:
Make sure to add a comma after each profile except the last to make the JSON valid.
- Copy any profile from your profiles section. These start at
[and end at]under the list node in the JSON file. This is lines seven through 14 above. - Generate a new GUID by running
[guid]::NewGuid()from any PowerShell session. Replace the current value forguidin your new profile with the GIUD that you generated. GUIDs are randomly generated when the terminal sets up the default profiles. - Add or change any other parameters to customize the profile.
- Copy the contents of settings.json and validate that it’s still valid by running it through JSON Lint or another JSON linter. Fix any issues.
- Save your changes.
There are many options available to configure in a profile. Keep in mind if you have a setting in the defaults section in settings.json, and you have that same setting set in your new profile, you will override the default. For a complete breakdown, check out the Windows Terminal Settings documentation.
Schemes
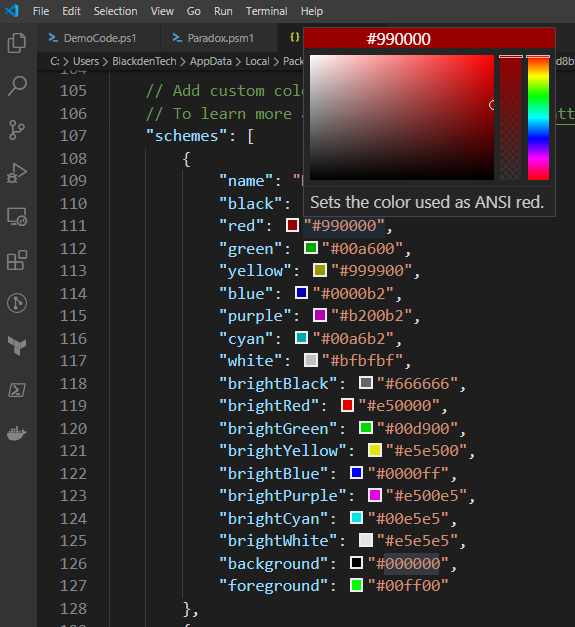
This section refers to color schemes for your Windows Terminal profiles. A color scheme tells the terminal which hex value to use for each color that shows up in the terminal. Since the terminal can render colors in 24-bit, these colors can get quite creative. Each scheme will have a name and a list of colors that map to a hex value which can be easily changed as shown below.
// settings.json

"schemes": [
        {
            "name" : "Ubuntu",
            "background" : "#2C001E",
            "black" : "#4E9A06",
            "blue" : "#3465A4",
            "brightBlack" : "#b3b3b3",
            "brightBlue" : "#729FCF",
            "brightCyan" : "#34E2E2",
            "brightGreen" : "#8AE234",
            "brightPurple" : "#AD7FA8",
            "brightRed" : "#EF2929",
            "brightWhite" : "#EEEEEE",
            "brightYellow" : "#FCE94F",
            "cyan" : "#06989A",
            "foreground" : "#EEEEEE",
            "green" : "#300A24",
            "purple" : "#75507B",
            "red" : "#CC0000",
            "white" : "#D3D7CF",
            "yellow" : "#C4A000"
        }
    ]
These colors will correspond to the background and text colors while you are using that scheme in the Windows Terminal. If you have settings.json open in Visual Studio Code, you can click on the hex values which have a graphical slider that shows the actual colors as seen below.
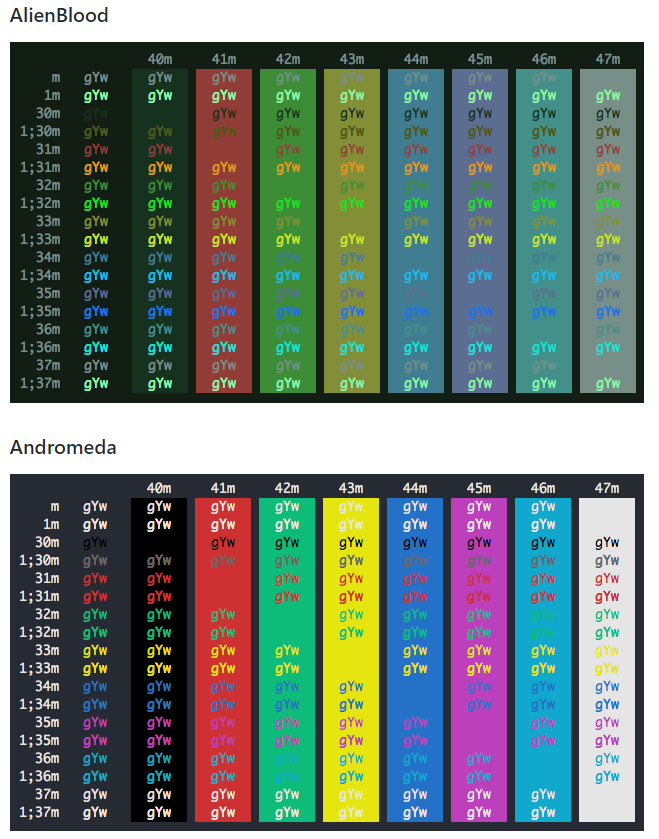
Terminal themes (referred to as schemes in the Windows Terminal) are not uncommon in the terminal program world. While there’s not a single way to create a theme (scheme) that works across different terminal applications, you can find many tools out there to make them no matter what application you use, You can find a pre-made one fairly easily, or make your own!
Key Bindings
Key bindings are how the Windows Terminal assigns hotkeys for actions like new panes, tabs, or even basic actions like copy and paste. There are a lot of actions that can be assigned custom hotkeys, making it easy to customize the terminal any way that’s comfortable for you.
You can see in the following code snippet some default key bindings.
// settings.json

"keybindings":
    [
        { "command": {"action": "copy", "singleLine": false }, "keys": "ctrl+c" },
        { "command": "paste", "keys": "ctrl+v" },
        { "command": "find", "keys": "ctrl+f" },
        { "command": { "action": "splitPane", "split": "auto", "splitMode": "duplicate" }, "keys": "alt+d" },
        { "command": { "action": "closePane" }, "keys": "ctrl+w" },
        { "command": { "action": "newTab" }, "keys": "ctrl+t" }
    ]
By now, your terminal might start to behave the way you want it to, but you’re not done yet. Now it’s time to learn how to keep customizing the look and feel of the terminal.
Visual settings
When you spend the majority of your working life staring at text on a screen, it’s worth taking a few extra steps to make that text easier to look at. Whether that’s changing the fonts, sizes, or colors, putting a little time into the appearance of your new Windows Terminal will pay huge dividends after staring at it for a full workday.
Text Enhancements
One of the most advertised features that the Windows Terminal is 24-bit color support and accelerated text rendering. That might not sound impressive on its own until you compare it to how powershell.exe or cmd.exe renders text and color. Using Python’s rich library to demonstrate, it’s pretty clear how large the differences in rendering capability are between the old consoles and the Windows Terminal.
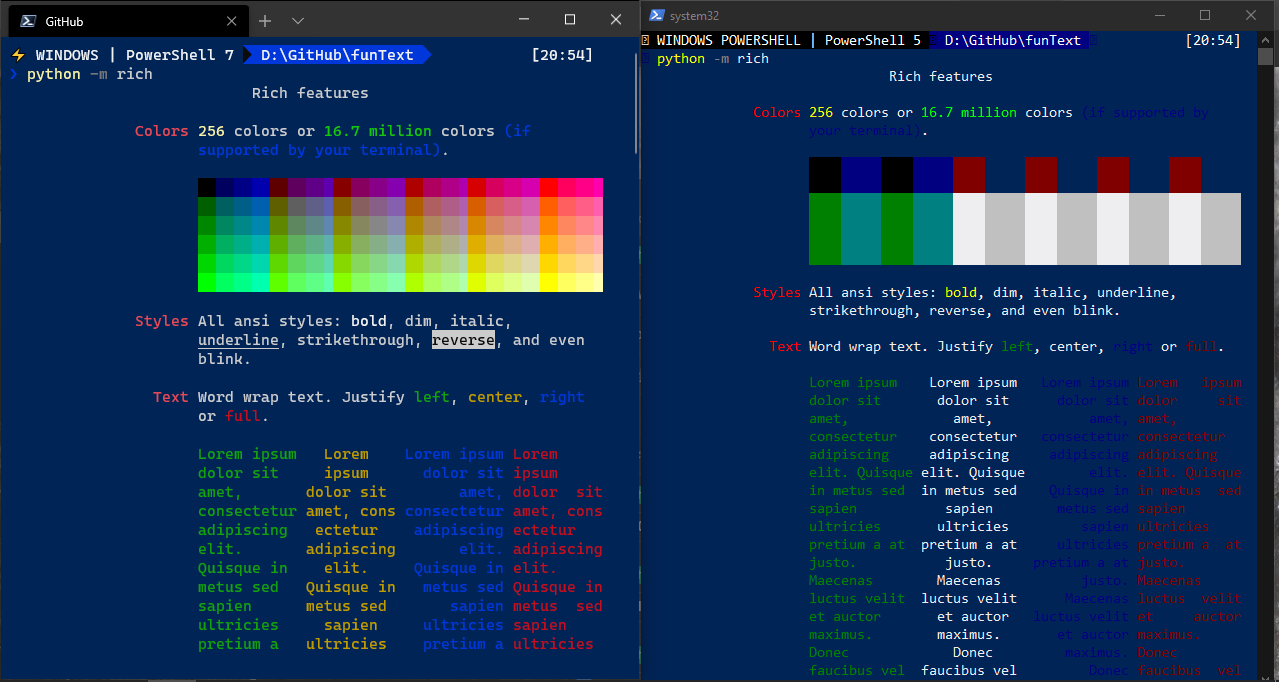
Opening the rich library from Python in the Windows Terminal and powershell.exe
The Windows Terminal also has support for Unicode characters, which means that it can be used with other alphabets and symbols, including Cyrillic characters, Kanji, and any other character will render without issues. That’s because of the Cascadia Code Font, which will be covered later.

Writing in Japanese Kanji with the Windows Terminal and powershell.exe
This has some obvious internationalization benefits, but supporting Unicode and UTF-8 also means that the Windows Terminal can also support…
Emoji 🙂
Emoji might not seem like a useful thing to include in a command-line tool, but they’re becoming more and more of a mainstay in development. Software engineers are using them to label commits and issues, respond quickly to messages with apps like Slack or Microsoft Teams, and there’s even an emoji programming language. While some of those are definitely more useful than the other, it’s clear that emoji aren’t going anywhere.
Below is an example of rendering Emojis on the powershell.exe console and the same in the Windows Terminal using python’s rich library. Notice the The Terminal is pretty line and see the difference.
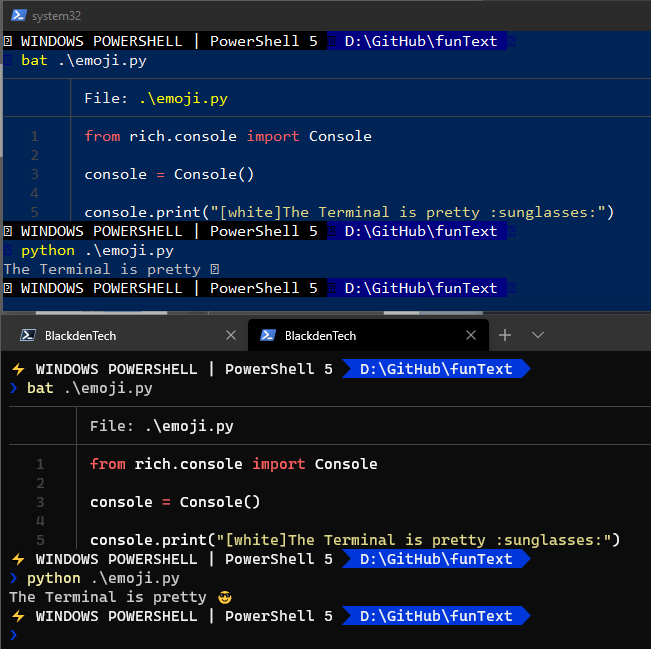
Displaying emoji with the python rich text library
Cascadia Fonts
As mentioned earlier, the Cascadia Code font is what allows displaying some of the characters. But the font also has some other subtle changes that make it easier to look at for hours on end, like ligatures.
FYI: The same team that designed the Windows Terminal made the Cascadia Code font specifically for use on the Windows Terminal.
In addition to special characters, the Cascadia Code font also supports ligatures. Ligatures are symbols that render a little differently when displayed on the screen. You can see a list of the ones supported by the Cascadia Code here.
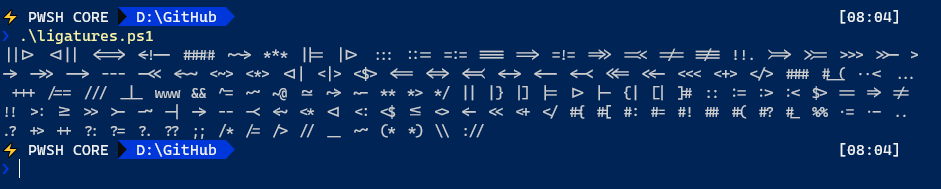
A printout of all the ligatures supported by Cascadia Code. Code here.
If you prefer not to use ligatures but still want the other benefits of Cascadia Code, the Windows Terminal also ships with a font called Cascadia Mono that does just that. Each of them also has a variant for powerline, (Cascadia Code PL and Cascadia Mono PL) which will be covered next.
Powerline
Powerline is originally a vim plugin that added information to the shell, and has been around in the Linux world for a long time. The idea was to provide more information at in the prompt, making more information available at your fingertips while working in the console.
Powerline has been ported, cloned, and replicated in every modern shell, including PowerShell, but because of the limitations of the previous consoles, it’s been missing something. The terminal solves that problem by including specific symbols called glyphs. Glypes are used in powerline to give the prompt a lot more information at a glance.
Powerline in PowerShell
For PowerShell, you can configure a powerline-like prompt by installing oh-my-posh by using the sample code below.
# PowerShell

Install-Module posh-git -Scope CurrentUser
Install-Module oh-my-posh -Scope CurrentUser
Set-Prompt
Once that’s installed, your PowerShell prompt will have more information, including the git branch name and commits between remote and local repositories. You can see an example below.
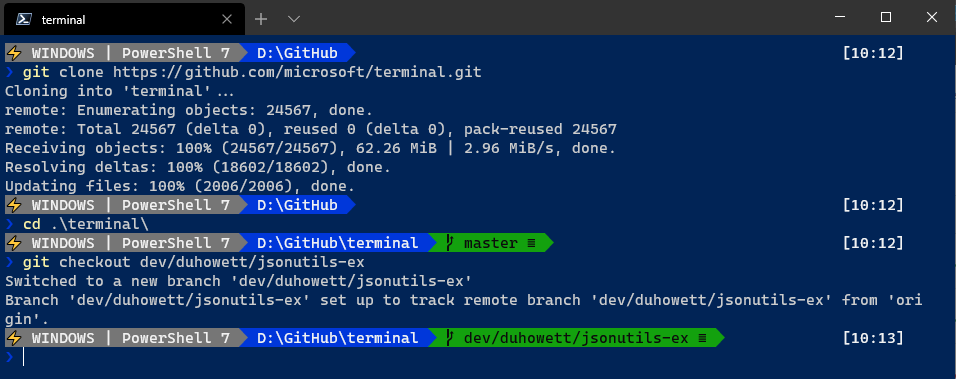
This is the Paradox theme from oh-my-posh with some customization to display the current OS and PowerShell version.
Powerline in Bash
For Bash, you’ll need to install a shell-like zsh or fishshell. These add some features and custom highlighting to the terminal, but can be a little tough to use on their own. It’s recommended that you also install a framework for zsh like ohmyzsh, which will make using it a lot easier. ohmyzsh comes with themes and bash prompt customization similar to how oh-my-posh does for a PowerShell prompt.
Once that’s installed, you can change the theme by modifying the ZSH_THEME property in the ~/.zshrc file. Change that using an editor like vim or nano and save the file. Once that’s done, run source ~/.zshrc and your changes will be applied.

Changing from the agnoster theme to the robbyrussell theme in zsh.
Background Images
One of the most talked-about features of the Windows Terminal on its release was the ability to use images in each profile. Up until now, you’ve probably noticed that the backgrounds have all been a single color defined in the settings.json file with the background tag.
Some people find images to be distracting when they’re coding, so if you’re one of those people, here is an example of using a single color background in settings.json.
// settings.json

"profiles":
    {
        "defaults": {},
        "list":
        [
            {
                "guid": "{d2df7eb9-1d7e-4a05-91a6-04ac0ee99970}",
                "name": "Windows PowerShell",
                "commandline": "powershell.exe",
								"background": "#006e1c",
                "hidden": false
            }
				]
		}
With a single color set, that color will become the background for that profile. If no background tag is set in your profile, the Windows Terminal will default to whatever is in your schema.
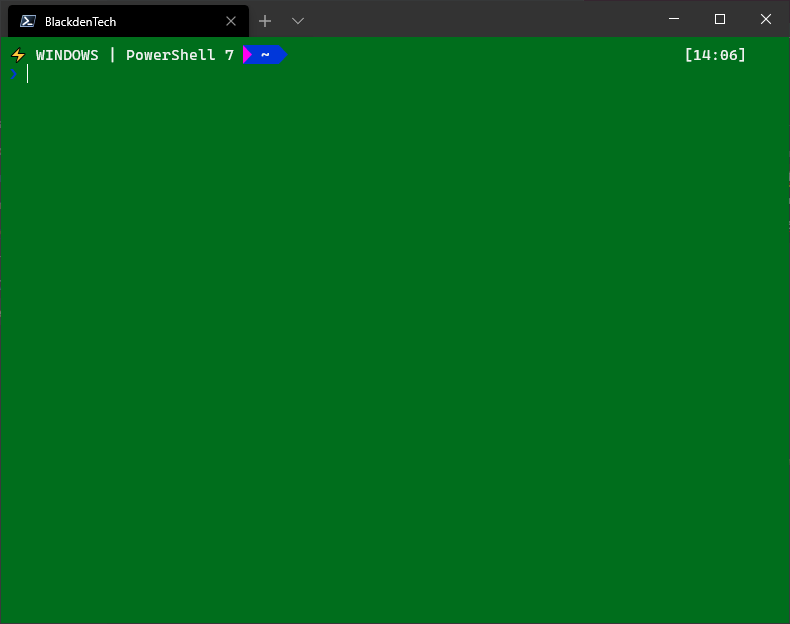
The example profile above will show this color as the background.
To use a background image, you’ll need to have the image on your local file system. At the time of writing, the Terminal doesn’t support background images from a URL. In settings.json, navigate to the profile that you want to assign the background image to. From here, add in the backgroundImage tag and give it the value of the path to the image. Below is an example that sets the profile background to a picture of a cat.
// settings.json

"profiles":
    {
        "defaults": {},
        "list":
        [
            {
                "guid": "{d2df7eb9-1d7e-4a05-91a6-04ac0ee99970}",
                "name": "Windows PowerShell",
                "commandline": "powershell.exe",
								"backgroundImage": "%USERPROFILE%\Pictures\terminal_cat.jpg",
                "hidden": false
            }
				]
		}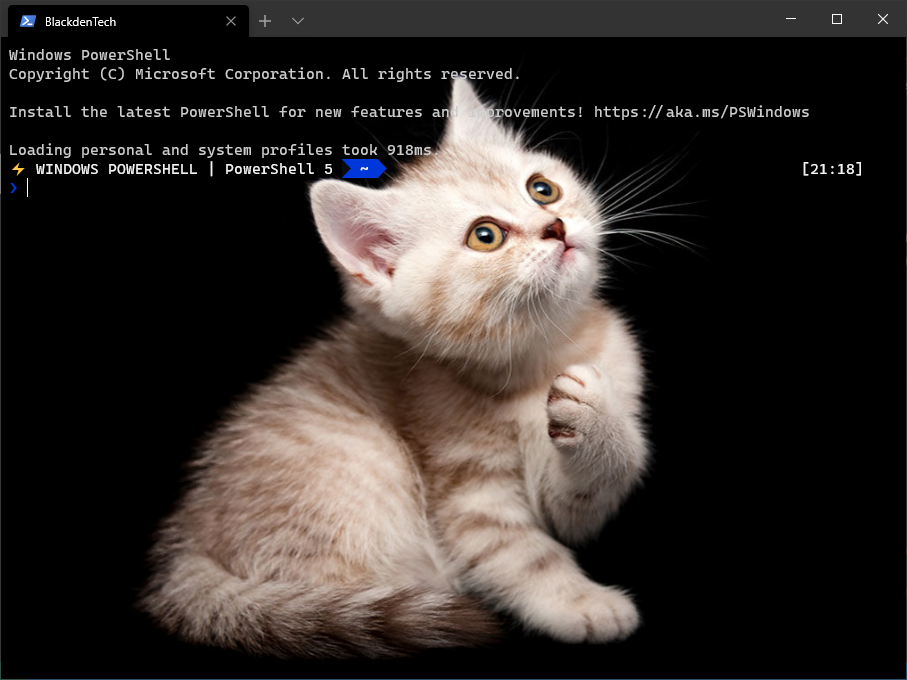
If you decide to customize your own background, know that the terminal doesn’t take your colors into account against your background. The terminal will default to whatever colors are in your current profile’s schema. If you’re not careful, you might put a light color font on a light color background, which would make it really hard to read. Not all backgrounds are good terminal backgrounds.
Terminal cat is in your terminal, taking up your background.
As long as settings.json is still a valid JSON file and still adheres to the terminal schema, you will see the background update right away with no need to manually refresh or close and re-open the terminal. You can see a great example of this real-time updating below.
The Windows Terminal will update as soon as you make changes in settings.json and save.
Positioning Images
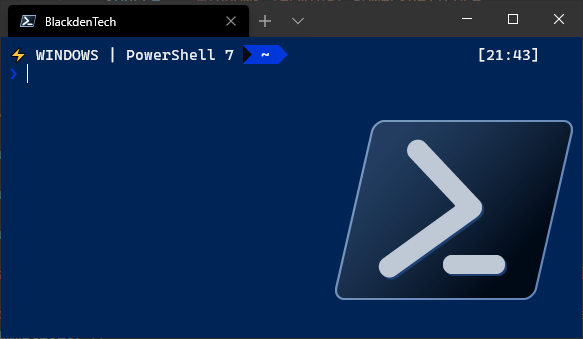
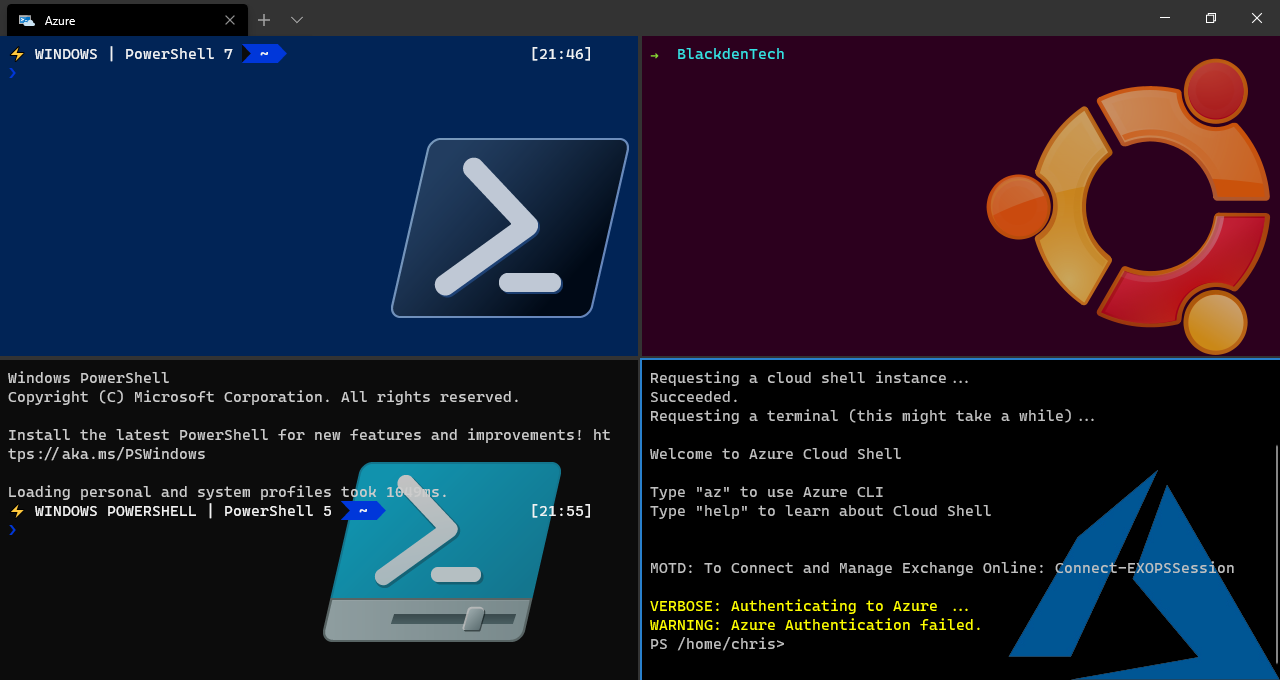
You might be thinking that images are too distracting in a terminal window, and they can be. However they can also be a quick reference if you need to switch between tabs and profiles a lot. Below is an example of using a background image to highlight the shell being used.
// settings.json

"profiles":
    {
        "defaults": {},
        "list":
        [
            {
                "guid": "{d8a5efb7-25a0-4d75-8c6c-1f2603188971}",
                "name": "PowerShell 7",
                "source": "Windows.Terminal.PowershellCore",
								"backgroundImage": "%USERPROFILE%\Pictures\icons\pwsh.png",
								"backgroundImageStretchMode": "none",
                "backgroundImageAlignment": "bottomRight",
								"backgroundImageOpacity": 0.75,
                "hidden": false
            }
				]
		}
To set a background image, as shown above, you need three additional parameters that start with backgroundImage to help control the size, location, and opacity of the image on the screen. Always remember to check the documentation to see what options are available. Below is an example of the profile shown above.
The Windows Terminal also supports animated gifs, so if you don’t find it too distracting, you can also have some fun with your profiles as well.
Advanced Windows Terminal Commands
So now that your terminal is set up and customized to your liking, it’s time to explore some of the more advanced capabilities of the Windows Terminal.
Split Panes with Different Kernels
The Windows Terminal supports multiple panes. This means that you can run parallel sessions in the same Terminal window. This behavior isn’t new. Other console applications have had support for panes for years. The Windows Terminal is different because since it supports profiles (in settings.json), you can have each session open in its own pane. Even if each session is a completely different operating system like when using WSL or a remote profile (more on remote profiles in a bit), you can show a pane for each OS.
To create split panes of different profiles, in settings.json each profile must have its own splitPane key binding. By specifying the profile parameter with either the name or the GUID of the Windows Terminal profile, you can have open each one side by side.
The split property can be set to horizontal, vertical or auto which will pick the orientation that provides the most space based on the currently selected pane. You can see below an example of setting key bindings for four panes.
// settings.json

"keybindings":
    [
        { "command": { "action": "splitPane", "split": "auto", "splitMode": "duplicate" }, "keys": "alt+d" },
        { "command": { "action": "splitPane", "split": "auto", "profile": "Windows PowerShell" }, "keys": "ctrl+alt+1" },
        { "command": { "action": "splitPane", "split": "auto", "profile": "Command Prompt" }, "keys": "ctrl+alt+2" },
				{ "command": { "action": "splitPane", "split": "auto", "profile": "a4b7092a-6825-422c-bdb8-89b9251f4d7d" }, "keys": "ctrl+alt+4" }
    ]
Customizing how the Windows Terminal is Opened
If you don’t like hotkeys, or you want a quick way to open up the terminal with the CLI, then you’re in luck. The Windows Terminal includes a command-line executable called wt that allows you to automate opening it in whichever configuration you want.
Below you can see an example of passing various arguments while opening up the terminal which changes the behavior.
Remote profiles
Most of the time, your profiles be running local shells. However, Windows Terminal can also display remote sessions through a concept called remote profiles too!
If you take a look at other sample profiles for the Windows Terminal, you may notice that some of them aren’t using .exe applications at all. The Windows Terminal is flexible enough that you can even use the ssh command or the Enter-PsSession PowerShell command to create profiles that map to remote servers or other shells. You can even use terraform console to bring up a Terraform session! You can see an example of that in the profile below.
By using the commandline parameter in the profile section of settings.json, you can open almost anything as it’s own Windows Terminal Profile that doesn’t need to login interactively.
// settings.json

"profiles":
    {
        "defaults": {},
        "list":
        [
            {
                "guid": "{f74c374e-d9ce-4f53-b3f1-072e020f08a5}",
                "name": "Python REPL",
                "backgroundImage": "%USERPROFILE%\Pictures\icons\python.png",
                "commandline": "python",
                "hidden": false
            },
            {
                "guid": "{98a15d46-813c-4d1e-badd-5a22798e73c1}",
                "name": "Test EC2 Instance",
                "backgroundImage": "%USERPROFILE%\Pictures\icons\vm.jpg",
                "commandline": "ssh -i %USERPROFILE%\demos.pem [email protected]",
                "hidden": false
            }
        ]
    }
Opening the Python REPL and an SSH connection to an AWS EC2 instance with Windows Terminal profiles
Summary
At this point, you should be not only familiar with the Windows Terminal, but have configured your custom settings and have a fairly comfortable configuration set up. You should be able to customize profiles and key bindings to control the look and operation of the terminal, as well as know how to modify the fonts, glyphs, and characters that you can use in the terminal.
Command-line tools aren’t going anywhere. Developers and engineers alike need to keep using them. The new Windows Terminal won’t stop software development from being a job where you stare at small text on a screen but it might make it a lot easier to keep doing it!


