

Hosting an Azure static website in Microsoftis a way to build simple web pages. Coupled with the ability to use your own domain name (custom domain), choosing to use a static website is a win-win. Using a static website means you don’t have to mess around with complicated website hosting either.
To make the deal even sweeter, you can also integrate CloudFlare’s cloud network to improve speed, security and manageability. Here’s how.
In this blog post, I’ll show you how to create and host a static website in Azure capable of serving up pages both via HTTP and HTTPs with HTML, CSS, JavaScript or whatever other kinds of content you’d like to build. Once the Azure static website is created, we’ll then associate our own domain to it using a feature called a custom domain using a free CloudFlare account for DNS and some URL forwarding.
Note that you will be charged for any Azure resources you deploy. Be forewarned if you set up your blog and a month later get a bill! Although it should be minimal, always ensure you know the costs ahead of time.
Assuming you already have a Microsoft Azure account created and are logged into the Azure portal with an administrative user account, proceed on.
Let’s get started!
Create an Azure Storage Account
To create an Azure static website, you’ll need to create an Azure storage account first. If you don’t know how to create an Azure storage account, check out the Create an Azure Storage Account Microsoft Learn tutorial. Below you will see the settings I’m using to set up my storage account.
There’s nothing fancy going on here since the website I’ll be serving from Azure will not be resource intensive.
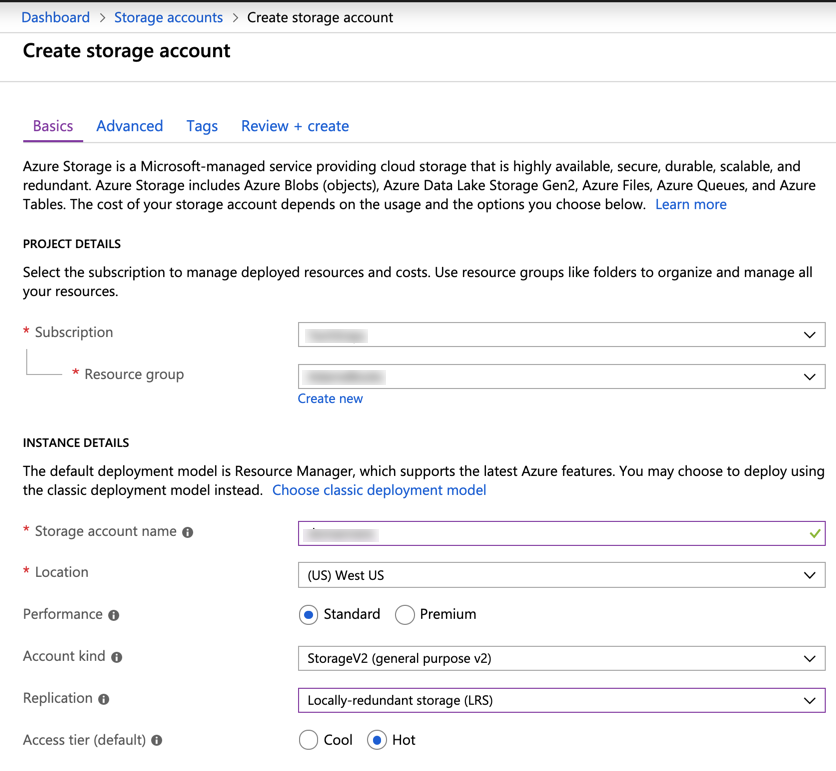
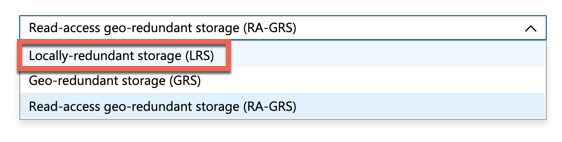
Since we’ll be using the CloudFlare network eventually, there’s no reason to spend a little extra to get redundancy built into the storage account. I’ve chosen the Locally-redundant storage (LRS) option for this reason.
Allowing HTTP and HTTPS for Your Static Site
Once you’ve created the storage account, it’s not quite time to create the static website. If you will ever need HTTP access to your static website on your storage account, you’ll need set the Secure transfer required option on the storage account to Disabled. You’ll find this option in the Configuration section as shown below.

If you don’t disable Secure transfer required, your static website will never have the ability to serve up HTTP resources.
Note that once you’ve disabled Secure transfer required, you may need to wait for up to a minute while the change is applied. I ran into some issues receiving Access Denied error messages when attempting to go create to creating the website.
Create an Azure Static Website
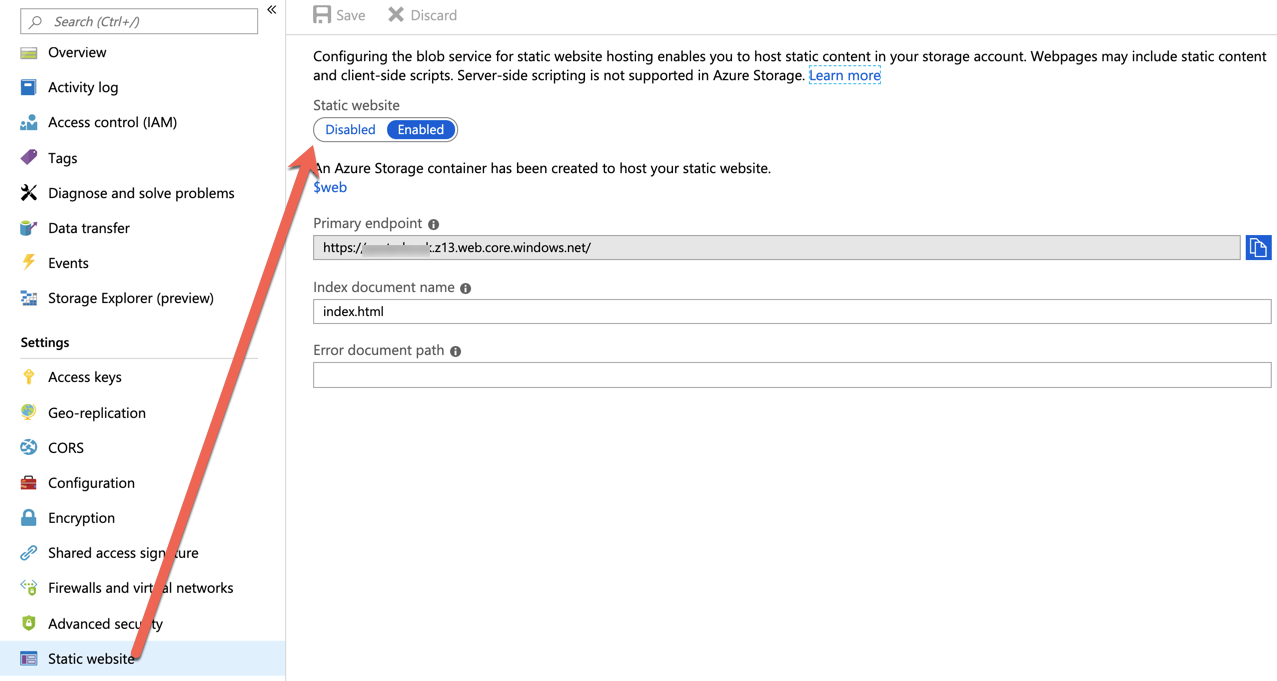
Now click on the Static website option in your storage account and toggle the Static website option to Enabled as shown below.
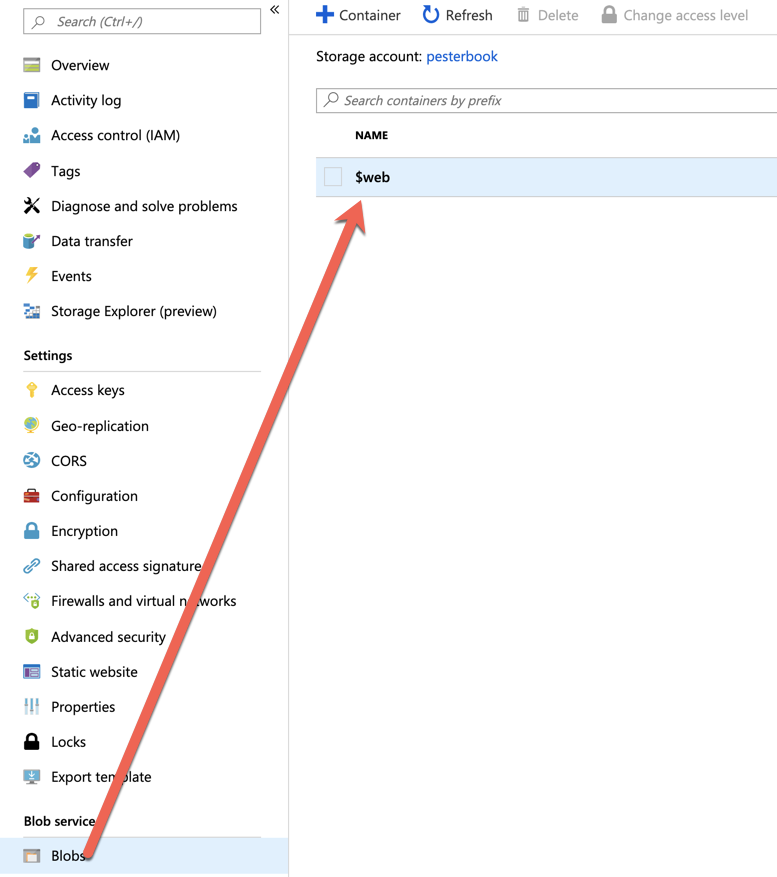
You’ll see that Azure will create a storage container in your storage account called $web and assign you a primary endpoint like https://<storageaccountname>.z13.web.core.windows.net. This endpoint will be the one you’ll use in CloudFlare once we get there.
Also, as you can see below, I’ve defined an Index document name as index.html. I’m doing this here so that I can upload a simple HTML file to test whether or not we can hit the webpage via our custom domain later.
For a great video walkthrough on hosting a static website in Azure, check out this TechSnips short how-to video.
How to Host a Serverless Static Website in Azure by Matt Browne @ TechSnips
Set up CloudFlare DNS
Before we can associate a custom domain to our Azure static website, we must first ensure DNS is set up properly with our domain name. Assuming that you’ve already created a CloudFlare account and set up your site, we’ll now need to add a couple CNAME records which we’ll use to both verify to Azure we own this domain and to forward traffic to the static website primary endpoint.
Go to the DNS section of your site in CloudFlare and add the following DNS records:
| Type | Name | Value | Status |
|---|---|---|---|
| CNAME | asverify | asverify.%storageaccountname%.blob.core.windows.net | Grey cloud |
| CNAME | %example.com% | %storageaccountname%.z13.web.core.windows.net | Orange cloud |
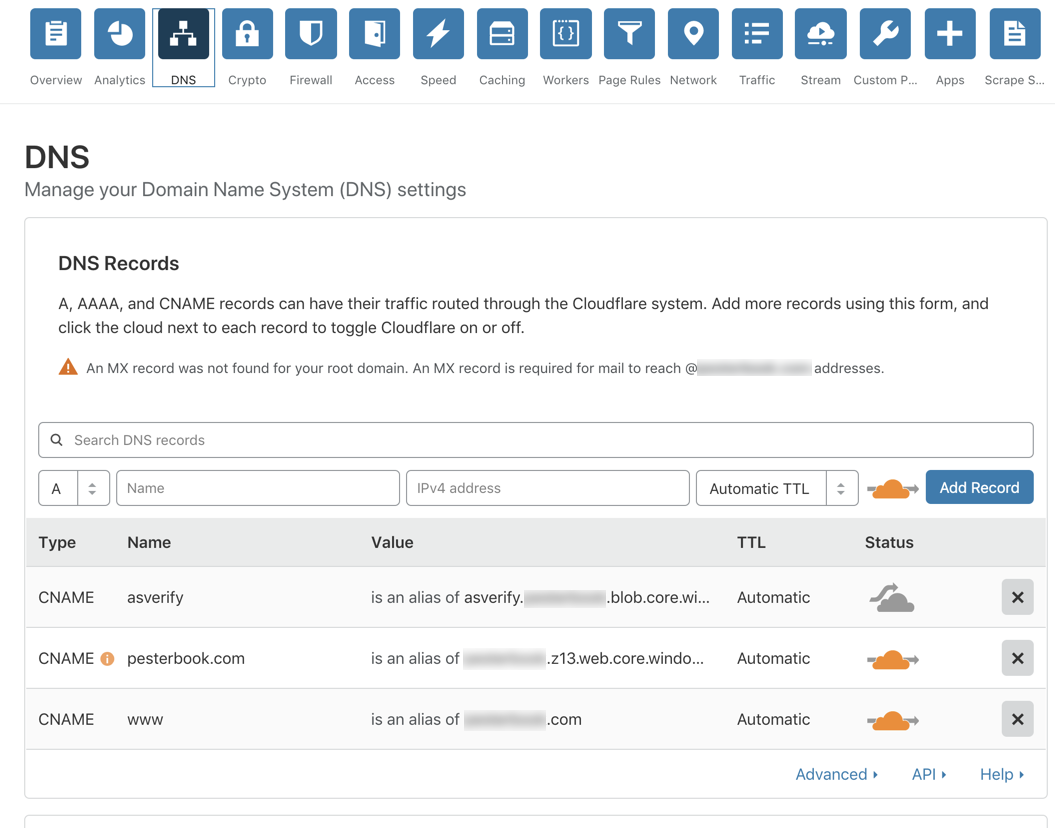
To toggle between grey and orange cloud icons, click on the cloud. If the cloud is orange, CloudFlare does some magic to the asverify DNS record which will prevent Azure from verifying your custom domain.
Set up an Azure Static Website Custom Domain
Head back over to the Azure portal and click on Custom domain within your storage account. Here, you will be presented with the options to verify the custom domain. Even though Azure says that you use option #1 to verify the account, using CloudFlare, I had no luck at all doing this.
When trying option #1, I repeatedly ran into this error below when navigating to the site.
<Error>
    <Code>InvalidQueryParameterValue</Code>
    <Message>
        Value for one of the query parameters specified in the request URI is invalid. RequestId:076c687e-b01e-0012-1c9e-31eb8e000000 Time:2019-07-03T12:51:53.7137522Z
    </Message>
    <QueryParameterName>comp</QueryParameterName>
    <QueryParameterValue/>
    <Reason/>
</Error>
Since we’ve already set up DNS in CloudFlare, provide your domain name in the box without the http or https and then select Use indirect CNAME validation. This method will query the asverify DNS record created in CloudFlare to verify you own the domain name.
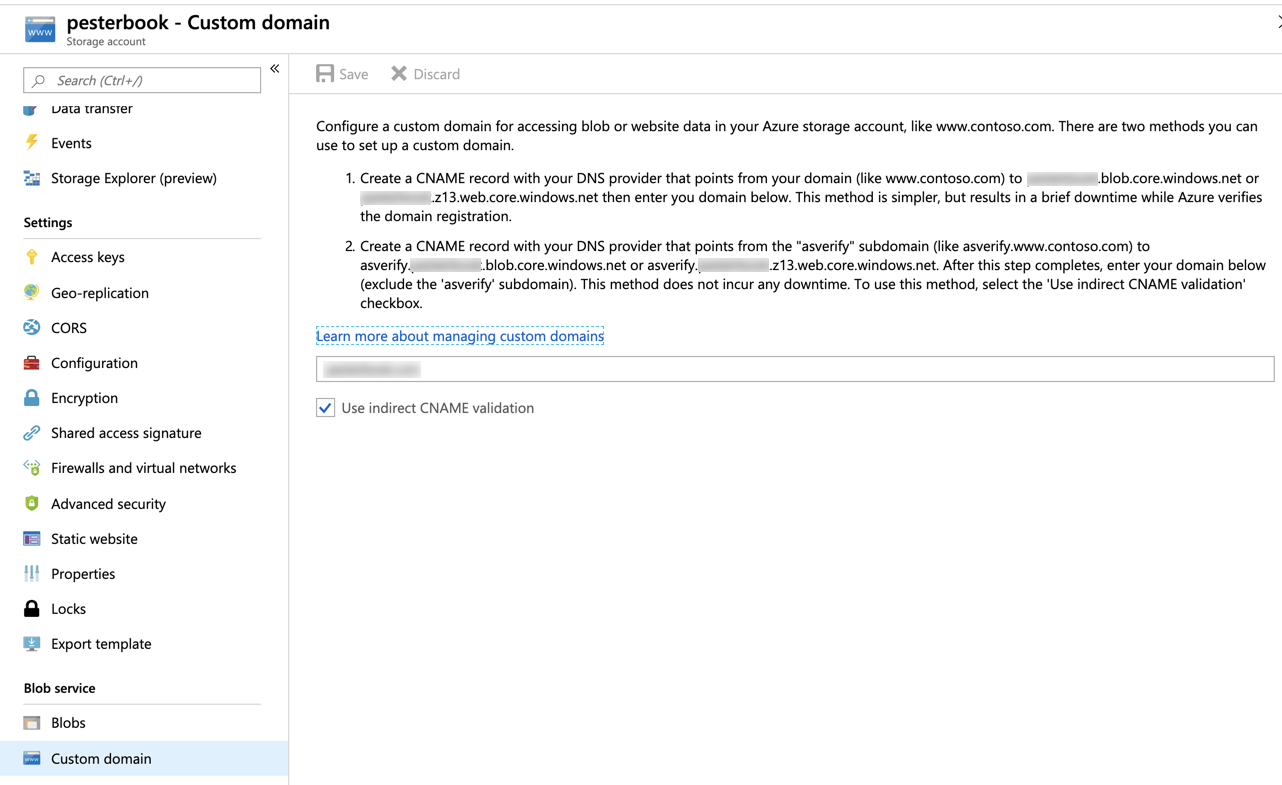
Click Save and if all goes well, your custom domain should be verified!
Testing it Out
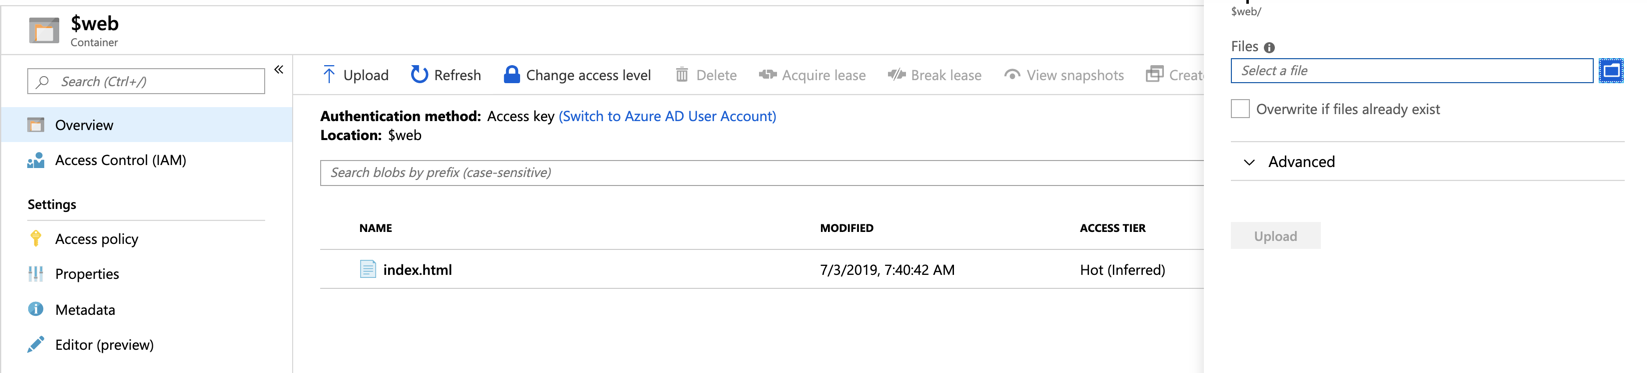
At this point, the initial set up should be working. To test it out, create an index.html page with any text in it like “Yay! My site is working!”. This will be the static content that will be rendered by the user’s browser.
Then, upload that file to the static website by going to Blobs and clicking on the $web storage container that was created.
Then, upload the index.html file by clicking on the Upload button.
Now try to navigate to http://<domainame> and https://<domainname> and you should see the text in your test index.html file.
Summary
You should now have an Azure static website set up that can be accessed via your custom domain with speed and security improved by using CloudFlare!


