
When you need to automate tasks in Azure with scripts and tools, would you consider using service accounts or Azure service principals? It is not uncommon for some to just create a new service account, slap it with all the admin roles you want, and exclude it from MFA.
Not a reader? Watch this related video tutorial!I know what you’re thinking – “that is a horrible idea”. Of course, it is! And for sure, your IT Sec will give you a lot of grief if you did all that.
But what’s the alternative? How can you use a privileged credential with a limited scope that doesn’t have to be excluded from multi-factor authentication? You’re in luck because that’s what this article will teach you.
In this article, you’ll learn about what Azure Service Principal is. You’ll learn how to create service principals with different types of credentials, such as passwords, secret keys, and certificates.
There are many tools to create Azure Service Principals. These include using the Azure Portal, Azure Active Directory Admin Center, Azure AD PowerShell, Azure CLI, and Azure PowerShell. The tool that will be the focus of this article is the Azure PowerShell.
Still interested? Keep on reading and let’s get started!
Requirements
Since this is a learning-by-doing article, here are some prerequisites so you can follow along.
- Access to an Azure subscription. It would be best if you’re working on a test tenant. If you don’t have one, you could register for a free trial.
- Access to a computer that is running on Windows 10 with PowerShell 5.1.
- The Azure PowerShell module must be installed.
Azure Service Principal vs. Service Account
Automation tools and scripts often need admin or privileged access. Like, provisioning storage accounts or starting and stopping virtual machines at a schedule. And most admins probably use a fully privileged user account (called a service account) to set up the credential requirements for scripts.
A service account is essentially a privileged user account used to authenticate using a username and password. And, if used with automation, a service account is most likely excluded from any conditional access policies or multi-factor authentication.
On the other hand, an Azure service principal can be set up to use a username and password or a certificate for authentication. Think of it as a user identity without a user, but rather an identity for an application.
An Azure service principal can be assigned just enough access to as little as a specific single Azure resource. For example, you can create an Azure service principal that has role-based access to an entire subscription or a single Azure virtual machine only.
Primary Considerations for Creating Azure Service Principals
Before you create an Azure service principal, you should know the basic details that you need to plan for. These details may seem simple. Still, they will make creating an Azure service principal as efficient and as easy as possible.
The display name. It all starts with a name, and an Azure service principal must have a name. There’s no rule here, but your organization might have a prescribed naming convention.
- The type of credential to use. You could choose to create an Azure service principal that will use a password or certificate for authentication. This is not to say that you can only choose one, you can use both.
For service principals, the username and password are more appropriately referred to as application id and secret key.
- The validity period of the credential(s). Whether you’re assigning a password or a certificate credential, you have to define a start and end date for its validity. How long a credential will be valid for typically depends on how often you’re willing to rotate/renew certificates and passwords.
- The scope of access. Are you creating an Azure service principal that will have access to a subscription, resource group, or selected resources?
- The role. There are several roles available, such as Contributor, Reader, and Owner, to name a few. You need to define which role is “just enough” of the service principal.
Creating an Azure Service Principal with Automatically Assigned Secret Key
The heart of creating a new service principal in Azure is the New-AzAdServicePrincipal cmdlet. In this example, a new service principal will be created with these values:
DisplayName: AzVM_Reader
Scope: AzVM1 (Virtual Machine)
Role: Reader
Password: <automatically assigned>
Credential Validity: 1 year
Getting the ID of the Target Scope (Virtual Machine)
As you can see, the scope of this new service principal is only for the virtual machine named AzVM1. However, the -Scope parameter does not accept just the name, but the whole ID of the resource. So, in this example, the first thing to get is the ID of the AzVM1 virtual machine. To do that, use the code below.
Get-AzVM | Format-Table Name, IDWhen you run the code above in PowerShell, you should see the list of VM names and IDs, similar to the screenshot below.

Creating the Azure Service Principal with Secret Key
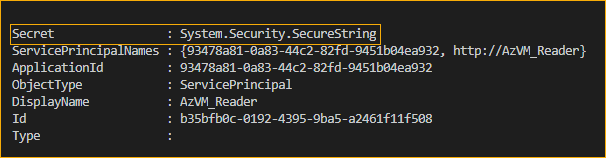
Now that you have the ID of the target scope, which is the ID AzVM1 virtual machine, you can use the command below to create the new service principal that has the reader role. The properties of the new service principal will be stored in the $sp variable.
$sp = New-AzAdServicePrincipal `
	-DisplayName AzVM_Reader `
	-Scope '/subscriptions/5e252811-b376-4136-b8ae-d3b8abe2c9c3/resourceGroups/ATA/providers/Microsoft.Compute/virtualMachines/AzVM1'
	-Role 'Reader'
As a result of the above command, the service principal was created with these values below.
Decrypting the Secret Key
Now you have the ApplicationID and Secret, which is the username and password of the service principal. However, the value of the Secret is shown as System.Security.SecureString. You will want to know what the secret is. For that, use the command below to convert the secret to plain text.
# Convert the encrypted password to plain text
[System.Runtime.InteropServices.Marshal]::PtrToStringAuto(
    [System.Runtime.InteropServices.Marshal]::SecureStringToBSTR(
        $sp.Secret
    )
)
The command above converts the secured string value of $sp.Secret to plain text. See the image below for reference.

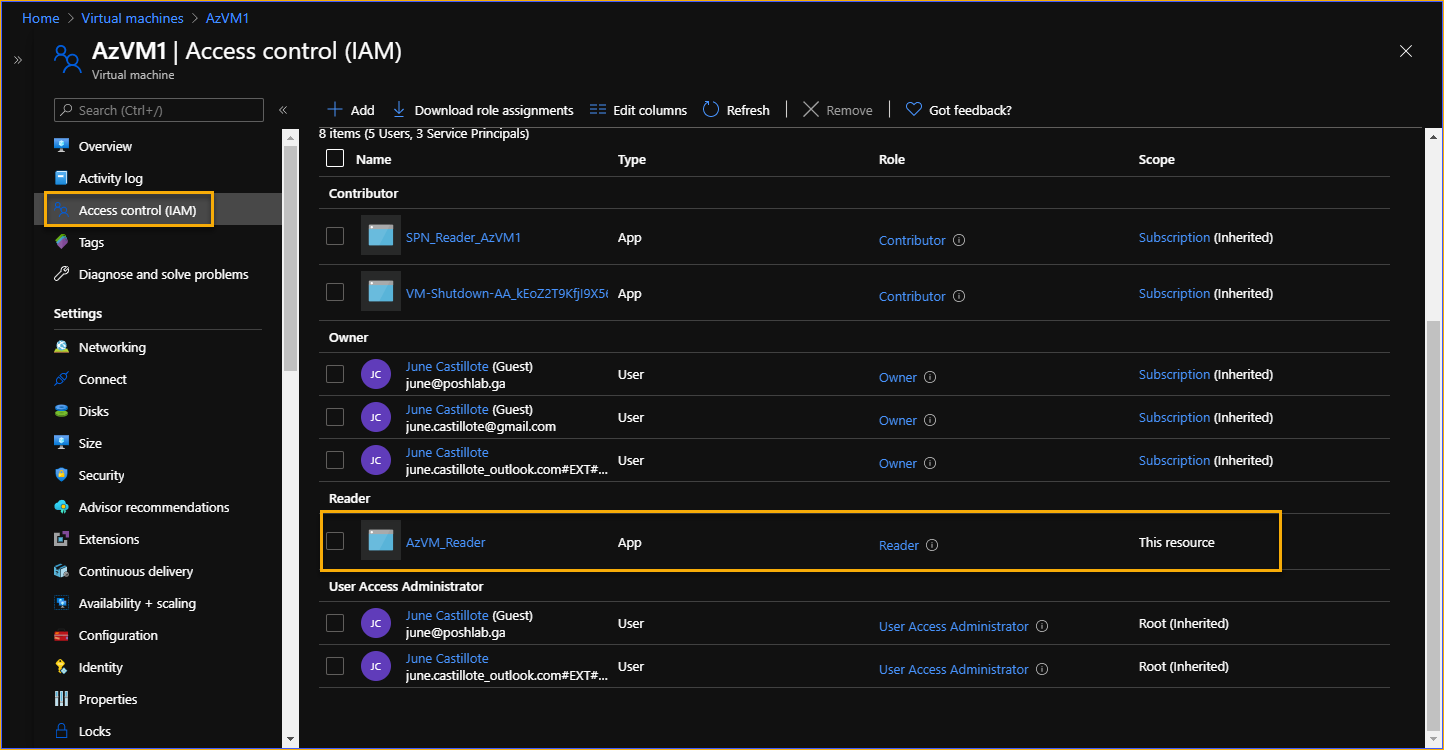
Verifying the Azure Service Principal Role Assignment
How do you know this worked? You can check the resource’s access control list using the Azure Portal. For example, in the image below, you can see that the AzVM_Reader service principal now has Reader access to the AzVM1 virtual machine.
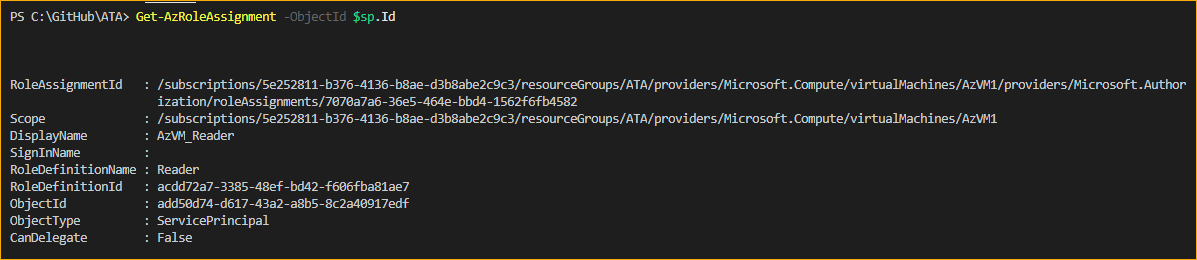
Also, you can use the Get-AzRoleAssignment -ObjectID $sp.id command to get the role assignments of the Azure service principal. See the screenshot below as an example.
Creating an Azure Service Principal with Password
If you want more control over what password or secret key that is assigned to your Azure service principal, use the -PasswordCredential parameter during the service principal creation. This is especially useful if the password must meet a complexity requirement.
In this example, the new Azure service principal will be created with these values:
DisplayName: ATA_RG_Contributor
Scope: ATA (ResourceGroup)
Role: Contributor
Password: 20 characters long with 6 non-alphanumeric characters
Credential Validity: 5 years
Getting the ID of the Target Scope (Resource Group)
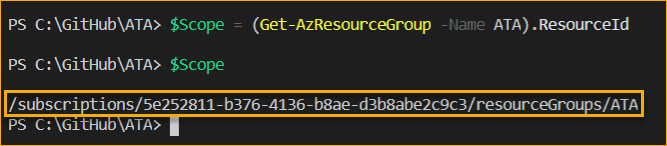
The scope of this new service principal covers the whole resource group named ATA. The first thing to get is the ID of the ATA resource group. To do that, use the code below but make sure to change the value of the -Name parameter to your resource group name.
# Get the ResourceId value of the resource group
$Scope = (Get-AzResourceGroup -Name ATA).ResourceId
$Scope
Then, you should see the ResourceID of the resource group that is now stored in the $Scope variable.
Generating the Password String
Next step is to generate the password that follows the 20 characters long with 6 non-alphanumeric characters complexity. For that, you can utilize the .NET static method GeneratePassword().
# Generate a Random Password using the GeneratePassword() static method
Add-Type -AssemblyName 'System.Web'
$password = [System.Web.Security.Membership]::GeneratePassword(20, 6)
$password
In the above code GeneratePassword(20, 6), the first value means the length of the password, and the second value means the number of non-alphanumeric characters to include. The result is shown in the screenshot below.

GeneratePassword() static methodCreating the Password Credential Object
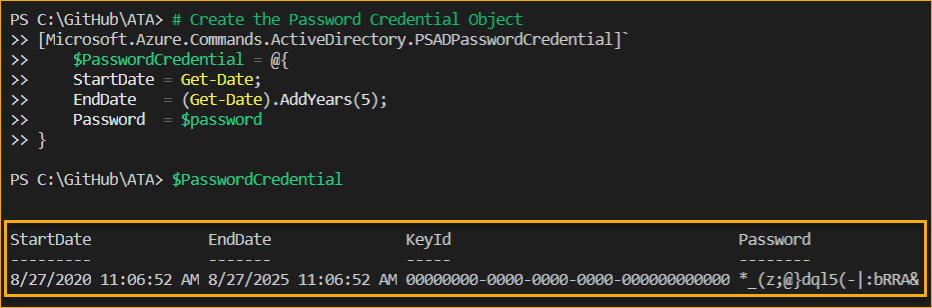
Now that you have the password string, the next step is to create the Microsoft.Azure.Commands.ActiveDirectory.PSADPasswordCredential object. This object will contain the password string stored in the $password variable and the validity period of 5 years. Copy the code below and run it in your Azure PowerShell session.
# Create the Password Credential Object
[Microsoft.Azure.Commands.ActiveDirectory.PSADPasswordCredential]`
    $PasswordCredential = @{
    StartDate = Get-Date;
    EndDate   = (Get-Date).AddYears(5);
    Password  = $password
}
$PasswordCredential
Running the code above in PowerShell will in turn store the credential object to the $PasswordCredential variable. The expected result would be similar to the one shown below.
Creating the Service Principal with Password
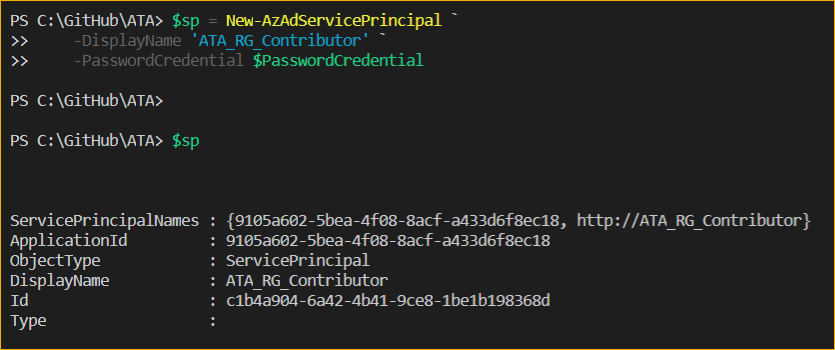
You now have the required parameter values ready to create the Azure service principal. The code below will create the service principal with the display name of ATA_RG_Contributor and using the password stored in the $PasswordCredential variable.
# Create the Service Principal with a Password Credential
$sp = New-AzAdServicePrincipal `
    -DisplayName 'ATA_RG_Contributor' `
    -PasswordCredential $PasswordCredential
$sp
After running the code, the new service principal should be created, and the properties are stored in the $sp variable. See the example result below.
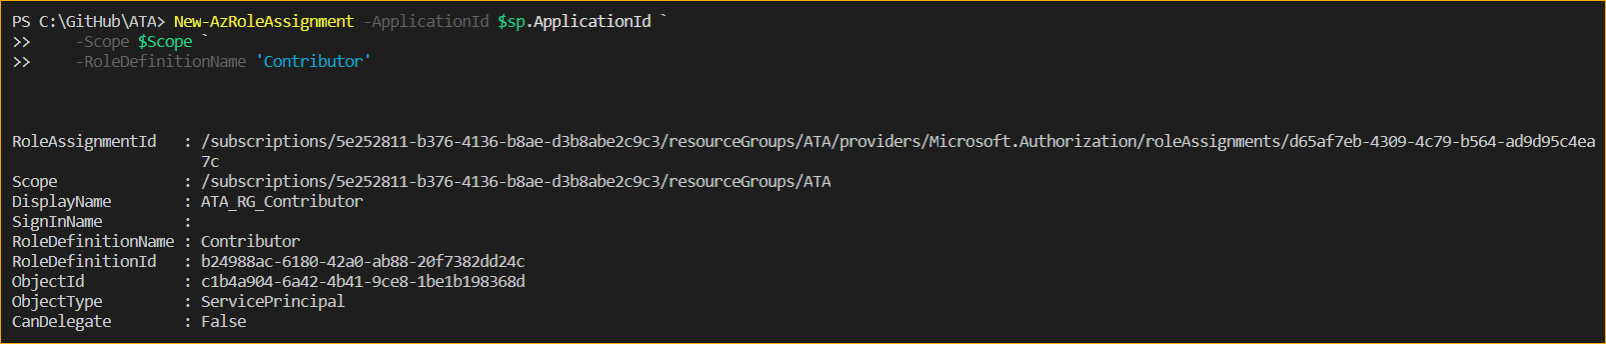
Assigning the Role and Scope
The Azure service principal has been created in the previous section, but with no Role and Scope. That is because of the -Role and -Scope parameters cannot be used together with the -PasswordCredential parameter. This means that an additional step is needed to assign the role and scope to the service principal.
The code below uses the New-AzRoleAssignment cmdlet to assign the scope and role of the Azure service principal.
# Assign the role to the target resource
New-AzRoleAssignment -$azSubscription = Get-AzSubscription -SubscriptionName VSE3
$Scope = "/subscriptions/$($azSubscription.ID)"
$TenantID = $azSubscription.TenantID$sp.ApplicationId `
    -Scope $Scope `
    -RoleDefinitionName 'Contributor'
The screenshot below shows the expected result after the role and scope have been assigned to the Azure service principal.
Always make sure to save the service principal’s password because there is no way to recover it if you were not able to save or have forgotten it.
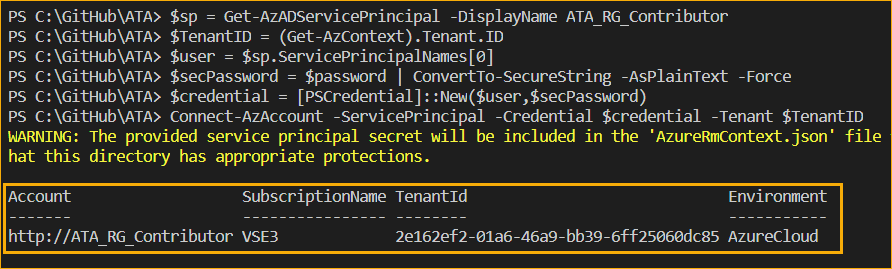
Connecting to Azure with a Service Principal Password
Now to put the service principal to use. Instead of logging in to Azure PowerShell using a user account, the code below uses the service principal credential instead.
# Get the service principal with displayname ATA_RG_Contributor
$sp = Get-AzADServicePrincipal -DisplayName ATA_RG_Contributor

# Get the tenant ID
$TenantID = (Get-AzContext).Tenant.ID

# Get the first service principal name
$user = $sp.ServicePrincipalNames[0]

# Convert the password to a secure string
$secPassword = $password | ConvertTo-SecureString -AsPlainText -Force

# Create the PSCredential object
$credential = [PSCredential]::New($user,$secPassword)

# Connect to Azure
Connect-AzAccount -ServicePrincipal -Credential $credential -Tenant $TenantID
# Get the service principal with displayname ATA_RG_Contributor
$sp = Get-AzADServicePrincipal -DisplayName ATA_RG_Contributor

# Get the tenant ID
$TenantID = (Get-AzContext).Tenant.ID

# Get the first service principal name
$user = $sp.ServicePrincipalNames[0]

# Convert the password to a secure string
$secPassword = $password | ConvertTo-SecureString -AsPlainText -Force

# Create the PSCredential object
$credential = [PSCredential]::New($user,$secPassword)

# Connect to Azure
Connect-AzAccount -ServicePrincipal -Credential $credential -Tenant $TenantID# Get the service principal with displayname ATA_RG_Contributor
$sp = Get-AzADServicePrincipal -DisplayName ATA_RG_Contributor

# Get the tenant ID
$TenantID = (Get-AzContext).Tenant.ID

# Get the first service principal name
$user = $sp.ServicePrincipalNames[0]

# Convert the password to a secure string
$secPassword = $password | ConvertTo-SecureString -AsPlainText -Force

# Create the PSCredential object
$credential = [PSCredential]::New($user,$secPassword)

# Connect to Azure
Connect-AzAccount -ServicePrincipal -Credential $credential -Tenant $TenantID
After running the code above, you should be logged in to Azure PowerShell using the ATA_RG_Contributor service principal and password credential.
Creating an Azure Service Principal with Certificate
Apart from password credentials, an Azure service principal can also have a certificate-based credential. The associated certificate can be one that’s issued by a certificate authority or self-signed.
In this example, the new Azure service principal will be created with these values:
DisplayName: VSE3_SUB_OWNER
Scope: VSE3 (Subscription)
Role: Owner
Certificate Validity: 2 years
Getting the ID of the Target Scope (Subscription)
The scope of this new service principal covers the Azure subscription named VSE3. The first thing to get is the ID of the VSE3 subscription. To do that, use the code below but make sure to change the value of the -SubscriptionName parameter to your resource group name.
# Get the ID of the Subscription scope and the Tenant ID
$azSubscription = Get-AzSubscription -SubscriptionName VSE3
$Scope = "/subscriptions/$($azSubscription.ID)"
$TenantID = $azSubscription.TenantID
Next, specify the name of the new Azure service principal and self-signed certificate to be created.
# The name of the new azure service principal and self-signed certificate
$DisplayName = 'VSE3_SUB_OWNER'
Creating the Self-Signed Certificate
The code below creates the self-signed password in the personal certificate store with the name CN=VSE3_SUB_OWNER. The validity of the certificate is set to two years. The properties of the certificate are saved to the $cert variable.
# Generate a Self-Signed Certificate
$cert = New-SelfSignedCertificate -CertStoreLocation "cert:\CurrentUser\My" `
    -Subject "CN=$($DisplayName)" `
    -KeySpec KeyExchange `
    -NotBefore ((Get-Date).AddDays(-1)) `
    -NotAfter ((Get-Date).AddYears(2))
$cert
The screenshow below shows that the certificate has been created.
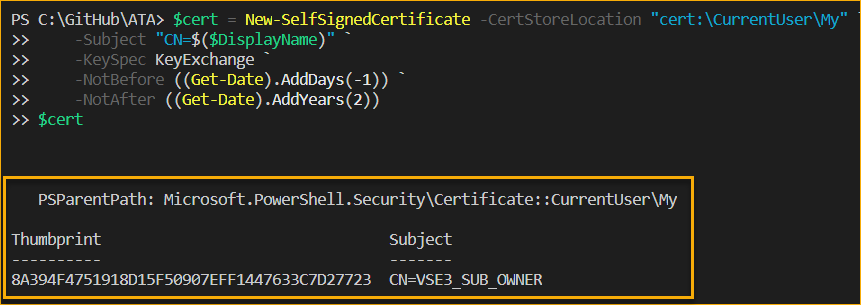
If you want to see the new certificate in a more familiar view (GUI), you can find it in the Certificates console (certmgr.mmc). Refer to the image below showing the certificate.

Next is to get the Base64 encoded value of the self-signed certificate and save it to the $keyValue variable.
# Get the base64 value of the self-signed certificate
$keyValue = [System.Convert]::ToBase64String($cert.GetRawCertData())
Creating the Service Principal with Certificate
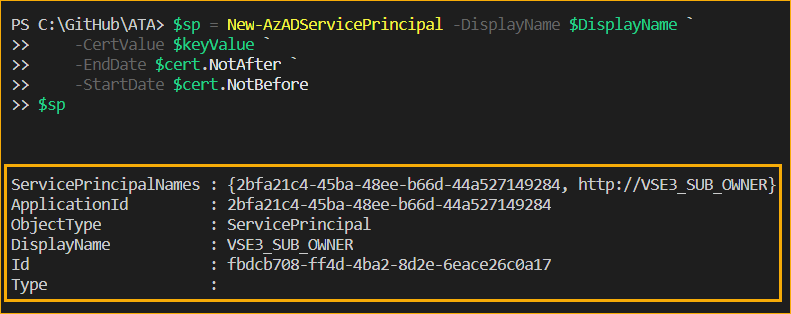
Now that the certificate is created, the next step is to create the new Azure service principal. The code below will create the Azure service principal that will use the self-signed certificate as its credential. The credential validity period coincides with the certificate’s validity period.
$sp = New-AzADServicePrincipal -DisplayName $DisplayName `
    -CertValue $keyValue `
    -EndDate $cert.NotAfter `
    -StartDate $cert.NotBefore
$sp
You’ll get a similar output, as shown in the image below.
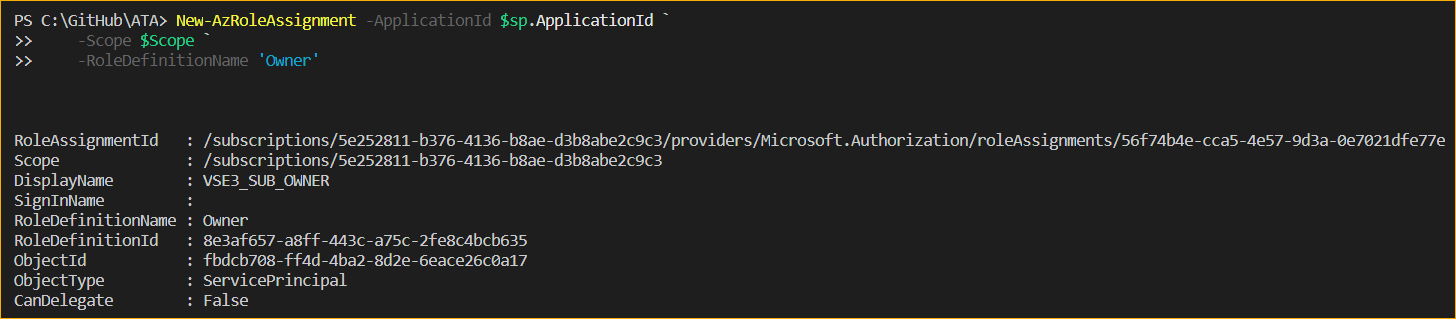
Assigning the Role and Scope
The Azure service principal has been created, but with no Role and Scope assigned yet. This means that an additional step is needed to assign the role and scope to the service principal.
The code below uses the New-AzRoleAssignment cmdlet to assign the owner role to the VSE3 subscription of the service principal.
# Assign role and scope
New-AzRoleAssignment -ApplicationId $sp.ApplicationId `
    -Scope $Scope `
    -RoleDefinitionName 'Owner'
When the code is run, the below screenshot shows the confirmation that the role assignment is done.
Connecting to Azure with a Service Principal Certificate
Now you’ve created the service principal with a certificate-based credential. This means that you can use it to connect to Azure without using a password. Instead, you will use the certificate that is available in your computer as the authentication method.
In this example, the service principal’s display name is VSE3_SUB_OWNER, and the certificate name is CN=VSE3_SUB_OWNER. The code below will get the thumbprint of the certificate from the personal certificate store and use it as the login credential.
# Get the certificate with subject CN=VSE3_SUB_OWNER
$cert = Get-ChildItem Cert:\CurrentUser\My\ | Where-Object { $_.Subject -eq 'CN=VSE3_SUB_OWNER' }

# Connect to Azure
Connect-AzAccount -ServicePrincipal -CertificateThumbprint $cert.ThumbPrint -ApplicationID $sp.ApplicationID -Tenant $TenantID
The screenshot below shows that using the code above, the login to Azure PowerShell was successful using only the ApplicationID, Tenant, and Certificate ThumbPrint.

Conclusion
Azure Service Principals is the security principal that must be considered when creating credentials for automation tasks and tools that access Azure resource. The scope and role to be applied can be picked to give “just enough” access permissions.
In this article, you’ve learned how to create Azure Service Principals all by using PowerShell. Azure Service Principals can have a password, secret key, or certificate-based credentials. Each of these types of credentials has its advantage and applicable usage scenarios.
Service principals with a password or secret key credential are more portable but are considered less secure because the credential can be shared as plain text. On the other hand, certificate-based credentials are the more secure option but require a little bit more effort to maintain.
The techniques you learned in this article covered only the basics to get you started in using Azure service principals in your automation. There are many more ways to configure Azure service principals like adding, removing, and resetting credentials. It’s up to you to discover them as you go.
Thank you for reading!
Additional Learning Resources
Here are some resources that you might find helpful to accompany this article.
- Connect-AzAccount: Your Gateway To Azure with PowerShell
- Connect-AzAccount: Your Gateway To Azure with PowerShell
- How to Generate a Random Password with PowerShell
- What is Azure role-based access control (Azure RBAC)?
- Demystifying Azure AD Service Principals
- How To Create An Azure Service Principal Via The Azure CLI 2.0
- How to Control Access to Office 365 Services with MFA


